Chocolate Peppermint Cake Roll
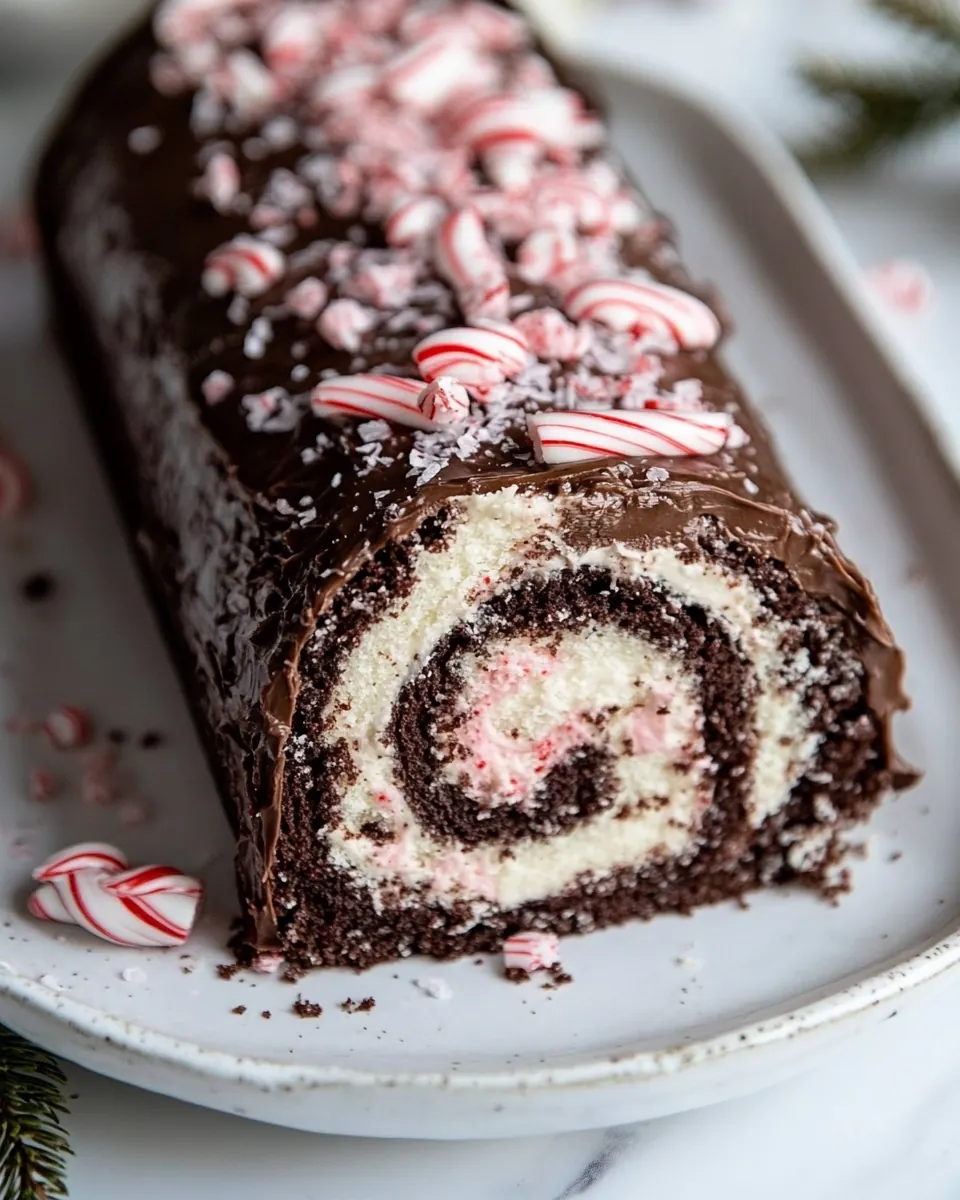
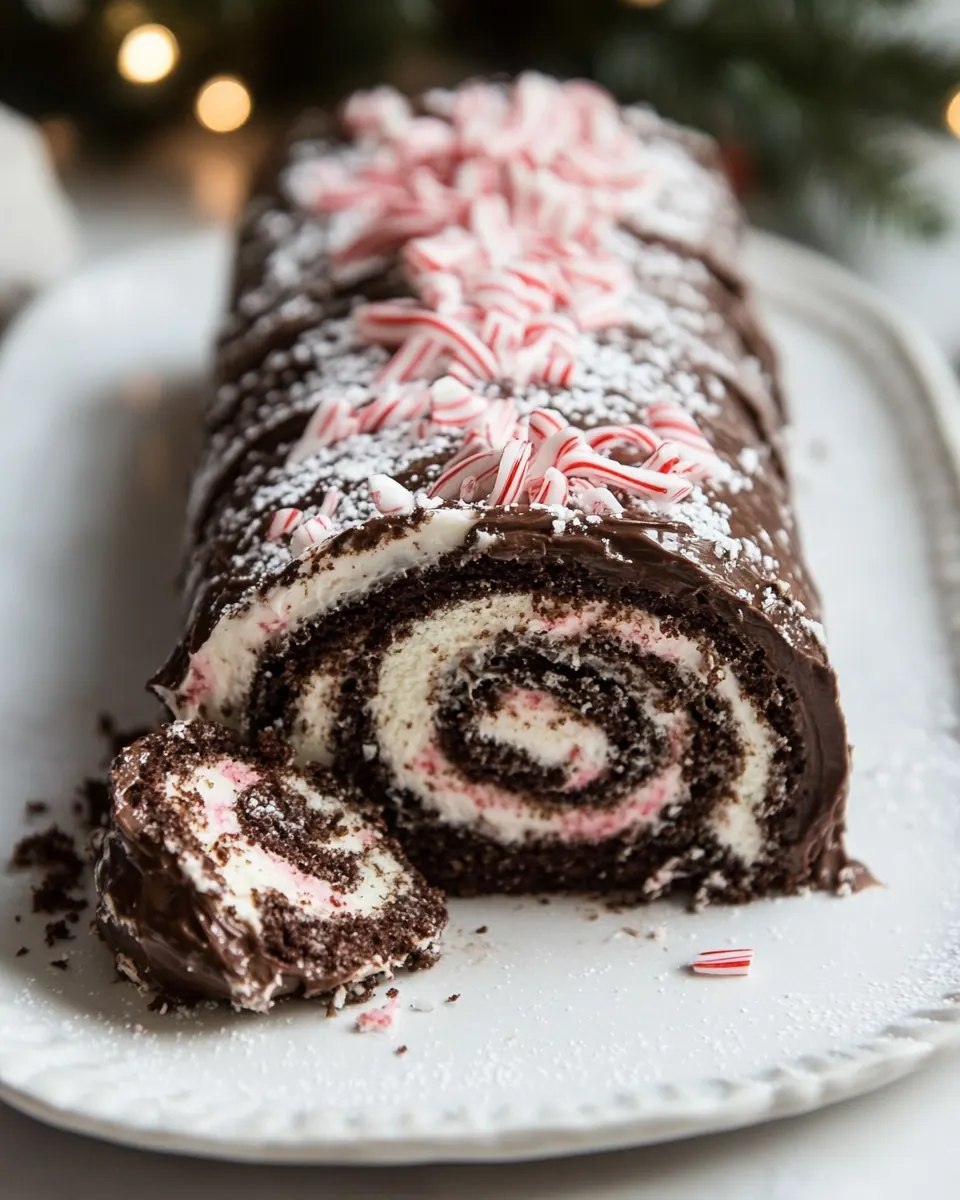
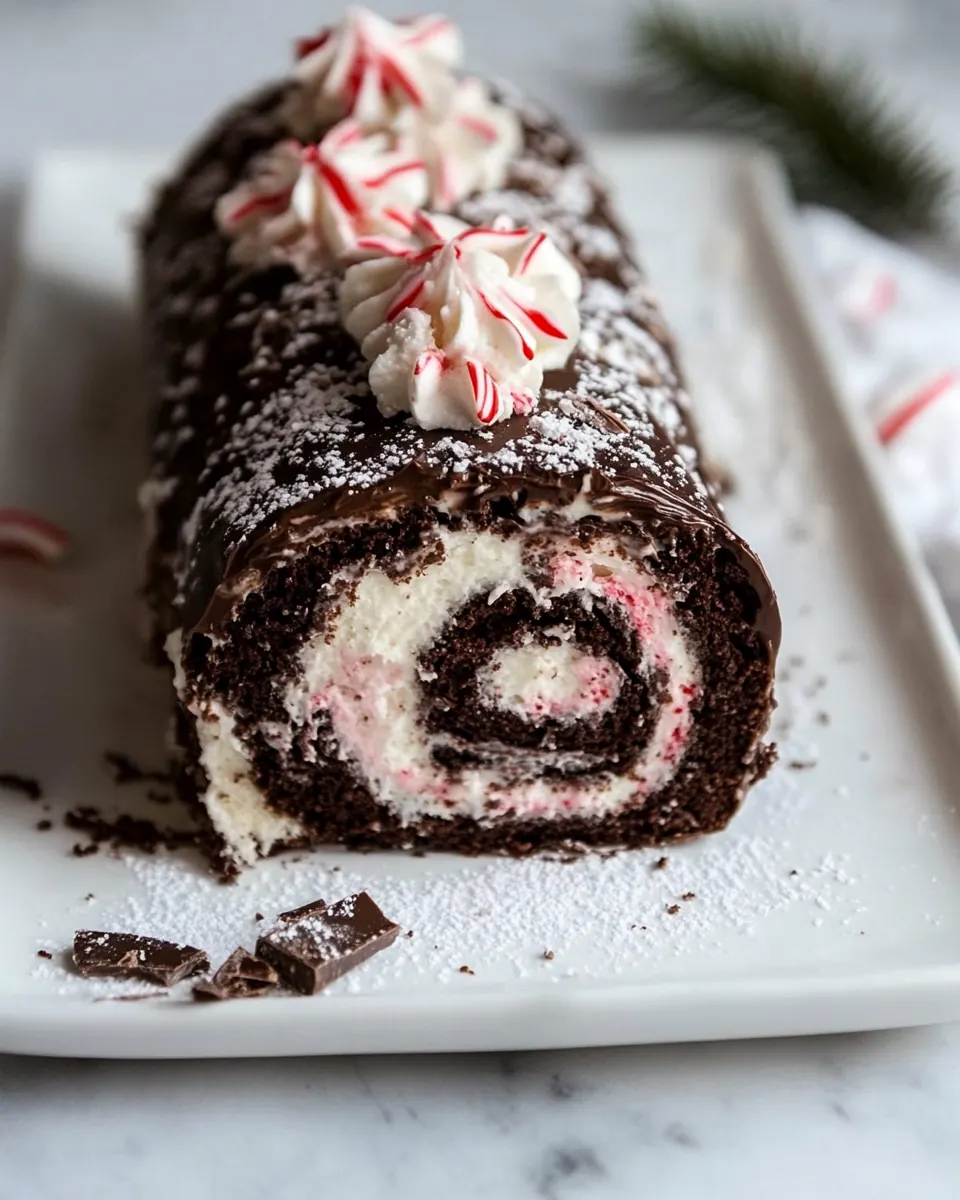
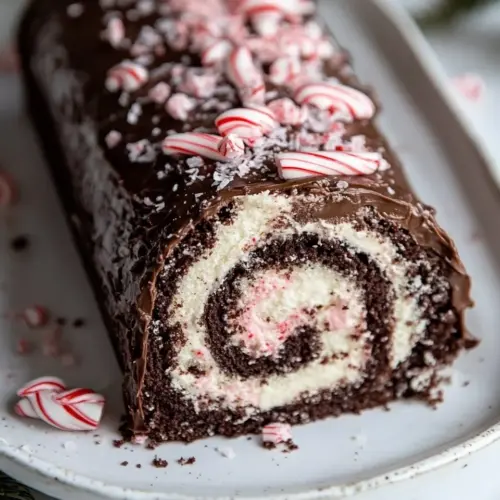
Chocolate Peppermint Cake Roll began as one of those kitchen experiments that turned into a holiday favorite in my house. The first time I baked it I remember juggling a dozen tasks, laughing at my flour-dusted apron, and being amazed at how a simple sponge transformed into a showstopper when swirled with cool, minty filling. I still get a little thrill when I unroll the cake and see that perfect spiral reveal, flecked with crushed peppermint that crunches under your fork.
Over the years I’ve played with textures and timing, learning to trust the moment when the cake is warm enough to roll yet cool enough not to crack. I love the contrast between the airy chocolate cake and the silky cream cheese filling, and how a glossy ganache ties everything together. Guests often ask how I get the roll so neat, and I tell them it’s part technique and part not overworking the batter. There is a comforting nostalgia about serving this, since peppermint evokes holiday lights and cozy nights. Each slice feels festive, and I often save a few crushed starlight mint candies to sprinkle on top for that extra pop.
Recipe Snapshot
2 hr 15 mins
120 mins
15 mins
Hard
350 kcal
American
Gluten-Free, Low FODMAP
Desserts
Jelly-roll pan, Parchment paper, Electric mixer, Wire cooling rack, Saucepan, Mixing bowls
What We Adore About This Chocolate Peppermint Cake Roll
1. Festive flavor balance
I love how Chocolate Peppermint Cake Roll balances rich chocolate with bright peppermint. The cocoa gives a deep, slightly bitter foundation while the peppermint adds lift, so every bite feels celebratory without being cloying.
2. Texture contrast that wows
The soft, spongey cake and the creamy cream cheese filling make a lovely pairing. I always notice the small crunch from the crushed starlight mint candies, which keeps the mouthfeel interesting and prevents the roll from feeling one note.
3. Make ahead friendly
I’ve learned this is a forgiving recipe for busy hosts. You can make the cake, chill it, and finish the filling and ganache later, which is why I reach for Chocolate Peppermint Cake Roll when I want something showy with minimal stress on the day of entertaining.
4. Simple techniques, big payoff
There are no exotic tools required, just careful folding and attention to temperature. I appreciate how straightforward steps like beating the egg whites to the right peak and rolling while warm, reward you with a flawless spiral.
5. Crowd pleaser for special occasions
Whether it is an intimate dessert or the centerpiece of a holiday table, this roll is eye catching. I bring it to winter gatherings and always get compliments, partly because it looks like effort was poured into it even when the method is delightfully accessible.
Chocolate Peppermint Cake Roll Ingredients

The ingredient list for Chocolate Peppermint Cake Roll reflects a philosophy of contrasts. Each component plays a specific role: the eggs and careful folding create a light sponge, the cocoa supplies chocolate intensity, and the cream cheese filling brings tang and creaminess. The crushed starlight mint candies add brightness and a crunchy counterpoint to the soft textures. Together these players create a festive, balanced dessert that slices neatly and feels luxurious.
- 4 large eggs, separated: Separate eggs and use yolks to enrich batter while beating whites until stiff peaks form to provide lift and lightness to the cake roll.
- 1/2 cup + 1/3 cup granulated sugar, divided: Measure divided granulated sugar to sweeten both the cake batter and the meringue-like egg whites, aiding structure and caramelization during baking.
- 1 teaspoon vanilla extract: Add vanilla extract to enhance and round out the chocolate and peppermint flavors, contributing aromatic depth to both cake and filling.
- 1/2 cup all-purpose flour: Sift all-purpose flour into the batter to provide structure and crumb; gently fold to avoid deflating whipped egg whites for a tender roll.
- 1/3 cup unsweetened cocoa powder: Incorporate unsweetened cocoa powder to deliver concentrated chocolate flavor and a darker color while absorbing some moisture in the batter.
- 1/2 teaspoon baking powder: Combine baking powder to give a mild rise and help the cake maintain a light, airy texture while baking and rolling.
- 1/4 teaspoon baking soda: Include baking soda to react with acidic components if present, promoting additional lift and a softer crumb in the cake.
- 1/8 teaspoons salt: Sprinkle a pinch of salt to balance sweetness and enhance the overall flavor profile by sharpening the chocolate and peppermint notes.
- 1/3 cup water: Stir water into the batter to adjust consistency, dissolve cocoa and sugar, and help create a smooth, spreadable cake batter.
- 8 ounces cream cheese: Soften cream cheese and blend into the filling to create creamy tanginess and stability, making a rich contrast to the sweet chocolate.
- 1/4 cup butter: Soften butter and beat into the cream cheese filling to add richness, smoothness, and a spreadable texture for easy assembly of the roll.
- 1 cup powdered sugar: Sift powdered sugar into the filling to sweeten and thicken the cream cheese mixture, creating a smooth, pipeable consistency.
- 1/2 teaspoon peppermint extract: Stir peppermint extract into the filling to impart concentrated mint flavor, complementing the chocolate and crushed mints for a festive profile.
- 20 starlight mint candies, crushed: Crush starlight mint candies into the filling to provide crunchy texture and bright peppermint flecks that perfume the cream cheese mixture.
- 1/2 cup heavy whipping cream: Whip heavy cream to medium peaks and fold into the filling or topping to lighten texture and add airy richness for a balanced mouthfeel.
- 1 cup semi-sweet chocolate chips or 3 oz. semi-sweet baking chocolate: Melt semi–sweet chocolate chips or baking chocolate to create a ganache or drizzle that adds glossy chocolate intensity and stability to the cake.
- starlight mint candies, crushed for topping: Sprinkle crushed starlight mint candies over the finished cake roll as a crunchy, decorative topping that reinforces peppermint flavor and visual appeal.
Chocolate Peppermint Cake Roll Instructions
These instructions will walk you through each step with sensory cues and small troubleshooting notes so your Chocolate Peppermint Cake Roll comes out evenly textured and beautifully spiraled. Take your time with the folding and rolling, and trust the visual and tactile signals described below.
- Preheat oven to 375 degrees F. Grease a 15 x 10-inch jelly-roll pan; line with parchment paper. Grease and flour paper.: Warmth fills the kitchen as the oven climbs to 375 degrees F , and that faint scent of heating metal signals readiness. It's important the pan is well greased and the parchment pressed into corners so batter spreads smoothly. If the paper is not greased the cake can stick, so take an extra moment to oil and dust it. A common mistake is skipping the parchment or not securing it, which can cause the sponge to tear when removed.
- Beat egg whites in large bowl until soft peaks form; gradually add 1/2 cup granulated sugar, beating until stiff peaks form.: As you whisk, listen for the change from liquid swoosh to a thicker, muffled sound, and watch the egg whites turn glossy. Soft peaks will bend at the tip, then after adding the first 1/2 cup granulated sugar they will stand up firm and shiny. This is critical because the air trapped here provides lift. Overbeating is a typical error, it will dry the whites and make folding difficult and deflate the batter.
- Beat egg yolks and vanilla in medium bowl on medium speed of mixer 3 minutes. Gradually add remaining 1/3 cup granulated sugar; continue beating 2 additional minutes.: The yolks should become paler and slightly thickened, with a creamier texture and a sweet, rich aroma of vanilla . Adding the second portion of granulated sugar slowly helps dissolve it into the yolks, creating a silky component for the batter. If the yolks look grainy, you may have added sugar too quickly; keep beating until smooth and cohesive.
- Stir together flour, cocoa, baking powder, baking soda and salt; add to egg yolk mixture alternately with water, beating on low speed just until batter is smooth.: When the dry mix of all-purpose flour , cocoa , baking powder , baking soda , and salt meets the yolks, the batter will take on a chocolatey aroma and deepen in color. Adding the water alternately keeps the batter fluid enough to spread without overmixing. Mix on low until just smooth, because overworking develops gluten and will toughen the sponge.
- Gradually fold chocolate mixture into beaten egg whites until well blended. Spread batter evenly in prepared pan.: Folding is a quiet, deliberate motion you should see rather than hear. The batter should look marbled at first, then uniform and airy, with tiny suspended bubbles. Use a rubber spatula and a gentle under-and-over motion, turning the bowl as you go. If you stir too vigorously you will deflate the beaten air and the cake will be dense instead of tender.
- Bake 14 to 16 minutes or until top springs back when touched lightly in center and a toothpick inserted comes out clean.: The oven will fill with warm chocolate scent, and the top should feel slightly springy. The center giving back when touched tells you the crumb has set. A toothpick coming out clean is the final check. Avoid overbaking, which can dry the sponge and make it brittle when you try to roll it.
- Allow cake to cool in the pan for ONE minute.: That one minute lets steam settle so the cake won't immediately collapse when moved. The surface will still be warm and pliable, which is the window for safely lifting it out. Skipping this brief rest increases risk of tearing when you lift the cake.
- Lift the parchment paper and hot cake out of the pan and onto a flat (heat-safe) surface. Immediately, while the cake is hot, starting at one of the short ends, use your hands to gently and slowly roll the cake (and parchment paper!) all the way up.: The cake should feel warm and soft as you roll; this warmth prevents cracking. Rolling with the parchment keeps the spiral neat and trains the cake to hold shape. If you wait until it is cold the cake may fracture, so be decisive during this step.
- Allow the rolled up cake to cool completely, on top of a wire cooling rack. (Setting it on a wire rack allows it to cool underneath the roll, and keeps the cake from sweating).: Placing the roll on a wire cooling rack encourages even air circulation so it cools without condensation forming. The roll should cool to room temperature, firming slightly. Cooling on a flat surface can trap moisture and make the exterior soggy, which will complicate filling.
- Transfer to the fridge to cool for an additional 30 minutes.: Refrigeration chills the roll and makes it easier to handle when you unroll and fill. The texture becomes more stable and the filling will set better later. If you skip chilling the cake may be too soft to unroll without damage.
- While the cake roll is cooling in the fridge, mix the cream cheese, butter, powdered sugar and peppermint extract together with an electric mixer until fluffy and smooth.: The mixture will change from lumpier to silky, and the aroma of peppermint extract will brighten the room. Beat until light and spreadable; this creates a filling that balances tang and sweetness. Undermixing can leave lumps, while overbeating may warm the filling too much, making it runny.
- Gently stir in desired amount of crushed peppermint candies, to taste. Save a handful for sprinkling on the ganache, at the end, if desired.: The crushed starlight mint candies provide textural contrast and pops of peppermint. Stirring them in by hand keeps the filling smooth while distributing crunch. If you add too many, the filling can become difficult to spread evenly, so balance is key.
- Once the cake roll is cooled completely, unroll it very carefully. Gently smooth the filling in an even layer over the cake.: The unrolled sponge should be cool and slightly firm to the touch. Use a spatula to spread the filling to the edges, aiming for an even coating so the spiral looks uniform when re-rolled. Rushing here can cause tearing or uneven distribution.
- Roll up the cake, without the parchment paper. (If you see it start to stick at all to the paper you can use a butter knife gently scrape along the bottom edge of the cake as you roll it up, to help release it.): As you re-roll, the spiral should compress gently. The filling will press into the cake creating a neat swirl. If the cake resists, pause and check that there are no sticky spots; using the knife tip can free edges without tearing the sponge.
- Cover with plastic wrap and refrigerate for at least 1 hour.: Chilling firms the filling and sets the shape so slices hold together cleanly. The cold also mellows flavors and makes cutting easier. Not chilling long enough can yield sloppy slices that fall apart when plated.
- Heat heavy cream in a saucepan until hot. Pour over chocolate and stir continuously until the chocolate is melted and smooth.: When the heavy whipping cream is hot but not boiling, pouring it over the semi–sweet chocolate lets you whisk a glossy ganache. The mixture should be shiny and flowing, with a deep chocolate aroma. If the cream is too cool the chocolate may seize; if it is too hot it can change texture. Stir until silky.
- Allow the ganache to cool for several minutes to give it time to thicken up a little.: Cooling slightly helps the ganache cling to the roll without running off. You want pourable but viscous ganache so it forms a thin, glossy coating. Pouring when it is too hot will make it thin and messy, and too cool will make it lumpy.
- Gently spoon/pour the chocolate ganache over the top of the peppermint roll. Sprinkle additional chopped peppermint candy on top, if desired.: A slow pour creates a smooth shell; the ganache should cascade and settle with a soft sheen. Scatter reserved crushed starlight mint candies for festive sparkle and contrast. If you pour too quickly the ganache can pool unevenly, so work with a steady hand.
- Refrigerate for at least 20 minutes before serving.: Chilling the finished roll sets the ganache and improves sliceability. The cake will firm and present clean slices that show the spiral clearly. Serving too soon risks messy, soft slices.
- Store in the fridge, covered, for up to three days.: Kept cold and wrapped, the roll maintains its texture and flavor for several days. Proper storage prevents drying out. Leaving it uncovered will dry the cake and dull the ganache.
Helpful Notes about Chocolate Peppermint Cake Roll
This section gathers practical reminders and make ahead strategies I rely on. Each tip starts with a bolded phrase so you can scan quickly and find what you need for timing, storage, or assembly.
- Make ahead flexibility: You can prepare the cake roll completely and refrigerate it for one to two days before serving, which is ideal for holiday planning. Alternatively, bake and roll the cake in parchment and refrigerate it rolled for up to one day before filling and adding the ganache. This helps distribute workload and reduces day of stress. When chilled rolled, the cake retains moisture and becomes easier to handle during final assembly.
- Freezing option: If you want to freeze for longer storage, assemble the cake and filling but skip the ganache. Wrap tightly and freeze for up to two to three months. Thaw overnight in the refrigerator, add ganache the next day, and serve. This method helps preserve texture and prevents the ganache from weeping during thawing.
- Temperature checks: Ensure the ganache is warm enough to pour but cooled slightly to thicken for better coverage. Too hot and it will slide off the roll, too cool and it will clump. Aim for a glossy, slightly viscous pour for a picture perfect finish.
- Even candy crush: Crush peppermint candies in a sealed bag using a rolling pin to get a range of sizes. Smaller bits incorporate into the filling while larger shards make a pleasing garnish. Avoid pulverizing into dust, which can make the filling grainy and overly sweet.
- Knife care: Use a long, sharp knife chilled in the fridge between slices for smooth, neat cuts. Wipe the blade between each slice to keep edges clean and presentable, especially when serving to guests.
Side Dish Ideas for Chocolate Peppermint Cake Roll
This dessert pairs nicely with light accompaniments and is especially suited to winter and holiday gatherings. Below are serving suggestions, occasion notes, and storage tips to help you present the roll beautifully and preserve leftovers.
- Simple whipped cream: A dollop of lightly sweetened whipped heavy whipping cream alongside a slice keeps the plate airy and complements the denser cake without competing with peppermint notes.
- Espresso or coffee: A small cup of strong coffee cuts through richness and enhances the chocolate flavors, making it an ideal pairing after a festive meal.
- Holiday tables: Serve the roll as a centerpiece dessert at Christmas gatherings where its peppermint motif feels seasonal and celebratory, and label slices so guests can see the spiral pattern.
- Buffet service: Pre-slice and arrange pieces on a platter, garnished with extra crushed starlight mint candies, so guests can help themselves easily during casual parties.
- Storage notes: Keep the roll refrigerated, covered tightly, for up to three days. For longer storage, freeze without ganache for two to three months and add ganache after thawing for the best texture.
- Seasonal pairing: The mint and chocolate profile is especially fitting in winter; pair with warm drinks and cozy linens to create a festive dessert moment.
FAQ
Conclusion
What makes this Chocolate Peppermint Cake Roll special is the way chocolate and peppermint play off each other, creating a festive dessert that looks and tastes like a holiday treat. I encourage you to try it for your next winter gathering, because the texture contrast between the airy sponge and creamy filling delivers a memorable slice every time. It is approachable for home bakers, rewarding with visual appeal, and can be made ahead to fit into busy entertaining plans. Share a slice with friends, and enjoy the simple joy of a dessert that tastes like celebration.
Chocolate Peppermint Cake Roll
Equipment
- Jelly Roll Pan
- Parchment Paper
- Electric Mixer
- wire cooling rack
- Saucepan
- Mixing Bowls
Ingredients
- 4 large eggs, separated Separate eggs and use yolks to enrich batter while beating whites until stiff peaks form to provide lift and lightness to the cake roll.
- 1/2 cup + 1/3 cup granulated sugar, divided Measure divided granulated sugar to sweeten both the cake batter and the meringue-like egg whites, aiding structure and caramelization during baking.
- 1 teaspoon vanilla extract Add vanilla extract to enhance and round out the chocolate and peppermint flavors, contributing aromatic depth to both cake and filling.
- 1/2 cup all-purpose flour Sift all-purpose flour into the batter to provide structure and crumb; gently fold to avoid deflating whipped egg whites for a tender roll.
- 1/3 cup unsweetened cocoa powder Incorporate unsweetened cocoa powder to deliver concentrated chocolate flavor and a darker color while absorbing some moisture in the batter.
- 1/2 teaspoon baking powder Combine baking powder to give a mild rise and help the cake maintain a light, airy texture while baking and rolling.
- 1/4 teaspoon baking soda Include baking soda to react with acidic components if present, promoting additional lift and a softer crumb in the cake.
- 1/8 teaspoons salt Sprinkle a pinch of salt to balance sweetness and enhance the overall flavor profile by sharpening the chocolate and peppermint notes.
- 1/3 cup water Stir water into the batter to adjust consistency, dissolve cocoa and sugar, and help create a smooth, spreadable cake batter.
- 8 ounces cream cheese Soften cream cheese and blend into the filling to create creamy tanginess and stability, making a rich contrast to the sweet chocolate.
- 1/4 cup butter Soften butter and beat into the cream cheese filling to add richness, smoothness, and a spreadable texture for easy assembly of the roll.
- 1 cup powdered sugar Sift powdered sugar into the filling to sweeten and thicken the cream cheese mixture, creating a smooth, pipeable consistency.
- 1/2 teaspoon peppermint extract Stir peppermint extract into the filling to impart concentrated mint flavor, complementing the chocolate and crushed mints for a festive profile.
- 20 starlight mint candies, crushed Crush starlight mint candies into the filling to provide crunchy texture and bright peppermint flecks that perfume the cream cheese mixture.
- 1/2 cup heavy whipping cream Whip heavy cream to medium peaks and fold into the filling or topping to lighten texture and add airy richness for a balanced mouthfeel.
- 1 cup semi-sweet chocolate chips or 3 oz. semi-sweet baking chocolate Melt semi-sweet chocolate chips or baking chocolate to create a ganache or drizzle that adds glossy chocolate intensity and stability to the cake.
- starlight mint candies, crushed for topping Sprinkle crushed starlight mint candies over the finished cake roll as a crunchy, decorative topping that reinforces peppermint flavor and visual appeal.
Instructions
- Preheat oven to 375 degrees F. Grease a 15 x 10-inch jelly-roll pan; line with parchment paper. Grease and flour paper.: Warmth fills the kitchen as the oven climbs to 375 degrees F , and that faint scent of heating metal signals readiness. It's important the pan is well greased and the parchment pressed into corners so batter spreads smoothly. If the paper is not greased the cake can stick, so take an extra moment to oil and dust it. A common mistake is skipping the parchment or not securing it, which can cause the sponge to tear when removed.
- Beat egg whites in large bowl until soft peaks form; gradually add 1/2 cup granulated sugar, beating until stiff peaks form.: As you whisk, listen for the change from liquid swoosh to a thicker, muffled sound, and watch the egg whites turn glossy. Soft peaks will bend at the tip, then after adding the first 1/2 cup granulated sugar they will stand up firm and shiny. This is critical because the air trapped here provides lift. Overbeating is a typical error, it will dry the whites and make folding difficult and deflate the batter.
- Beat egg yolks and vanilla in medium bowl on medium speed of mixer 3 minutes. Gradually add remaining 1/3 cup granulated sugar; continue beating 2 additional minutes.: The yolks should become paler and slightly thickened, with a creamier texture and a sweet, rich aroma of vanilla . Adding the second portion of granulated sugar slowly helps dissolve it into the yolks, creating a silky component for the batter. If the yolks look grainy, you may have added sugar too quickly; keep beating until smooth and cohesive.
- Stir together flour, cocoa, baking powder, baking soda and salt; add to egg yolk mixture alternately with water, beating on low speed just until batter is smooth.: When the dry mix of all-purpose flour , cocoa , baking powder , baking soda , and salt meets the yolks, the batter will take on a chocolatey aroma and deepen in color. Adding the water alternately keeps the batter fluid enough to spread without overmixing. Mix on low until just smooth, because overworking develops gluten and will toughen the sponge.
- Gradually fold chocolate mixture into beaten egg whites until well blended. Spread batter evenly in prepared pan.: Folding is a quiet, deliberate motion you should see rather than hear. The batter should look marbled at first, then uniform and airy, with tiny suspended bubbles. Use a rubber spatula and a gentle under-and-over motion, turning the bowl as you go. If you stir too vigorously you will deflate the beaten air and the cake will be dense instead of tender.
- Bake 14 to 16 minutes or until top springs back when touched lightly in center and a toothpick inserted comes out clean.: The oven will fill with warm chocolate scent, and the top should feel slightly springy. The center giving back when touched tells you the crumb has set. A toothpick coming out clean is the final check. Avoid overbaking, which can dry the sponge and make it brittle when you try to roll it.
- Allow cake to cool in the pan for ONE minute.: That one minute lets steam settle so the cake won't immediately collapse when moved. The surface will still be warm and pliable, which is the window for safely lifting it out. Skipping this brief rest increases risk of tearing when you lift the cake.
- Lift the parchment paper and hot cake out of the pan and onto a flat (heat-safe) surface. Immediately, while the cake is hot, starting at one of the short ends, use your hands to gently and slowly roll the cake (and parchment paper!) all the way up.: The cake should feel warm and soft as you roll; this warmth prevents cracking. Rolling with the parchment keeps the spiral neat and trains the cake to hold shape. If you wait until it is cold the cake may fracture, so be decisive during this step.
- Allow the rolled up cake to cool completely, on top of a wire cooling rack. (Setting it on a wire rack allows it to cool underneath the roll, and keeps the cake from sweating).: Placing the roll on a wire cooling rack encourages even air circulation so it cools without condensation forming. The roll should cool to room temperature, firming slightly. Cooling on a flat surface can trap moisture and make the exterior soggy, which will complicate filling.
- Transfer to the fridge to cool for an additional 30 minutes.: Refrigeration chills the roll and makes it easier to handle when you unroll and fill. The texture becomes more stable and the filling will set better later. If you skip chilling the cake may be too soft to unroll without damage.
- While the cake roll is cooling in the fridge, mix the cream cheese, butter, powdered sugar and peppermint extract together with an electric mixer until fluffy and smooth.: The mixture will change from lumpier to silky, and the aroma of peppermint extract will brighten the room. Beat until light and spreadable; this creates a filling that balances tang and sweetness. Undermixing can leave lumps, while overbeating may warm the filling too much, making it runny.
- Gently stir in desired amount of crushed peppermint candies, to taste. Save a handful for sprinkling on the ganache, at the end, if desired.: The crushed starlight mint candies provide textural contrast and pops of peppermint. Stirring them in by hand keeps the filling smooth while distributing crunch. If you add too many, the filling can become difficult to spread evenly, so balance is key.
- Once the cake roll is cooled completely, unroll it very carefully. Gently smooth the filling in an even layer over the cake.: The unrolled sponge should be cool and slightly firm to the touch. Use a spatula to spread the filling to the edges, aiming for an even coating so the spiral looks uniform when re-rolled. Rushing here can cause tearing or uneven distribution.
- Roll up the cake, without the parchment paper. (If you see it start to stick at all to the paper you can use a butter knife gently scrape along the bottom edge of the cake as you roll it up, to help release it.): As you re-roll, the spiral should compress gently. The filling will press into the cake creating a neat swirl. If the cake resists, pause and check that there are no sticky spots; using the knife tip can free edges without tearing the sponge.
- Cover with plastic wrap and refrigerate for at least 1 hour.: Chilling firms the filling and sets the shape so slices hold together cleanly. The cold also mellows flavors and makes cutting easier. Not chilling long enough can yield sloppy slices that fall apart when plated.
- Heat heavy cream in a saucepan until hot. Pour over chocolate and stir continuously until the chocolate is melted and smooth.: When the heavy whipping cream is hot but not boiling, pouring it over the semi-sweet chocolate lets you whisk a glossy ganache. The mixture should be shiny and flowing, with a deep chocolate aroma. If the cream is too cool the chocolate may seize; if it is too hot it can change texture. Stir until silky.
- Allow the ganache to cool for several minutes to give it time to thicken up a little.: Cooling slightly helps the ganache cling to the roll without running off. You want pourable but viscous ganache so it forms a thin, glossy coating. Pouring when it is too hot will make it thin and messy, and too cool will make it lumpy.
- Gently spoon/pour the chocolate ganache over the top of the peppermint roll. Sprinkle additional chopped peppermint candy on top, if desired.: A slow pour creates a smooth shell; the ganache should cascade and settle with a soft sheen. Scatter reserved crushed starlight mint candies for festive sparkle and contrast. If you pour too quickly the ganache can pool unevenly, so work with a steady hand.
- Refrigerate for at least 20 minutes before serving.: Chilling the finished roll sets the ganache and improves sliceability. The cake will firm and present clean slices that show the spiral clearly. Serving too soon risks messy, soft slices.
- Store in the fridge, covered, for up to three days.: Kept cold and wrapped, the roll maintains its texture and flavor for several days. Proper storage prevents drying out. Leaving it uncovered will dry the cake and dull the ganache.
Notes
- Make ahead flexibility: You can prepare the cake roll completely and refrigerate it for one to two days before serving, which is ideal for holiday planning. Alternatively, bake and roll the cake in parchment and refrigerate it rolled for up to one day before filling and adding the ganache. This helps distribute workload and reduces day of stress. When chilled rolled, the cake retains moisture and becomes easier to handle during final assembly.
- Freezing option: If you want to freeze for longer storage, assemble the cake and filling but skip the ganache. Wrap tightly and freeze for up to two to three months. Thaw overnight in the refrigerator, add ganache the next day, and serve. This method helps preserve texture and prevents the ganache from weeping during thawing.
- Temperature checks: Ensure the ganache is warm enough to pour but cooled slightly to thicken for better coverage. Too hot and it will slide off the roll, too cool and it will clump. Aim for a glossy, slightly viscous pour for a picture perfect finish.
- Even candy crush: Crush peppermint candies in a sealed bag using a rolling pin to get a range of sizes. Smaller bits incorporate into the filling while larger shards make a pleasing garnish. Avoid pulverizing into dust, which can make the filling grainy and overly sweet.
- Knife care: Use a long, sharp knife chilled in the fridge between slices for smooth, neat cuts. Wipe the blade between each slice to keep edges clean and presentable, especially when serving to guests.