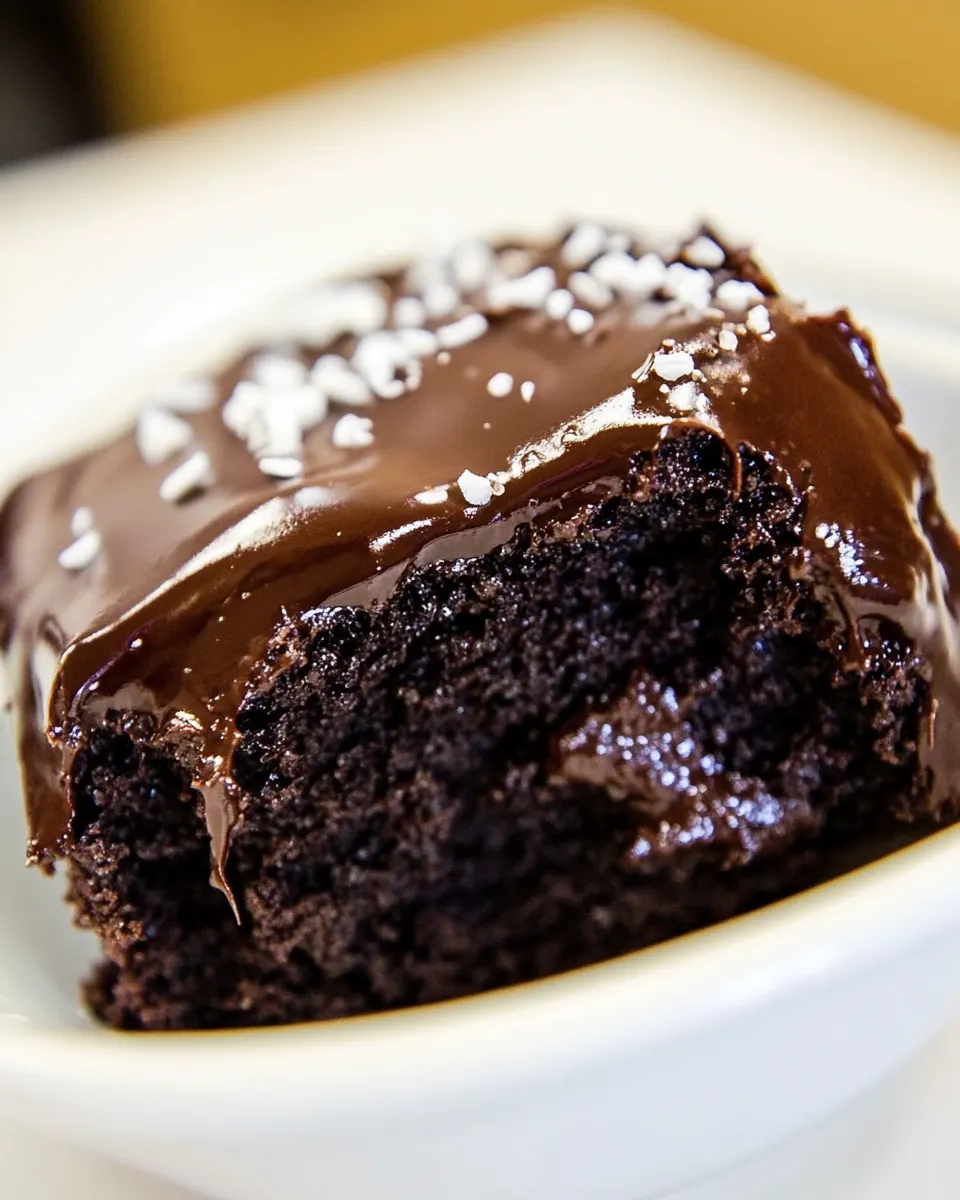
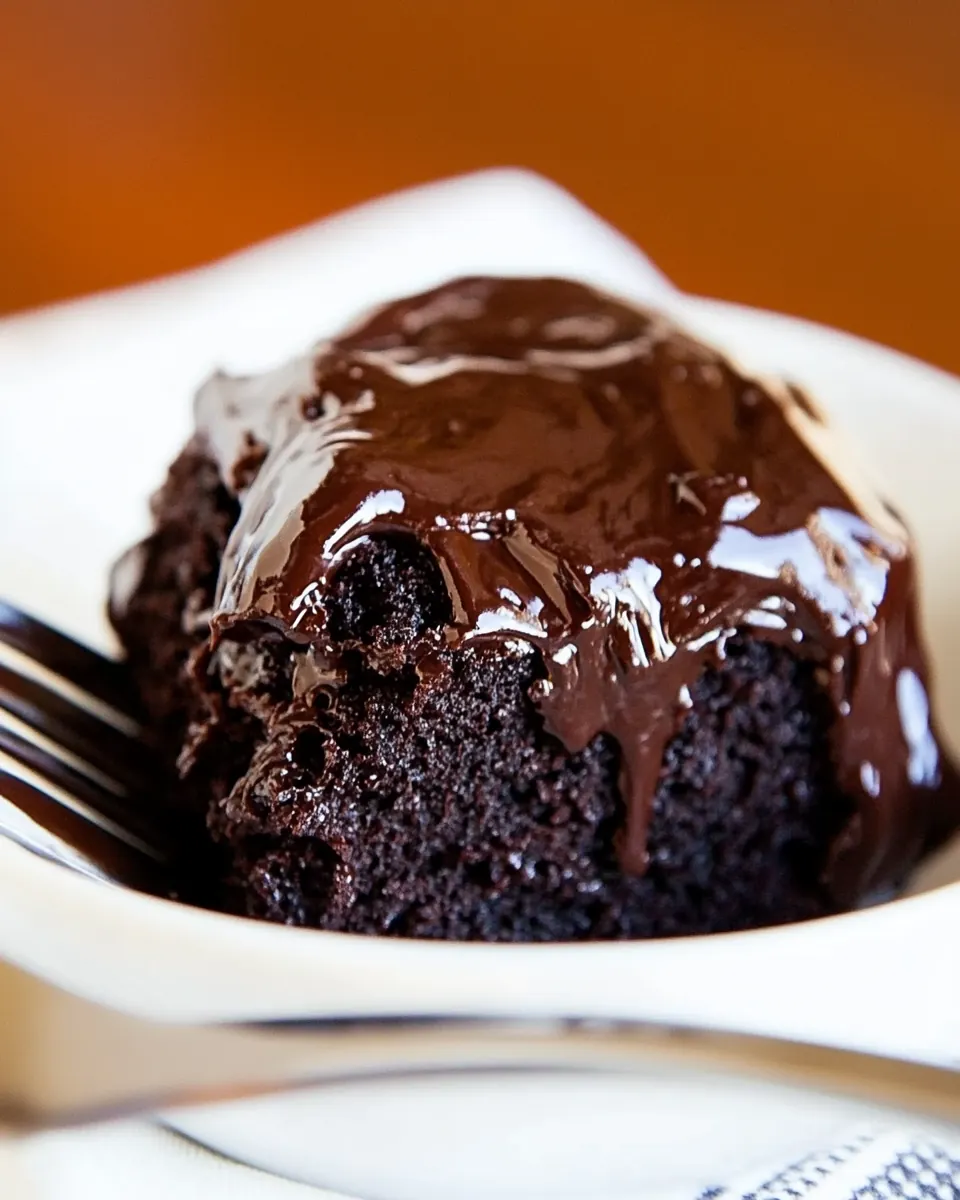
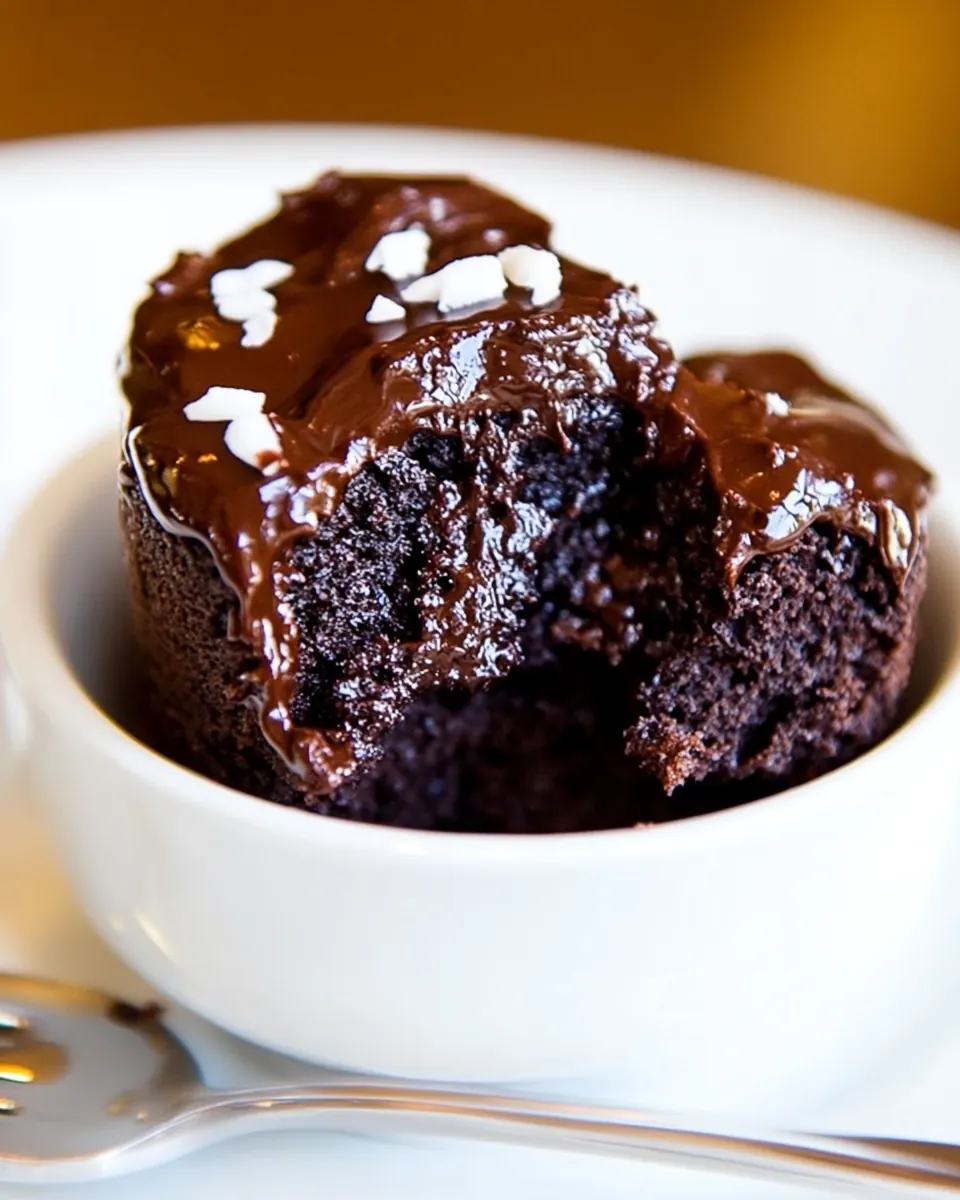
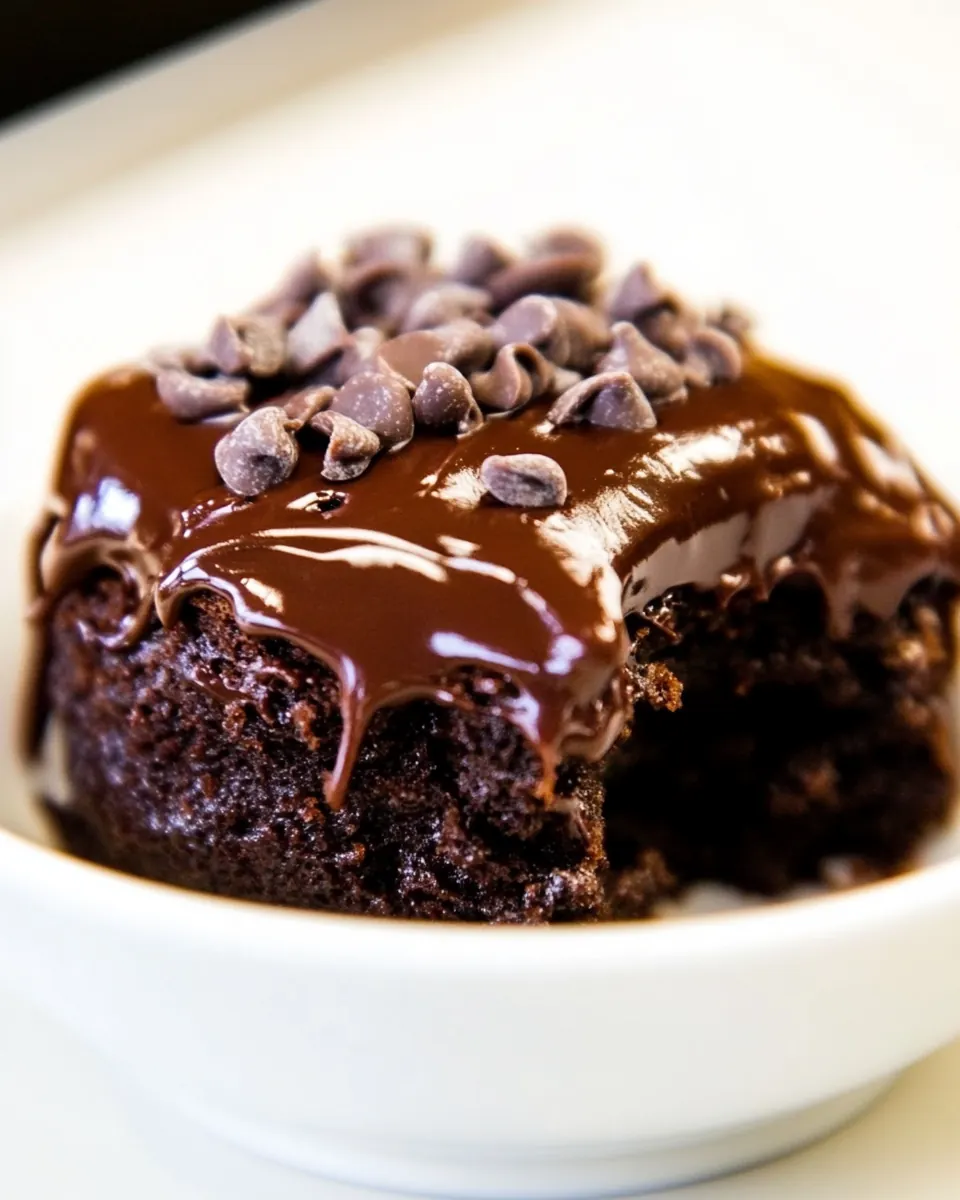
Chocolate Mug Cake
Chocolate Mug Cake is the tiny, comforting victory I reach for when I need dessert in a hurry. The very first time I stirred this together at midnight, I remember the warm cocoa scent filling the kitchen and the way the steamed crumb felt impossibly soft for something made in a mug. That moment convinced me that speed need not sacrifice satisfaction.
Some evenings I crave a little celebration just for myself, and this mug cake answers that call. I like to think of it as a one bowl hug, a single serving treat that lets you be indulgent without committing to a whole cake. Over time I learned small tricks that make the texture reliably tender and chocolatey, and I enjoy sharing those with friends who want big flavor from minimal effort.
There are days when I hand this to a skeptical guest with nothing but a spoon and a napkin, and they invariably come back smiling. The beauty is how forgiving the recipe is, letting you adapt flours, sweeteners, and oils while keeping the core joy intact. For busy nights, late study sessions, or quiet celebrations, this little cake has become my dependable, cozy companion.
Recipe Snapshot
5 mins
4 mins
1 mins
Easy
350 kcal
American
Vegan, Gluten-Free
Desserts
Mug or ramekin, Spoon
What We Adore About This Chocolate Mug Cake
Quick satisfaction without fuss
I love that Chocolate Mug Cake delivers an immediate payoff. You mix a few dry components, add a splash of milk and fat, and in under two minutes your kitchen smells like a bakery. That instant gratification makes it perfect for when you need a comforting snack fast, and I often reach for it after a long day.
One serving, zero waste
Because this is built for a single mug, you avoid leftovers that go stale. I appreciate that I can make exactly what I want, which reduces food waste and gives just the right portion. It is especially useful when I crave something sweet but do not want to be tempted for days.
Highly adaptable
The ingredient list lets you swap flours, sweeteners, and fats without wrecking the result. I often switch between flour types and try nut butter or oil based on what I have. That flexibility keeps the recipe interesting, and I enjoy experimenting while still getting a consistently tender crumb.
Comforting texture and flavor
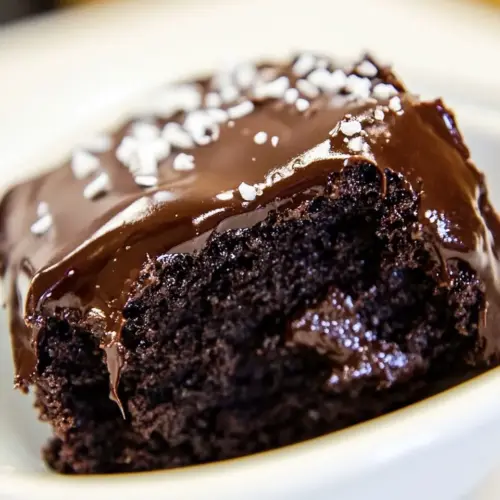
When executed well, the cake has a tender, slightly gooey center and a lightly chewy edge. The cocoa gives that deep chocolate note, and a touch of vanilla lifts the flavor. I find the mouthfeel very satisfying, making it feel like a true dessert rather than a quick snack.
Minimal equipment and fuss
One of my favorite aspects is the lack of cleanup. A fork or small whisk, a mug or ramekin, and either a microwave or a small oven are all you need. That simplicity makes it a go to for late night cravings or when I want to bake without committing to a full sheet pan.
What You Need for Chocolate Mug Cake
The philosophy here is simple, comfort-forward baking. Each component plays a clear role: the cocoa powder brings chocolate depth, flour provides structure, a pinch of salt balances sweetness, and the oil or nut butter ensures tenderness and moistness. Liquids tie everything together, while a lift from baking powder gives the cake a light crumb. These ingredients are chosen to be flexible, so you can tailor texture and flavor with small swaps while keeping the outcome reliably cake like.
- 1 tbsp cocoa powder: Provide deep chocolate flavor and natural bitterness that balances sweetness; helps create a rich, cocoa-forward base for the mug cake and intensifies the overall chocolate profile when combined with wet ingredients.
- 2 tsp Dutch cocoa powder or additional regular: Contribute an additional layer of intense chocolate complexity and deepen color; using Dutch-processed cocoa yields smoother, less acidic flavor while regular cocoa increases brightness and bite.
- 3 tbsp flour spelt, white, oat, or all purpose gluten free (or try this Keto Mug Cake Recipe): Supply structure and bulk to the batter while determining crumb and texture; choosing spelt, white, oat, or all-purpose gluten–free flours alters chewiness and tenderness, and amounts remain interchangeable in small mug-cake batches.
- 1/8 tsp salt: Enhance the overall flavor by counteracting sweetness and amplifying other taste components; small amounts also help balance the palate without affecting leavening.
- 2 tbsp sweetener of choice: Sweeten the batter to taste and aid in tenderness and moisture retention; selecting different sweeteners (sugar, sugar alternatives) will modify sweetness intensity and caloric profile.
- 1/4 tsp baking powder: Leaven the cake by producing gas during heating which creates lift and lightness; the small powder amount prevents excessive rise and ensures an even, tender crumb in the quick-cook mug format.
- 2 1/2 tsp oil or nut butter (While I much prefer the version with fat, many commenters say they love substituting applesauce or mashed banana here): Provide fat for moistness, richness, and improved mouthfeel while helping emulsify batter; swapping with applesauce or mashed banana reduces fat but adds moisture and subtle flavor changes.
- 3 tbsp milk of choice: Add liquid to hydrate dry ingredients, dissolve sweetener, and create a pourable batter; milk choice affects creaminess and can subtly change flavor and nutritional content.
- 1/2 tsp pure vanilla extract: Impart aromatic depth and a rounded flavor profile, enhancing perceived sweetness and complexity; a small amount of pure vanilla elevates the chocolate notes without overpowering them.
Recipe Directions for Chocolate Mug Cake
These directions are written to be friendly and thorough, guiding you through subtle cues so your single serving cake turns out tender and chocolatey. Read each step and pay attention to the sensory notes, they will tell you when you are on track. I like to move confidently but gently when working with this small batter, because tiny missteps change the texture quickly.
- How to make a chocolate mug cake recipe: Combine dry ingredients and mix very, very well. Add liquid, stir, then transfer to a little dish, ramekin, or even a coffee mug. Either microwave 30-60 seconds (time will depend on your microwave's wattage) OR cook in a preheated 350 F oven for about 14 minutes. If you don’t want to eat it straight out of the dish, be sure to spray your dish first and then wait for the mug cake to cool before trying to remove it. Frosting ideas are listed above in the post! View Nutrition Facts: The mixture should smell faintly of cocoa and look evenly colored after you combine the dry ingredients, which helps avoid pockets of baking powder that can cause uneven rise, and clumps of cocoa that make bitter spots. As you whisk, notice a fine, slightly dusty aroma from the cocoa and flour blending together, and the texture should feel light and powdery on the fork. This stage matters because even distribution of leavening and cocoa ensures an even crumb and consistent lift, preventing dense areas. A common mistake here is rushing the mixing, which leaves clumps, so take a moment to scrape the bowl and stir thoroughly until homogenous.
- Combine dry ingredients and mix very, very well: When you begin adding the liquids, the batter will transition from dusty to glossy, and you will see it come together into a thick ribbon. Pay attention to the sound of the spoon as it moves through the batter, which becomes smoother and slightly sticky when properly hydrated. This technique matters because thorough hydration activates the baking powder evenly, producing a uniform rise and tender interior. Avoid overmixing, which can develop gluten and lead to a chewier result, and do not leave dry streaks of flour or cocoa that will create textural contrast in the finished cake.
- Add liquid, stir, then transfer to a little dish, ramekin, or even a coffee mug: As you add milk , oil , and vanilla , smell the aroma deepen into a creamier chocolate scent, and watch the batter smooth out. Transfer the batter into a lightly greased small dish or mug; you should see a glossy top that holds a spoon impression briefly. This matters for even cooking because the vessel controls how heat penetrates the batter. A frequent error is using a mug that is too deep, which can undercook the center, or forgetting to grease a dish if you plan to remove the cake, leading to sticking. If you plan to eat from the mug, greasing is optional but helps with clean removal.
- Either microwave 30-60 seconds (time will depend on your microwave's wattage): In a microwave you will hear the batter bubble softly as it cooks, and the top will lose its raw shine and spring back slightly when touched. Microwaving is fast and efficient, but timing varies a lot by wattage, so start with 30 seconds and add increments of 10 seconds if needed. This technique yields a moist, slightly steamed crumb, which is ideal for mug cakes. The main pitfall is overcooking, which turns the cake rubbery, so err on the side of slightly underdone because it continues to set as it cools.
- OR cook in a preheated 350 F oven for about 14 minutes: When using an oven, the outer edges will set first and begin to pull away slightly from the dish, and you may see a faint rise to a domed top. The aroma will deepen into a warm, baked chocolate scent that fills the kitchen. Oven baking produces a slightly more uniform crumb with a delicate crust, which many people prefer for texture contrast. To avoid a dry cake, check for a gentle spring when pressed and remove when a toothpick has a few moist crumbs, rather than being completely dry, as overbaking is the most common oven error here.
- If you don’t want to eat it straight out of the dish, be sure to spray your dish first and then wait for the mug cake to cool before trying to remove it: Cooling allows the internal steam to redistribute and the crumb to set, which makes removal from the dish much cleaner, and you will notice a calmer, less steamy aroma as it cools. Spraying the dish ensures the cake releases easily and keeps the edges intact, which matters if you plan to plate it. A typical mistake is trying to invert it while still too warm, causing it to break apart, so give it a few minutes to settle before attempting removal.
- Frosting ideas are listed above in the post: While the cake is simple on its own, adding a spoonful of a glossy topping elevates both flavor and texture, introducing contrasts such as creamy and cold versus warm and cakey. When you add a topping, observe the contrast in temperature and texture, and let the frosting sit briefly so it softens slightly on contact. A common misstep is piling on too heavy a sauce that overwhelms the delicate cake, so apply toppings sparingly to maintain balance.
Helpful Notes about Chocolate Mug Cake
This collection of tips is meant to make your experience with the mug cake effortless and repeatable. I include practical notes that I use when I bake, from timing tweaks to flavor swaps. These ideas will help you nail texture and flavor every time.
- Timing matters — Microwaves vary, so start with shorter bursts and increase in ten second increments; it is better to slightly undercook than overcook because residual heat finishes the set.
- Choose your flour wisely — Lighter flours like all purpose produce a finer crumb, while oat or spelt adds a rustic chew; adjust liquids by a teaspoon if using denser flours.
- Fat choices affect mouthfeel — Oil yields silkiness, nut butter gives richness and flavor, and fruit purées reduce fat but may tighten the crumb, so pick based on the texture you prefer.
- Sweetener swaps — Granulated sugar gives classic structure, granular natural sweeteners may alter moisture, so tweak by small amounts and taste the batter for preferred sweetness.
- Serving temperature — Enjoy warm for gooey comfort, or cool slightly for a more cake like bite; both are intentional and delicious depending on mood.
- Presentation trick — A small dusting of cocoa or a tiny spoonful of a glossy topping adds visual polish and a flavor lift with minimal effort.
Serving Ideas for Chocolate Mug Cake
This cake is very versatile and is lovely for solo treats or small celebrations. Think about portion, temperature, and complementary textures when planning to serve. Below are ideas for pairing, occasions, storage, and seasonal variations to help you enjoy it again and again.
- Solo dessert — Serve warm in the mug with a small spoon for a cozy, immediate treat after dinner or during a study break.
- Casual celebrations — Plate in a ramekin and garnish with a tiny dollop of a glossy topping for birthdays or small victories without baking a whole cake.
- Ramadan or special evenings — This single serving format is convenient for breaking a fast with something sweet and comforting, and it pairs well with a cup of tea or coffee.
- Storage — Leftovers are best kept covered in the refrigerator for up to two days, then gently warmed to refresh texture; avoid long storage which dries the crumb.
- Seasonal pairing — In cooler months, serve with a warm spice tea to enhance the cozy factor; in warmer months, try a chilled topping to create contrast.
- Occasion flexibility — Use this cake for quick breakfasts when you want a sweeter start, or as an after school treat for kids who love a fast bake.
FAQ
Conclusion
This Chocolate Mug Cake stands out for its speed, adaptability, and deeply satisfying chocolate flavor. It proves that you can have a warm, single serving dessert that feels indulgent without a big time or ingredient commitment. Give it a try when you need a quick lift or a personal celebration, and enjoy the comforting aroma and tender crumb. I hope this becomes one of your go to treats for busy nights and little wins.
Chocolate Mug Cake
Equipment
- Mug or ramekin
- Spoon
Ingredients
- 1 tbsp cocoa powder Provide deep chocolate flavor and natural bitterness that balances sweetness; helps create a rich, cocoa-forward base for the mug cake and intensifies the overall chocolate profile when combined with wet ingredients.
- 2 tsp Dutch cocoa powder or additional regular Contribute an additional layer of intense chocolate complexity and deepen color; using Dutch-processed cocoa yields smoother, less acidic flavor while regular cocoa increases brightness and bite.
- 3 tbsp flour spelt, white, oat, or all purpose gluten free (or try this Keto Mug Cake Recipe) Supply structure and bulk to the batter while determining crumb and texture; choosing spelt, white, oat, or all-purpose gluten-free flours alters chewiness and tenderness, and amounts remain interchangeable in small mug-cake batches.
- 1/8 tsp salt Enhance the overall flavor by counteracting sweetness and amplifying other taste components; small amounts also help balance the palate without affecting leavening.
- 2 tbsp sweetener of choice Sweeten the batter to taste and aid in tenderness and moisture retention; selecting different sweeteners (sugar, sugar alternatives) will modify sweetness intensity and caloric profile.
- 1/4 tsp baking powder Leaven the cake by producing gas during heating which creates lift and lightness; the small powder amount prevents excessive rise and ensures an even, tender crumb in the quick-cook mug format.
- 2 1/2 tsp oil or nut butter (While I much prefer the version with fat, many commenters say they love substituting applesauce or mashed banana here) Provide fat for moistness, richness, and improved mouthfeel while helping emulsify batter; swapping with applesauce or mashed banana reduces fat but adds moisture and subtle flavor changes.
- 3 tbsp milk of choice Add liquid to hydrate dry ingredients, dissolve sweetener, and create a pourable batter; milk choice affects creaminess and can subtly change flavor and nutritional content.
- 1/2 tsp pure vanilla extract Impart aromatic depth and a rounded flavor profile, enhancing perceived sweetness and complexity; a small amount of pure vanilla elevates the chocolate notes without overpowering them.
Instructions
- How to make a chocolate mug cake recipe: Combine dry ingredients and mix very, very well. Add liquid, stir, then transfer to a little dish, ramekin, or even a coffee mug. Either microwave 30-60 seconds (time will depend on your microwave's wattage) OR cook in a preheated 350 F oven for about 14 minutes. If you don’t want to eat it straight out of the dish, be sure to spray your dish first and then wait for the mug cake to cool before trying to remove it. Frosting ideas are listed above in the post! View Nutrition Facts: The mixture should smell faintly of cocoa and look evenly colored after you combine the dry ingredients, which helps avoid pockets of baking powder that can cause uneven rise, and clumps of cocoa that make bitter spots. As you whisk, notice a fine, slightly dusty aroma from the cocoa and flour blending together, and the texture should feel light and powdery on the fork. This stage matters because even distribution of leavening and cocoa ensures an even crumb and consistent lift, preventing dense areas. A common mistake here is rushing the mixing, which leaves clumps, so take a moment to scrape the bowl and stir thoroughly until homogenous.
- Combine dry ingredients and mix very, very well: When you begin adding the liquids, the batter will transition from dusty to glossy, and you will see it come together into a thick ribbon. Pay attention to the sound of the spoon as it moves through the batter, which becomes smoother and slightly sticky when properly hydrated. This technique matters because thorough hydration activates the baking powder evenly, producing a uniform rise and tender interior. Avoid overmixing, which can develop gluten and lead to a chewier result, and do not leave dry streaks of flour or cocoa that will create textural contrast in the finished cake.
- Add liquid, stir, then transfer to a little dish, ramekin, or even a coffee mug: As you add milk , oil , and vanilla , smell the aroma deepen into a creamier chocolate scent, and watch the batter smooth out. Transfer the batter into a lightly greased small dish or mug; you should see a glossy top that holds a spoon impression briefly. This matters for even cooking because the vessel controls how heat penetrates the batter. A frequent error is using a mug that is too deep, which can undercook the center, or forgetting to grease a dish if you plan to remove the cake, leading to sticking. If you plan to eat from the mug, greasing is optional but helps with clean removal.
- Either microwave 30-60 seconds (time will depend on your microwave's wattage): In a microwave you will hear the batter bubble softly as it cooks, and the top will lose its raw shine and spring back slightly when touched. Microwaving is fast and efficient, but timing varies a lot by wattage, so start with 30 seconds and add increments of 10 seconds if needed. This technique yields a moist, slightly steamed crumb, which is ideal for mug cakes. The main pitfall is overcooking, which turns the cake rubbery, so err on the side of slightly underdone because it continues to set as it cools.
- OR cook in a preheated 350 F oven for about 14 minutes: When using an oven, the outer edges will set first and begin to pull away slightly from the dish, and you may see a faint rise to a domed top. The aroma will deepen into a warm, baked chocolate scent that fills the kitchen. Oven baking produces a slightly more uniform crumb with a delicate crust, which many people prefer for texture contrast. To avoid a dry cake, check for a gentle spring when pressed and remove when a toothpick has a few moist crumbs, rather than being completely dry, as overbaking is the most common oven error here.
- If you don’t want to eat it straight out of the dish, be sure to spray your dish first and then wait for the mug cake to cool before trying to remove it: Cooling allows the internal steam to redistribute and the crumb to set, which makes removal from the dish much cleaner, and you will notice a calmer, less steamy aroma as it cools. Spraying the dish ensures the cake releases easily and keeps the edges intact, which matters if you plan to plate it. A typical mistake is trying to invert it while still too warm, causing it to break apart, so give it a few minutes to settle before attempting removal.
- Frosting ideas are listed above in the post: While the cake is simple on its own, adding a spoonful of a glossy topping elevates both flavor and texture, introducing contrasts such as creamy and cold versus warm and cakey. When you add a topping, observe the contrast in temperature and texture, and let the frosting sit briefly so it softens slightly on contact. A common misstep is piling on too heavy a sauce that overwhelms the delicate cake, so apply toppings sparingly to maintain balance.
Notes
- Timing matters — Microwaves vary, so start with shorter bursts and increase in ten second increments; it is better to slightly undercook than overcook because residual heat finishes the set.
- Choose your flour wisely — Lighter flours like all purpose produce a finer crumb, while oat or spelt adds a rustic chew; adjust liquids by a teaspoon if using denser flours.
- Fat choices affect mouthfeel — Oil yields silkiness, nut butter gives richness and flavor, and fruit purées reduce fat but may tighten the crumb, so pick based on the texture you prefer.
- Sweetener swaps — Granulated sugar gives classic structure, granular natural sweeteners may alter moisture, so tweak by small amounts and taste the batter for preferred sweetness.
- Serving temperature — Enjoy warm for gooey comfort, or cool slightly for a more cake like bite; both are intentional and delicious depending on mood.
- Presentation trick — A small dusting of cocoa or a tiny spoonful of a glossy topping adds visual polish and a flavor lift with minimal effort.