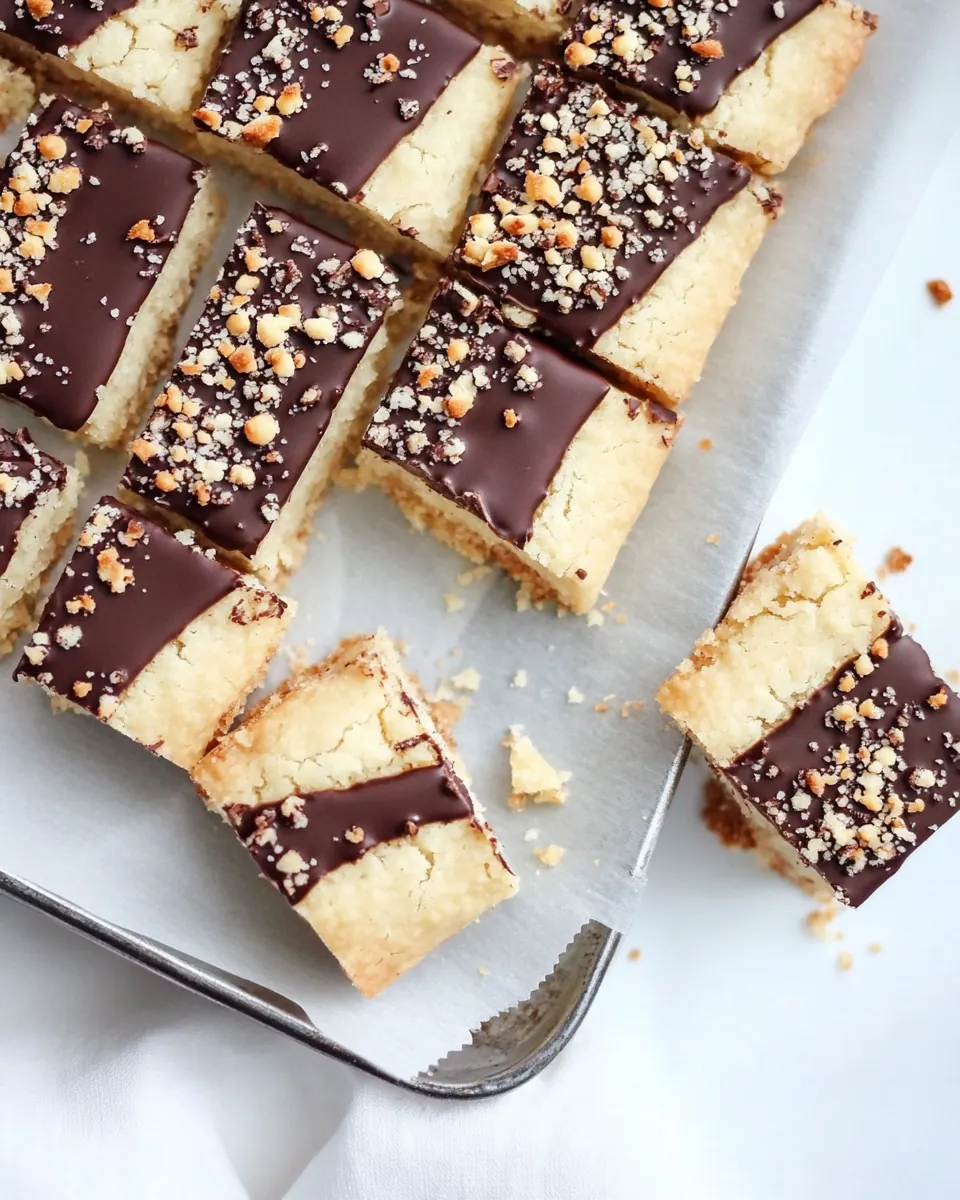
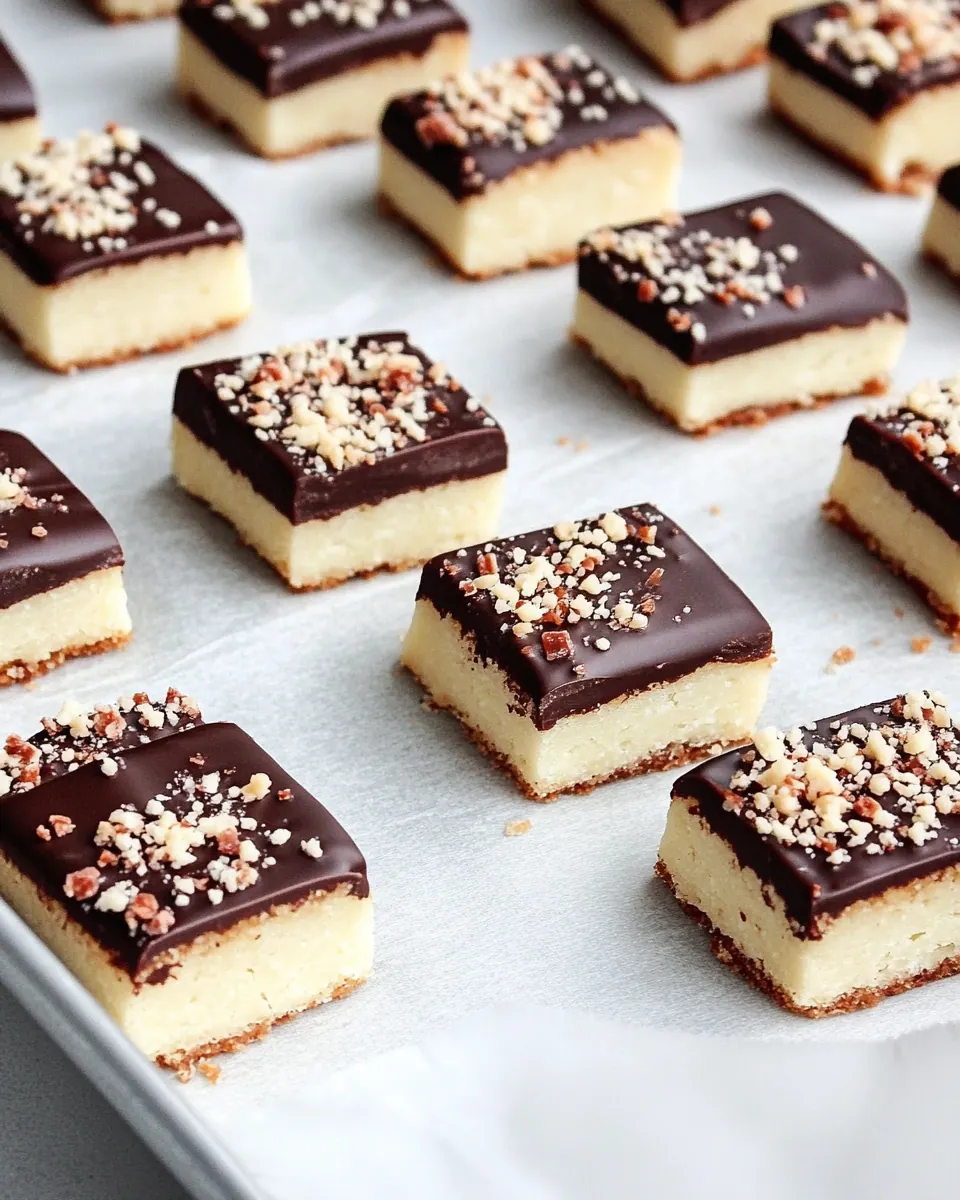
Chocolate Dipped Toffee Shortbread
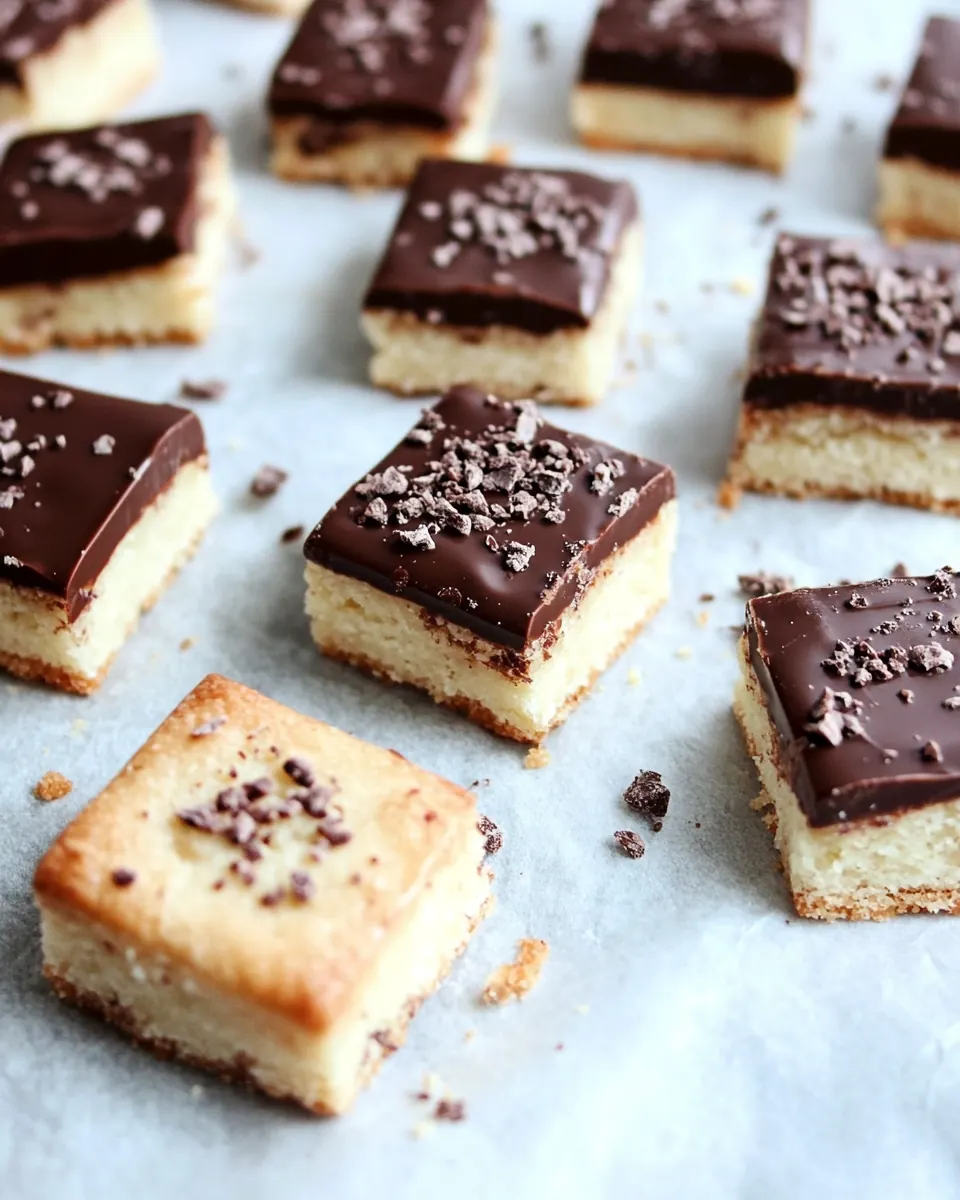
Chocolate Dipped Toffee Shortbread has been my go to treat whenever I want something buttery and just a little bit fancy, the kind of cookie that disappears before guests even reach for napkins. I first made these on a rainy afternoon when I needed a comfort project, and the simple act of creaming butter and powdered sugar into a pale, silky mix felt almost meditative. The dough came together quietly, and when I folded in the toffee bits I smiled at that first crunchy hint of caramel that promised contrast against the tender crumb.
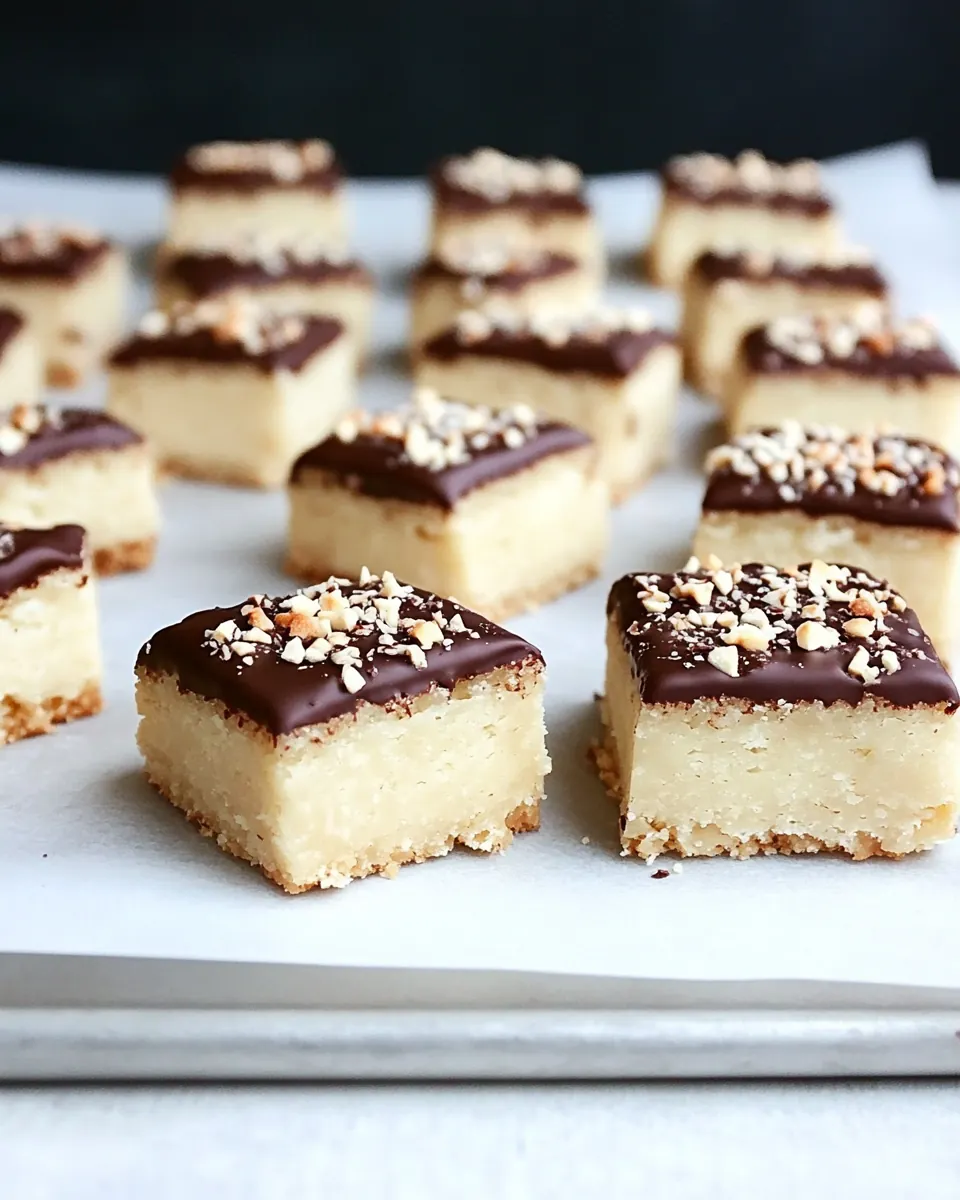
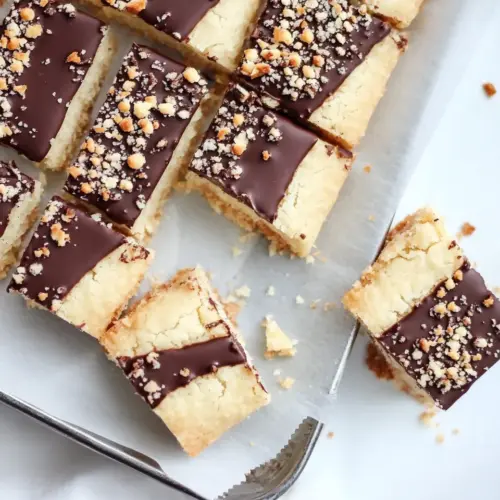
That batch taught me how small details change everything, like chilling the dough so the cookies hold their shape, or dipping half of them into warm, glossy milk chocolate chips for a beautiful finish. Friends described the texture as shortbread yet better, because the little flecks of toffee supply tiny explosions of sweetness that balance the rich, buttery base. I loved watching the chocolate set, the surface going from glossy to slightly matte as it cooled, and I learned to store them carefully so the chocolate stays crisp while the interior remains sandy and melt in your mouth.
Recipe Snapshot
1 hr 33 mins
75 mins
18 mins
Medium
150 kcal
American
Gluten-Free, Low FODMAP
Desserts
Stand mixer, Mixing bowl, Baking sheet, Parchment paper, Wire cooling rack, Microwave safe bowl
Why This Chocolate Dipped Toffee Shortbread Shines
Classic Texture with Modern Crunch
I adore how Chocolate Dipped Toffee Shortbread keeps the beloved sandy, tender shortbread texture while introducing crunchy toffee bits for surprises in every bite. The contrast between the crumbly base and caramel shards makes each mouthful interesting, and I find that it satisfies both fans of delicate cookies and people who like a bit of chew.
Simple Techniques, Big Payoff
We use straightforward methods that any home baker can handle. Creaming butter and powdered sugar until smooth creates the right aeration for a light, tender cookie. Chilling the dough is a small step that yields beautifully shaped cookies and prevents spreading, so I never skip it when I want consistent batches.
Decorative and Gift Ready
These cookies are lovely dipped in milk chocolate chips, making them look intentionally crafted without much extra effort. I’ve gifted trays of these cookies during holidays, and they always look upscale enough for company, while still feeling homey. A sprinkle of extra toffee bits while the chocolate is wet adds both texture and visual appeal.
Adaptable for Any Occasion
I reach for Chocolate Dipped Toffee Shortbread whether I want an afternoon treat, a party platter, or a thoughtful edible gift. They are sturdy enough for transport and store well, which makes them practical as well as delicious. I’ve served them with coffee and tea, and they play nicely with other desserts on a platter.
Reliable Ingredients
The ingredient list is short and familiar, yet the combination is greater than the sum of its parts. Pantry staples like all purpose flour and unsalted butter form the base, while vanilla extract and the toffee pieces lift the flavor into something memorable. I appreciate recipes that respect quality ingredients without requiring rare items.
Main Ingredients for Chocolate Dipped Toffee Shortbread
These ingredients are straightforward, and they work together to create a buttery, crisp shortbread with pockets of caramel crunch and a glossy chocolate finish. The real key players are the butter for richness, the all purpose flour for structure, and the toffee bits for texture. Each element plays a distinct role, and small adjustments to technique influence the final bite more than swapping the components.
- 2 cups all-purpose flour: Provides a structural base and tender crumb for the shortbread; contributes gluten to bind the dough when mixed with butter. Balances richness so cookies hold their shape during baking and yields a classic shortbread texture.
- 1/4 teaspoons salt: Adds a subtle savory balance that enhances the sweetness and deepens overall flavor; tightens the dough slightly for better texture. Sprinkling evenly into dry ingredients prevents localized salt pockets.
- 1 cup unsalted butter, at room temperature: Supplies rich fat that creates the tender, crumbly shortbread texture and carries flavor throughout the cookie. Creaming with sugar incorporates air for lightness and helps dissolve powdered sugar for a smooth dough.
- 3/4 cup powdered sugar: Sweetens and contributes fine texture to the dough; powders easily into butter for even distribution without grittiness. Helps produce a delicate, melt-in-your-mouth shortbread crumb.
- 1 teaspoon vanilla extract: Imparts aromatic flavor and enhances other ingredients, rounding out the buttery and toffee notes in the cookie. Dissolves readily into the dough to provide consistent vanilla warmth.
- 1 cup toffee bits, divided: Provides crunchy, caramelized bits that add toffee flavor and textural contrast; reserving half allows for mixing into the dough and sprinkling on top before baking. Contributes bursts of caramel sweetness in each bite.
- 2 cups milk chocolate chips: Offers a glossy, sweet coating when melted for dipping and sets to a firm snap that complements the crumbly shortbread. Melts smoothly for coating and provides a rich chocolate finish that contrasts the buttery base.
How to Prepare Chocolate Dipped Toffee Shortbread
These directions are written to guide you through small technique points that make a big difference, from sensory cues to common pitfalls. I’ll walk you through each step so the cookies come out with the best texture and flavor, and so you can recognize when things are going right.
- In a small bowl, whisk the flour and salt together. Set aside.: The moment you whisk all purpose flour and salt together you will notice a faint, dry aroma and a uniform pale color, which means the salt is evenly distributed and will season the dough consistently. This step prevents pockets of salt in the finished cookies and also ensures the dry ingredients will incorporate smoothly into the creamed fat, avoiding streaks of flour. A common mistake is dumping the flour straight into the butter, which can cause overmixing as you try to work out clumps. If you see visible clumps after adding, gently break them up with a spatula rather than overbeating, which develops gluten and makes the shortbread tougher.
- In the bowl of a stand mixer, beat the butter and powdered sugar until smooth and creamy, about 3 minutes. Beat in the vanilla extract. Slowly add in the flour mixture and mix until just combined. Stir in 1/2 cup of the toffee bits. Form the dough into a disk shape and wrap in plastic wrap. Chill the dough for at least 1 hour or until firm.: As you beat unsalted butter with powdered sugar , the mixture will transform from pale yellow lumps into a smooth, glossy cream, with a light whipped sound from the mixer. This aeration gives the cookies their tender texture, creating tiny air pockets that make the crumb delicate. If the butter is too cold you will see chunks and the sugar will not incorporate, producing a gritty dough. Conversely, if the butter is too warm you may end up with a greasy mass that won’t hold structure during baking. Watch for a smooth, spreadable consistency and scrape the bowl once so all ingredients are evenly creamed.
- When ready to bake, preheat oven to 350 degrees F. Line a large baking sheet with parchment paper or a Silpat baking mat and set aside.: When you add vanilla extract the aroma will lift and become more complex, signaling flavor development. Stirring it in gently ensures the extract is distributed without losing the texture achieved by creaming. A pitfall is adding too much liquid at once, which can loosen the dough; measure carefully. If the mixture looks slightly thinner after adding the vanilla, rest it a few minutes so the sugar can absorb the small amount of liquid and the texture firms up before adding dry ingredients.
- On a lightly floured surface, roll out the dough into a 1/4 inch thick square. Cut into squares, rounds, or shape of your choice using a lightly floured cookie cutter.: As you incorporate the whisked flour and salt , you will see the batter take on a drier, sandy look, indicating the transition from creamed texture to dough. Adding the flour slowly prevents pockets of dry flour and lets you stop as soon as it is combined, which is crucial to avoiding gluten development. The dough should look cohesive but not overly elastic. A frequent error is overmixing, which yields chewy cookies instead of a tender shortbread. If you notice the dough starting to look shiny and stretched, pause immediately and switch to folding by hand to finish combining.
- Place shortbread cookies on the prepared baking sheet and bake for 15-18 minutes, or until cookies are very lightly browned around the edges. Remove cookies from baking sheet and cool completely on a wire cooling rack.: Folding in the reserved portion of the toffee bits introduces bursts of caramel flavor and shiny amber specks throughout the dough. You should hear soft crunches as the bits are folded in, and visually you will spot the darker toffee against the pale dough. Be gentle to avoid crushing the toffee into powder, which deprives the cookies of delightful textural contrast. If you see fine powder instead of intact bits, you may have stirred too vigorously; next time fold with a spatula slowly and deliberately.
- Put the chocolate chips in a microwave safe bowl and melt, stirring every 30 seconds until melted. Dip the shortbread cookies in the melted chocolate and sprinkle with additional toffee bits. Lay on a piece of parchment paper or wax paper to set up. Once chocolate is completely dried, store cookies in an air tight container for up to 5 days.: Shaping the dough into a compact disk chills more evenly and makes it easier to roll later. The surface should be smooth and slightly tacky but not wet, which indicates correct moisture balance. Wrapping tightly prevents drying and avoids formation of a crust. A mistake is leaving air pockets under the wrap, which can cause uneven chilling; press gently to expel air and seal the edges to keep the dough uniform.
- Chill the dough for at least 1 hour or until firm.: During chilling the dough firms up and the butter solidifies, which prevents spreading in the oven. You will feel the dough become cold and more manageable; it should be firm enough to roll without sticking. Chilling also helps the flavors meld, making the cookies taste more rounded. If you skip chilling, expect wider, flatter cookies that may brown unevenly. If your kitchen is warm, allow a bit longer chilling time so the butter is properly set.
- When ready to bake, preheat oven to 350 degrees F.: As the oven heats, you may notice a faint warmth in the kitchen and a steady hum from the preheating cycle. A properly preheated oven ensures consistent bake times and even browning. Use an oven thermometer if your oven runs hot or cold, since inaccurate temperatures can cause underbaked or overly browned cookies. Setting the temperature too high makes the edges brown before the centers set, so wait until the oven reaches the full 350 degrees F before baking.
- Line a large baking sheet with parchment paper or a Silpat baking mat and set aside.: Preparing the baking surface prevents sticking and promotes even heat distribution. Parchment yields slightly crisper bottoms while Silpat provides a consistent, nonstick layer. You should notice that cookies lift cleanly after baking, and cleanup is simpler. Placing cookies directly on an unlined sheet can lead to uneven baking and sticking, so always line the pan to avoid ruined cookies.
- On a lightly floured surface, roll out the dough into a 1/4 inch thick square.: When rolling the dough, aim for a uniform thickness to ensure even baking, and you will see a smooth, slightly matte surface as air pockets are pressed out. The dough should still be cool to the touch; if it becomes soft and sticky, pop it back into the fridge for a short rest. Overflouring the surface can dry the dough and make the shortbread tough, so dust sparingly and handle gently to preserve tenderness.
- Cut into squares, rounds, or shape of your choice using a lightly floured cookie cutter.: Cutting shapes creates neat edges that bake evenly; as you press your cutter you may hear a soft snap as it separates the dough. Transfer shapes carefully to the prepared sheet to keep their form. A common misstep is twisting the cutter, which can seal edges and distort the pattern; press straight down and lift the cutter vertically for clean shapes.
- Place shortbread cookies on the prepared baking sheet and bake for 15 to 18 minutes, or until cookies are very lightly browned around the edges.: While baking you will notice a gentle aroma of butter and caramel, and the edges will take on a faint golden hue while the centers stay pale. This subtle browning signals the perfect shortbread texture, crisp at the edge and tender inside. Remove the cookies promptly when you see the color change; leaving them just a bit too long will create a dry, crumbly interior. If cookies puff excessively, your oven may be too hot or the dough was overworked.
- Remove cookies from baking sheet and cool completely on a wire cooling rack.: Cooling on a rack allows air to circulate and prevents steam from softening the bottoms, leaving them crisp and set. You should be able to gently lift the cookies once cooled and observe a firm, sandy texture. Stacking warm cookies traps steam and will cause the chocolate later to adhere poorly, so ensure they are fully cool before the next step.
- Put the chocolate chips in a microwave safe bowl and melt, stirring every 30 seconds until melted.: As you melt milk chocolate chips , the chips will soften then become glossy and fluid; stirring regularly prevents hot spots and ensures smooth texture. Use medium power and brief intervals to avoid burning, and stop while a few streaks remain, stirring until completely melted. Overheating can seize the chocolate into a grainy mass, so if you see thick clumps, add a tiny bit of neutral oil and stir gently to rescue it.
- Dip the shortbread cookies in the melted chocolate and sprinkle with additional toffee bits.: Dipping results in a shiny coat that transforms the cookies visually and texturally, with warm chocolate aroma filling the air. Sprinkle reserved toffee bits immediately while the chocolate is wet so they adhere. A common error is waiting too long, which leads to poor adhesion and a dull finish. Use a fork to tap off excess chocolate and place cookies on parchment for setting.
- Lay on a piece of parchment paper or wax paper to set up.: As the chocolate cools it will lose gloss and become slightly matte, signaling it has set. The surface should feel firm to the touch after cooling, and the toffee will be nestled into the chocolate. If humidity is high, the chocolate can become sticky; set in a cool, dry spot to ensure a crisp finish. Avoid refrigerating immediately, which can cause condensation and bloom on the chocolate.
- Once chocolate is completely dried, store cookies in an air tight container for up to 5 days.: Proper storage preserves both the crisp cookie texture and the chocolate coating. Layer cookies with parchment to prevent sticking and keep the container sealed to avoid absorbing odors. A typical mistake is storing warm cookies, which traps moisture and softens them; always ensure they are fully cooled and set before stashing away.
Pro Tips and Tweaks
I like to think of small adjustments as shortcuts to better texture and flavor. These tips focus on technique, timing, and simple tweaks that make the cookies look professional and taste balanced. Try one or two and see how they change the result.
- Use cold tools for shaping to keep the dough firm longer, which helps maintain crisp edges when cutting and baking.
- Fine powdered sugar matters because it dissolves into the butter for a smoother dough and more tender crumb.
- Reserve some toffee bits to sprinkle on the wet chocolate, adding decorative crunch and visual appeal.
- Test bake one cookie first to check oven temperature accuracy and adjust baking time for your rack position.
- Stir chocolate off heat at the last moment to prevent overheating, and cool slightly before dipping so it is glossy but not runny.
What to Serve Alongside Chocolate Dipped Toffee Shortbread
These shortbread cookies pair well with beverages and simple accompaniments, and they travel nicely for gatherings. Below are serving ideas, occasions, and storage notes to help you present them beautifully and keep them tasting their best.
- Afternoon Tea, serve a plate of Chocolate Dipped Toffee Shortbread with a pot of strong black tea or a light herbal infusion for a balancing sip.
- Gift Box, arrange the cookies in a decorative tin layered with parchment for birthdays, holidays, or as a hostess gift, ensuring they stay upright to avoid smudging the chocolate.
- Coffee Pairing, present these cookies alongside a bold brewed coffee or espresso to match the cookie sweetness with roasted notes.
- Party Platter, mix with other small cookies and confections on a dessert board for variety in texture and flavor during celebrations.
- Storage Tips, keep in an air tight container at room temperature for up to five days, layering parchment between cookies to protect the chocolate finish.
- Seasonal Pairings, these are great for holiday dessert tables and winter gatherings, and they also make charming additions to picnic dessert boxes in cooler months.
FAQ
Conclusion
These cookies stand out for their marriage of tender, buttery shortbread and crunchy toffee, finished with a glossy chocolate dip that elevates presentation and flavor. I encourage you to try making them because small technique choices like chilling the dough and melting chocolate gently make a noticeable difference, and they reward a little attention with big flavor payoff. Whether you bake a batch for yourself, to give away, or to share at a gathering, they are reliably delicious and bring a special touch to any occasion.
Chocolate Dipped Toffee Shortbread
Equipment
- Stand mixer
- Mixing Bowl
- Baking Sheet
- Parchment Paper
- wire cooling rack
- Microwave-safe Bowl
Ingredients
- 2 cups all-purpose flour Provides a structural base and tender crumb for the shortbread; contributes gluten to bind the dough when mixed with butter. Balances richness so cookies hold their shape during baking and yields a classic shortbread texture.
- 1/4 teaspoons salt Adds a subtle savory balance that enhances the sweetness and deepens overall flavor; tightens the dough slightly for better texture. Sprinkling evenly into dry ingredients prevents localized salt pockets.
- 1 cup unsalted butter, at room temperature Supplies rich fat that creates the tender, crumbly shortbread texture and carries flavor throughout the cookie. Creaming with sugar incorporates air for lightness and helps dissolve powdered sugar for a smooth dough.
- 3/4 cup powdered sugar Sweetens and contributes fine texture to the dough; powders easily into butter for even distribution without grittiness. Helps produce a delicate, melt-in-your-mouth shortbread crumb.
- 1 teaspoon vanilla extract Imparts aromatic flavor and enhances other ingredients, rounding out the buttery and toffee notes in the cookie. Dissolves readily into the dough to provide consistent vanilla warmth.
- 1 cup toffee bits, divided Provides crunchy, caramelized bits that add toffee flavor and textural contrast; reserving half allows for mixing into the dough and sprinkling on top before baking. Contributes bursts of caramel sweetness in each bite.
- 2 cups milk chocolate chips Offers a glossy, sweet coating when melted for dipping and sets to a firm snap that complements the crumbly shortbread. Melts smoothly for coating and provides a rich chocolate finish that contrasts the buttery base.
Instructions
- In a small bowl, whisk the flour and salt together. Set aside.: The moment you whisk all purpose flour and salt together you will notice a faint, dry aroma and a uniform pale color, which means the salt is evenly distributed and will season the dough consistently. This step prevents pockets of salt in the finished cookies and also ensures the dry ingredients will incorporate smoothly into the creamed fat, avoiding streaks of flour. A common mistake is dumping the flour straight into the butter, which can cause overmixing as you try to work out clumps. If you see visible clumps after adding, gently break them up with a spatula rather than overbeating, which develops gluten and makes the shortbread tougher.
- In the bowl of a stand mixer, beat the butter and powdered sugar until smooth and creamy, about 3 minutes. Beat in the vanilla extract. Slowly add in the flour mixture and mix until just combined. Stir in 1/2 cup of the toffee bits. Form the dough into a disk shape and wrap in plastic wrap. Chill the dough for at least 1 hour or until firm.: As you beat unsalted butter with powdered sugar , the mixture will transform from pale yellow lumps into a smooth, glossy cream, with a light whipped sound from the mixer. This aeration gives the cookies their tender texture, creating tiny air pockets that make the crumb delicate. If the butter is too cold you will see chunks and the sugar will not incorporate, producing a gritty dough. Conversely, if the butter is too warm you may end up with a greasy mass that won’t hold structure during baking. Watch for a smooth, spreadable consistency and scrape the bowl once so all ingredients are evenly creamed.
- When ready to bake, preheat oven to 350 degrees F. Line a large baking sheet with parchment paper or a Silpat baking mat and set aside.: When you add vanilla extract the aroma will lift and become more complex, signaling flavor development. Stirring it in gently ensures the extract is distributed without losing the texture achieved by creaming. A pitfall is adding too much liquid at once, which can loosen the dough; measure carefully. If the mixture looks slightly thinner after adding the vanilla, rest it a few minutes so the sugar can absorb the small amount of liquid and the texture firms up before adding dry ingredients.
- On a lightly floured surface, roll out the dough into a 1/4 inch thick square. Cut into squares, rounds, or shape of your choice using a lightly floured cookie cutter.: As you incorporate the whisked flour and salt , you will see the batter take on a drier, sandy look, indicating the transition from creamed texture to dough. Adding the flour slowly prevents pockets of dry flour and lets you stop as soon as it is combined, which is crucial to avoiding gluten development. The dough should look cohesive but not overly elastic. A frequent error is overmixing, which yields chewy cookies instead of a tender shortbread. If you notice the dough starting to look shiny and stretched, pause immediately and switch to folding by hand to finish combining.
- Place shortbread cookies on the prepared baking sheet and bake for 15-18 minutes, or until cookies are very lightly browned around the edges. Remove cookies from baking sheet and cool completely on a wire cooling rack.: Folding in the reserved portion of the toffee bits introduces bursts of caramel flavor and shiny amber specks throughout the dough. You should hear soft crunches as the bits are folded in, and visually you will spot the darker toffee against the pale dough. Be gentle to avoid crushing the toffee into powder, which deprives the cookies of delightful textural contrast. If you see fine powder instead of intact bits, you may have stirred too vigorously; next time fold with a spatula slowly and deliberately.
- Put the chocolate chips in a microwave safe bowl and melt, stirring every 30 seconds until melted. Dip the shortbread cookies in the melted chocolate and sprinkle with additional toffee bits. Lay on a piece of parchment paper or wax paper to set up. Once chocolate is completely dried, store cookies in an air tight container for up to 5 days.: Shaping the dough into a compact disk chills more evenly and makes it easier to roll later. The surface should be smooth and slightly tacky but not wet, which indicates correct moisture balance. Wrapping tightly prevents drying and avoids formation of a crust. A mistake is leaving air pockets under the wrap, which can cause uneven chilling; press gently to expel air and seal the edges to keep the dough uniform.
- Chill the dough for at least 1 hour or until firm.: During chilling the dough firms up and the butter solidifies, which prevents spreading in the oven. You will feel the dough become cold and more manageable; it should be firm enough to roll without sticking. Chilling also helps the flavors meld, making the cookies taste more rounded. If you skip chilling, expect wider, flatter cookies that may brown unevenly. If your kitchen is warm, allow a bit longer chilling time so the butter is properly set.
- When ready to bake, preheat oven to 350 degrees F.: As the oven heats, you may notice a faint warmth in the kitchen and a steady hum from the preheating cycle. A properly preheated oven ensures consistent bake times and even browning. Use an oven thermometer if your oven runs hot or cold, since inaccurate temperatures can cause underbaked or overly browned cookies. Setting the temperature too high makes the edges brown before the centers set, so wait until the oven reaches the full 350 degrees F before baking.
- Line a large baking sheet with parchment paper or a Silpat baking mat and set aside.: Preparing the baking surface prevents sticking and promotes even heat distribution. Parchment yields slightly crisper bottoms while Silpat provides a consistent, nonstick layer. You should notice that cookies lift cleanly after baking, and cleanup is simpler. Placing cookies directly on an unlined sheet can lead to uneven baking and sticking, so always line the pan to avoid ruined cookies.
- On a lightly floured surface, roll out the dough into a 1/4 inch thick square.: When rolling the dough, aim for a uniform thickness to ensure even baking, and you will see a smooth, slightly matte surface as air pockets are pressed out. The dough should still be cool to the touch; if it becomes soft and sticky, pop it back into the fridge for a short rest. Overflouring the surface can dry the dough and make the shortbread tough, so dust sparingly and handle gently to preserve tenderness.
- Cut into squares, rounds, or shape of your choice using a lightly floured cookie cutter.: Cutting shapes creates neat edges that bake evenly; as you press your cutter you may hear a soft snap as it separates the dough. Transfer shapes carefully to the prepared sheet to keep their form. A common misstep is twisting the cutter, which can seal edges and distort the pattern; press straight down and lift the cutter vertically for clean shapes.
- Place shortbread cookies on the prepared baking sheet and bake for 15 to 18 minutes, or until cookies are very lightly browned around the edges.: While baking you will notice a gentle aroma of butter and caramel, and the edges will take on a faint golden hue while the centers stay pale. This subtle browning signals the perfect shortbread texture, crisp at the edge and tender inside. Remove the cookies promptly when you see the color change; leaving them just a bit too long will create a dry, crumbly interior. If cookies puff excessively, your oven may be too hot or the dough was overworked.
- Remove cookies from baking sheet and cool completely on a wire cooling rack.: Cooling on a rack allows air to circulate and prevents steam from softening the bottoms, leaving them crisp and set. You should be able to gently lift the cookies once cooled and observe a firm, sandy texture. Stacking warm cookies traps steam and will cause the chocolate later to adhere poorly, so ensure they are fully cool before the next step.
- Put the chocolate chips in a microwave safe bowl and melt, stirring every 30 seconds until melted.: As you melt milk chocolate chips , the chips will soften then become glossy and fluid; stirring regularly prevents hot spots and ensures smooth texture. Use medium power and brief intervals to avoid burning, and stop while a few streaks remain, stirring until completely melted. Overheating can seize the chocolate into a grainy mass, so if you see thick clumps, add a tiny bit of neutral oil and stir gently to rescue it.
- Dip the shortbread cookies in the melted chocolate and sprinkle with additional toffee bits.: Dipping results in a shiny coat that transforms the cookies visually and texturally, with warm chocolate aroma filling the air. Sprinkle reserved toffee bits immediately while the chocolate is wet so they adhere. A common error is waiting too long, which leads to poor adhesion and a dull finish. Use a fork to tap off excess chocolate and place cookies on parchment for setting.
- Lay on a piece of parchment paper or wax paper to set up.: As the chocolate cools it will lose gloss and become slightly matte, signaling it has set. The surface should feel firm to the touch after cooling, and the toffee will be nestled into the chocolate. If humidity is high, the chocolate can become sticky; set in a cool, dry spot to ensure a crisp finish. Avoid refrigerating immediately, which can cause condensation and bloom on the chocolate.
- Once chocolate is completely dried, store cookies in an air tight container for up to 5 days.: Proper storage preserves both the crisp cookie texture and the chocolate coating. Layer cookies with parchment to prevent sticking and keep the container sealed to avoid absorbing odors. A typical mistake is storing warm cookies, which traps moisture and softens them; always ensure they are fully cooled and set before stashing away.
Notes
- Use cold tools for shaping to keep the dough firm longer, which helps maintain crisp edges when cutting and baking.
- Fine powdered sugar matters because it dissolves into the butter for a smoother dough and more tender crumb.
- Reserve some toffee bits to sprinkle on the wet chocolate, adding decorative crunch and visual appeal.
- Test bake one cookie first to check oven temperature accuracy and adjust baking time for your rack position.
- Stir chocolate off heat at the last moment to prevent overheating, and cool slightly before dipping so it is glossy but not runny.