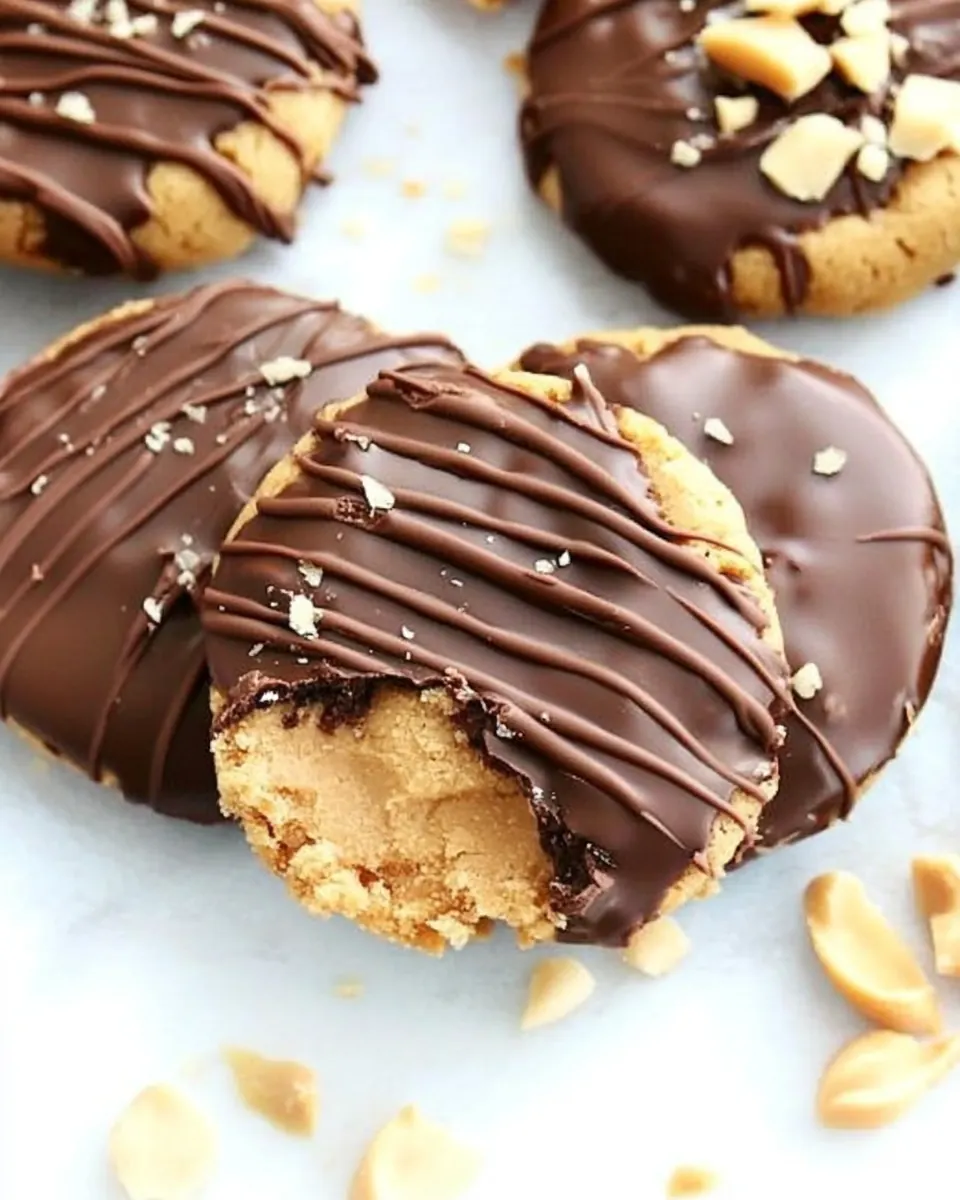
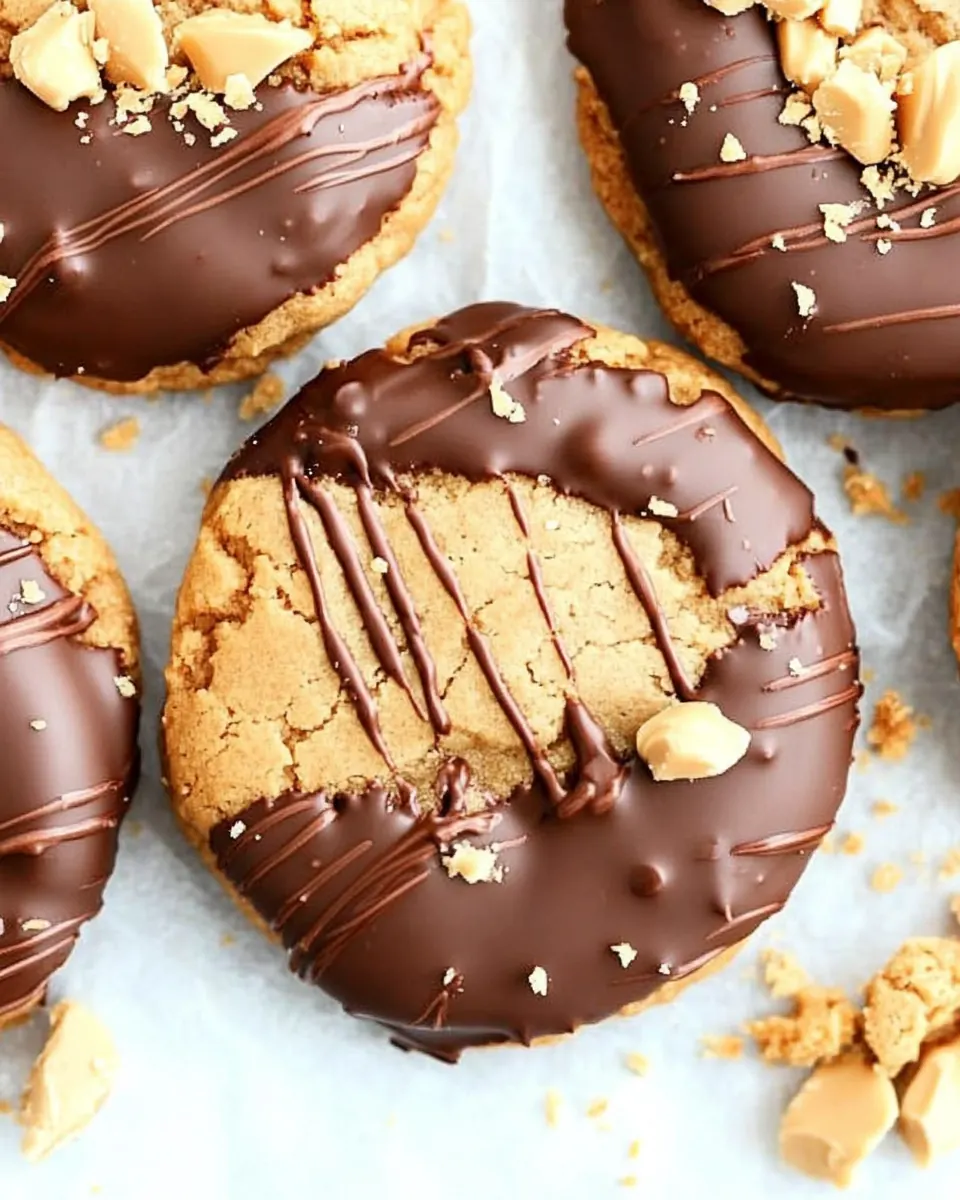
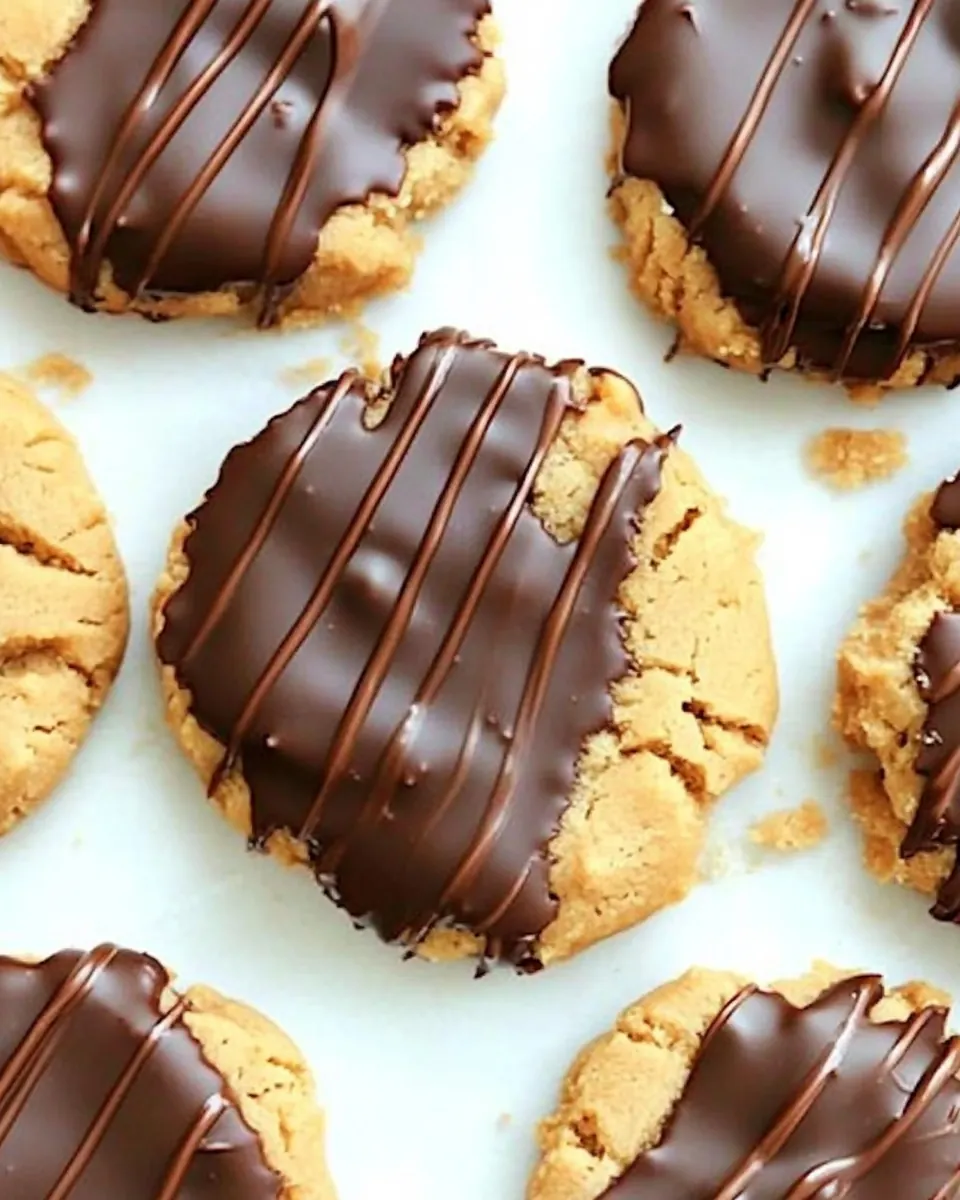
Chocolate Dipped Peanut Butter Cookies
Chocolate Dipped Peanut Butter Cookies are one of those treats that instantly take me back to an afternoon in my grandmother’s tiny kitchen, when the sun warmed the windows and the house smelled of roasted peanuts and sugar. I can still hear the quiet clink of a wooden spoon against the bowl as she mixed the simple dough, and she always let me press the tops with a cute stamp before they went into the oven. Years later I found myself trimming the edges off store bought cookies and wishing I’d just make a batch from scratch instead.
My relationship with Chocolate Dipped Peanut Butter Cookies started as a comfort ritual, something I made when I needed a calm, focused task. The recipe is forgiving enough that I could teach it to a toddler, and flexible enough that I could dress it up for guests. I remember the first time I dipped one in warm chocolate and saw the glossy sheen set in minutes, the chopped peanuts adding a satisfying crunch that made everyone at the table pause in appreciation. That texture contrast is the heart of why I keep this recipe in my rotation.
Recipe Snapshot
15 mins
5 mins
10 mins
Medium
150 kcal
American
Gluten-Free, Low FODMAP
Desserts
Mixing bowl, Whisk, Baking sheet, Parchment paper, Cookie scoop, Microwave safe bowl, Cooling rack
Why This Chocolate Dipped Peanut Butter Cookies Works
They are ridiculously simple to make
I love that Chocolate Dipped Peanut Butter Cookies require only a handful of pantry staples, and I can whisk the dough in one bowl. When life is busy, I appreciate recipes that get out of the way, and these cookies do exactly that, delivering maximum flavor for minimal fuss.
Texture is everything
The combination of smooth peanut butter and chopped roasted peanuts gives a creamy base with crunchy highlights. That interplay keeps every bite interesting, and the melted chocolate chips introduce a silky layer that contrasts beautifully with the cookie.
They please a crowd
I often bring these to gatherings because they travel well and are universally loved. Whether you stamp them for a party or scoop them casually for an afternoon tea, they adapt to the occasion, and people always ask for the recipe.
Customizable finishing touches
You can adjust how much chocolate you use, or sprinkle more chopped peanuts on top for extra crunch. Small choices like adding a touch of oil while melting the chocolate chips make the coating glossy and easy to work with, and I use this little trick every time.
Comfort in every bite
These cookies are nostalgic and comforting without being fussy, and they teach simple baking skills like judging doneness by sight and touch. I find making them calming, and sharing them feels like giving someone a warm, edible hug.
What You Need for Chocolate Dipped Peanut Butter Cookies
These ingredients read like a short grocery list and a love letter to texture. The key players are the peanut butter for body and flavor, the brown sugar for a tender chew and caramel notes, and the chocolate chips plus chopped peanuts for contrast. Together they form a cookie that is both creamy and crunchy, with a glossy chocolate finish that makes each bite feel special.
- 1 cup smooth peanut butter: Provide creamy texture and rich peanut flavor while acting as the primary fat and binder for the cookie dough; contributes moisture and helps create a tender, dense crumb. Also aids in spreading and gives the cookies their characteristic chewiness when baked.
- 3/4 cup packed light brown sugar: Add deep caramel-like sweetness and moisture while contributing to the cookie’s chewiness and color through caramelization; packed brown sugar helps retain softness and enhances overall flavor complexity. Use as the main sweetener to balance the savory peanut notes.
- 1 large egg: Bind the dough and provide structure through coagulated proteins when baked, helping the cookies set and hold shape; egg also contributes moisture and a slight richness. Incorporate evenly to ensure consistent texture throughout the batch.
- 1/2 cup semi-sweet chocolate chips: Melt into a glossy coating when dipped or folded into the dough, providing bittersweet chocolate flavor that complements the peanut butter; chocolate chips can be gently melted for dipping or left intact for pockets of chocolate. Adds contrast in taste and a pleasing finish to each cookie.
- 1/2 cup chopped roasted peanuts: Introduce crunchy texture and intensified roasted peanut flavor while reinforcing the peanut profile of the cookies; chopped roasted peanuts add contrast to the smooth peanut butter and lend a nutty bite. Sprinkle or fold in for additional visual appeal and texture variation.
Putting Together Chocolate Dipped Peanut Butter Cookies
I like to approach assembly as a relaxed, sensory process. The recipe moves quickly, so I set out my ingredients and tools first, then enjoy the rhythmic actions of stirring, scooping, and dipping. These few steps reward you with cookies that look and taste like you spent all day on them, while really taking a fraction of the time.
- In a large mixing bowl, whisk together peanut butter and brown sugar.: The moment you combine the peanut butter and packed light brown sugar you will notice a silky, grainy texture that smooths as you whisk, with a sweet, nutty aroma rising from the bowl. This initial cream creates the backbone of the cookie, melding fat and sugar so the finished texture is tender rather than dry. If the mixture seems too stiff, it could be because your peanut butter is chilled, so let it sit at room temperature for a few minutes. Avoid overworking the mixture until it is homogeneous, because too much mixing can introduce excess air or heat the oils, which changes the final crumb.
- Add egg and whisk well.: As you add the large egg , the bowl will transform, gaining sheen and smoothness as the egg disperses. The egg binds the dough and gives lift, yielding a tender interior. Use a whisk or sturdy spoon and make sure the egg is fully incorporated so you do not have streaks of uncooked white. A common mistake is adding a cold egg to a chilled mixture, which can cause slight separation, so I usually let the egg come to room temperature first.
- Line a baking sheet with parchment paper.: Lining a sheet with parchment prevents sticking and promotes even browning, and it also makes cleanup effortless. When the dough hits the hot sheet, you'll see the edges set quickly but the centers remain soft, and parchment helps keep that balance. Avoid placing the cookies on an unlined sheet, because direct metal contact can lead to overbrowned bottoms. If your sheet is warped or very thin, use an additional baking sheet beneath to reduce hot spots.
- Preheat oven to 350 degrees F.: The oven should be fully preheated so the cookies begin to set immediately upon entering, which preserves chew and shape. At 350 degrees F the exterior will gently caramelize while the center stays soft, creating that classic slightly crinkled top. If your oven runs hot or cold, use an oven thermometer to confirm the actual temperature, because a variance of just a few degrees affects spread and color. Resist opening the oven door during the early bake, as sudden temperature drops can cause the cookies to fall flat.
- Scoop cookie dough with a medium size cookie scoop (1 and 1/2 tablespoon size) and place on prepared baking sheet.: Using a medium scoop gives uniform cookies that bake evenly, and when you place them on the sheet you will notice a slightly domed mound that will flatten just enough. The visual cue to watch for is smooth domes rather than rough, crumbly scoops, which indicates well combined dough. Space them with room to spread, and if you want perfect rounds, gently roll the scooped dough between your palms to smooth the surface. A frequent misstep is compressing the dough too much, which yields dense cookies, so handle them gently.
- Bake cookies for 10 to 11 minutes. Cool on sheet for 5 minutes. Remove onto cooling rack.: During baking you will see the edges turn a light golden brown and small cracks form across the tops, and the kitchen will fill with roasted nut and caramel notes. Cooling on the sheet allows the cookies to firm without overbaking, and transferring them to a rack prevents residual heat from steaming the bottoms. If you bake too long they can dry out, so keep a close eye near the 10 minute mark. Letting them cool fully before dipping ensures the melted chocolate chips do not slide off and that the cookie texture is preserved.
- In the meantime, melt chocolate chips in microwave safe bowl. It helps to add 1/2 teaspoon of vegetable or coconut oil. Stir until smooth.: As the chocolate chips warm, they will transform from shiny pellets to a glossy liquid, and adding a touch of neutral oil gives the coating a silky sheen and improves flow. Stirring frequently avoids hot spots and prevents scorching, which can ruin the flavor. Melt in short bursts to maintain control, and if the chocolate looks grainy it may have seized from moisture or overheating, in which case a small additional splash of oil and gentle stirring can help revive it. Avoid introducing water or steam, which causes irreversible seizing.
- Once completely cooled, dip cookies in melted chocolate and sprinkle with chopped peanuts.: When you dip the fully cooled cookies, the warm chocolate will coat the surface and set into a glossy shell as it cools, while the chopped roasted peanuts stick and add crunch. The sensory reward is immediate the moment you press the peanuts into the chocolate, hearing a soft scrape and feeling the gentle give under your fingers. If you dip too early while the cookies are warm, the chocolate may slide off, so patience matters here. Also, avoid overloading with peanuts, which can overpower the balance of flavors.
- Place back on sheet to let the chocolate set.: Returning the cookies to the parchment lined sheet creates a neat resting place where the chocolate can cool and harden without sticking. You will notice the shine dull slightly as the coating crystallizes, and within minutes to half an hour the shells will be set to the touch. If you want the chocolate to set faster, a brief stint in the refrigerator for a few minutes works, but too long in the cold can cause condensation after returning to room temperature, which affects appearance. To prevent smudging, give each cookie enough room so the toppings do not touch while the chocolate is still soft.
Making Adjustments
I keep adjustments simple so you can adapt the recipe to preference without losing its essence. Below are practical tips that focus on texture, timing, and presentation, each expanded into actionable advice you can use while baking.
- Swap peanut butter texture carefully — If you prefer chunkier bites, you can stir some chopped roasted peanuts into the dough, but keep the base as smooth peanut butter to ensure the batter binds well and bakes evenly.
- Control sweetness with brown sugar — Using packed light brown sugar gives a balanced sweetness and chew, but if you want a slightly less sweet cookie, reduce the sugar by a tablespoon and watch the texture closely as it will be a touch less tender.
- Melting chocolate chips smoothly — Microwave in short bursts and stir often, adding 1/2 teaspoon of vegetable or coconut oil to keep the melted chocolate chips glossy and fluid for easy dipping, which prevents a grainy or dull finish.
- Perfecting bake time — The 10 to 11 minute window should produce cookies with set edges and soft centers, so check at ten minutes and remove when edges are lightly golden to avoid an overly dry texture.
- Stamping or pressing — If you plan to stamp designs, do so gently once scooped, before baking, because excessive pressure can flatten the cookies too much and affect how they bake and hold shape.
Great Combinations for Chocolate Dipped Peanut Butter Cookies
These cookies work wonderfully in many settings, from casual snacks to festive plates. Below I outline serving ideas, storage methods, and occasions where they truly shine, all in list form so you can quickly pick the approach that fits your plan.
- Snack platter — Arrange the cookies with plain crackers and fresh fruit for a simple afternoon spread that pairs crunchy and sweet elements for varied textures.
- Party dessert table — Use a tiered stand and label them as a nut forward option, ideal for gatherings where guests can pick and choose bite sized delights.
- Gift box — Pack in a small box with parchment and a bow, making sure to layer with parchment so the chocolate does not smudge during transport, a lovely homemade gift idea.
- Storage for freshness — Keep in an airtight container at room temperature for up to three days, or freeze solid cookies in a single layer then transfer to a bag to preserve texture longer.
- Occasions — These fit casual lunches, tea time, Eid or Ramadan gatherings, and any celebration where handheld desserts are preferred, because they are easy to serve and universally enjoyed.
- Seasonal pairings — They are perfect year round; in colder months serve with warm coffee, and in warmer months pair with iced tea to balance the richness.
FAQ
Conclusion
These Chocolate Dipped Peanut Butter Cookies combine creamy nutty dough, a silky chocolate coating, and crunchy roasted peanuts for a recipe that feels both simple and special. They shine because they use basic pantry ingredients and a few small techniques that elevate the finish, making them ideal for everyday treats or festive sharing. Give them a try this week, and enjoy the little ritual of scooping, baking, and dipping that makes baking feel like a small celebration.

Chocolate Dipped Peanut Butter Cookies
Equipment
- Mixing Bowl
- Whisk
- Baking Sheet
- Parchment Paper
- Cookie Scoop
- Microwave-safe Bowl
- Cooling rack
Ingredients
- 1 cup smooth peanut butter Provide creamy texture and rich peanut flavor while acting as the primary fat and binder for the cookie dough; contributes moisture and helps create a tender, dense crumb. Also aids in spreading and gives the cookies their characteristic chewiness when baked.
- 3/4 cup packed light brown sugar Add deep caramel-like sweetness and moisture while contributing to the cookie’s chewiness and color through caramelization; packed brown sugar helps retain softness and enhances overall flavor complexity. Use as the main sweetener to balance the savory peanut notes.
- 1 large egg Bind the dough and provide structure through coagulated proteins when baked, helping the cookies set and hold shape; egg also contributes moisture and a slight richness. Incorporate evenly to ensure consistent texture throughout the batch.
- 1/2 cup semi-sweet chocolate chips Melt into a glossy coating when dipped or folded into the dough, providing bittersweet chocolate flavor that complements the peanut butter; chocolate chips can be gently melted for dipping or left intact for pockets of chocolate. Adds contrast in taste and a pleasing finish to each cookie.
- 1/2 cup chopped roasted peanuts Introduce crunchy texture and intensified roasted peanut flavor while reinforcing the peanut profile of the cookies; chopped roasted peanuts add contrast to the smooth peanut butter and lend a nutty bite. Sprinkle or fold in for additional visual appeal and texture variation.
Instructions
- In a large mixing bowl, whisk together peanut butter and brown sugar.: The moment you combine the peanut butter and packed light brown sugar you will notice a silky, grainy texture that smooths as you whisk, with a sweet, nutty aroma rising from the bowl. This initial cream creates the backbone of the cookie, melding fat and sugar so the finished texture is tender rather than dry. If the mixture seems too stiff, it could be because your peanut butter is chilled, so let it sit at room temperature for a few minutes. Avoid overworking the mixture until it is homogeneous, because too much mixing can introduce excess air or heat the oils, which changes the final crumb.
- Add egg and whisk well.: As you add the large egg , the bowl will transform, gaining sheen and smoothness as the egg disperses. The egg binds the dough and gives lift, yielding a tender interior. Use a whisk or sturdy spoon and make sure the egg is fully incorporated so you do not have streaks of uncooked white. A common mistake is adding a cold egg to a chilled mixture, which can cause slight separation, so I usually let the egg come to room temperature first.
- Line a baking sheet with parchment paper.: Lining a sheet with parchment prevents sticking and promotes even browning, and it also makes cleanup effortless. When the dough hits the hot sheet, you'll see the edges set quickly but the centers remain soft, and parchment helps keep that balance. Avoid placing the cookies on an unlined sheet, because direct metal contact can lead to overbrowned bottoms. If your sheet is warped or very thin, use an additional baking sheet beneath to reduce hot spots.
- Preheat oven to 350 degrees F.: The oven should be fully preheated so the cookies begin to set immediately upon entering, which preserves chew and shape. At 350 degrees F the exterior will gently caramelize while the center stays soft, creating that classic slightly crinkled top. If your oven runs hot or cold, use an oven thermometer to confirm the actual temperature, because a variance of just a few degrees affects spread and color. Resist opening the oven door during the early bake, as sudden temperature drops can cause the cookies to fall flat.
- Scoop cookie dough with a medium size cookie scoop (1 and 1/2 tablespoon size) and place on prepared baking sheet.: Using a medium scoop gives uniform cookies that bake evenly, and when you place them on the sheet you will notice a slightly domed mound that will flatten just enough. The visual cue to watch for is smooth domes rather than rough, crumbly scoops, which indicates well combined dough. Space them with room to spread, and if you want perfect rounds, gently roll the scooped dough between your palms to smooth the surface. A frequent misstep is compressing the dough too much, which yields dense cookies, so handle them gently.
- Bake cookies for 10 to 11 minutes. Cool on sheet for 5 minutes. Remove onto cooling rack.: During baking you will see the edges turn a light golden brown and small cracks form across the tops, and the kitchen will fill with roasted nut and caramel notes. Cooling on the sheet allows the cookies to firm without overbaking, and transferring them to a rack prevents residual heat from steaming the bottoms. If you bake too long they can dry out, so keep a close eye near the 10 minute mark. Letting them cool fully before dipping ensures the melted chocolate chips do not slide off and that the cookie texture is preserved.
- In the meantime, melt chocolate chips in microwave safe bowl. It helps to add 1/2 teaspoon of vegetable or coconut oil. Stir until smooth.: As the chocolate chips warm, they will transform from shiny pellets to a glossy liquid, and adding a touch of neutral oil gives the coating a silky sheen and improves flow. Stirring frequently avoids hot spots and prevents scorching, which can ruin the flavor. Melt in short bursts to maintain control, and if the chocolate looks grainy it may have seized from moisture or overheating, in which case a small additional splash of oil and gentle stirring can help revive it. Avoid introducing water or steam, which causes irreversible seizing.
- Once completely cooled, dip cookies in melted chocolate and sprinkle with chopped peanuts.: When you dip the fully cooled cookies, the warm chocolate will coat the surface and set into a glossy shell as it cools, while the chopped roasted peanuts stick and add crunch. The sensory reward is immediate the moment you press the peanuts into the chocolate, hearing a soft scrape and feeling the gentle give under your fingers. If you dip too early while the cookies are warm, the chocolate may slide off, so patience matters here. Also, avoid overloading with peanuts, which can overpower the balance of flavors.
- Place back on sheet to let the chocolate set.: Returning the cookies to the parchment lined sheet creates a neat resting place where the chocolate can cool and harden without sticking. You will notice the shine dull slightly as the coating crystallizes, and within minutes to half an hour the shells will be set to the touch. If you want the chocolate to set faster, a brief stint in the refrigerator for a few minutes works, but too long in the cold can cause condensation after returning to room temperature, which affects appearance. To prevent smudging, give each cookie enough room so the toppings do not touch while the chocolate is still soft.
Notes
- Swap peanut butter texture carefully — If you prefer chunkier bites, you can stir some chopped roasted peanuts into the dough, but keep the base as smooth peanut butter to ensure the batter binds well and bakes evenly.
- Control sweetness with brown sugar — Using packed light brown sugar gives a balanced sweetness and chew, but if you want a slightly less sweet cookie, reduce the sugar by a tablespoon and watch the texture closely as it will be a touch less tender.
- Melting chocolate chips smoothly — Microwave in short bursts and stir often, adding 1/2 teaspoon of vegetable or coconut oil to keep the melted chocolate chips glossy and fluid for easy dipping, which prevents a grainy or dull finish.
- Perfecting bake time — The 10 to 11 minute window should produce cookies with set edges and soft centers, so check at ten minutes and remove when edges are lightly golden to avoid an overly dry texture.
- Stamping or pressing — If you plan to stamp designs, do so gently once scooped, before baking, because excessive pressure can flatten the cookies too much and affect how they bake and hold shape.