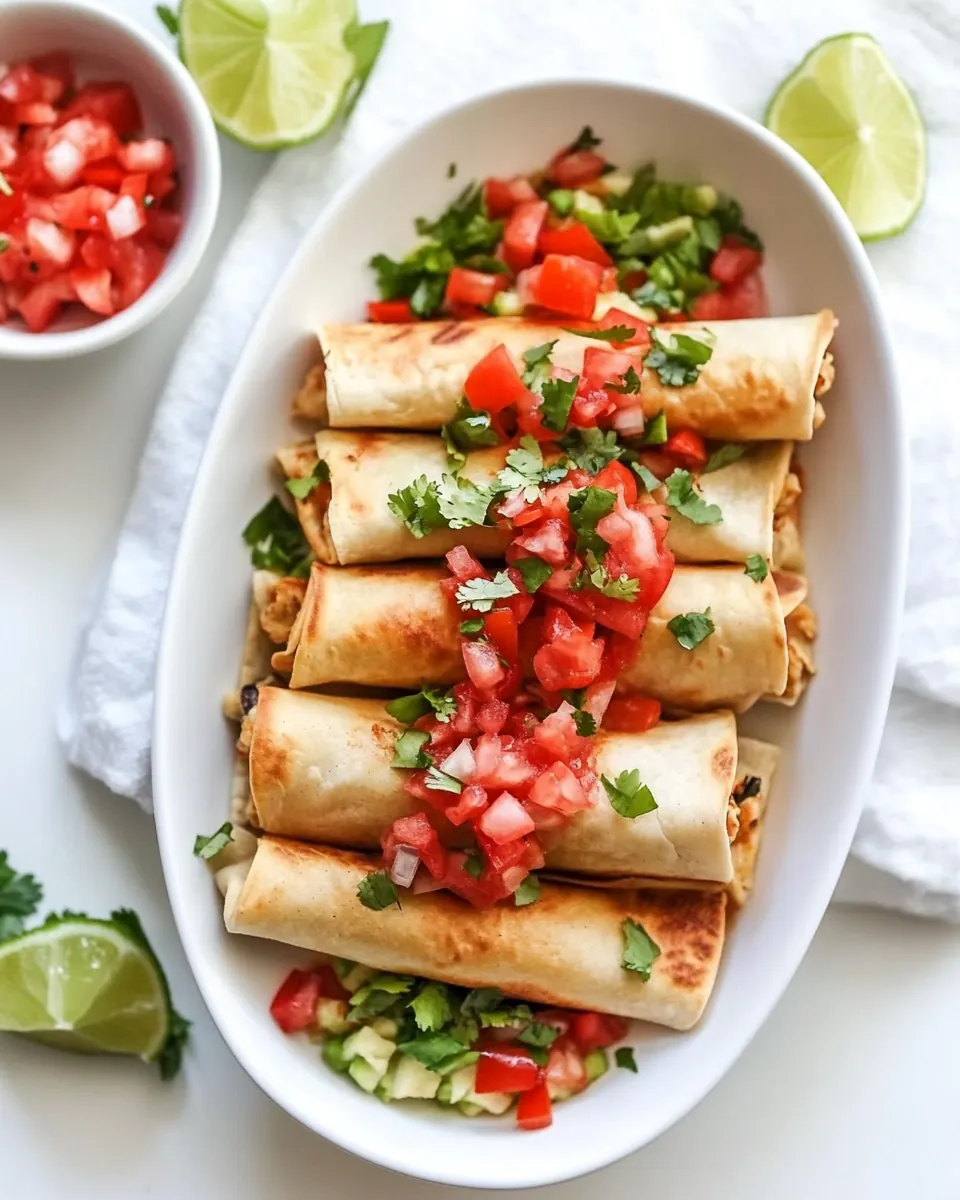
Chicken Flautas
Chicken Flautas are one of those recipes that instantly transport me back to family gatherings where the kitchen hummed with energy and laughter. The first time I made Chicken Flautas, I remember the thrill of rolling each tortilla tightly so the filling peeked out just a little, promising a crunchy bite and warm, savory center. That memory still makes me smile whenever I heat the oven, because the sound of them turning golden is as comforting as the smell of seasoned chicken and melted cheddar cheese filling the room.
I often make Chicken Flautas when I want something festive but not fussy. Friends gather around the counter while I assemble, and conversation drifts between weekend plans and the secret to the crispiest exterior. I like to swap stories as I roll, and by the time the tray goes into the oven, everyone is eager. The routine is simple, the payoff immediate, and the toppings let each person personalize their own bite.
Another reason I keep this recipe in regular rotation is how forgiving it is. Leftover chicken becomes the star, and a small handful of pantry staples turns it into something special. I’ll often tweak the seasoning depending on what I have, and I never get tired of watching the tortillas puff slightly, edges bronzed to perfection. Every time I serve Chicken Flautas, someone asks for the recipe, and I love that it brings people together around a crunchy, satisfying snack or meal.
Recipe Snapshot
25 mins
10 mins
15 mins
Easy
350 kcal
Mexican
Gluten-Free, Low FODMAP
Dinner
Oven, Baking sheet, Mixing bowl, Parchment paper
Why This Chicken Flautas Is a Winner
Crunchy satisfying texture
I adore how Chicken Flautas balance a crisp exterior with a tender, juicy filling. When you bite in, the initial crackle from the toasted tortilla gives way to warm, seasoned chicken and melted cheddar cheese, creating a contrast that keeps you coming back for more. I always aim for that golden brown finish because it means you nailed the texture.
Simple pantry friendly
This recipe shines because it leans on ingredients I usually have around. With cooked shredded chicken, a touch of taco sauce or salsa, and a little alfredo sauce or cream, you get depth without fuss. I love recipes that respect time and still deliver bold flavors, and these flautas do exactly that.
Customizable topping options
One of my favorite parts is the toppings. From creamy slices of avocado to a spoonful of sour cream, each garnish changes the mood of the bite. I encourage you to let guests pick their own combos, because it turns a simple plate into a fun, interactive experience.
Great for feeding a crowd
I often make a tray when friends drop by since Chicken Flautas scale easily. You can prepare the filling ahead, assemble quickly, and bake right before serving. The assembly line vibe makes it a sociable cooking project, and you get to enjoy conversation instead of spending the evening at the stove.
Comfort food with a twist
There is something comforting about warm, cheesy chicken wrapped in a crisp tortilla, but the use of both taco sauce and alfredo sauce gives the filling a creamy, tangy complexity. I love that little twist, because each bite feels familiar yet a little unexpected.
Chicken Flautas Ingredients
These ingredients come together to create a balanced, flavorful filling wrapped in a toasty shell. The key players are the cooked shredded chicken, the creamy element provided by the alfredo sauce or heavy cream, and the melty cheddar cheese that binds everything. Spices like onion powder, cumin, and chili powder add warmth without overpowering the fresh toppings that finish the dish.
- 1 pound boneless, skinless chicken breasts cooked and shredded: Provide cooked and shredded chicken as the primary protein filling that yields tender, flavorful meat and substantial texture inside each flauta. Use about one pound to ensure enough filling for roughly ten tortillas, and season it as desired before rolling. Reheat gently if pre-cooked to maintain moisture and prevent drying while assembling.
- 1/4 cup taco sauce or mild salsa: Add taco sauce or mild salsa to moisten and flavor the shredded chicken, contributing a tangy, slightly spicy profile that complements other seasonings. Stir into the chicken to distribute flavor evenly and help bind the filling for easier rolling. Choose mild salsa for a gentler heat if serving to children or those sensitive to spice.
- 1/4 cup alfredo sauce or heavy cream: Incorporate alfredo sauce or heavy cream to lend creaminess and richness to the chicken filling, creating a smooth mouthfeel that contrasts with crisped tortillas. Mix well with the taco sauce and shredded cheese to form a cohesive, luscious filling. Adjust quantity slightly to avoid sogginess when frying or baking.
- 1/2 cup cheddar cheese shredded: Sprinkle shredded cheddar cheese into the filling to provide melty, savory richness and help the filling bind as it warms. Use about a half cup to get a noticeable cheesy pull without overwhelming other flavors. Distribute evenly so each flauta has a balanced cheese-to-protein ratio.
- 1 teaspoon onion powder: Season with onion powder to introduce concentrated savory and slightly sweet onion flavor without adding moisture or texture. Use the teaspoon measurement to enhance overall depth of flavor throughout the filling mixture. Combine thoroughly so the seasoning is consistent in every bite.
- 1/2 teaspoon cumin: Add cumin to bring warm, earthy, slightly smoky notes that pair well with taco-style flavors and make the filling taste more complex. Measure half a teaspoon to accent rather than overpower other spices. Mix into the chicken mixture to infuse the entire batch uniformly.
- 1/2 teaspoon chili powder: Include chili powder to contribute a mild heat and robust chili flavor that rounds out the seasoning blend for a classic Tex-Mex profile. Use the half-teaspoon amount for subtle warmth that accentuates rather than overwhelms. Blend well so each flauta carries a hint of spice.
- salt & pepper to taste: Season with salt and pepper to balance and enhance all other flavors, adjusting to personal taste for optimal seasoning. Use sparingly at first and taste the filling mixture before final adjustment. Ensure even distribution to avoid salty or bland pockets in the flautas.
- 10 tortillas medium, fajita size: Warm medium fajita–size tortillas to make them pliable for rolling and to prevent cracking when wrapping the filling for frying or baking. Use ten tortillas to match the quantity of filling and keep them covered while assembling to retain heat and flexibility. Slight toasting or microwaving for a few seconds improves rollability.
- nonstick cooking spray: Coat a pan or tortillas lightly with nonstick cooking spray to prevent sticking during cooking and to promote even crisping without excess oil. Use sparingly for healthier preparation whether pan-frying or baking the flautas. Reapply as needed to achieve a uniformly golden exterior.
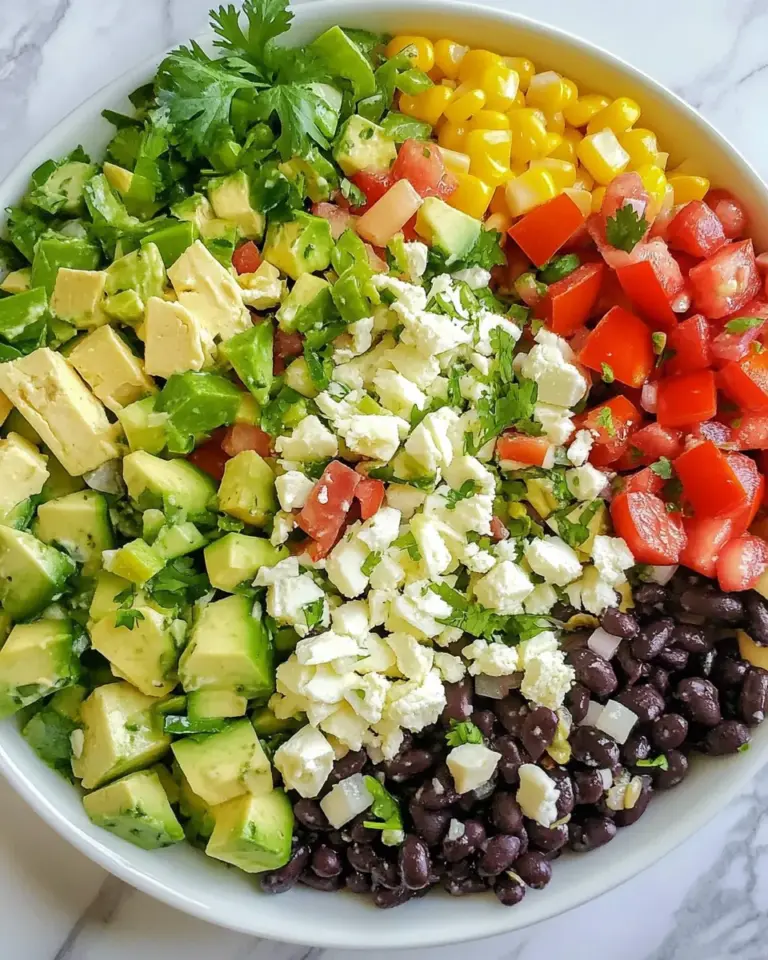
- toppings: avocado, cilantro, sour cream, guacamole, salsa, etc.: Offer toppings such as avocado, cilantro, sour cream, guacamole, and salsa to provide fresh, creamy, and bright contrasts to the crispy, savory flautas. Arrange a selection so diners can customize heat, acidity, and richness to their preference. Serve toppings on the side or spoon over plated flautas for immediate flavor enhancement.
Recipe Steps for Chicken Flautas
Assembling these flautas is an effortless process that turns basic pantry items into something special. Below I expand each direction into detailed, sensory rich guidance so you know exactly what to look and listen for as you cook. Take your time with rolling and watch the oven transform the tortillas into crisp, golden vehicles for the creamy filling.
- Preheat your oven to 425 degrees. Line baking sheet with parchment paper or foil and set aside.: The moment you set the oven to 425 degrees , take note of the warm, dry air that will eventually crispen the outer layer of the tortillas, a key to getting a satisfying crunch. Preheating ensures the baking sheet and oven environment are hot and ready, which promotes immediate browning and reduces sogginess. You might smell a faint toasty scent as the oven reaches temperature; that is normal. One common mistake is placing the tray into an oven that is not fully hot, which can lead to limp, under crisped tortillas. Line a baking sheet with parchment paper or foil and set it aside so assembly moves quickly when the oven is ready.
- In a large bowl, stir the chicken together with taco sauce, alfredo, cheese and seasonings.: When you mix the shredded chicken with the taco sauce , alfredo sauce , shredded cheddar cheese , and spices, you should notice the aromas of cumin and onion powder bloom, and the mixture become glossy from the sauce. The texture should be moist but not soupy, allowing it to hold shape when scooped. I like to taste a small pinch to balance salt and spice before filling. If the mixture seems too wet, the tortillas may become soggy; too dry and the filling will be crumbly. Adjust by adding a touch more sauce or a small sprinkle of cheese to reach a cohesive, scoopable texture.
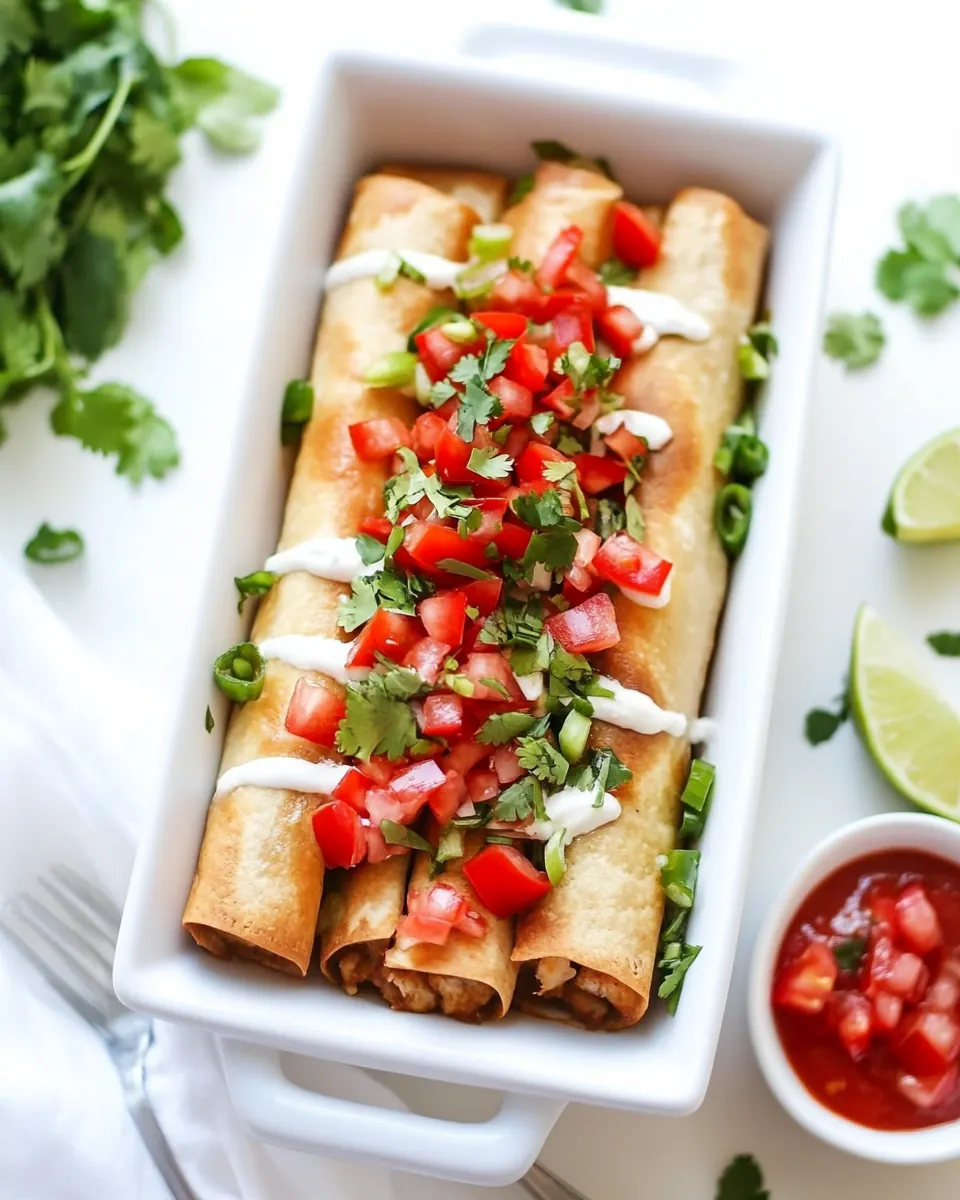
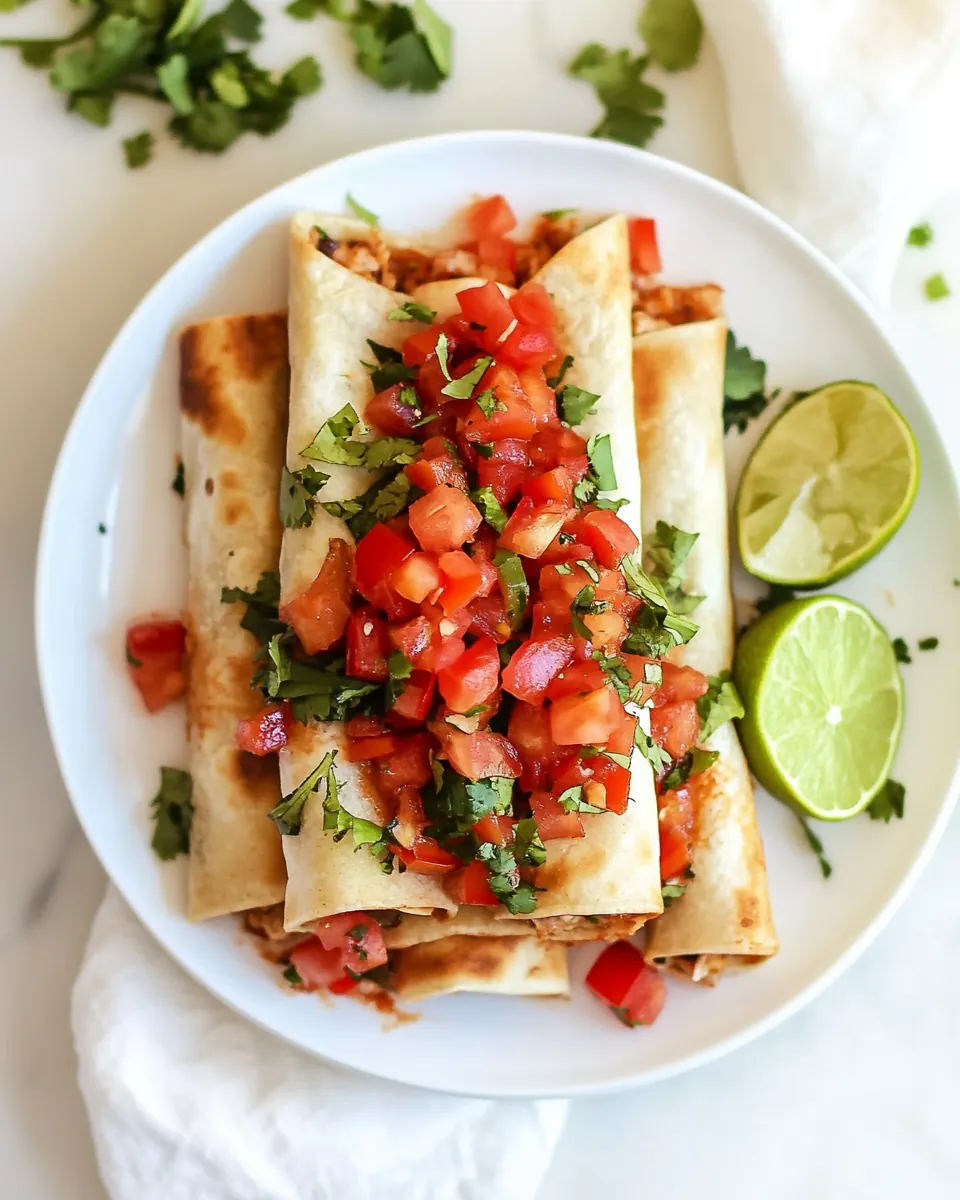
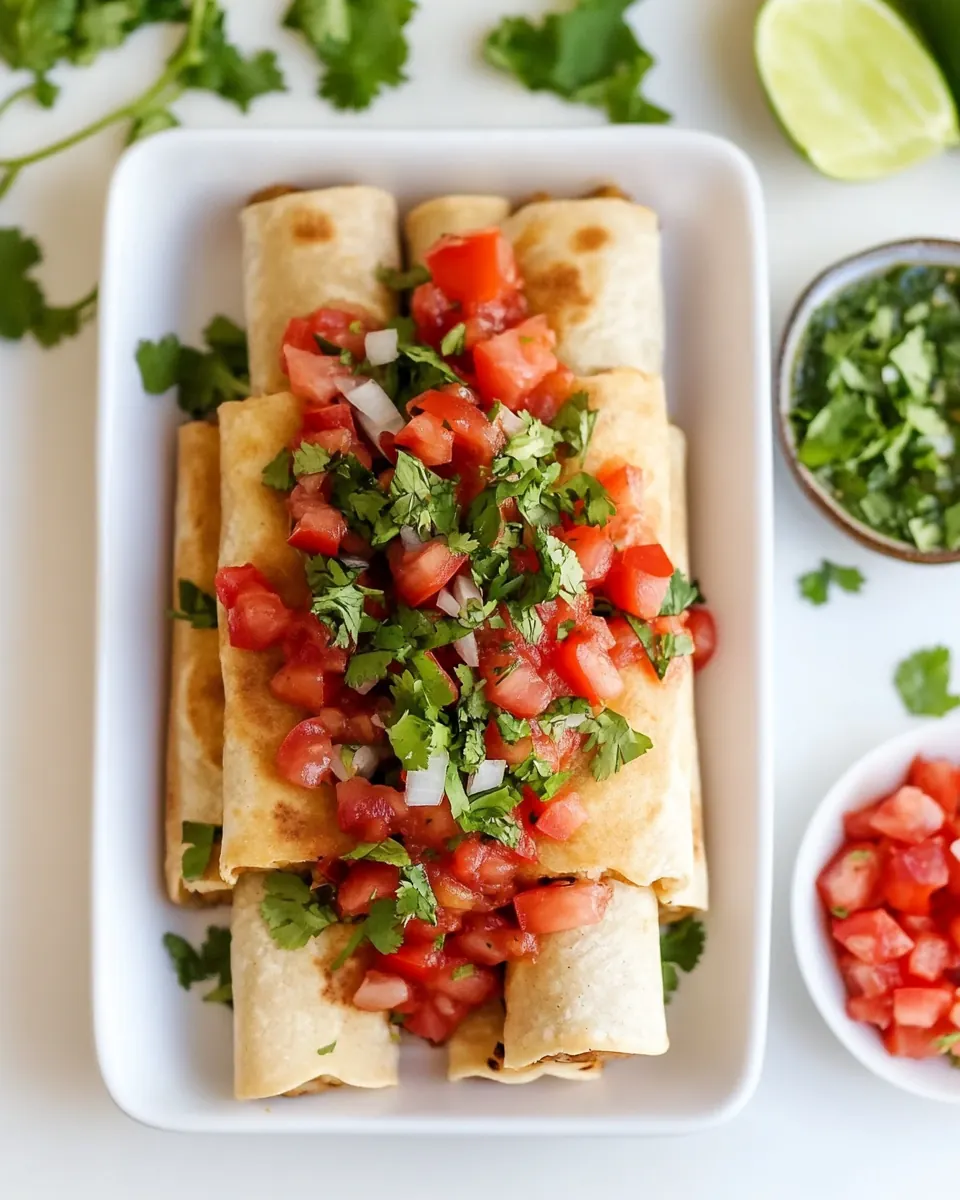
- Divide the mixture into ten equal portions and fill the tortillas with filling, rolling tightly and placing the seam side down on the baking sheet.: As you portion the filling, pay attention to weight and distribution so each flauta bakes evenly. Place a modest line of filling near the edge of a warmed tortilla, roll with a firm, even pressure, and tuck the seam underneath on the baking sheet; this prevents unrolling and encourages even browning. You should hear a faint soft scraping of the filling against the tortilla as you roll, and the filled roll will feel pleasantly compact. A typical pitfall is overfilling, which leads to splitting during baking; err on the side of restraint and compress gently for a neat, well sealed roll.
- Spray chicken taquitos lightly with a nonstick cooking spray and bake for 15 minutes or until they are golden and as crispy as you'd like.: Once the tray is in the preheated oven, watch for visual cues as the tortillas transform. Around the 10 to 12 minute mark, edges will deepen in color and the surface will begin to blister slightly, releasing a toasty, wheaty smell. The nonstick spray encourages even, golden crisping without excess oil pooling, producing a satisfying crackle when you bite in. Let them bake until the shells are a rich golden brown and the filling is hot, but be mindful not to leave them until they darken too much, which can taste bitter. If you notice uneven browning, rotate the pan once during baking for consistent results.
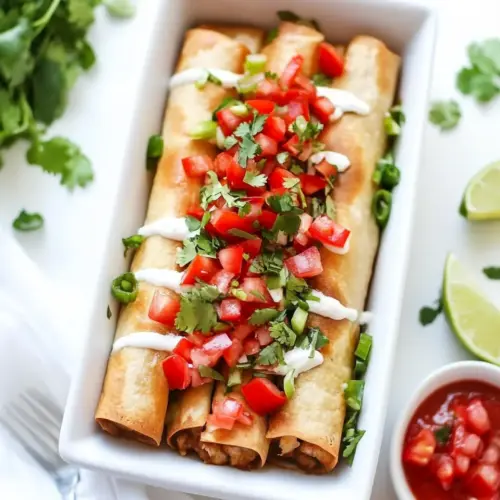
- Serve your chicken flautas warm with any desired toppings: salsa, guacamole, taco sauce, sour cream, cilantro, etc.: Serving warm maximizes contrast between the crunchy tortilla and creamy interior, and the toppings layer freshness and brightness. When you add avocado or sour cream , the cool, silky texture plays off the hot, seasoned chicken and melted cheddar cheese . Spoon salsa or guacamole on the side so guests can choose, and scatter cilantro for color and a burst of herbaceous aroma. One mistake is letting the flautas sit too long before serving, which softens the shell; plate them promptly to preserve that initial crunch and the full sensory experience.
How to Switch It Up
If you like to experiment, these small changes keep the core recipe exciting while staying true to the comforting spirit of Chicken Flautas. Below are practical variations and ideas to adapt the filling, seasonings, and presentation for different tastes and occasions.
- Swap the cream element: Replace alfredo sauce with a splash of heavy cream for a silkier filling, or use a thicker sour cream to add tang and body while maintaining creaminess.
- Adjust the heat level: Choose a spicier taco sauce or add a pinch more chili powder to the filling for guests who prefer a bolder kick, tasting as you go to avoid overdoing it.
- Cheese choices: Substitute or blend in Monterey Jack with the shredded cheddar cheese for a creamier melt and a milder dairy profile that complements the spices.
- Tortilla variety: Try corn tortillas for a more authentic texture and nuttier flavor, warming them gently first so they roll without cracking.
- Make ahead: Assemble the flautas and refrigerate them uncovered for a short time before baking to make hosting simpler, but bake from chilled to preserve crispness.
Serving Ideas for Chicken Flautas
Chicken Flautas are a versatile dish that fits casual gatherings and festive meals alike. Below are serving suggestions, paired sides, and storage pointers to help you present them beautifully and keep leftovers tasting fresh.
- Casual party platter: Arrange warm flautas on a large board with small bowls of salsa, guacamole, and sour cream for dipping, allowing guests to build their ideal bite.
- Weeknight dinner: Serve two to three flautas per person alongside a crisp green salad dressed simply with lime and olive oil to balance the richness.
- Family friendly: Offer mild taco sauce and sliced avocado for kids, and let adults add cilantro and extra spice to their plates.
- Ramadan or special occasions: These make a great iftar option when paired with light soups or a chilled cucumber salad, providing comforting, easy to share portions after fasting.
- Storage tips: Cool flautas completely before refrigerating in an airtight container for up to three days. Recrisp in a 375 degree oven for 8 to 10 minutes to restore texture rather than microwaving which yields a softer shell.
- Seasonal pairings: In warmer months, pair with a citrusy slaw; in cooler weather, a warm black bean side adds hearty contrast and complements the spices.
FAQ
Conclusion
Chicken Flautas are special because they combine crunchy, golden tortillas with a creamy, seasoned shredded chicken filling that everyone can tailor with toppings. They are easy to scale, forgiving with ingredients, and endlessly customizable, making them a reliable choice for weeknight dinners and festive gatherings alike. Give them a try the next time you want something shareable and satisfying, and enjoy the ritual of rolling and serving these toasty, flavorful bites with friends and family.
Chicken Flautas
Equipment
- Oven
- Baking Sheet
- Mixing Bowl
- Parchment Paper
Ingredients
- 1 pound boneless, skinless chicken breasts cooked and shredded Provide cooked and shredded chicken as the primary protein filling that yields tender, flavorful meat and substantial texture inside each flauta. Use about one pound to ensure enough filling for roughly ten tortillas, and season it as desired before rolling. Reheat gently if pre-cooked to maintain moisture and prevent drying while assembling.
- 1/4 cup taco sauce or mild salsa Add taco sauce or mild salsa to moisten and flavor the shredded chicken, contributing a tangy, slightly spicy profile that complements other seasonings. Stir into the chicken to distribute flavor evenly and help bind the filling for easier rolling. Choose mild salsa for a gentler heat if serving to children or those sensitive to spice.
- 1/4 cup alfredo sauce or heavy cream Incorporate alfredo sauce or heavy cream to lend creaminess and richness to the chicken filling, creating a smooth mouthfeel that contrasts with crisped tortillas. Mix well with the taco sauce and shredded cheese to form a cohesive, luscious filling. Adjust quantity slightly to avoid sogginess when frying or baking.
- 1/2 cup cheddar cheese shredded Sprinkle shredded cheddar cheese into the filling to provide melty, savory richness and help the filling bind as it warms. Use about a half cup to get a noticeable cheesy pull without overwhelming other flavors. Distribute evenly so each flauta has a balanced cheese-to-protein ratio.
- 1 teaspoon onion powder Season with onion powder to introduce concentrated savory and slightly sweet onion flavor without adding moisture or texture. Use the teaspoon measurement to enhance overall depth of flavor throughout the filling mixture. Combine thoroughly so the seasoning is consistent in every bite.
- 1/2 teaspoon cumin Add cumin to bring warm, earthy, slightly smoky notes that pair well with taco-style flavors and make the filling taste more complex. Measure half a teaspoon to accent rather than overpower other spices. Mix into the chicken mixture to infuse the entire batch uniformly.
- 1/2 teaspoon chili powder Include chili powder to contribute a mild heat and robust chili flavor that rounds out the seasoning blend for a classic Tex-Mex profile. Use the half-teaspoon amount for subtle warmth that accentuates rather than overwhelms. Blend well so each flauta carries a hint of spice.
- salt & pepper to taste Season with salt and pepper to balance and enhance all other flavors, adjusting to personal taste for optimal seasoning. Use sparingly at first and taste the filling mixture before final adjustment. Ensure even distribution to avoid salty or bland pockets in the flautas.
- 10 tortillas medium, fajita size Warm medium fajita-size tortillas to make them pliable for rolling and to prevent cracking when wrapping the filling for frying or baking. Use ten tortillas to match the quantity of filling and keep them covered while assembling to retain heat and flexibility. Slight toasting or microwaving for a few seconds improves rollability.
- nonstick cooking spray Coat a pan or tortillas lightly with nonstick cooking spray to prevent sticking during cooking and to promote even crisping without excess oil. Use sparingly for healthier preparation whether pan-frying or baking the flautas. Reapply as needed to achieve a uniformly golden exterior.
- toppings: avocado, cilantro, sour cream, guacamole, salsa, etc. Offer toppings such as avocado, cilantro, sour cream, guacamole, and salsa to provide fresh, creamy, and bright contrasts to the crispy, savory flautas. Arrange a selection so diners can customize heat, acidity, and richness to their preference. Serve toppings on the side or spoon over plated flautas for immediate flavor enhancement.
Instructions
- Preheat your oven to 425 degrees. Line baking sheet with parchment paper or foil and set aside.: The moment you set the oven to 425 degrees , take note of the warm, dry air that will eventually crispen the outer layer of the tortillas, a key to getting a satisfying crunch. Preheating ensures the baking sheet and oven environment are hot and ready, which promotes immediate browning and reduces sogginess. You might smell a faint toasty scent as the oven reaches temperature; that is normal. One common mistake is placing the tray into an oven that is not fully hot, which can lead to limp, under crisped tortillas. Line a baking sheet with parchment paper or foil and set it aside so assembly moves quickly when the oven is ready.
- In a large bowl, stir the chicken together with taco sauce, alfredo, cheese and seasonings.: When you mix the shredded chicken with the taco sauce , alfredo sauce , shredded cheddar cheese , and spices, you should notice the aromas of cumin and onion powder bloom, and the mixture become glossy from the sauce. The texture should be moist but not soupy, allowing it to hold shape when scooped. I like to taste a small pinch to balance salt and spice before filling. If the mixture seems too wet, the tortillas may become soggy; too dry and the filling will be crumbly. Adjust by adding a touch more sauce or a small sprinkle of cheese to reach a cohesive, scoopable texture.
- Divide the mixture into ten equal portions and fill the tortillas with filling, rolling tightly and placing the seam side down on the baking sheet.: As you portion the filling, pay attention to weight and distribution so each flauta bakes evenly. Place a modest line of filling near the edge of a warmed tortilla, roll with a firm, even pressure, and tuck the seam underneath on the baking sheet; this prevents unrolling and encourages even browning. You should hear a faint soft scraping of the filling against the tortilla as you roll, and the filled roll will feel pleasantly compact. A typical pitfall is overfilling, which leads to splitting during baking; err on the side of restraint and compress gently for a neat, well sealed roll.
- Spray chicken taquitos lightly with a nonstick cooking spray and bake for 15 minutes or until they are golden and as crispy as you'd like.: Once the tray is in the preheated oven, watch for visual cues as the tortillas transform. Around the 10 to 12 minute mark, edges will deepen in color and the surface will begin to blister slightly, releasing a toasty, wheaty smell. The nonstick spray encourages even, golden crisping without excess oil pooling, producing a satisfying crackle when you bite in. Let them bake until the shells are a rich golden brown and the filling is hot, but be mindful not to leave them until they darken too much, which can taste bitter. If you notice uneven browning, rotate the pan once during baking for consistent results.
- Serve your chicken flautas warm with any desired toppings: salsa, guacamole, taco sauce, sour cream, cilantro, etc.: Serving warm maximizes contrast between the crunchy tortilla and creamy interior, and the toppings layer freshness and brightness. When you add avocado or sour cream , the cool, silky texture plays off the hot, seasoned chicken and melted cheddar cheese . Spoon salsa or guacamole on the side so guests can choose, and scatter cilantro for color and a burst of herbaceous aroma. One mistake is letting the flautas sit too long before serving, which softens the shell; plate them promptly to preserve that initial crunch and the full sensory experience.
Notes
- Swap the cream element: Replace alfredo sauce with a splash of heavy cream for a silkier filling, or use a thicker sour cream to add tang and body while maintaining creaminess.
- Adjust the heat level: Choose a spicier taco sauce or add a pinch more chili powder to the filling for guests who prefer a bolder kick, tasting as you go to avoid overdoing it.
- Cheese choices: Substitute or blend in Monterey Jack with the shredded cheddar cheese for a creamier melt and a milder dairy profile that complements the spices.
- Tortilla variety: Try corn tortillas for a more authentic texture and nuttier flavor, warming them gently first so they roll without cracking.
- Make ahead: Assemble the flautas and refrigerate them uncovered for a short time before baking to make hosting simpler, but bake from chilled to preserve crispness.