Best 7 Layer Dip
Best 7 Layer Dip has been my go to party showstopper ever since I first layered it for a backyard barbecue years ago.
That first time I brought out the dish, folks gravitated toward the bowl like it had a magnet inside, and I loved watching conversations spark over scoops of tortilla chips piled high with every layer. I remember juggling chopping and mashing while someone told a story that made me laugh so hard I nearly squeezed a lime into the guacamole by accident. The dish felt celebratory and casual all at once, which is exactly why I keep returning to this lineup of flavors whenever friends drop by.
Over the seasons I tweaked tiny things, like how finely I dice the tomatoes for the salsa fresca and how chunky I leave the mashed avocados. Those small choices changed the mouthfeel in ways I didn’t expect, so I learned to be deliberate about texture. Now I make it when I need something colorful and forgiving, when I want a recipe that travels well, and when I want a layered bowl that feeds a crowd without fuss.
Recipe Snapshot
46 mins
45 mins
1 mins
Medium
250 kcal
Mexican
Gluten-Free, Vegan
Appetizers
Medium bowl, Medium skillet, Fork or potato masher, 8-inch glass baking dish, Fine sieve
The Best Thing About This Best 7 Layer Dip
It feeds a crowd with minimal stress
I love that Best 7 Layer Dip scales gracefully. When I double or halve the recipe it still behaves, which is a huge relief when I am planning for unpredictable numbers of guests. You can prep most layers ahead, and that freedom makes hosting less frantic and more enjoyable for me.
Texture driven and highly customizable
What truly wins me over is the layers of texture. The creamy guacamole contrasts with the chunky black beans and the crisp pop of corn kernels. I enjoy nudging those textures by changing how much I mash the avocados or how finely I chop the salsa. That control keeps the dish interesting every time I make it.
Bright, balanced flavors
The lime and garlic brighten the whole bowl while the Cheddar and sour cream add a comforting richness. I appreciate recipes that have that sweet spot between lively and indulgent, and this one lands right there. When I taste it, I always notice the harmony between acid, salt, and fat.
Make ahead friendly
I often prepare most of the layers a day ahead, and that saves me precious hosting time. The bean layer and salsa hold up beautifully chilled, and glazing the top with the salsa right before serving keeps the presentation fresh. As someone who hates last minute scrambling, this trait makes the dip a repeat performer in my entertaining rotation.
Kid friendly and crowd pleasing
Finally, this dip appeals to a wide range of palates. Little hands can scoop around spicy bits, and adults can dive into the full flavor profile. I frequently hear guests comment that it tastes homemade and familiar, and that kind of feedback always makes me happy when I serve it.
Shopping List for Best 7 Layer Dip
These ingredients play off one another, creating a balance of creaminess, brightness, and savory depth. The star players are the black beans, avocados, and the tangy sour cream, while supporting roles from tomatoes and Cheddar provide texture and contrast. When the components are fresh and handled deliberately, the finished dip is layered, colorful, and irresistibly scoopable.
- 2 cups cored, seeded, and finely chopped tomatoes, from 2 to 3 large tomatoes (or 4 to 6 plum tomatoes): Provide ripe, juicy tomato flesh that adds bright acidity and fresh texture; finely chopped after coring and seeding lets juices blend evenly through the dip while avoiding excess liquid that would make layers runny.
- 1 bunch scallions, thinly sliced, light and dark green parts separated (divided): Add crisp, oniony flavor and mild sharpness with both light and dark green parts used; thinly slicing and separating the greens lets you sprinkle some for garnish while folding the whites into inner layers for balanced bite.
- 1 jalapeño pepper, seeded and finely diced (divided): Deliver a touch of heat and vegetal brightness when seeded and finely diced; dividing the jalapeño ensures controlled spiciness so some pieces can be mixed in and some reserved for topping.
- 4 tablespoons lime juice, from 2 limes (divided): Contribute fresh citrus tang and help prevent avocado browning; dividing the lime juice lets part brighten the tomato and bean layers and part be tossed with the avocado for flavor and color retention.
- Salt: Season layers to taste and enhance overall flavor balance; add gradually and taste as you build the dip to avoid over-salting any single layer.
- 1/2 teaspoons sugar: Brighten flavors with a small amount of sweetness that moderates acidity and rounds sharp edges; dissolve into wet components so it distributes evenly throughout the layers.
- 3 tablespoons extra-virgin olive oil: Provide a fruity, rich fat note and help bind ingredients when drizzled or used to cook aromatics; choosing extra–virgin olive oil adds subtle peppery complexity to the dip.
- 3 cloves garlic, minced (divided): Introduce pungent, savory depth when minced; dividing the garlic lets some be softened into beans or cream layers while some can be used raw for stronger aromatic bursts.
- 1 (15-oz) can black beans, drained and rinsed: Supply hearty texture and protein while adding a creamy bean base; draining and rinsing reduces sodium and excess starch so the black beans layer holds shape without overpowering other flavors.
- 1 teaspoon ground cumin, divided: Impart warm, earthy spice that complements beans and avocado; dividing the ground cumin lets you season the bean mixture more heavily while sprinkling a little atop for aromatic continuity.
- 2 tablespoons water: Adjust texture and loosen thicker mixtures with a splash of liquid; using water helps smooth out the bean or avocado layers without altering flavors noticeably.
- 3 medium avocados, halved, pitted and diced: Add rich, buttery body and creamy mouthfeel when halved, pitted, and diced; fresh avocados provide the classic guacamole layer and their diced form helps maintain distinct layers.
- 1 (8-oz) block sharp Cheddar, shredded (see note): Bring sharp, savory cheese flavor and melting texture when shredded; using an 8-ounce block yields a freshly grated topping that melts slightly and adds salty contrast to creamy layers.
- 1 (8-oz) container sour cream (1 cup): Supply cool, tangy creaminess as a smooth middle layer; using a one-cup container of sour cream creates a mild, cohesive buffer between robust and fresh components.
- 1 1/4 cups fresh cooked or canned and drained corn kernels: Add sweet, crisp kernels that contribute color and a pop of texture; using fresh cooked or canned and drained corn ensures kernels remain firm and do not water down surrounding layers.
- Tortilla chips, for serving: Provide crunchy scooping and salty contrast for serving; arranging tortilla chips around the layered dip lets guests portion and enjoy the combination of textures and flavors.
Step by Step Instructions for Best 7 Layer Dip
Below are the step by step instructions rewritten into a personal, sensory narrative that helps you execute each stage with confidence and joy.
- Make the salsa fresca: In a medium bowl, combine the tomatoes, half of the dark green scallions, half of the minced jalapeño, 2 tablespoons of the lime juice, 1/4 teaspoon of salt, and the sugar. (If your tomatoes are sweet, you can reduce or omit the sugar.) Set aside.: In a medium bowl, combine the tomatoes, half of the dark green scallions, half of the minced jalapeño, 2 tablespoons of the lime juice, 1/4 teaspoon of salt, and the sugar. : I can hear the gentle clink of the spoon against the bowl as I fold these ingredients together, and the first scent is always bright citrus warming into raw tomatoes . The juices should glisten, not puddle, and the diced tomatoes should still hold their shape so each spoonful gives a little pop. This mixture is all about balance, so taste for acid and sweetness before you set it aside. If you let it sit too long, it can become watery, which dilutes the top layers, so drain a little if necessary. A common mistake is chopping the tomatoes too fine, which makes the salsa too saucy; aim for small but definite pieces for the best texture.
- Make the bean layer: Heat the olive oil in a medium skillet over medium heat. Add all of the light scallions and cook, stirring frequently, until softened, about 2 minutes. Measure out 1/4 teaspoon of the minced garlic and set aside in a medium bowl (you’ll use this for the guacamole). Add the remaining garlic to the skillet and continue cooking for 30 seconds more. Do not brown. Add the black beans, 1/2 teaspoon salt, 1/2 teaspoon of the cumin, and water and continue cooking for about one minute. Off the heat, mash the beans with a fork or potato masher until they have a chunky puréed texture. Scrape the beans into an 8-inch glass baking dish and spread into an even layer. Set aside. (The bean mixture may taste salty; that’s okay.): Heat the olive oil in a medium skillet over medium heat. : As the oil warms, it should shimmer slightly but not smoke, releasing a gentle olive aroma. This step builds a savory foundation, so keep the heat steady. If the pan gets too hot, the scallions will brown quickly and become bitter, so watch for a soft sizzle and stir frequently. A typical misstep is rushing the softening, which leaves raw onion bite in the bean layer rather than a mellow sweetness.
- Make the guacamole layer: To the medium bowl with the reserved garlic, add the avocados, the remaining dark green scallions, the remaining jalapeño, 1/2 teaspoon salt, the remaining 1/2 teaspoon cumin, and the remaining 2 tablespoons lime juice. Mash with a fork until blended but still a bit chunky.: The sound here is soft sizzling and the visual cue is the scallions turning translucent and fragrant. Softening the light parts brings their sweetness forward and prevents harsh raw onion notes in the bean mixture. If they begin to brown, reduce the heat; browned scallions will change the intended flavor profile. Stir consistently to avoid hot spots that can char the scallions.
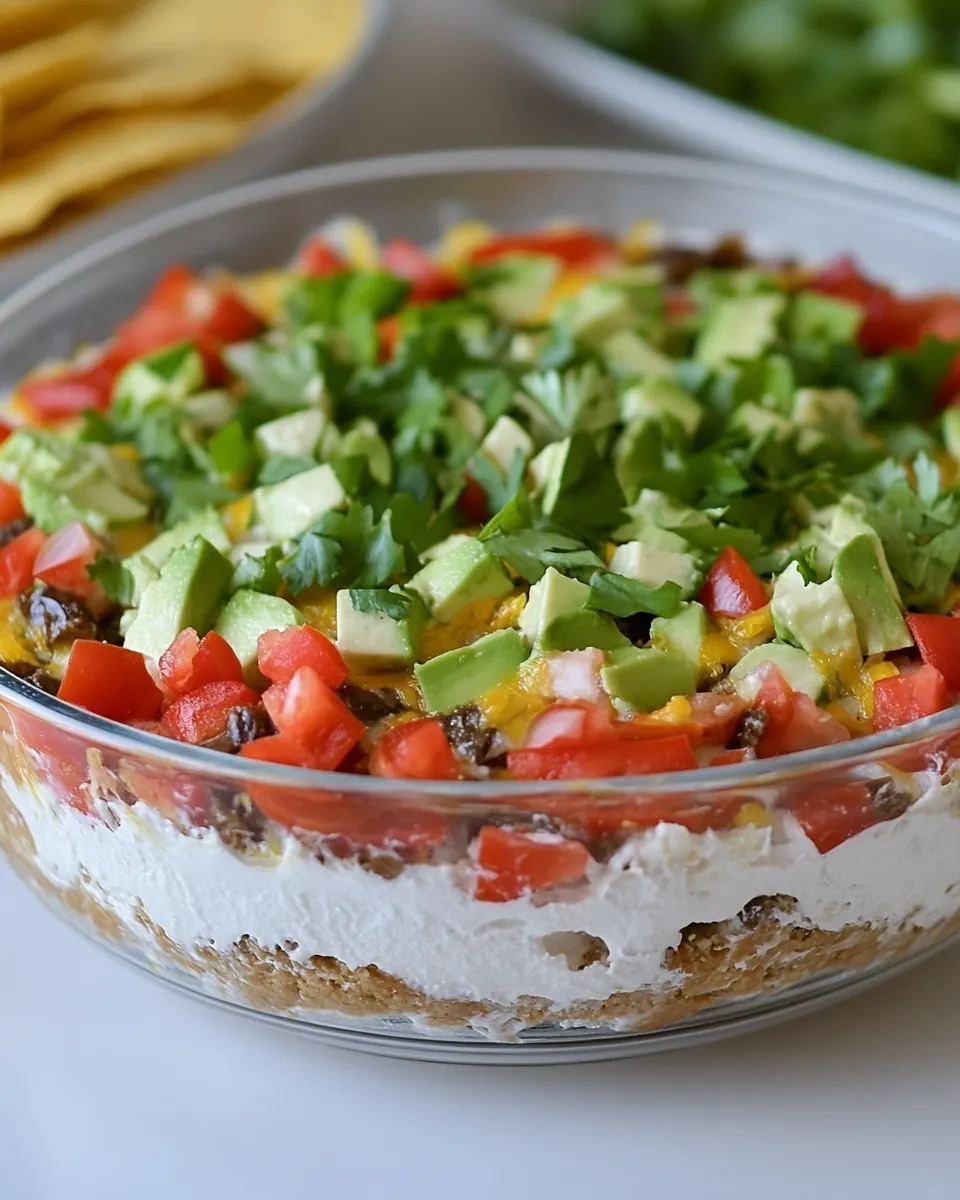
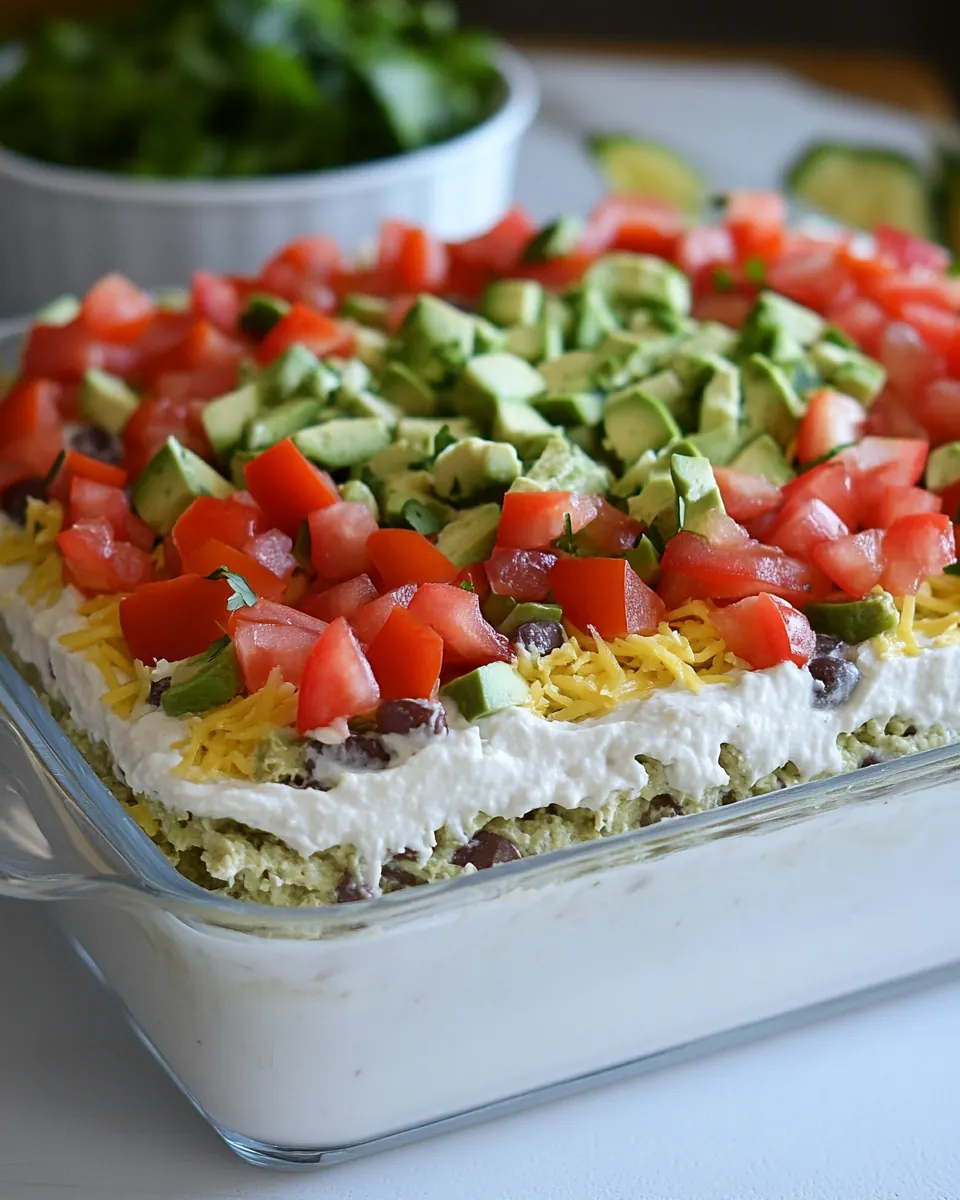
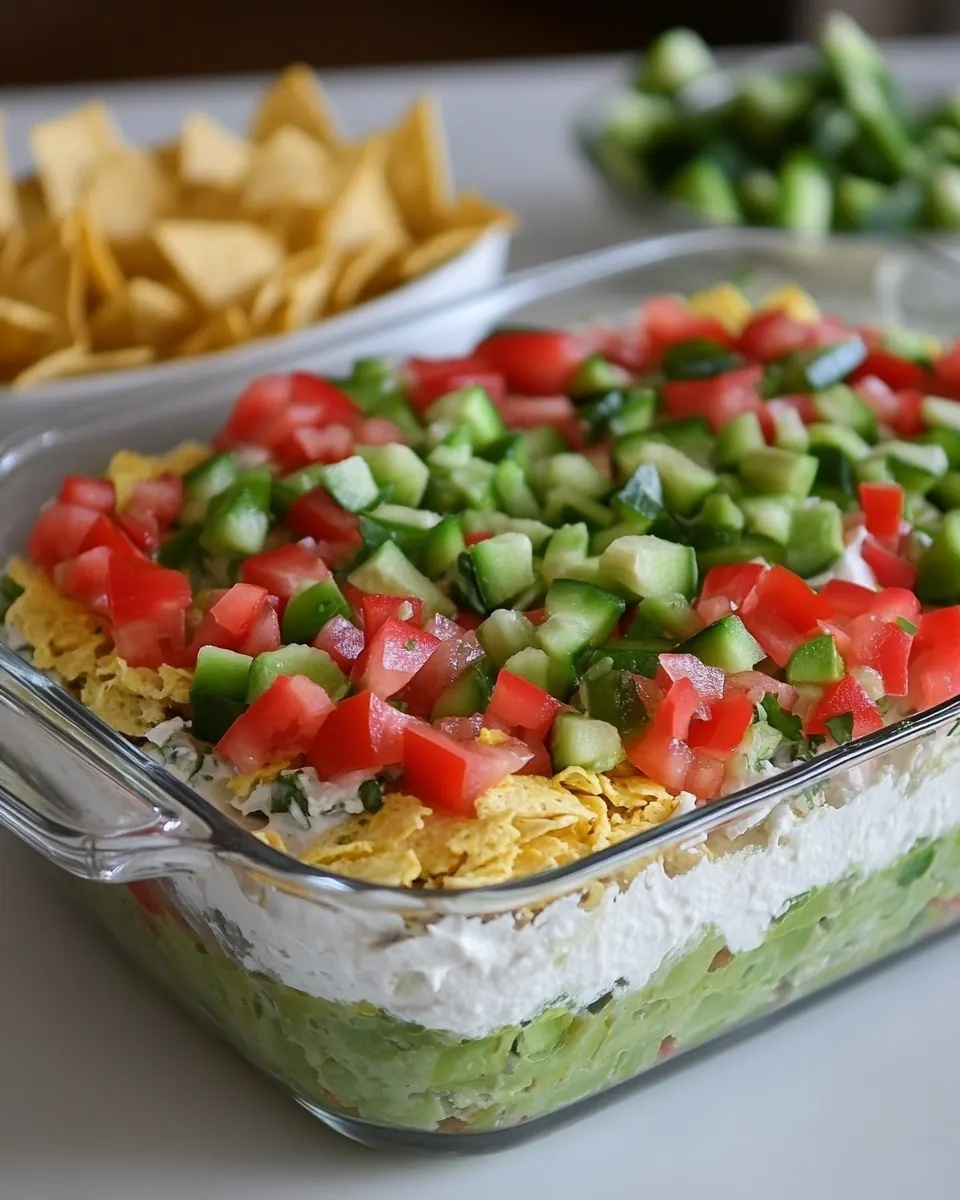
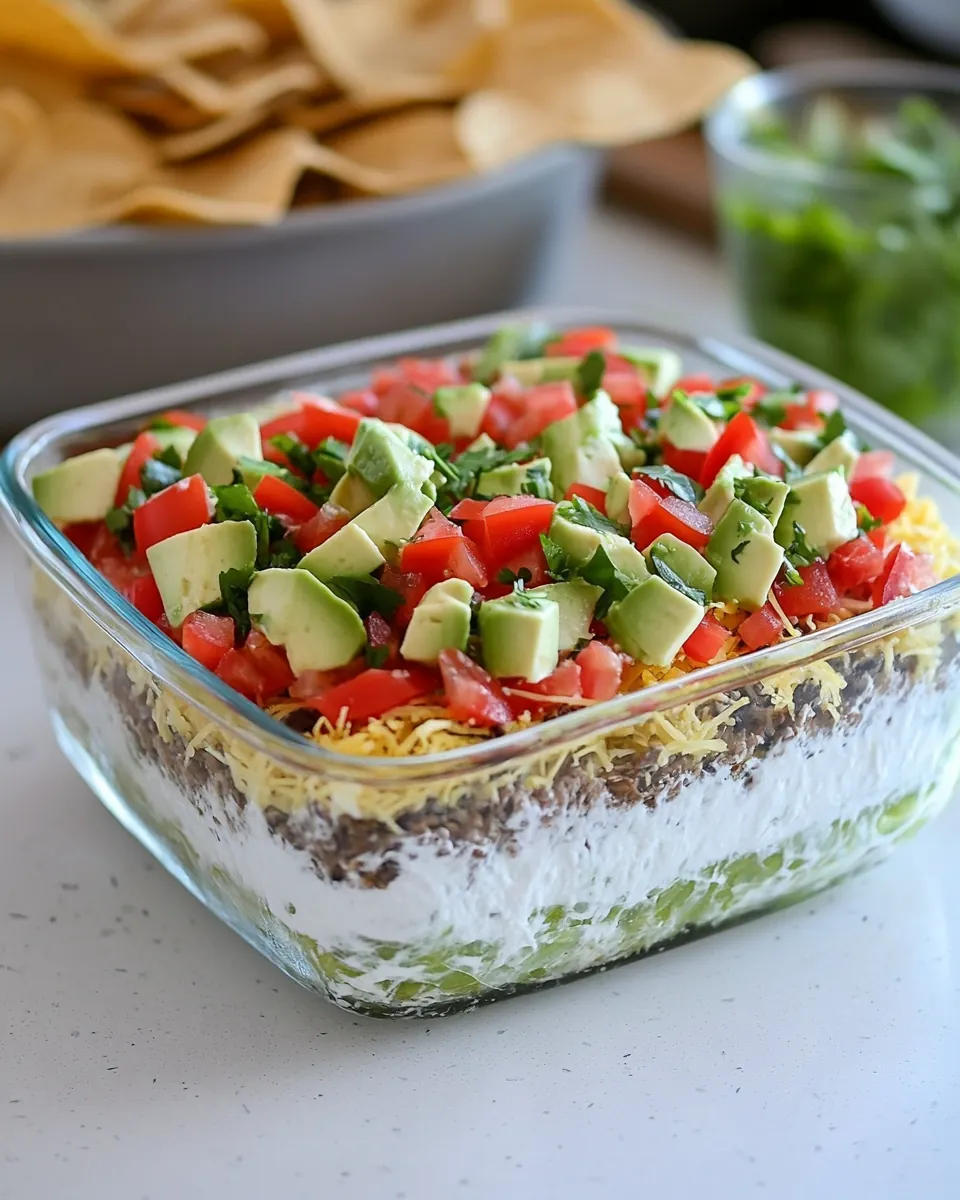
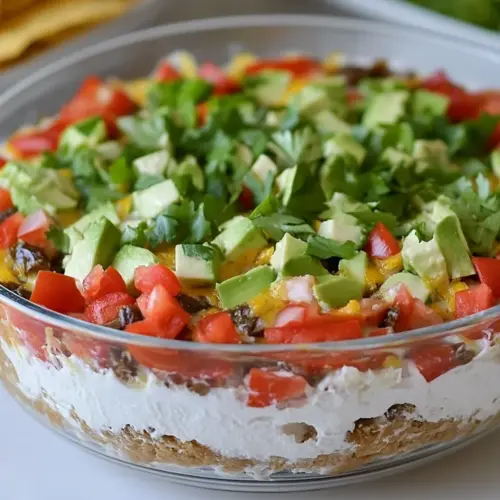
- Assemble the dip: Spread the sour cream evenly over the black bean layer. Sprinkle half of the cheese over the sour cream, followed by all of the guacamole, and then the remaining cheese. Sprinkle the corn over the cheese.: The reserved raw garlic will lend a fresher, sharper aroma to the guacamole, so measure carefully. The small bowl will hold a fragrant pocket of pungency that brightens the avocados without overpowering them. Overdoing raw garlic is easy, so err on the side of restraint to keep the guacamole balanced.
- Transfer the salsa to a fine sieve and drain. Top the corn layer with the salsa. Serve the dip with a spoon and tortilla chips.: Cooked garlic should release a toasty, sweet scent almost immediately, and the sizzling should be gentle. Browning changes the flavor to bitter, so watch carefully and remove from heat if it starts to darken. This softened garlic will infuse the beans with mellow depth without sharpness.
- Add the black beans, 1/2 teaspoon salt, 1/2 teaspoon of the cumin, and water and continue cooking for about one minute.: When the beans hit the warm pan they should hiss softly and absorb the aromatics. The combination of salt and cumin lifts the earthy character of the black beans , and the water loosens the mixture so it becomes easily mashable. Cook just long enough for the flavors to marry, because overcooking can dry the mixture out. A common misstep is using too much water, which makes the layer runny instead of spreadable.
- Off the heat, mash the beans with a fork or potato masher until they have a chunky pur茅ed texture.: Mashing by hand gives you tactile feedback, allowing you to leave appealing bits of whole bean for bite. The aroma at this point is warm and savory, with cumin and olive oil weaving through the beans. Aim for a spreadable texture that still has presence, not a paste. If you over mash, the bean layer becomes pasty and heavy, losing the pleasant contrast against the other layers.
- Scrape the beans into an 8-inch glass baking dish and spread into an even layer. Set aside.: As you spread, the beans should form a cohesive base that supports the layers above. The contrast between the warm, slightly glossy bean surface and the cool toppings will be obvious once you layer. Make sure it is even so the later layers sit level, and be careful not to press too hard which can compress the texture. Uneven layering leads to inconsistent bites when serving.
- Make the guacamole layer: To the medium bowl with the reserved garlic, add the avocados, the remaining dark green scallions, the remaining jalapeño, 1/2 teaspoon salt, the remaining 1/2 teaspoon cumin, and the remaining 2 tablespoons lime juice. : The first forkful should smell green and bright, with citrus and garlic lifting the fat of the avocados . Mash gently so you keep small chunks for mouthfeel. The lime brightens and prevents browning, and the dark scallions add a fresh onion lift. Overmashing creates a uniform texture that can make the dip feel heavy, so stop when it is creamy but still a little rustic.
- Mash with a fork until blended but still a bit chunky.: The sound is quiet, the texture should be slightly yielding with occasional avocado pieces. This chunkiness is key to a satisfying bite. If you find bitterness, add a touch more lime and a pinch of salt to balance. A frequent error is adding too much acid, which can make the guacamole taste jarred and sharp rather than bright and smooth.
- Assemble the dip: Spread the sour cream evenly over the black bean layer. : The cold, tangy sour cream will feel silky as you smooth it across the warm bean base, creating a temperature contrast that is delightful. The sour cream acts as a neutral bed for the cheese and guacamole and helps prevent the layers from mixing. If you overwork this step the bean layer may tear or mix, so spread gently from the center outward.
- Sprinkle half of the cheese over the sour cream, followed by all of the guacamole, and then the remaining cheese.: The scattered Cheddar should create pockets of savory richness that melt slightly into the sour cream under room temperature, while the guacamole sits like a vibrant green cushion. The visual of alternating cheese and guacamole makes the dish inviting. Avoid piling the cheese so thickly that it overwhelms the guacamole; aim for a balanced distribution.
- Sprinkle the corn over the cheese.: The corn kernels add little golden pops both visually and texturally as you dot them across the top. Fresh or well drained canned corn will have a snappy bite; if the corn is soggy it will weigh down the top. Scatter evenly so every scoop has some sweet kernels for contrast.
- Transfer the salsa to a fine sieve and drain. Top the corn layer with the salsa.: Draining the salsa ensures the top stays vibrant without becoming watery. The bright lime and tomato perfume will top the dish, and the small dice should remain intact so each serving shows color and texture. If you skip draining, the juices will pool and make the chips soggy very quickly.
- Serve the dip with a spoon and tortilla chips.: When you bring the bowl to the table, the mix of warm and cool notes should be obvious, and guests will appreciate the variety of textures. Use sturdy tortilla chips for scooping to prevent breakage, and serve with extra napkins because this is a deliciously messy, hands on affair. A typical mistake is using thin chips that shatter, leaving guests frustrated and the presentation disrupted.
Variations to Try
This dish adapts well to preferences and pantry limits. Below are variations and tweaks that keep the spirit of the recipe while offering new textures and flavors for repeated enjoyment.
- Swap or add beans: Try a mix of black and pinto beans if you want a nuttier, more rustic bean layer while keeping the same cooking approach and seasoning.
- Make it smoky: Stir a touch more cumin into the bean mix and lightly char fresh corn kernels on a hot pan to introduce a gentle smoky note that pairs beautifully with the Cheddar.
- Cheese options: If you prefer a milder profile, substitute part of the sharp Cheddar with Monterey Jack for a creamier melt and fewer sharp edges in flavor.
- Advance assembly: Prepare all layers up to the corn a day ahead and refrigerate. Add the corn and salsa right before serving to preserve texture and color.
- Presentation tips: Use a shallow, wide dish to maximize surface area for more even scooping and to let each guest access multiple layers at once.
What to Serve Alongside Best 7 Layer Dip
When planning a spread, think about contrasting textures and simple pairings that let the dip shine. Choose dippers and accompaniments that are sturdy enough to scoop and flavors that complement the bright, creamy profile of the dip.
- Tortilla chips for scooping: Thick, restaurant style chips are ideal because they hold up under multiple layers without breaking, ensuring guests can get a satisfying bite each time.
- Fresh vegetable sticks: Crisp carrot and celery sticks or sliced bell peppers add refreshing crunch and lighter options for guests who prefer vegetables over chips.
- Seasonal boards: Pair the dip with a cheese and charcuterie platter for a larger gathering, balancing the creamy dip with cured items and crunchy nuts when the occasion calls for variety.
- Occasions to serve: This dip is perfect for summer barbecues, game days, potlucks, and casual get togethers where communal snacking is the vibe. It also works well for Ramadan if served as part of a larger iftar spread, letting everyone graze before a main course.
- Storage tips: Store any leftovers in an airtight container for up to two days in the refrigerator. Expect some liquid separation; blot excess moisture with a paper towel before serving again to preserve texture and appearance.
- Serving style: Bring the dip to room temperature for at least one hour before serving if it has been refrigerated, which helps the flavors open up and the layers blend pleasantly on the palate.
FAQ
Conclusion
Best 7 Layer Dip stands out because it balances creamy, bright, and crunchy textures in a single bowl, making it an easy crowd pleaser. If you are looking for a recipe that is forgiving, make ahead friendly, and endlessly tweakable, give this layered dip a try. It brings people together around the table, simplifies hosting, and offers plenty of room for personal tweaks that make it feel like your signature party dish.
Best 7 Layer Dip
Equipment
- Medium Bowl
- Medium skillet
- Fork or Potato Masher
- 8-inch glass baking dish
- Fine sieve
Ingredients
- 2 cups cored, seeded, and finely chopped tomatoes, from 2 to 3 large tomatoes (or 4 to 6 plum tomatoes) Provide ripe, juicy tomato flesh that adds bright acidity and fresh texture; finely chopped after coring and seeding lets juices blend evenly through the dip while avoiding excess liquid that would make layers runny.
- 1 bunch scallions, thinly sliced, light and dark green parts separated (divided) Add crisp, oniony flavor and mild sharpness with both light and dark green parts used; thinly slicing and separating the greens lets you sprinkle some for garnish while folding the whites into inner layers for balanced bite.
- 1 jalapeño pepper, seeded and finely diced (divided) Deliver a touch of heat and vegetal brightness when seeded and finely diced; dividing the jalapeño ensures controlled spiciness so some pieces can be mixed in and some reserved for topping.
- 4 tablespoons lime juice, from 2 limes (divided) Contribute fresh citrus tang and help prevent avocado browning; dividing the lime juice lets part brighten the tomato and bean layers and part be tossed with the avocado for flavor and color retention.
- Salt Season layers to taste and enhance overall flavor balance; add gradually and taste as you build the dip to avoid over-salting any single layer.
- 1/2 teaspoons sugar Brighten flavors with a small amount of sweetness that moderates acidity and rounds sharp edges; dissolve into wet components so it distributes evenly throughout the layers.
- 3 tablespoons extra-virgin olive oil Provide a fruity, rich fat note and help bind ingredients when drizzled or used to cook aromatics; choosing extra-virgin olive oil adds subtle peppery complexity to the dip.
- 3 cloves garlic, minced (divided) Introduce pungent, savory depth when minced; dividing the garlic lets some be softened into beans or cream layers while some can be used raw for stronger aromatic bursts.
- 1 (15-oz) can black beans, drained and rinsed Supply hearty texture and protein while adding a creamy bean base; draining and rinsing reduces sodium and excess starch so the black beans layer holds shape without overpowering other flavors.
- 1 teaspoon ground cumin, divided Impart warm, earthy spice that complements beans and avocado; dividing the ground cumin lets you season the bean mixture more heavily while sprinkling a little atop for aromatic continuity.
- 2 tablespoons water Adjust texture and loosen thicker mixtures with a splash of liquid; using water helps smooth out the bean or avocado layers without altering flavors noticeably.
- 3 medium avocados, halved, pitted and diced Add rich, buttery body and creamy mouthfeel when halved, pitted, and diced; fresh avocados provide the classic guacamole layer and their diced form helps maintain distinct layers.
- 1 (8-oz) block sharp Cheddar, shredded (see note) Bring sharp, savory cheese flavor and melting texture when shredded; using an 8-ounce block yields a freshly grated topping that melts slightly and adds salty contrast to creamy layers.
- 1 (8-oz) container sour cream (1 cup) Supply cool, tangy creaminess as a smooth middle layer; using a one-cup container of sour cream creates a mild, cohesive buffer between robust and fresh components.
- 1 1/4 cups fresh cooked or canned and drained corn kernels Add sweet, crisp kernels that contribute color and a pop of texture; using fresh cooked or canned and drained corn ensures kernels remain firm and do not water down surrounding layers.
- Tortilla chips, for serving Provide crunchy scooping and salty contrast for serving; arranging tortilla chips around the layered dip lets guests portion and enjoy the combination of textures and flavors.
Instructions
- Make the salsa fresca: In a medium bowl, combine the tomatoes, half of the dark green scallions, half of the minced jalapeño, 2 tablespoons of the lime juice, 1/4 teaspoon of salt, and the sugar. (If your tomatoes are sweet, you can reduce or omit the sugar.) Set aside.: In a medium bowl, combine the tomatoes, half of the dark green scallions, half of the minced jalapeño, 2 tablespoons of the lime juice, 1/4 teaspoon of salt, and the sugar. : I can hear the gentle clink of the spoon against the bowl as I fold these ingredients together, and the first scent is always bright citrus warming into raw tomatoes . The juices should glisten, not puddle, and the diced tomatoes should still hold their shape so each spoonful gives a little pop. This mixture is all about balance, so taste for acid and sweetness before you set it aside. If you let it sit too long, it can become watery, which dilutes the top layers, so drain a little if necessary. A common mistake is chopping the tomatoes too fine, which makes the salsa too saucy; aim for small but definite pieces for the best texture.
- Make the bean layer: Heat the olive oil in a medium skillet over medium heat. Add all of the light scallions and cook, stirring frequently, until softened, about 2 minutes. Measure out 1/4 teaspoon of the minced garlic and set aside in a medium bowl (you’ll use this for the guacamole). Add the remaining garlic to the skillet and continue cooking for 30 seconds more. Do not brown. Add the black beans, 1/2 teaspoon salt, 1/2 teaspoon of the cumin, and water and continue cooking for about one minute. Off the heat, mash the beans with a fork or potato masher until they have a chunky puréed texture. Scrape the beans into an 8-inch glass baking dish and spread into an even layer. Set aside. (The bean mixture may taste salty; that’s okay.): Heat the olive oil in a medium skillet over medium heat. : As the oil warms, it should shimmer slightly but not smoke, releasing a gentle olive aroma. This step builds a savory foundation, so keep the heat steady. If the pan gets too hot, the scallions will brown quickly and become bitter, so watch for a soft sizzle and stir frequently. A typical misstep is rushing the softening, which leaves raw onion bite in the bean layer rather than a mellow sweetness.
- Make the guacamole layer: To the medium bowl with the reserved garlic, add the avocados, the remaining dark green scallions, the remaining jalapeño, 1/2 teaspoon salt, the remaining 1/2 teaspoon cumin, and the remaining 2 tablespoons lime juice. Mash with a fork until blended but still a bit chunky.: The sound here is soft sizzling and the visual cue is the scallions turning translucent and fragrant. Softening the light parts brings their sweetness forward and prevents harsh raw onion notes in the bean mixture. If they begin to brown, reduce the heat; browned scallions will change the intended flavor profile. Stir consistently to avoid hot spots that can char the scallions.
- Assemble the dip: Spread the sour cream evenly over the black bean layer. Sprinkle half of the cheese over the sour cream, followed by all of the guacamole, and then the remaining cheese. Sprinkle the corn over the cheese.: The reserved raw garlic will lend a fresher, sharper aroma to the guacamole, so measure carefully. The small bowl will hold a fragrant pocket of pungency that brightens the avocados without overpowering them. Overdoing raw garlic is easy, so err on the side of restraint to keep the guacamole balanced.
- Transfer the salsa to a fine sieve and drain. Top the corn layer with the salsa. Serve the dip with a spoon and tortilla chips.: Cooked garlic should release a toasty, sweet scent almost immediately, and the sizzling should be gentle. Browning changes the flavor to bitter, so watch carefully and remove from heat if it starts to darken. This softened garlic will infuse the beans with mellow depth without sharpness.
- Add the black beans, 1/2 teaspoon salt, 1/2 teaspoon of the cumin, and water and continue cooking for about one minute.: When the beans hit the warm pan they should hiss softly and absorb the aromatics. The combination of salt and cumin lifts the earthy character of the black beans , and the water loosens the mixture so it becomes easily mashable. Cook just long enough for the flavors to marry, because overcooking can dry the mixture out. A common misstep is using too much water, which makes the layer runny instead of spreadable.
- Off the heat, mash the beans with a fork or potato masher until they have a chunky pur茅ed texture.: Mashing by hand gives you tactile feedback, allowing you to leave appealing bits of whole bean for bite. The aroma at this point is warm and savory, with cumin and olive oil weaving through the beans. Aim for a spreadable texture that still has presence, not a paste. If you over mash, the bean layer becomes pasty and heavy, losing the pleasant contrast against the other layers.
- Scrape the beans into an 8-inch glass baking dish and spread into an even layer. Set aside.: As you spread, the beans should form a cohesive base that supports the layers above. The contrast between the warm, slightly glossy bean surface and the cool toppings will be obvious once you layer. Make sure it is even so the later layers sit level, and be careful not to press too hard which can compress the texture. Uneven layering leads to inconsistent bites when serving.
- Make the guacamole layer: To the medium bowl with the reserved garlic, add the avocados, the remaining dark green scallions, the remaining jalapeño, 1/2 teaspoon salt, the remaining 1/2 teaspoon cumin, and the remaining 2 tablespoons lime juice. : The first forkful should smell green and bright, with citrus and garlic lifting the fat of the avocados . Mash gently so you keep small chunks for mouthfeel. The lime brightens and prevents browning, and the dark scallions add a fresh onion lift. Overmashing creates a uniform texture that can make the dip feel heavy, so stop when it is creamy but still a little rustic.
- Mash with a fork until blended but still a bit chunky.: The sound is quiet, the texture should be slightly yielding with occasional avocado pieces. This chunkiness is key to a satisfying bite. If you find bitterness, add a touch more lime and a pinch of salt to balance. A frequent error is adding too much acid, which can make the guacamole taste jarred and sharp rather than bright and smooth.
- Assemble the dip: Spread the sour cream evenly over the black bean layer. : The cold, tangy sour cream will feel silky as you smooth it across the warm bean base, creating a temperature contrast that is delightful. The sour cream acts as a neutral bed for the cheese and guacamole and helps prevent the layers from mixing. If you overwork this step the bean layer may tear or mix, so spread gently from the center outward.
- Sprinkle half of the cheese over the sour cream, followed by all of the guacamole, and then the remaining cheese.: The scattered Cheddar should create pockets of savory richness that melt slightly into the sour cream under room temperature, while the guacamole sits like a vibrant green cushion. The visual of alternating cheese and guacamole makes the dish inviting. Avoid piling the cheese so thickly that it overwhelms the guacamole; aim for a balanced distribution.
- Sprinkle the corn over the cheese.: The corn kernels add little golden pops both visually and texturally as you dot them across the top. Fresh or well drained canned corn will have a snappy bite; if the corn is soggy it will weigh down the top. Scatter evenly so every scoop has some sweet kernels for contrast.
- Transfer the salsa to a fine sieve and drain. Top the corn layer with the salsa.: Draining the salsa ensures the top stays vibrant without becoming watery. The bright lime and tomato perfume will top the dish, and the small dice should remain intact so each serving shows color and texture. If you skip draining, the juices will pool and make the chips soggy very quickly.
- Serve the dip with a spoon and tortilla chips.: When you bring the bowl to the table, the mix of warm and cool notes should be obvious, and guests will appreciate the variety of textures. Use sturdy tortilla chips for scooping to prevent breakage, and serve with extra napkins because this is a deliciously messy, hands on affair. A typical mistake is using thin chips that shatter, leaving guests frustrated and the presentation disrupted.
Notes
- Swap or add beans: Try a mix of black and pinto beans if you want a nuttier, more rustic bean layer while keeping the same cooking approach and seasoning.
- Make it smoky: Stir a touch more cumin into the bean mix and lightly char fresh corn kernels on a hot pan to introduce a gentle smoky note that pairs beautifully with the Cheddar.
- Cheese options: If you prefer a milder profile, substitute part of the sharp Cheddar with Monterey Jack for a creamier melt and fewer sharp edges in flavor.
- Advance assembly: Prepare all layers up to the corn a day ahead and refrigerate. Add the corn and salsa right before serving to preserve texture and color.
- Presentation tips: Use a shallow, wide dish to maximize surface area for more even scooping and to let each guest access multiple layers at once.