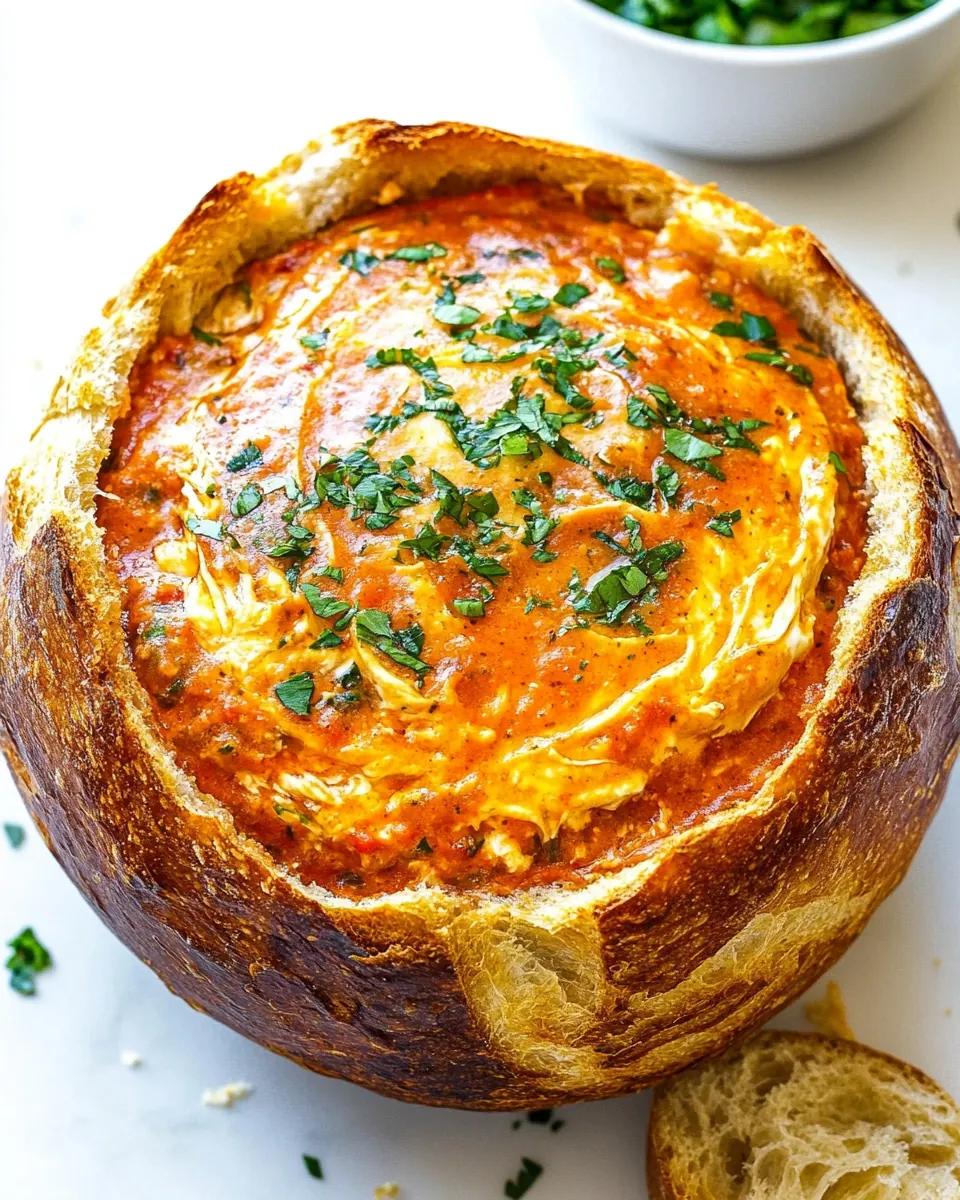
Baked Cream Cheese Salsa Dip
Baked Cream Cheese Salsa Dip has been my go to for casual get togethers ever since I first melted a bubbling scoop into a hollowed out loaf of bread on a snowy Sunday afternoon. I remember the way the warm, tomato scented salsa cut through the tangy, silky cream cheese, and how friends reached in with toasted cubes until the loaf was nearly gone. That day felt effortless and festive at once, and ever since I’ve tweaked this little comfort ritual to make it even easier to pull off.
Years of hosting have taught me that a show stopping snack does not need to be complicated. I love the theater of bringing a warm loaf to the table, its crust crackling slightly from the oven, then breaking into the soft, molten center. Guests gravitate to it immediately, laughing over who gets the last cube. For me, Baked Cream Cheese Salsa Dip is more memory than recipe, a reliable crowd pleaser that travels well to potlucks, living room movie nights, or impromptu celebrations.
Recipe Snapshot
35 mins
5 mins
30 mins
Easy
250 kcal
American
Gluten-Free, Low FODMAP
Appetizers
Oven, Mixing bowl, Baking sheet, Foil
The Magic of This Baked Cream Cheese Salsa Dip
It is irresistibly shareable
I find that nothing invites conversation like a communal Baked Cream Cheese Salsa Dip. The hollowed out loaf becomes a centerpiece, and people naturally gather, which turns eating into an experience instead of a snacking moment. I watch guests trade bread cube strategies and that interaction is part of why I keep returning to this dish.
The texture is a perfect contrast
The creamy combination of cream cheese and sour cream meets the bright, slightly chunky zing of salsa, while shredded cheddar cheese forms a golden, bubbling top. I like how the crunchy cubes of crusty sourdough loaf contrast with the silky interior. That interplay of textures turns each bite into a small revelation.
It is forgiving and fast
One of the reasons I adore this recipe is that it does not demand perfection. You can mix in a little more sour cream for extra silkiness or add a chunkier salsa if you like texture. Baking at a moderate temperature gently warms everything through, so even if your timing is off by a few minutes, the result is still smooth and melty.
Great for many occasions
I bring Baked Cream Cheese Salsa Dip to casual game nights, neighborhood potlucks, and holiday appetizer spreads. It adapts easily: serve it with crisp veggie sticks for lighter eats, or load the bread cubes on a platter for carb lovers. I love that it feels special without being precious.
Minimal ingredients, maximum impact
With just a handful of pantry friendly items, this dip delivers in both flavor and presentation. I often have everything on hand, which means I can throw it together in minutes and still produce a dish that looks and tastes like I planned for hours.
Main Ingredients for Baked Cream Cheese Salsa Dip

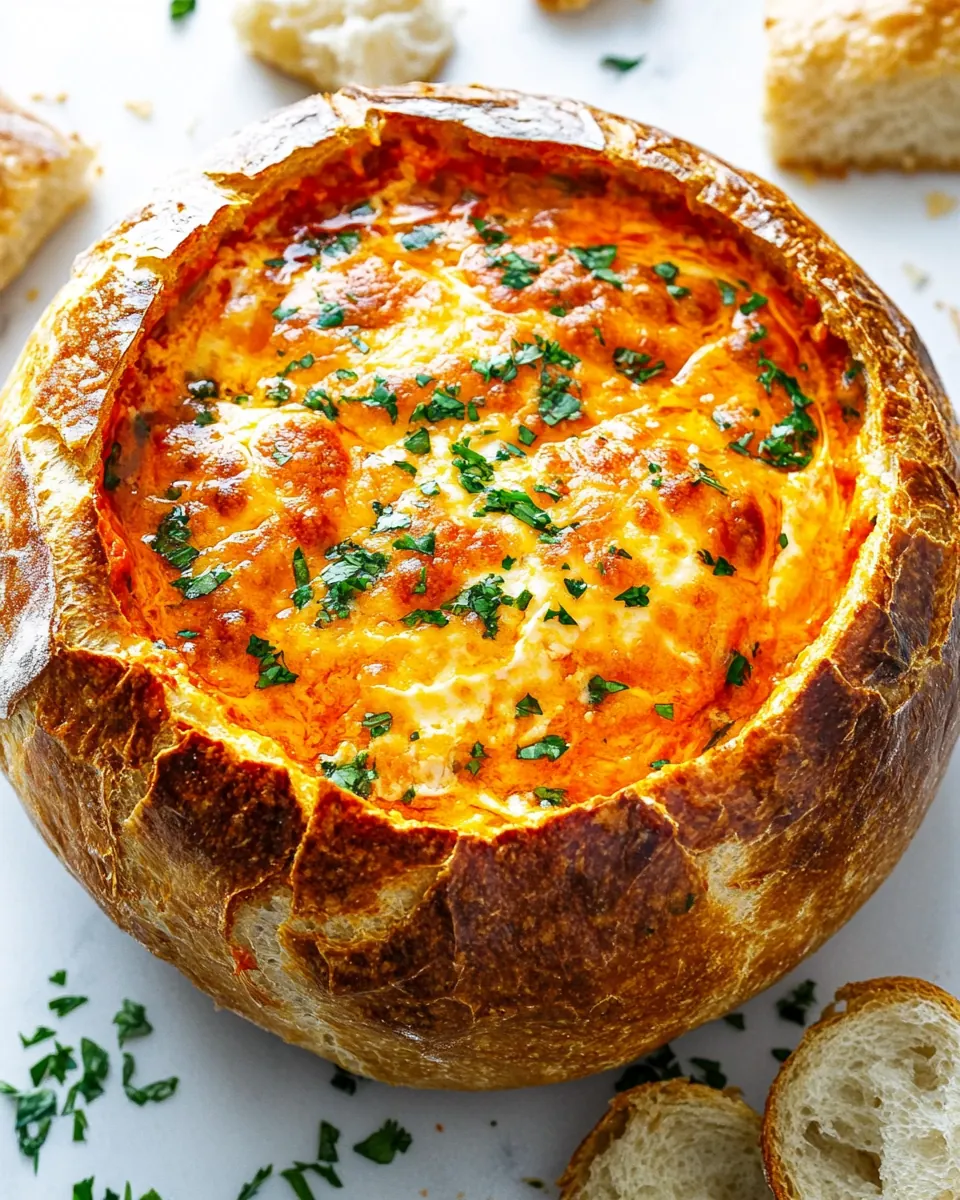
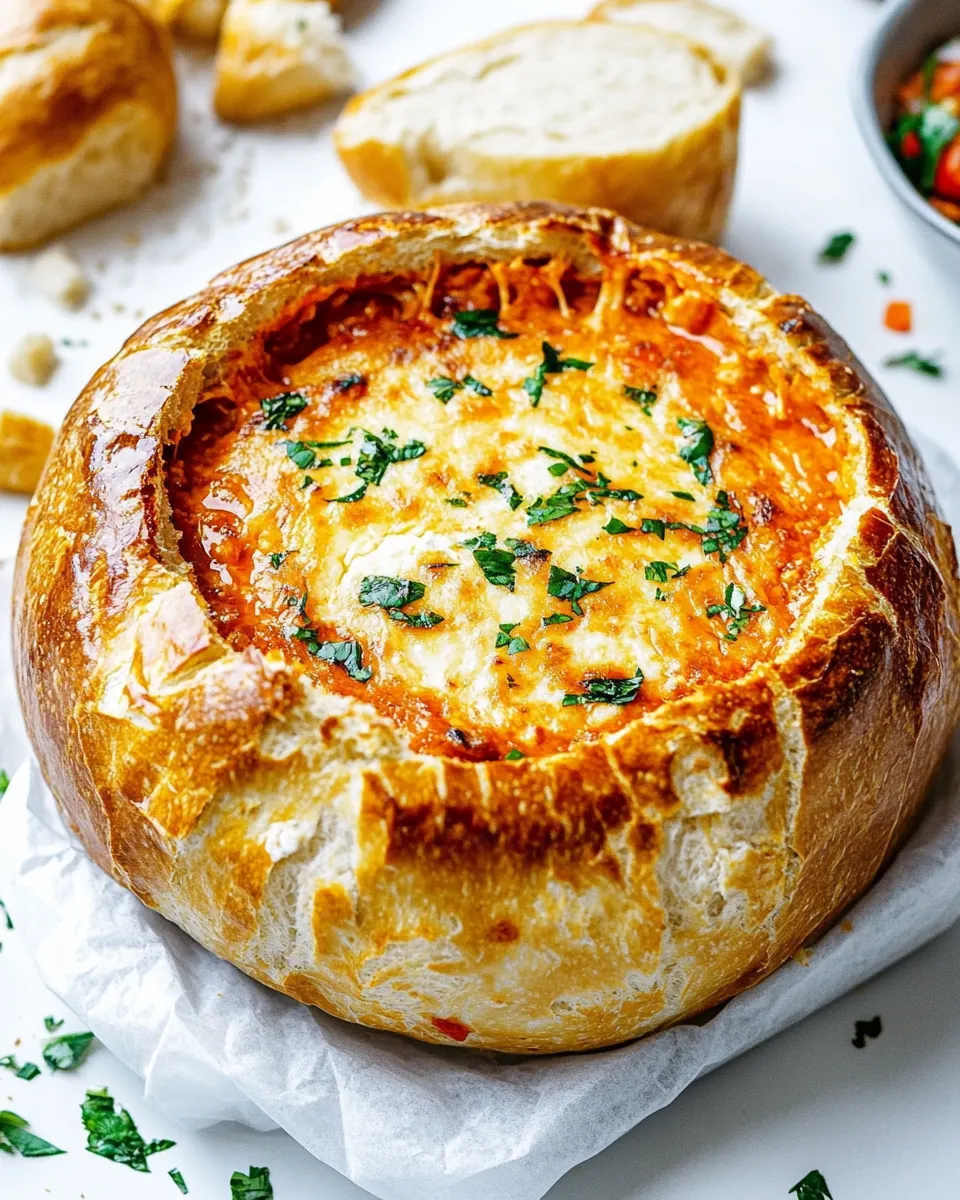
These ingredients are small in number but big in purpose. The philosophy here is simple: a creamy base, bright acidity, and melty cheese combine to create a rich, scooping dip while the bread bowl doubles as both vessel and edible serving. The key players are the tangy cream cheese and sour cream, which anchor the texture, while salsa brings brightness and cheddar cheese adds savory, gooey stretch. The sourdough loaf holds it all and gives crunchy contrast.
- 18 ounce package cream cheese, softened: Soften to create a smooth, creamy base that binds other ingredients and provides rich texture; allow to come to room temperature for easy mixing and even baking. Enhance flavor by gently whipping to remove lumps and ensure a luscious, spreadable dip consistency that browns slightly on top when baked.
- 1 cup sour cream: Provide tangy creaminess that lightens the richness of the cream cheese and adds moisture; fold in gently to maintain a velvety texture without becoming runny. Contribute a mild acidity that balances savory elements and helps create a scoopable dip perfect for bread or chips.
- 1 cup salsa: Add bright, zesty flavor and texture pockets of tomato, onion, and peppers; stir in to distribute savory spice and moisture throughout the dip. Offer seasoning and a bit of liquid to help loosen the cheese mixture while contributing a familiar, robust salsa character.
- 3 cups cheddar cheese shredded: Melt to form a gooey, flavorful topping and interior strands that pull with each dip; layer or stir in to ensure even cheesy coverage. Provide sharpness and color contrast that complements the cream cheese base and helps develop a golden-bubbly crust when baked.
- 1 sourdough loaf or French bread loaf: Serve as the vehicle for scooping, slicing, or tearing into the baked dip once warmed and crisped; slice or hollow as needed to create dippers. Offer a sturdy, carb-rich counterpart that soaks up creamy, cheesy filling and adds a toasty, crunchy balance to the dish.
- Reynolds Wrap® Heavy Duty Foil: Protect and contain the baking vessel while retaining heat to promote even cooking; line or tent to prevent excessive browning and to make cleanup easier. Create a barrier for transfer or storage and help maintain moisture during reheating without altering flavors.
Cooking Method for Baked Cream Cheese Salsa Dip
This method is straightforward and satisfying, built around gentle, even oven heat that warms the filling and melts the cheese without burning the crust. I like to prepare everything first so the transition to oven is seamless and stress free. Below I expand each original direction into a full, sensory guide to ensure success.
- Preheat oven to 350 degrees. In a medium sized bowl combine the cream cheese, sour cream, salsa, and cheese.: As the air warms, you should notice a faint, dry heat in the oven that will promote even melting without scorching. I preheat fully so the baking time is predictable, and a consistent oven temperature helps the cheddar cheese brown in appealing patches. A common mistake is putting the bread into a not fully heated oven, which prolongs cooking and can leave the center cool. Use an oven thermometer if your appliance runs hot or cold.
- Cut the top off of the loaf and hollow out the loaf leaving a hole in the bread. Cut the remaining bread into cubes.: The mixture will yield a glossy, chilled paste at first, then soften into a cohesive blend as you fold. Listen for the quiet scrape of your spoon and watch the mixture take on a uniform pink flecked look from the salsa . This step matters because uniform distribution of ingredients ensures consistent flavor in every scoop. Avoid vigorous beating which can overwork the dairy and make the texture too loose.
- Scoop the dip into the bread bowl. Using the Reynolds Wrap® foil the bread and seal. Place on a baking sheet and bake for 25-30 minutes or until heated throughout. Place the remaining bread cubes on the baking sheet the last 10 minutes of cooking.: When you slice the top, you will hear a crisp snap from the crust, and the interior will reveal a soft, spongy crumb. Leave about a one inch wall so the bread holds the filling without collapsing. If you remove too much crumb the structure weakens and the bowl may break; if you remove too little you will have less room for dip. Preserve the removed bread for toasting into cubes.
- Serve with bread cubes, veggies, and crackers.: When you slice the leftover loaf into cubes, you want a mix of crusty edges and soft centers. Toss them with a little oil or butter if you like extra crunch, then spread on a sheet so they toast evenly. Properly prepared cubes will crisp up in the oven and soak a touch of the dip, giving delightful contrast. Shoving too many cubes close together will steam them instead of crisping.
- Scoop the dip into the bread bowl: The filling should mound slightly above the rim, glossy and flecked with bits of salsa and cheddar cheese . Press gently so the mixture settles into the cavity without compressing the walls of the loaf. This packing creates even heat transfer during baking. Overfilling risks spills that make cleanup harder.
- Using the Reynolds Wrap® foil the bread and seal: Wrap the base and sides so steam is trapped, which helps the filling heat through before the top browns. You will feel the warmth through the foil as the oven works, and the sealing keeps the loaf from drying out. If you wrap too tightly you may prevent browning altogether, so leave a tiny vent if you prefer a crisper top.
- Place on a baking sheet and bake for 25 to 30 minutes or until heated throughout: As it bakes you will smell the tang of salsa and the buttery note of warmed bread. The filling will bubble gently, and the center should be hot to the touch after the lower end of the time range. This gentle, prolonged heat melts the cheeses without separating them. A frequent error is removing it too soon, leaving a cool center; use a thermometer or test a scoop in the middle to ensure it is hot.
- Place the remaining bread cubes on the baking sheet the last 10 minutes of cooking: During these final minutes the cubes toast to a satisfying crunch, turning golden and releasing a toasty aroma. They will crisp quickly so watch closely to avoid burning. Toasting alongside the bowl warms the cubes slightly so they do not cool the dip too fast when used. Crowding the pan reduces crisping efficiency, so give them space.
- Serve with bread cubes, veggies, and crackers: When you present the dish, the dip should be glossy and gently bubbling at the edges, while the cubes are crisp and fragrant. I arrange the cubes around the loaf and add a small dish of extra salsa if guests want more brightness. Expect enthusiastic scooping and a few triumphant crumbs. Leaving it out too long will cool and thicken the dip, so refresh in the oven if needed.
Recipe Variations about Baked Cream Cheese Salsa Dip
This recipe is ripe for subtle adaptations that keep the core flavor intact while offering different textures or heat levels. Below are practical, tested variations and serving ideas you can try right away. Each tip highlights a first phrase and then explains how to apply it.
- Use a chunky salsa to add extra texture and visible veggie pieces, which creates a heartier mouthfeel and slightly more pronounced tomato notes.
- Swap grating method by shredding your own cheddar cheese from a block for better melt and less anti caking agents, resulting in a silkier finish.
- Lighten with more sour cream if you prefer a tangier, looser dip that spreads and coats bread cubes without feeling too dense.
- Protect the crust by using foil around the loaf base so the crust does not overbrown before the center is warmed through.
- Make ahead by prepping the filling and storing it in the fridge, then scoop and bake at serving time for fresher texture and less last minute work.
- Double for crowds by using a larger loaf or two smaller loaves baked side by side to ensure everyone has access without constant refills.
What to Serve With Baked Cream Cheese Salsa Dip
This dip plays well with a range of companions, and the right pairings elevate it from casual snack to full event starter. Below I list practical serving suggestions, storage notes, and occasions that fit the dish, all in a helpful list format so you can pick what suits your plan.
- Crunchy bread cubes are the obvious pairing, toasted until golden so they provide sturdy, dippable pieces that soak up a bit of the warm filling without falling apart.
- Fresh vegetable sticks like carrot and cucumber offer a crisp, cooling contrast to the rich, warm dip, and they add color and a lighter option for guests.
- Assorted crackers give variety in shape and texture, from crisp water crackers to whole grain squares that add a nutty counterpoint to the creamy base.
- Party occasions such as casual game nights, potlucks, or holiday appetizer spreads are ideal because the loaf creates a communal focal point that encourages mingling.
- Storage tips include keeping leftover dip in an airtight container in the refrigerator for up to three days, then reheating gently in the oven to revive the texture.
- Seasonal pairings work well too; serve with bright, raw vegetables in spring and summer, and richer crackers or toasted nuts on the side for cooler months when guests want heartier bites.
- Serving style suggestions include placing the loaf on a shallow platter with a ring of dippers around it and a small spoon of extra salsa nearby for anyone who wants more tang.
FAQ
Conclusion
This recipe shines because it combines creamy, tangy, and melty elements into one inviting, shareable loaf. Baked Cream Cheese Salsa Dip is approachable yet impressive, perfect when you want something that feels special without a lot of effort. Give it a try the next time you host, and watch how quickly it brings people together. You will likely end up making it again, because it hits the sweet spot of flavor, texture, and easy presentation.

Baked Cream Cheese Salsa Dip
Equipment
- Oven
- Mixing Bowl
- Baking Sheet
- Foil
Ingredients
- 18 ounce package cream cheese, softened Soften to create a smooth, creamy base that binds other ingredients and provides rich texture; allow to come to room temperature for easy mixing and even baking. Enhance flavor by gently whipping to remove lumps and ensure a luscious, spreadable dip consistency that browns slightly on top when baked.
- 1 cup sour cream Provide tangy creaminess that lightens the richness of the cream cheese and adds moisture; fold in gently to maintain a velvety texture without becoming runny. Contribute a mild acidity that balances savory elements and helps create a scoopable dip perfect for bread or chips.
- 1 cup salsa Add bright, zesty flavor and texture pockets of tomato, onion, and peppers; stir in to distribute savory spice and moisture throughout the dip. Offer seasoning and a bit of liquid to help loosen the cheese mixture while contributing a familiar, robust salsa character.
- 3 cups cheddar cheese shredded Melt to form a gooey, flavorful topping and interior strands that pull with each dip; layer or stir in to ensure even cheesy coverage. Provide sharpness and color contrast that complements the cream cheese base and helps develop a golden-bubbly crust when baked.
- 1 sourdough loaf or French bread loaf Serve as the vehicle for scooping, slicing, or tearing into the baked dip once warmed and crisped; slice or hollow as needed to create dippers. Offer a sturdy, carb-rich counterpart that soaks up creamy, cheesy filling and adds a toasty, crunchy balance to the dish.
- Reynolds Wrap® Heavy Duty Foil Protect and contain the baking vessel while retaining heat to promote even cooking; line or tent to prevent excessive browning and to make cleanup easier. Create a barrier for transfer or storage and help maintain moisture during reheating without altering flavors.
Instructions
- Preheat oven to 350 degrees. In a medium sized bowl combine the cream cheese, sour cream, salsa, and cheese.: As the air warms, you should notice a faint, dry heat in the oven that will promote even melting without scorching. I preheat fully so the baking time is predictable, and a consistent oven temperature helps the cheddar cheese brown in appealing patches. A common mistake is putting the bread into a not fully heated oven, which prolongs cooking and can leave the center cool. Use an oven thermometer if your appliance runs hot or cold.
- Cut the top off of the loaf and hollow out the loaf leaving a hole in the bread. Cut the remaining bread into cubes.: The mixture will yield a glossy, chilled paste at first, then soften into a cohesive blend as you fold. Listen for the quiet scrape of your spoon and watch the mixture take on a uniform pink flecked look from the salsa . This step matters because uniform distribution of ingredients ensures consistent flavor in every scoop. Avoid vigorous beating which can overwork the dairy and make the texture too loose.
- Scoop the dip into the bread bowl. Using the Reynolds Wrap® foil the bread and seal. Place on a baking sheet and bake for 25-30 minutes or until heated throughout. Place the remaining bread cubes on the baking sheet the last 10 minutes of cooking.: When you slice the top, you will hear a crisp snap from the crust, and the interior will reveal a soft, spongy crumb. Leave about a one inch wall so the bread holds the filling without collapsing. If you remove too much crumb the structure weakens and the bowl may break; if you remove too little you will have less room for dip. Preserve the removed bread for toasting into cubes.
- Serve with bread cubes, veggies, and crackers.: When you slice the leftover loaf into cubes, you want a mix of crusty edges and soft centers. Toss them with a little oil or butter if you like extra crunch, then spread on a sheet so they toast evenly. Properly prepared cubes will crisp up in the oven and soak a touch of the dip, giving delightful contrast. Shoving too many cubes close together will steam them instead of crisping.
- Scoop the dip into the bread bowl: The filling should mound slightly above the rim, glossy and flecked with bits of salsa and cheddar cheese . Press gently so the mixture settles into the cavity without compressing the walls of the loaf. This packing creates even heat transfer during baking. Overfilling risks spills that make cleanup harder.
- Using the Reynolds Wrap® foil the bread and seal: Wrap the base and sides so steam is trapped, which helps the filling heat through before the top browns. You will feel the warmth through the foil as the oven works, and the sealing keeps the loaf from drying out. If you wrap too tightly you may prevent browning altogether, so leave a tiny vent if you prefer a crisper top.
- Place on a baking sheet and bake for 25 to 30 minutes or until heated throughout: As it bakes you will smell the tang of salsa and the buttery note of warmed bread. The filling will bubble gently, and the center should be hot to the touch after the lower end of the time range. This gentle, prolonged heat melts the cheeses without separating them. A frequent error is removing it too soon, leaving a cool center; use a thermometer or test a scoop in the middle to ensure it is hot.
- Place the remaining bread cubes on the baking sheet the last 10 minutes of cooking: During these final minutes the cubes toast to a satisfying crunch, turning golden and releasing a toasty aroma. They will crisp quickly so watch closely to avoid burning. Toasting alongside the bowl warms the cubes slightly so they do not cool the dip too fast when used. Crowding the pan reduces crisping efficiency, so give them space.
- Serve with bread cubes, veggies, and crackers: When you present the dish, the dip should be glossy and gently bubbling at the edges, while the cubes are crisp and fragrant. I arrange the cubes around the loaf and add a small dish of extra salsa if guests want more brightness. Expect enthusiastic scooping and a few triumphant crumbs. Leaving it out too long will cool and thicken the dip, so refresh in the oven if needed.
Notes
- Use a chunky salsa to add extra texture and visible veggie pieces, which creates a heartier mouthfeel and slightly more pronounced tomato notes.
- Swap grating method by shredding your own cheddar cheese from a block for better melt and less anti caking agents, resulting in a silkier finish.
- Lighten with more sour cream if you prefer a tangier, looser dip that spreads and coats bread cubes without feeling too dense.
- Protect the crust by using foil around the loaf base so the crust does not overbrown before the center is warmed through.
- Make ahead by prepping the filling and storing it in the fridge, then scoop and bake at serving time for fresher texture and less last minute work.
- Double for crowds by using a larger loaf or two smaller loaves baked side by side to ensure everyone has access without constant refills.