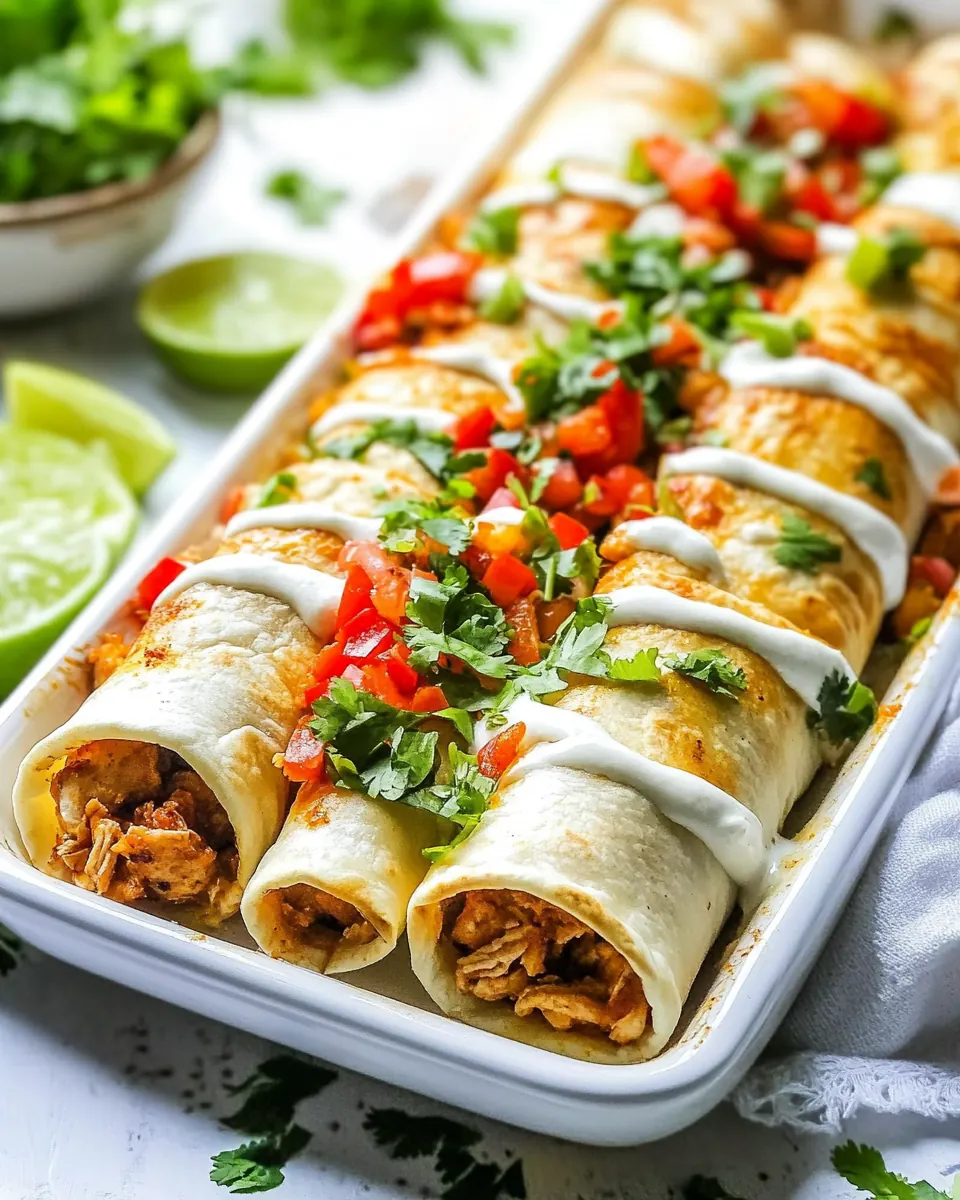
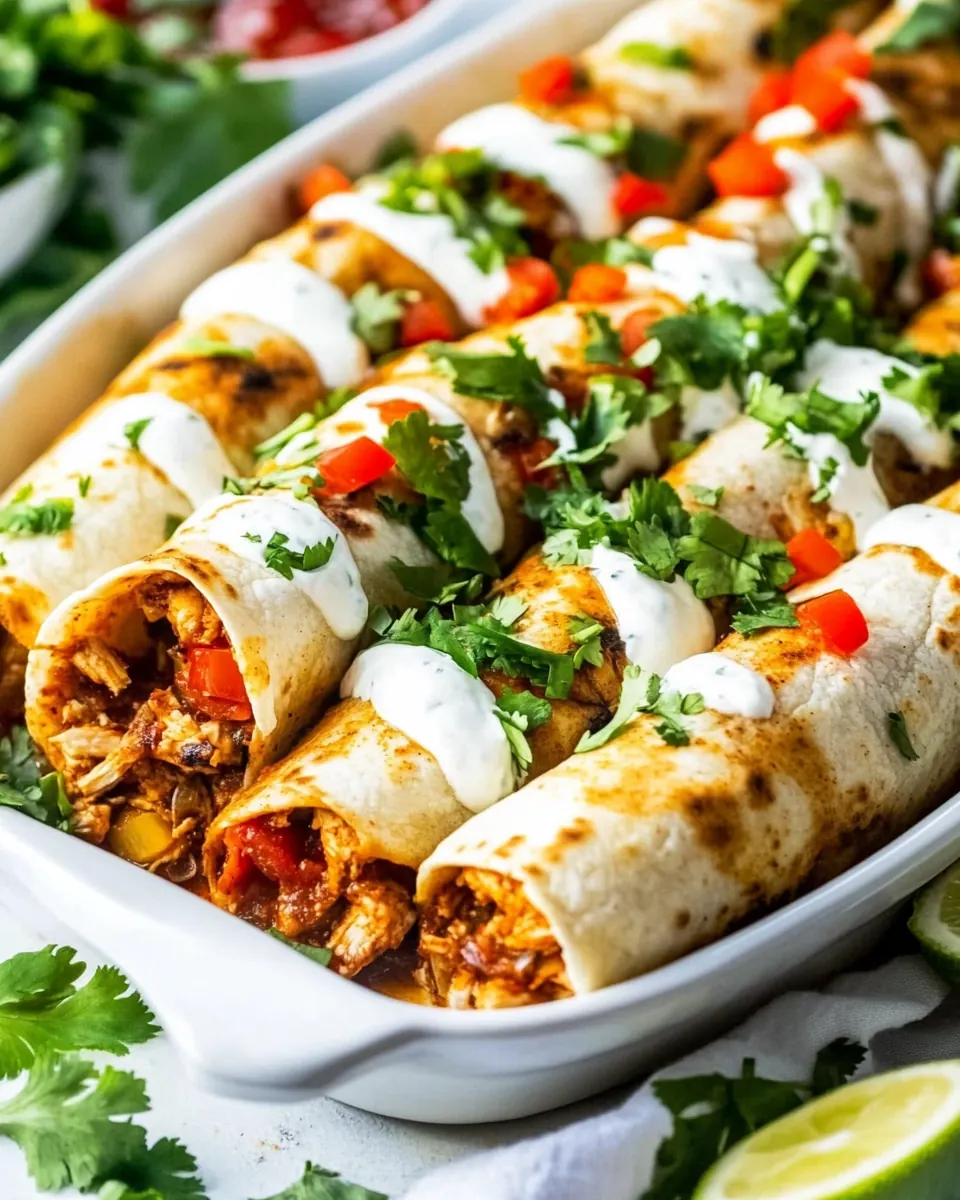
Baked Chicken Fajita Taquitos
Baked Chicken Fajita Taquitos are one of those recipes I keep coming back to when I want something cozy, shareable, and full of texture.
I first made these on a weeknight when friends dropped by unannounced, and I grabbed what I had in the fridge, tossed it into a skillet, and rolled everything into tortillas. The kitchen filled with the warm scent of sizzling chicken and caramelizing onion, and by the time we sat down, the taquitos were crunchy on the outside and tender inside. That night taught me how a few simple moves and modest ingredients turn into a crowd pleaser.
Since then I’ve tweaked the method so these Baked Chicken Fajita Taquitos are easy to scale, forgiving if your timing slips, and reliably crisp without deep frying. They travel well to potlucks, please picky eaters, and still feel special on a quiet dinner night. I love how the melted Mexican cheese blend binds the filling, and how brushing the shells with a little melted butter gives them golden color and a buttery crunch. Try them when you want a lively, hands on meal that doesn’t demand much fuss.
Recipe Snapshot
45 mins
15 mins
30 mins
Medium
300 kcal
Mexican
Gluten-Free, Low FODMAP
Dinner
9×13-inch Casserole Dish
Why You Need This Baked Chicken Fajita Taquitos
Easy weeknight crowd pleaser
I adore how Baked Chicken Fajita Taquitos come together fast, which means I can serve something impressive even on a busy night. The recipe uses straightforward pantry items, and the assembly is satisfying without being fussy. I often have everything prepped while I catch up on a podcast, and by the time I finish a quick tidy up the oven does the heavy lifting.
Texture contrast that wins
The crisp, golden exterior against the juicy chicken and soft, sweet onion inside is what keeps people reaching for seconds. I love that you get that audible crunch followed by a burst of seasoned filling. It makes every bite interesting, and that contrast makes this dish memorable at gatherings.
Flavor with simple seasoning
Using a focused amount of fajita seasoning highlights the natural flavors of the bell peppers and chicken without masking them. I appreciate recipes where seasoning enhances instead of overwhelms, and these taquitos hit that balance. The seasoning also gives the filling a warm, familiar profile that pairs with many dips and sides.
Customizable and forgiving
I often riff on this base, swapping tortillas or cheese depending on what’s in my kitchen, and it still works beautifully. The technique tolerates small timing variations, and the oven finish gives you a reliable golden result. If a tortilla cracks, warming it fixes the issue, so little hiccups don’t derail the whole batch.
Great for sharing and make ahead
These taquitos travel well and reheat cleanly, which is why I bring them to potlucks or prep them ahead for a busy week. You can assemble them earlier, keep them chilled, and pop them in the oven when you need them. That flexibility means you can enjoy more time with guests and less time at the stove.
Main Ingredients for Baked Chicken Fajita Taquitos
The philosophy behind these ingredients is simplicity with purpose. Each item plays a clear role: carry flavor, add texture, or bind the filling together. When combined, the ingredients create layers of taste and mouthfeel that keep every bite exciting.
- 3 tablespoon butter: Melted in a skillet to provide rich flavor and help sauté aromatics; coats other ingredients so they brown evenly and develop savory depth. Adds moisture and a buttery finish that enhances the overall mouthfeel of the taquito filling.
- 2 medium onions (sliced): Sliced and softened to add sweet, caramelized notes and a tender texture that balances the chicken; releases natural sugars when cooked in butter to deepen the dish's flavor profile. Also contributes aromatic complexity that complements the peppers and fajita seasoning.
- 1 pound chicken breasts (boneless and skinless, cut into small thin strips): Cut into small thin strips to ensure quick, even cooking and easy rolling into tortillas; absorbs spices and juices while staying tender. Serves as the primary protein, providing substance and savory richness to each taquito.
- 2 medium bell peppers (any color, thinly sliced): Thinly sliced to supply crisp-tender texture and bright, slightly sweet flavor; pairs with onions to create the classic fajita vegetable mix. Adds color contrast and freshness while absorbing butter and seasoning for cohesive filling.
- 2 tablespoons fajita seasoning: Sprinkled over the vegetables and chicken to deliver bold, smoky, and spicy flavors characteristic of fajitas; helps unify the filling with a consistent seasoning profile. Enhances aroma and provides depth through a blend of spices such as chili, cumin, and garlic.
- 1 cup Mexican cheese blend (shredded): Shredded and mixed into the warm filling to create gooey, melty pockets that bind ingredients together; contributes a creamy, slightly salty dimension when melted. Provides a satisfying cheesy pull that enriches texture and flavor in each taquito.
- 12 small flour tortillas: Filled and rolled around the prepared mixture to form handheld taquitos; offers a soft, pliable wrapper that crisps slightly when baked. Serves as the vessel for flavors and textures, making the dish convenient and portionable.
- 1/4 cup butter (melted): Brushed over rolled taquitos to promote browning and help achieve a golden, slightly crisp exterior in the oven; adds an extra buttery sheen and subtle richness. Assists in preventing tortillas from drying out during baking while enhancing flavor.
Preparation Steps for Baked Chicken Fajita Taquitos
These steps are approachable and rewarding, and I like to walk through them calmly so you can focus on the aromas and small cues that signal success. Follow the order below and notice the textures and smells at each stage.
- Prep the oven. Preheat the oven to 400°F. Lightly brush a 9×13-inch baking dish with the melted butter.: The warm, buttery scent signals the oven is ready and sets up the dish for even browning. You should feel a gentle heat when you open the oven, and the preheated environment helps the taquitos crisp evenly as soon as they go in. The brushed butter prevents sticking and encourages golden bottoms. A common mistake is placing an un-preheated pan into the oven which delays crisping, so always preheat fully until the oven reads 400°F.
- Cook the chicken. In a large skillet, melt 1 tablespoon of the butter and add the chicken to it. Season the chicken with half the fajita seasoning and toss to coat. Cook the chicken for about 5 minutes until it's no longer pink, and it's slightly charred, but not burned. Remove chicken from skillet, and wipe the skillet clean.: As the chicken sizzles, you will hear a gentle sear and smell a toasty, savory aroma that indicates the surface is caramelizing. The slight charring deepens flavor without drying the meat, and tossing helps every piece pick up seasoning. Wiping the skillet removes browned bits that could burn the vegetables, creating a clean surface for the next stage. Avoid using too high heat, which can char the exterior before the inside cooks through.
- Cook the veggies. Add the remaining 2 tablespoons of butter to the skillet and melt. Add the onion and peppers, season with remaining fajita seasoning and cook for a couple minutes until the onion peppers soften and the onion becomes translucent.: The pan will fill with sweet, savory steam as the onion and bell peppers release moisture and begin to soften. You want softened vegetables with slightly joyous edges but still some snap in the peppers, which keeps textural contrast. The remaining fajita seasoning brings a unified flavor, blooming in the butter and coating the veggies. Overcooking here makes the filling too soft, so stop when translucency appears and peppers give slightly to a fork.
- Assemble the taquitos. Lay a tortilla flat on a cutting board and top with some chicken fajita mixture, and a couple tablespoons of cheddar cheese. Tightly roll up the tortilla and place it in the prepared baking dish. Repeat with remaining tortillas. Brush the taquitos with melted butter.: As you roll, you will notice the warm filling steam a bit and the cheese begin to soften, helping it bind. Rolling tightly is key to keep the filling inside, and placing seam side down helps them stay closed while baking. The final brush of melted butter ensures the exterior browns and becomes crisp. A frequent slip is overfilling, which makes rolling difficult and causes leaks, so measure filling consistently for each tortilla.
- Bake. Transfer the baking dish to the preheated oven and bake for about 15 minutes or until tortillas are nicely golden brown. If they're still not golden after the 15 minutes, turn the broiler on and broil them for 1 to 2 minutes until golden, watching it carefully to not burn.: While baking you will see the edges take on a warm, golden color and the cheese inside will soften and meld. The oven's dry heat draws out surface moisture so the tortillas crisp rather than steam. If you choose to broil briefly, the color comes quickly, so stay attentive and listen for the faint crackle that signals browning. A common error is leaving them unattended under the broiler, which can quickly go from golden to burned, so watch closely and remove when color is right.
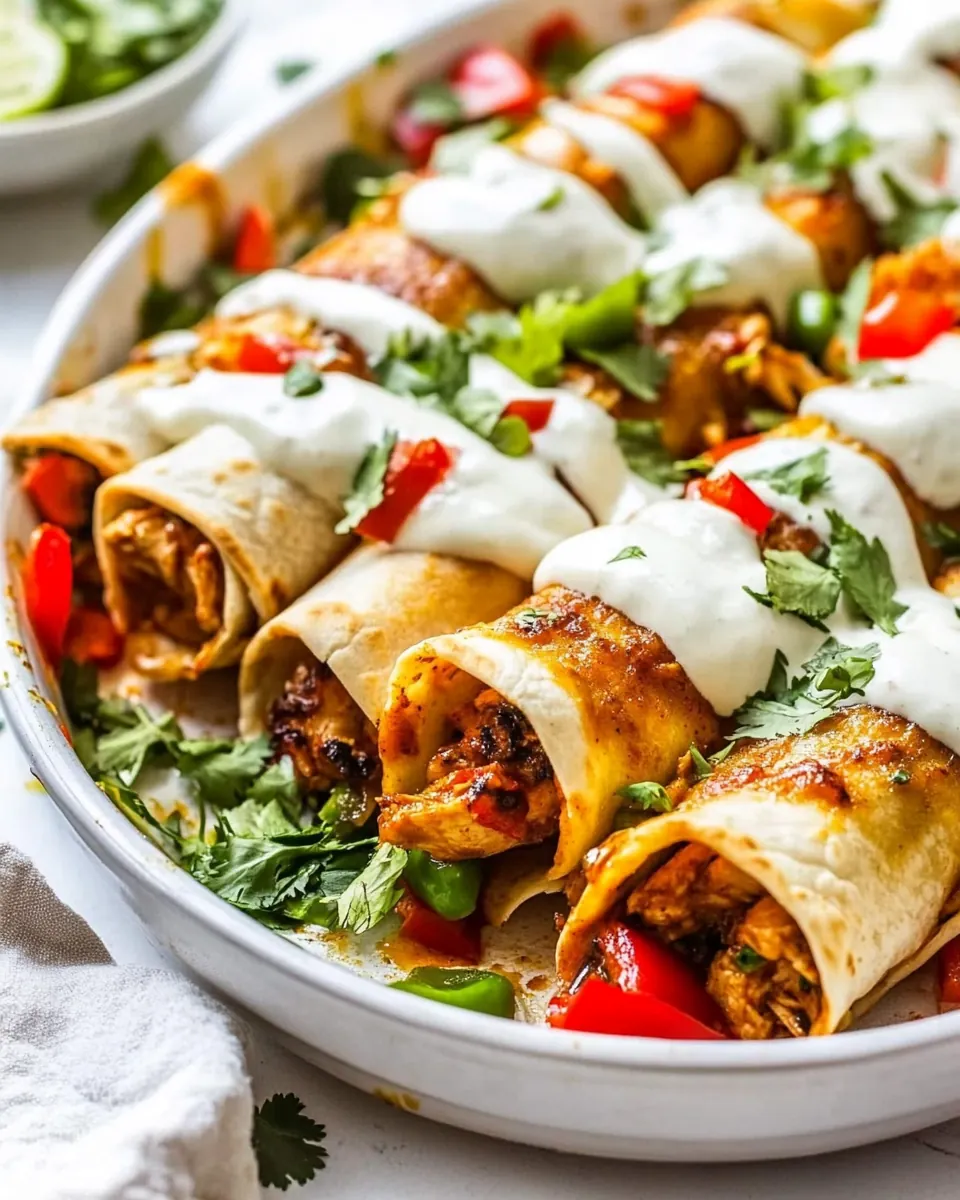
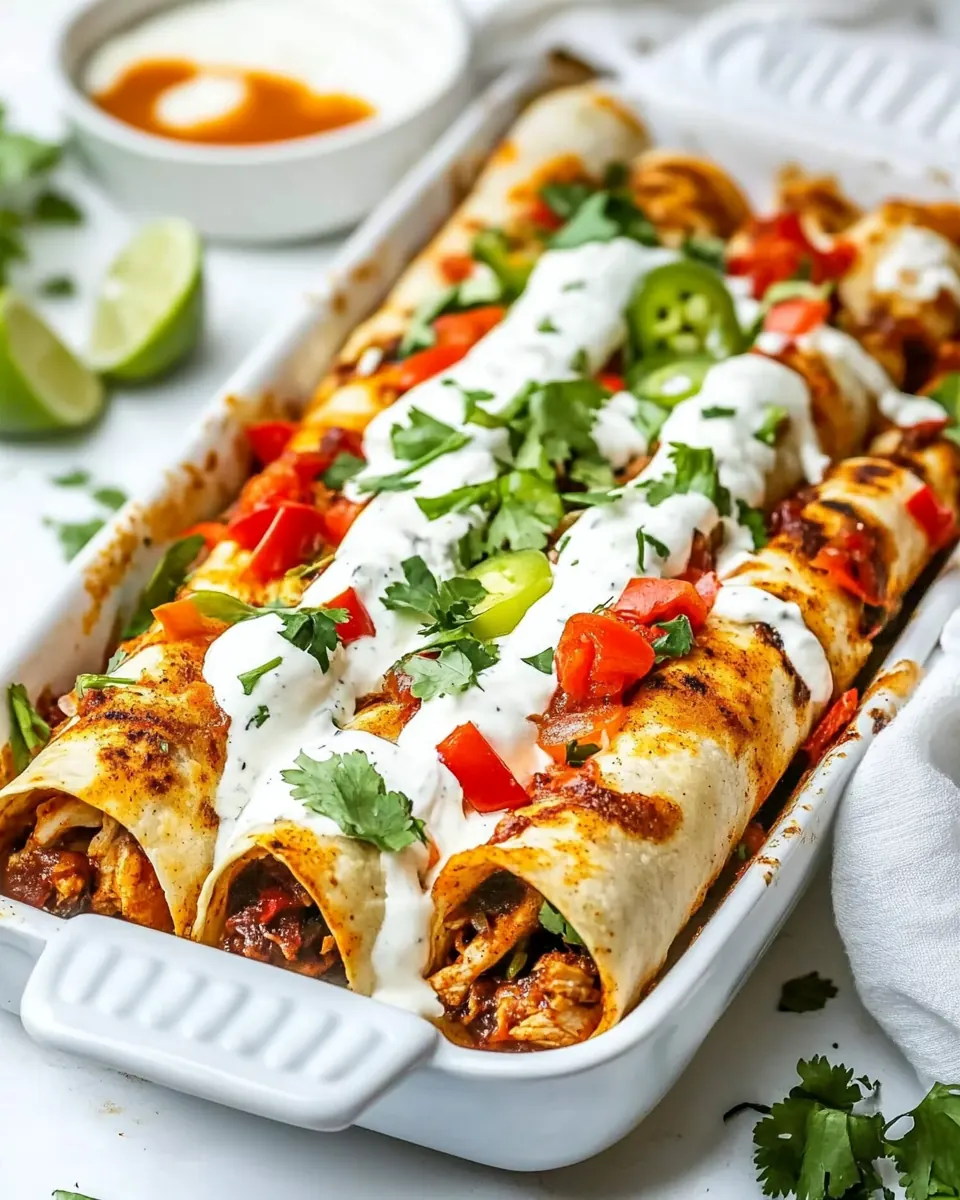
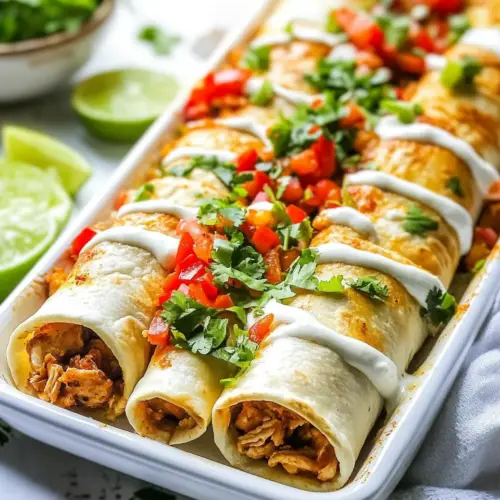
- Ready to serve. Serve with salsa and/or sour cream.: The finished taquitos should offer a crisp exterior and a warm, flavorful interior with melty Mexican cheese blend and seasoned chicken . Serving with salsa or sour cream adds a bright or cool counterpoint that complements the rich filling. If the taquitos sat a bit, reheating in a hot oven for a few minutes refreshes the crispness. Avoid microwaving for reheating unless you plan to crisp them afterward, because the microwave will make tortillas soggy.
Recipe Tips about Baked Chicken Fajita Taquitos
These practical tips will help you get consistent results every time. I wrote them based on small mistakes I made early on, so they save time and improve texture and flavor.
- Warm tortillas first, microwaving them for a few seconds or warming in a dry skillet makes them pliable and less likely to crack as you roll, which keeps the filling neatly inside.
- Evenly slice chicken and vegetables, matching sizes so everything cooks at the same rate and you avoid overcooked meat or undercooked peppers.
- Use moderate heat when searing, this produces a light char for flavor without drying the chicken, and it helps develop the toasty aroma that lifts the filling.
- Brush tortillas lightly with melted butter, this encourages a golden crisp finish without making the taquitos greasy at the bottom of the dish.
- Place seam side down, this simple positioning trick keeps rolls intact while baking and prevents filling from spilling out during cooking or serving.
- Broil carefully for color, if you need extra browning use short bursts under the broiler and keep the rack a safe distance to avoid burning in seconds.
Perfect Matches for Baked Chicken Fajita Taquitos
These serving ideas make it easy to plan a full meal or adapt the taquitos for different occasions. Use the suggestions below to match sides, times, and storage that fit your needs.
- Casual lunch or snack, serve with a bowl of fresh salsa and a dollop of sour cream, add lime wedges for a bright squeeze and keep napkins handy for easy eating.
- Family dinner, pair with a simple green salad dressed with citrus vinaigrette and a side of Spanish rice to round out the plate for a satisfying evening meal.
- Potlucks and parties, arrange the taquitos on a platter and offer ramekins of different dips, like guacamole and pico de gallo, so guests can mix and match flavors.
- Ramadan iftar option, these are easy to prepare ahead and reheat gently in the oven so they come out crisp and warm for breaking fast, complemented by light soups or salads.
- Storage tips, refrigerate cooled taquitos in an airtight container for up to three days, and reheat in a 350°F oven for 8 to 10 minutes to restore crispness rather than microwaving.
- Seasonal pairing, in cooler months serve alongside a spiced bean stew for warmth, and in summer present them with fresh corn salad and chilled beverages for a lighter plate.
FAQ
Conclusion
What makes these taquitos special is the contrast between a crisp, buttery exterior and a warmly seasoned, cheesy interior that keeps folks coming back for more. Give them a try on a busy weeknight or for a casual gathering and you will appreciate how easy they are to prepare and how well they travel. They are forgiving, adaptable, and perfect for sharing, so roll up a batch and enjoy the simple pleasure of a crunchy, flavorful bite.
Baked Chicken Fajita Taquitos
Equipment
- 9x13-inch Casserole Dish
Ingredients
- 3 tablespoon butter Melted in a skillet to provide rich flavor and help sauté aromatics; coats other ingredients so they brown evenly and develop savory depth. Adds moisture and a buttery finish that enhances the overall mouthfeel of the taquito filling.
- 2 medium onions (sliced) Sliced and softened to add sweet, caramelized notes and a tender texture that balances the chicken; releases natural sugars when cooked in butter to deepen the dish's flavor profile. Also contributes aromatic complexity that complements the peppers and fajita seasoning.
- 1 pound chicken breasts (boneless and skinless, cut into small thin strips) Cut into small thin strips to ensure quick, even cooking and easy rolling into tortillas; absorbs spices and juices while staying tender. Serves as the primary protein, providing substance and savory richness to each taquito.
- 2 medium bell peppers (any color, thinly sliced) Thinly sliced to supply crisp-tender texture and bright, slightly sweet flavor; pairs with onions to create the classic fajita vegetable mix. Adds color contrast and freshness while absorbing butter and seasoning for cohesive filling.
- 2 tablespoons fajita seasoning Sprinkled over the vegetables and chicken to deliver bold, smoky, and spicy flavors characteristic of fajitas; helps unify the filling with a consistent seasoning profile. Enhances aroma and provides depth through a blend of spices such as chili, cumin, and garlic.
- 1 cup Mexican cheese blend (shredded) Shredded and mixed into the warm filling to create gooey, melty pockets that bind ingredients together; contributes a creamy, slightly salty dimension when melted. Provides a satisfying cheesy pull that enriches texture and flavor in each taquito.
- 12 small flour tortillas Filled and rolled around the prepared mixture to form handheld taquitos; offers a soft, pliable wrapper that crisps slightly when baked. Serves as the vessel for flavors and textures, making the dish convenient and portionable.
- 1/4 cup butter (melted) Brushed over rolled taquitos to promote browning and help achieve a golden, slightly crisp exterior in the oven; adds an extra buttery sheen and subtle richness. Assists in preventing tortillas from drying out during baking while enhancing flavor.
Instructions
- Prep the oven. Preheat the oven to 400°F. Lightly brush a 9×13-inch baking dish with the melted butter.: The warm, buttery scent signals the oven is ready and sets up the dish for even browning. You should feel a gentle heat when you open the oven, and the preheated environment helps the taquitos crisp evenly as soon as they go in. The brushed butter prevents sticking and encourages golden bottoms. A common mistake is placing an un-preheated pan into the oven which delays crisping, so always preheat fully until the oven reads 400°F.
- Cook the chicken. In a large skillet, melt 1 tablespoon of the butter and add the chicken to it. Season the chicken with half the fajita seasoning and toss to coat. Cook the chicken for about 5 minutes until it's no longer pink, and it's slightly charred, but not burned. Remove chicken from skillet, and wipe the skillet clean.: As the chicken sizzles, you will hear a gentle sear and smell a toasty, savory aroma that indicates the surface is caramelizing. The slight charring deepens flavor without drying the meat, and tossing helps every piece pick up seasoning. Wiping the skillet removes browned bits that could burn the vegetables, creating a clean surface for the next stage. Avoid using too high heat, which can char the exterior before the inside cooks through.
- Cook the veggies. Add the remaining 2 tablespoons of butter to the skillet and melt. Add the onion and peppers, season with remaining fajita seasoning and cook for a couple minutes until the onion peppers soften and the onion becomes translucent.: The pan will fill with sweet, savory steam as the onion and bell peppers release moisture and begin to soften. You want softened vegetables with slightly joyous edges but still some snap in the peppers, which keeps textural contrast. The remaining fajita seasoning brings a unified flavor, blooming in the butter and coating the veggies. Overcooking here makes the filling too soft, so stop when translucency appears and peppers give slightly to a fork.
- Assemble the taquitos. Lay a tortilla flat on a cutting board and top with some chicken fajita mixture, and a couple tablespoons of cheddar cheese. Tightly roll up the tortilla and place it in the prepared baking dish. Repeat with remaining tortillas. Brush the taquitos with melted butter.: As you roll, you will notice the warm filling steam a bit and the cheese begin to soften, helping it bind. Rolling tightly is key to keep the filling inside, and placing seam side down helps them stay closed while baking. The final brush of melted butter ensures the exterior browns and becomes crisp. A frequent slip is overfilling, which makes rolling difficult and causes leaks, so measure filling consistently for each tortilla.
- Bake. Transfer the baking dish to the preheated oven and bake for about 15 minutes or until tortillas are nicely golden brown. If they're still not golden after the 15 minutes, turn the broiler on and broil them for 1 to 2 minutes until golden, watching it carefully to not burn.: While baking you will see the edges take on a warm, golden color and the cheese inside will soften and meld. The oven's dry heat draws out surface moisture so the tortillas crisp rather than steam. If you choose to broil briefly, the color comes quickly, so stay attentive and listen for the faint crackle that signals browning. A common error is leaving them unattended under the broiler, which can quickly go from golden to burned, so watch closely and remove when color is right.
- Ready to serve. Serve with salsa and/or sour cream.: The finished taquitos should offer a crisp exterior and a warm, flavorful interior with melty Mexican cheese blend and seasoned chicken . Serving with salsa or sour cream adds a bright or cool counterpoint that complements the rich filling. If the taquitos sat a bit, reheating in a hot oven for a few minutes refreshes the crispness. Avoid microwaving for reheating unless you plan to crisp them afterward, because the microwave will make tortillas soggy.
Notes
- Warm tortillas first, microwaving them for a few seconds or warming in a dry skillet makes them pliable and less likely to crack as you roll, which keeps the filling neatly inside.
- Evenly slice chicken and vegetables, matching sizes so everything cooks at the same rate and you avoid overcooked meat or undercooked peppers.
- Use moderate heat when searing, this produces a light char for flavor without drying the chicken, and it helps develop the toasty aroma that lifts the filling.
- Brush tortillas lightly with melted butter, this encourages a golden crisp finish without making the taquitos greasy at the bottom of the dish.
- Place seam side down, this simple positioning trick keeps rolls intact while baking and prevents filling from spilling out during cooking or serving.
- Broil carefully for color, if you need extra browning use short bursts under the broiler and keep the rack a safe distance to avoid burning in seconds.