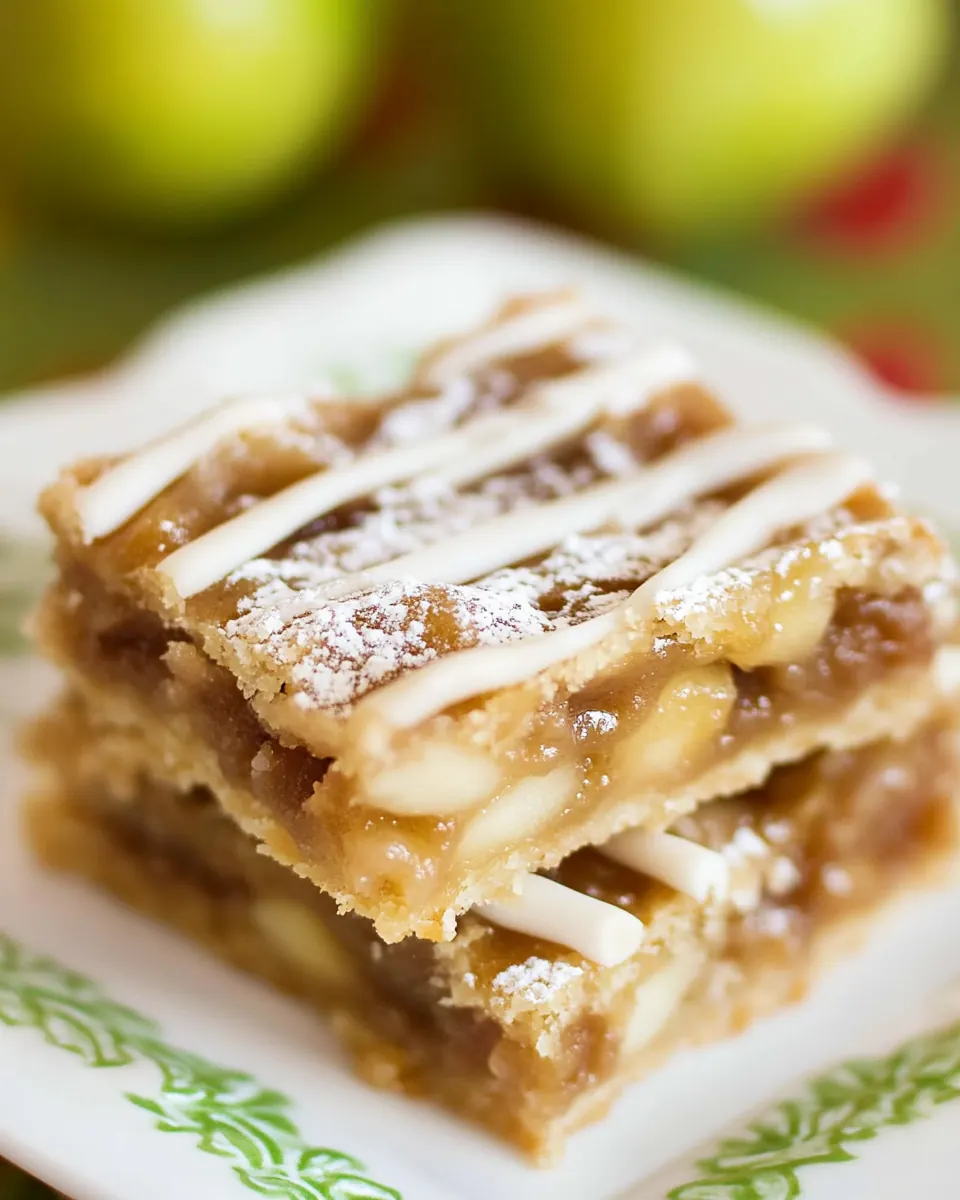
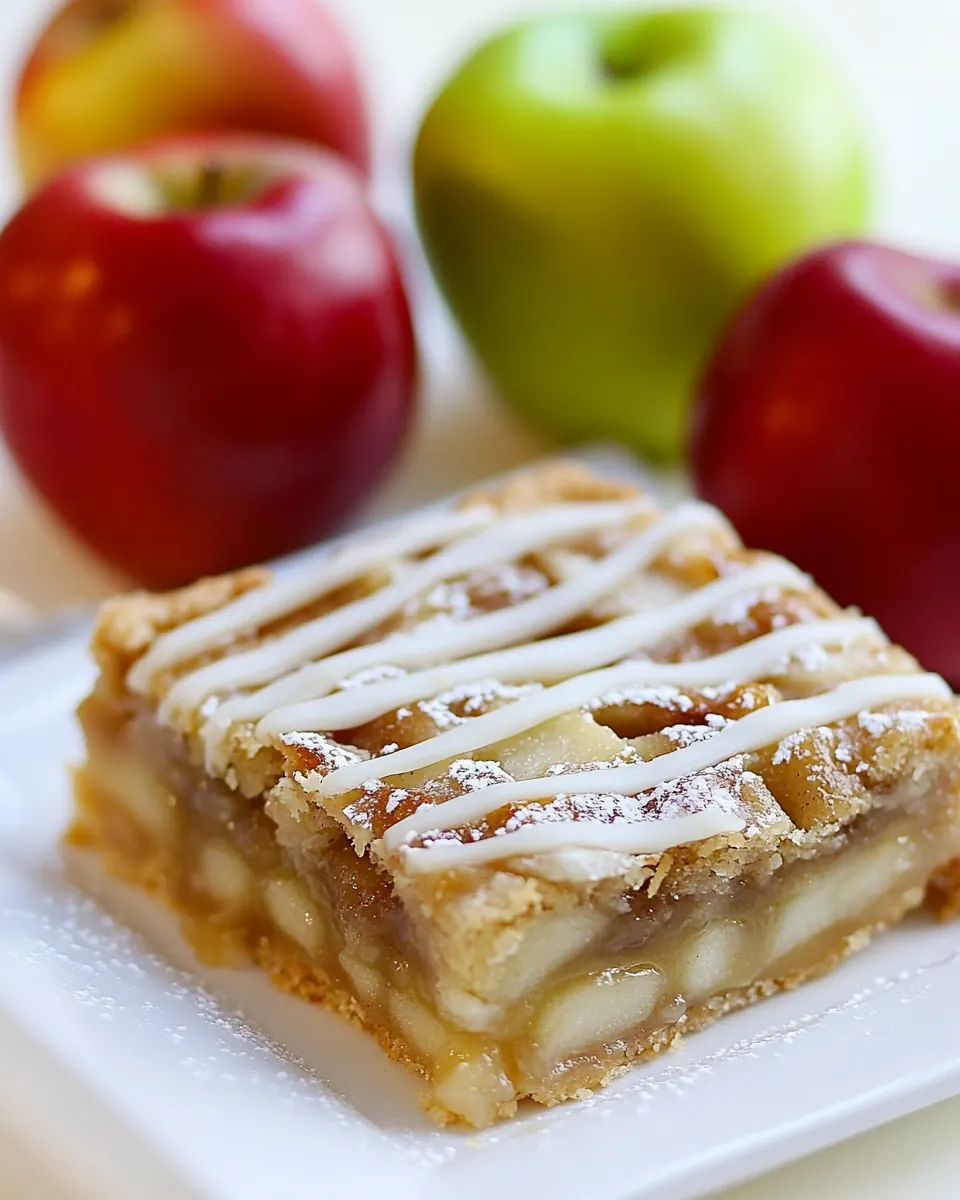
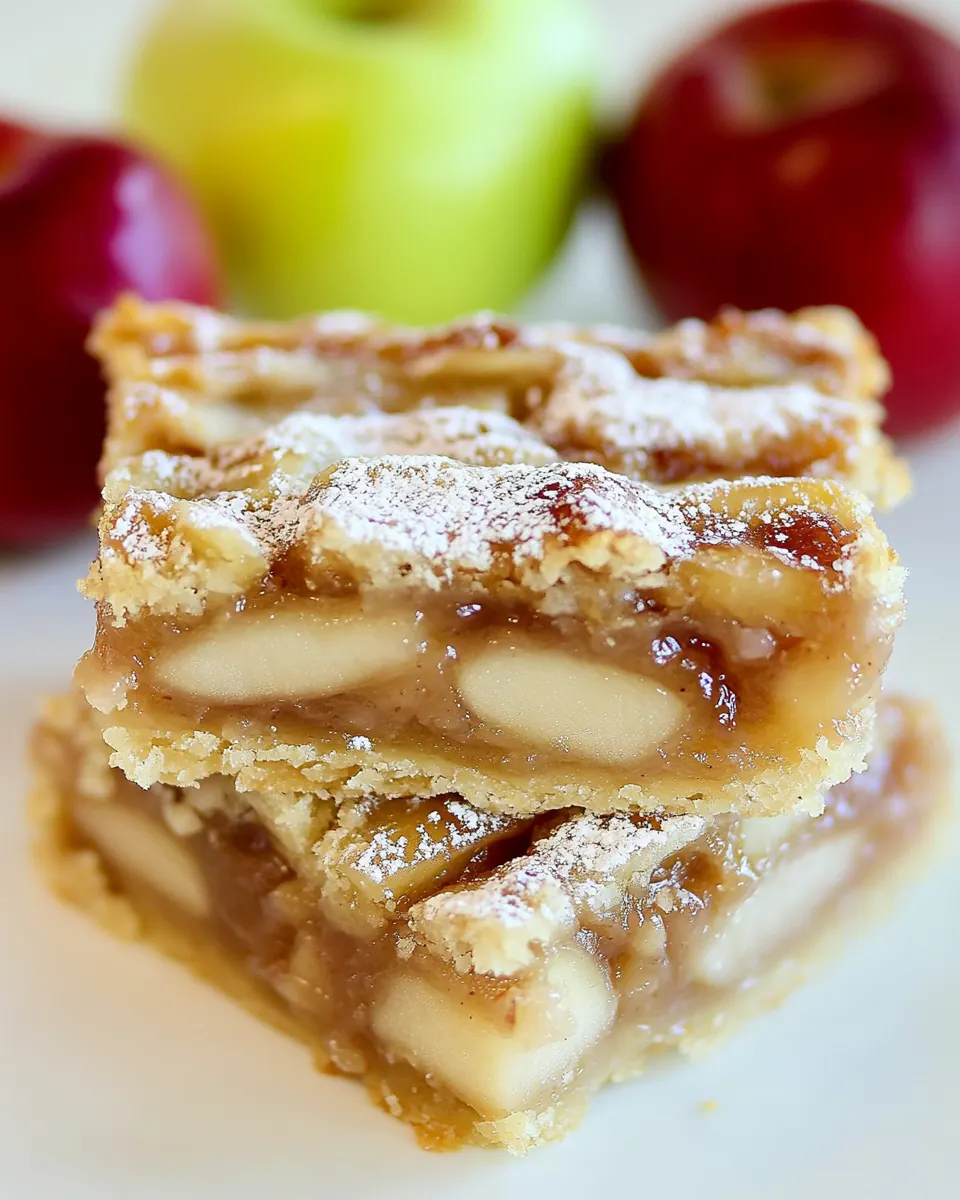
Apple Pie Bars
Apple Pie Bars are the recipe I reach for when I want the cozy, familiar flavors of a classic pie but sliced into portable, shareable squares that vanish fast at gatherings.
I remember the first time I made these, the house smelled like a bakery and my neighbor stopped by because she could not resist the scent. I told her the secret was patience and good apples, and we ended up trading stories while warm squares cooled on the counter. Over the years I tweaked the crust texture and the spice balance until the filling tasted bright yet homey, and the top crust developed a flaky, buttery snap that I still chase.
These Apple Pie Bars have become my fallback for potlucks and holiday tables because they are easy to slice and easy to transport, yet they deliver the same nostalgic satisfaction you get from a slice of pie. I like to make them a day ahead, so the flavors meld, but they are also forgiving if you bake and serve them the same afternoon. The interplay of crisp, tart granny smith apples and the warm notes of cinnamon and nutmeg keeps everyone coming back for seconds.
Recipe Snapshot
1 hr 35 mins
45 mins
50 mins
Medium
250 kcal
American
Gluten-Free, Low FODMAP
Desserts
Mixing Bowl, Pastry Cutter, Fork, 13 x 9 inch Baking Dish, Whisk, Rolling Pin
Why This Apple Pie Bars Is a Winner
Comfort in Every Bite
I love how Apple Pie Bars distill the essence of a classic pie into a handheld form, so you get that comforting apple spice without the fuss of slicing a round pie. The filling bursts with juicy, slightly tart apples, and the crumbly crust provides a buttery counterpoint.
Great for Gathering
These bars are built for sharing. I often bring a pan to neighborhood potlucks because they are simple to cut into neat squares, and guests can grab one without a fork. That portability makes them practical for busy holiday spreads, especially on Thanksgiving.
Balanced Texture
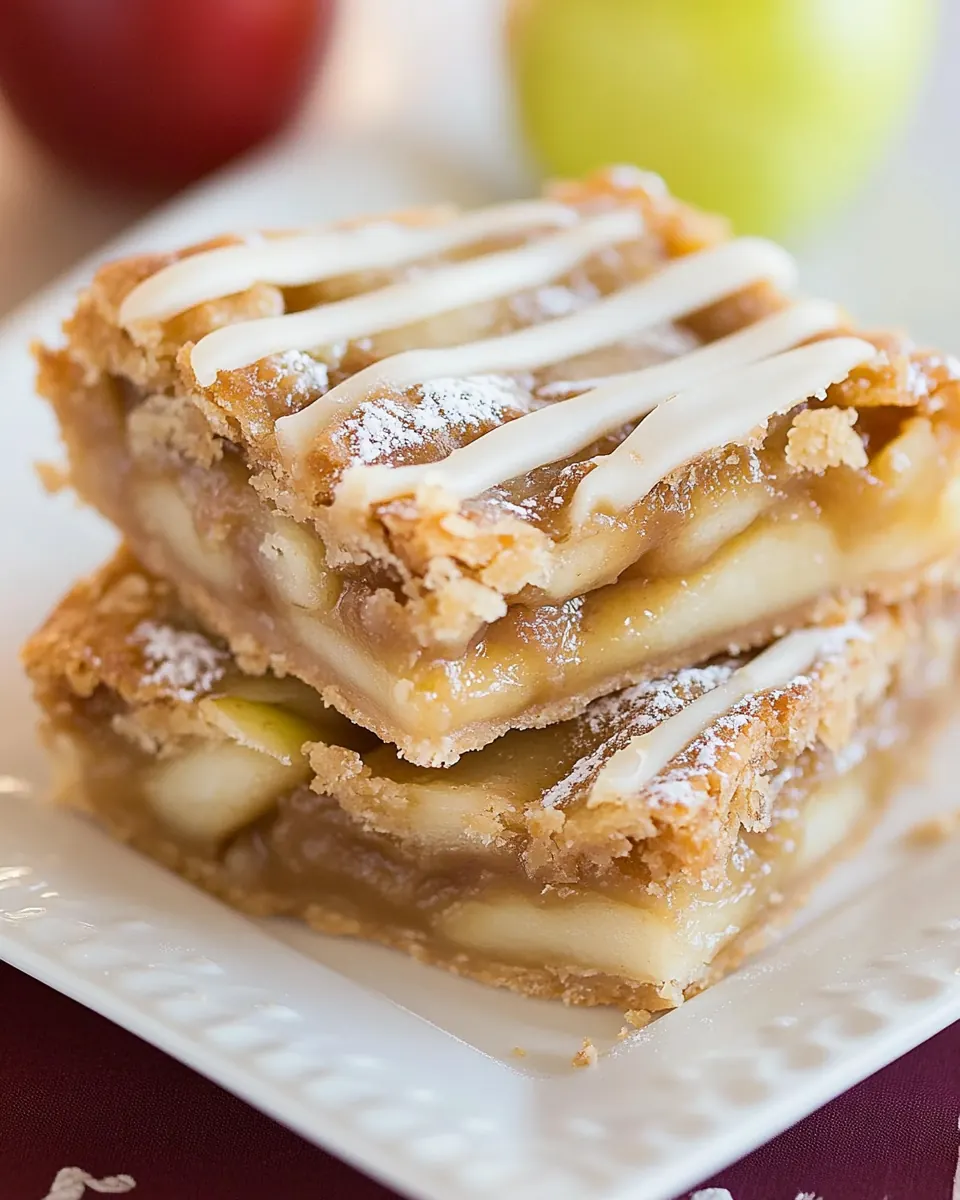
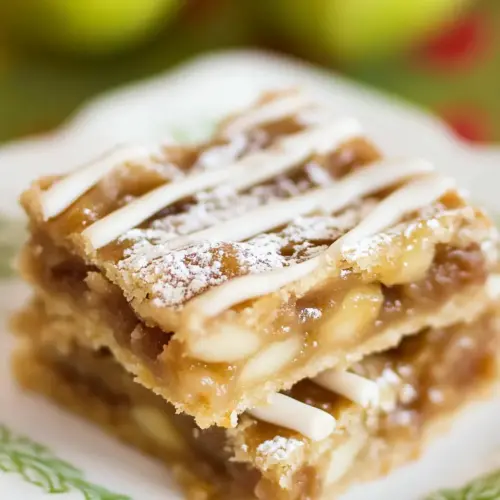
The recipe layers a tender bottom crust, a saucy apple center, and a golden top crust. I adore the contrast between the slightly chewy fruit and the crisp, powdered sugar glaze on top, it keeps the mouthfeel interesting and satisfying.
Simple, Familiar Ingredients
You do not need anything exotic to make these shine. The ingredient list reads like a pantry inventory: flour, butter, eggs, and a pile of apples. That familiarity makes the recipe approachable for bakers of all levels.
Flexible Serving Options
I appreciate how versatile the bars are. Serve them warm with a scoop of ice cream, or room temperature with a dusting of powdered sugar. They adapt to the occasion, whether a casual afternoon tea or a holiday dessert table.
What to Gather for Apple Pie Bars
These ingredients converge to create a balance of buttery crust and warmly spiced fruit. The foundation is the dough, which gives structure and a tender bite. The apples bring acidity and moisture, while the sugars and spices build depth and sweetness. The finishing touches, like the egg white wash and turbinado sugar, add color and crunch, and the glaze ties everything together.
- 2 cups all-purpose flour: Provide structure and bulk to the crust and crumble layers, creating a tender but sturdy base when combined with butter and liquid; sift or measure accurately for consistent texture and even baking.
- 1/2 tsp salt: Enhance overall flavor balance by accentuating sweetness and controlling gluten development; dissolve into dry ingredients to evenly season the dough and help stabilize the crust.
- 12 tbsp salted butter, cold and diced into cubes: Contribute richness, moisture, and flakiness to the pastry by coating flour proteins with fat, helping create tender layers; keep cold and cut into cubes to prevent greasy dough and ensure proper lamination.
- 1/4 cup + 2 Tbsp buttermilk, chilled: Add necessary moisture and a slight tang to activate tenderizing reactions in the dough while contributing a subtle acidic brightness; chill before mixing to maintain cold butter and flaky texture.
- 1 egg yolk: Enrich the dough with fat and help bind ingredients together, adding smoothness and color to the crust while limiting additional liquid compared with whole egg; incorporate gently for consistent dough.
- 2 1/4 lbs granny smith apples (about 6 medium apples): Provide tartness, natural sweetness, and texture to the filling when peeled and sliced; choose firm, crisp apples and cut uniformly so they cook evenly and hold shape within the bars.
- 2 1/2 tbsp orange juice: Impart bright citrus acidity to complement apples, helping prevent browning and adding depth to the filling; stir into apple mixture to distribute flavor without overpowering fruit.
- 1 tsp vanilla extract: Introduce warm aromatic notes that enhance fruit flavors and add complexity to the filling; add with liquid components so the extract disperses evenly throughout the mixture.
- 1/2 cup all-purpose flour: Serve as a thickening agent in the filling to absorb excess moisture and create a cohesive texture, preventing soggy bars; whisk with spices before adding to apples for even distribution.
- 1/2 cup granulated sugar: Sweeten the filling and balance tart apples while contributing slight structure to the cooked fruit mixture; dissolve into apples during maceration to draw out juices and promote caramelization.
- 1/3 cup packed light-brown sugar: Add deeper, molasses-like sweetness to the filling and support caramelization with a richer flavor profile than white sugar; pack lightly for accurate measurement and mix thoroughly into fruit.
- 1 1/4 tsp cinnamon: Provide warm, aromatic spice that complements apples and other sweet flavors, rounding out the filling’s flavor profile; mix with sugars and flour to ensure even spice distribution.
- 1/4 tsp nutmeg: Introduce subtle warmth and nutty complexity to the spice blend, enhancing overall aromatic depth; use sparingly to avoid overpowering the cinnamon and fruit flavors.
- 1 egg white: Brush on pastry surfaces to promote glossy browning and help coarse sugars adhere, contributing a professional finish and slight richness without adding bulk.
- 1 1/2 tbsp Raw Turbinado sugar: Add crunchy, sweet finishing texture and a hint of molasses on top of baked bars, enhancing mouthfeel and visual appeal; sprinkle evenly before baking to create a sparkling crust.
- 1/4 tsp cinnamon: Provide an additional layer of warm spice often used for finishing or topping, reinforcing cinnamon flavor without altering structure when dusted on baked goods.
- 1 cup powdered sugar: Create a sweet, smooth glaze when combined with liquid, adding sweetness and a silky finish to the bars while helping to seal in moisture; sift powdered sugar for lump-free icing.
- 2 tbsp half and half (milk could be substituted): Thin the glaze to a spreadable consistency and add richness; substitute with milk if necessary while adjusting quantity to achieve desired thickness.
- 1/2 tsp vanilla extract: Enhance the glaze with warm aromatic notes and depth, rounding out the finish and complementing the apple filling without adding moisture.
Cooking Method for Apple Pie Bars
These instructions walk you through making the dough, preparing the apple filling, assembling the bars, and finishing with a glaze. Read each step slowly, and rely on the sensory cues to guide you, from the dough texture to the bubbling fruit. Baking is part technique and part intuition, so pay attention to color and aroma at each stage.
- To prepare pie crust:: The first sensory clue is the flour smelling faintly nutty and the dots of cold butter bleeding butter scent as you cut it in, creating a mixture that looks like coarse crumbs. Why this matters: the tiny butter pieces steam during baking, creating flakiness, so keeping the butter cold and not over mixing is essential. Expect a slightly sandy texture that still holds together when squeezed, and avoid the common mistake of handling the dough so much that it becomes greasy and dense, which will ruin the crust's tenderness. If your kitchen is warm, chill the bowl briefly to keep the butter firm.
- Preheat oven to 350 degrees.: You should feel the kitchen begin to warm and notice a faint oven hum, and the set temperature ensures even baking for both crust and filling. An accurate oven temperature is important because if the oven is too hot the crust may brown before the apples soften, and if too cool the filling may remain undercooked. A quick mistake is assuming the oven reaches temperature instantly, so always wait until the oven indicates it's ready, and consider using an oven thermometer for precision.
- In a large mixing bowl, whisk together 2 cups flour and salt. Cut butter into flour mixture with a pastry cutter or fork until mixture resembles coarse crumbs. Add buttermilk and egg yolk to mixture and stir until mixture comes together and you are able to form a ball. Cover bowl with plastic wrap and refrigerate dough while preparing apple filling.: The combined dry ingredients smell neutral but well blended, and whisking evenly distributes the salt for consistent flavor. This step primes the dough for even texture, and when you add the butter , the flour pieces will cling to the fat, creating that coarse crumb structure you want. Avoid adding butter that has already softened to room temperature, because it will incorporate too smoothly and yield a less flaky crust.
- To prepare apple filling:: You will see a mixture dotted with pea sized pieces of cold butter , and the flour will have a dry, sandy feel. Those visual cues tell you the lamination will happen in the oven, producing flakiness. The main pitfall here is overworking the butter , which can cause the dough to become greasy rather than crumbly. If you notice the butter melting, chill the mixture before continuing.
- Peel, core and dice apples into thin and small pieces. Place diced apples in a large mixing bowl. Add orange juice and 1 tsp vanilla and toss apples to evenly coat. In a separate mixing bowl, whisk together 1/2 cup flour, granulated sugar, light-brown sugar, 1 1/4 tsp cinnamon and nutmeg. Pour flour mixture over apple mixture and toss to evenly coat, set aside.: The dough will transform from dry crumbs to a cohesive, slightly tacky ball that holds shape when pressed. The cold buttermilk and egg yolk hydrate the flour and bind the dough, improving flavor and crumb. If the dough stays too dry, a spoonful of chilled buttermilk can rescue it; conversely, too much liquid makes it sticky and hard to roll, so add sparingly. A common error is over mixing at this stage, which develops gluten and yields a tough crust.
- To assemble pie:: Chilling firms the dough so it is easier to roll, and you might notice the dough cools and becomes less tacky to the touch. Resting also allows the flour to fully hydrate, improving texture. Do not skip this rest, many find the crust becomes greasy or tears if rolled when warm, so plan ahead and chill for at least 20 minutes if possible.
- Divide pie dough into 2 equal portions. Roll one portion into a 13 x 9 inch rectangle on a lightly floured surface. Lift rolled dough into an ungreased 13 x 9 inch baking dish (the easiest way to do this is to fold the dough in half and then fold in half again, then transfer folded dough to one corner of the dish and unfold to its original shape to cover entire baking dish).: The apples emit a crisp, fresh aroma as you peel and dice them, and their exposed edges should look bright not brown once tossed with the orange juice . This acid helps preserve color and adds a bright note in the filling. When the apples are mixed with the dry sugar and spice blend, you will see them take on a glossy sheen as juices begin to release. A common mistake is cutting pieces unevenly, which creates inconsistent cooking; aim for thin, small dice so the apples soften uniformly.
- Toss apple mixture once more and pour into baking dish over pie crust. Roll remaining dough into a 13 1/2 x 9 1/2 inch rectangle and place rolled dough over apples (folding and unfolding as previously noted). In a small mixing bowl whisk egg white until foamy, brush egg white over top pie crust (you will only need about half of the egg white).: The tactile cue is a firm, crisp resistance when cutting, and the pieces should be uniform to ensure even baking. Smaller dice warms through faster and melds with the sugars to create a cohesive filling. Avoid leaving large chunks which can remain undercooked in the center of the bars, and if you notice any tough or mealy spots in apples, discard them.
- In a separate small mixing bowl whisk together 1 1/2 tbsp Raw Turbinado sugar with 1/4 tsp cinnamon. Sprinkle cinnamon sugar mixture evenly over top pie crust. Bake in preheated oven 50 – 60 minutes until golden brown and apples are tender when pierced with a toothpick.: As you toss the apples in the bowl they should glisten slightly from the applied orange juice and vanilla , and there will be a faint citrus perfume. This is the moment to evenly distribute those bright flavors so every bite tastes balanced. A frequent error is under tossing, which leaves uneven seasoning pockets, so ensure each piece is coated.
- Remove from oven and allow to cool at least 30 minutes before cutting into squares. Drizzle with optional glaze or serve with vanilla ice cream. Store bars in refrigerator in an airtight container, rewarm in microwave if desired.: The orange juice will brighten the apple flavor and prevent oxidation, while vanilla rounds the aroma. Tossing should leave a thin film over the fruit, not a puddle of liquid. Too much juice can thin the filling and make the bars soggy, so measure carefully; if the apples look watery, sprinkle the flour gradually to absorb excess moisture.
- Combine all ingredients in a small mixing bowl, whisk until smooth. Add an additional 1/2 Tbsp half and half if you'd prefer a thinner consistency.: The dry mixture should smell warmly spiced and have a slightly sandy texture. This blend will thicken the apple juices and caramelize as it bakes, so getting the ratios right impacts both texture and sweetness. The typical error here is skipping the whisking step, which can cause clumps of sugar or uneven spice pockets in the filling.
- Pour flour mixture over apple mixture and toss to evenly coat, set aside: You will see the dry mix cling to the apples, leaving them lightly dusted and ready to release cohesive filling juices while baking. Coating evenly prevents grainy pockets and assures the final bars are uniformly flavored. Avoid letting the apples sit too long after coating, as too much time may draw excessive liquid out and alter the final texture.
- To assemble pie: As you roll the dough, it should feel cool and slightly elastic, and the bottom crust will lay smoothly into the pan when transferred. Lifting the dough folded helps prevent tearing and keeps the surface tidy. If you rush and the dough sticks or tears, patch with a small piece of chilled dough instead of overworking the whole sheet, which can make it tough.
- Divide pie dough into 2 equal portions: The dough should look uniform and divide cleanly without crumbling. Equal portions ensure the top and bottom layers bake evenly and the bars have consistent thickness. If one portion is noticeably smaller, the top may brown faster, so take an extra minute to eyeball and remeasure if needed.
- Roll one portion into a 13 x 9 inch rectangle on a lightly floured surface: The dough should roll smoothly without sticking, and the surface will show a matte, slightly floured finish that indicates the right consistency. Rolling to an even thickness prevents thin spots that could burn and thick areas that could remain raw. If the dough resists stretching, let it rest chilled for a few minutes rather than forcing it, which can cause shrinkage during baking.
- Lift rolled dough into an ungreased 13 x 9 inch baking dish: Folding the dough into quarters helps transfer it without tearing; when unfolded, it should cover the pan evenly. An ungreased dish allows the crust to cling slightly and develop a crisp bottom. If the dough tears during transfer, patch gently with leftover dough pieces rather than overworking the patch, which will create dense spots.
- Toss apple mixture once more and pour into baking dish over pie crust: The apples should look glossy and slightly compacted as they settle into the crust, and you might hear a soft thump as they fill the pan. Even distribution prevents gaps and ensures every bar has a balanced filling to crust ratio. A mistake is overpacking the filling, which can cause juices to bubble over, so leave a little space along edges for expansion.
- Roll remaining dough into a 13 1/2 x 9 1/2 inch rectangle and place rolled dough over apples: The top dough should lay gently over the apples without trapping large air pockets; folding and unfolding helps manage this. The slight extra size ensures the edges meet for a neat seal. If the top slides unevenly, tuck and press gently at the edges for a tidy finish rather than stretching the dough aggressively.
- In a small mixing bowl whisk egg white until foamy, brush egg white over top pie crust: Brushing with foamy egg white gives a glossy sheen and helps the turbinado sugar adhere, producing a sparkly, crunchy surface. The visual cue is a light gloss that dries quickly before baking. Avoid using the entire egg white if the recipe calls for half, over application can pool and create uneven browning.
- In a separate small mixing bowl whisk together 1 1/2 tbsp Raw Turbinado sugar with 1/4 tsp cinnamon: This coarse sugar mixture should smell sweet and spicy and have a gritty texture that will provide a crunchy topping once baked. Sprinkling evenly gives a consistent color and bite on the crust. A common slip is dumping the sugar in clumps; use your fingers or a small spoon to distribute it evenly for uniform caramelization.
- Sprinkle cinnamon sugar mixture evenly over top pie crust: The topping should glint under light and sit uniformly on the surface, creating a decorative and textural finish. Even coverage ensures consistent browning and a pleasant crunch in every square. If you notice large piles of sugar, gently redistribute them so no section becomes overly sweet or burns.
- Bake in preheated oven 50 to 60 minutes until golden brown and apples are tender when pierced with a toothpick: The oven will fill with a warm spiced aroma as the crust browns and the filling bubbles gently, and the top should develop an even golden hue. A tester inserted into the filling should slide through softened apple pieces without resistance. If the top browns too quickly, tent with foil to prevent burning while the interior finishes cooking. Do not underbake, or the center will be gummy once cooled.
- Remove from oven and allow to cool at least 30 minutes before cutting into squares: Cooling lets the filling set so the bars slice cleanly, and you will notice the bubbling slow and the aroma mellow as they rest. Cutting too soon causes the filling to run and the slices to lose shape, so patience here preserves neat edges. A mistake is refrigerating immediately; abrupt cooling can make the crust tough.
- Drizzle with optional glaze or serve with vanilla ice cream: The glaze should be smooth and creamy, creating a thin, sweet layer that contrasts the tart apples, while a scoop of ice cream adds cold creaminess that complements the warm spices. Drizzle in a steady stream for an elegant look, and avoid over glazing which can mask the apple flavor.
- Store bars in refrigerator in an airtight container, rewarm in microwave if desired: Stored properly, the bars keep for several days and reheating briefly brings back the warm, freshly baked aroma. Let them come to room temperature for best texture before serving cold, and reheat in short intervals to avoid drying out. A common error is leaving them uncovered, which causes the crust to stale faster.
- Combine all ingredients in a small mixing bowl, whisk until smooth: The glaze should be silky and pourable with a faint vanilla fragrance, and whisking removes lumps for a glossy finish. If you want a thinner glaze, add up to an extra 1/2 Tbsp half and half , but add sparingly to avoid a runny consistency that will not set. Over thinning the glaze makes it difficult to achieve a pretty drizzle.
Tips for Success
Small techniques make a big difference with these bars. The following tips focus on texture, timing, and maximizing flavor so your final result looks bakery level and tastes irresistible. Read them before you start baking, and keep them nearby as you work.
- Keep ingredients cold, especially the butter and buttermilk, to ensure a flaky crust. If the butter softens, chill the dough briefly before rolling to prevent greasy, dense pastry.
- Measure flour correctly by spooning it into the cup and leveling it off, rather than scooping directly, to avoid a dry, tough crust from too much flour.
- Uniform apple dice ensures even cooking and prevents some pieces from being underdone while others are mushy. Aim for thin, small pieces about the size of a pea to a small cube.
- Don’t over mix the dough once liquid is added, as overworking develops gluten and leads to a tough crust rather than a tender one.
- Tent with foil if browning too quickly during baking, this allows the interior to finish cooking without burning the top crust.
- Cool before slicing for neat bars; the filling needs time to set, and premature slicing will cause juices to run and sloppy squares.
- Adjust glaze consistency by adding up to 1/2 Tbsp extra half and half if needed, but add slowly to avoid a glaze that will not set.
- Store in an airtight container in the refrigerator to preserve texture, and reheat briefly to revive that fresh baked aroma before serving.
- Use turbinado sugar on top for a crunchy, jewel like finish that adds texture contrast to the tender crust.
- Prepare a day ahead to allow flavors to meld, which often improves the taste and makes serving stress free for gatherings.
Serving This Apple Pie Bars
These bars are wonderfully adaptable, lending themselves to casual snacks, holiday dessert tables, or a comforting finish to a family meal. Below are serving ideas, pairing suggestions, and storage tips to ensure your presentation feels thoughtful and seasonal.
- Casual gatherings, serve warm squares on a platter so guests can grab one. Add a small bowl of napkins and let people help themselves.
- Holiday dessert table, display the bars in neat rows with a light dusting of powdered sugar and a drizzle of glaze for a polished look that fits right into a Thanksgiving spread.
- With ice cream, top warm bars with a scoop of vanilla ice cream to provide a creamy contrast to the spiced apples and crunchy top.
- Afternoon tea or coffee, pair a room temperature square with a mug of coffee or tea for a cozy treat that balances sweetness and acidity.
- Make ahead and store, keep cooled bars in an airtight container in the refrigerator for up to five days, or freeze individual squares wrapped tightly for longer storage, then thaw in the fridge before reheating.
- Presentation for gifting, wrap a few squares in parchment and tie with twine for a homemade gift that travels well and looks charming on a holiday plate.
- Seasonal pairings, these bars shine in the fall and pair beautifully with other autumn flavors like spiced drinks or nutty side bites for a cohesive seasonal menu.
- Reheating, warm in short bursts in the microwave or in a low oven to bring back that just baked aroma without drying the crust.
- Portioning, cut into 16 uniform squares for balanced servings, which makes them perfect for parties or potlucks.
- Serving temperature, they are enjoyable warm, at room temperature, or chilled, so choose what suits your occasion and audience.
FAQ
Conclusion
Apple Pie Bars capture the classic flavors of an apple pie in a convenient, crowd friendly square that is both satisfying and easy to serve. The balance of a buttery crust, bright granny smith apples, and warm spices creates a dessert that feels homemade and elevated at the same time. I hope you give this recipe a try, whether for a holiday table or a simple dessert night, because it brings comforting flavors with minimal fuss and maximum appeal.
Apple Pie Bars
Equipment
- Mixing Bowl
- Pastry Cutter
- Fork
- 13 x 9-inch baking dish
- Whisk
- Rolling Pin
Ingredients
- 2 cups all-purpose flour Provide structure and bulk to the crust and crumble layers, creating a tender but sturdy base when combined with butter and liquid; sift or measure accurately for consistent texture and even baking.
- 1/2 tsp salt Enhance overall flavor balance by accentuating sweetness and controlling gluten development; dissolve into dry ingredients to evenly season the dough and help stabilize the crust.
- 12 tbsp salted butter, cold and diced into cubes Contribute richness, moisture, and flakiness to the pastry by coating flour proteins with fat, helping create tender layers; keep cold and cut into cubes to prevent greasy dough and ensure proper lamination.
- 1/4 cup + 2 Tbsp buttermilk, chilled Add necessary moisture and a slight tang to activate tenderizing reactions in the dough while contributing a subtle acidic brightness; chill before mixing to maintain cold butter and flaky texture.
- 1 egg yolk Enrich the dough with fat and help bind ingredients together, adding smoothness and color to the crust while limiting additional liquid compared with whole egg; incorporate gently for consistent dough.
- 2 1/4 lbs granny smith apples (about 6 medium apples) Provide tartness, natural sweetness, and texture to the filling when peeled and sliced; choose firm, crisp apples and cut uniformly so they cook evenly and hold shape within the bars.
- 2 1/2 tbsp orange juice Impart bright citrus acidity to complement apples, helping prevent browning and adding depth to the filling; stir into apple mixture to distribute flavor without overpowering fruit.
- 1 tsp vanilla extract Introduce warm aromatic notes that enhance fruit flavors and add complexity to the filling; add with liquid components so the extract disperses evenly throughout the mixture.
- 1/2 cup all-purpose flour Serve as a thickening agent in the filling to absorb excess moisture and create a cohesive texture, preventing soggy bars; whisk with spices before adding to apples for even distribution.
- 1/2 cup granulated sugar Sweeten the filling and balance tart apples while contributing slight structure to the cooked fruit mixture; dissolve into apples during maceration to draw out juices and promote caramelization.
- 1/3 cup packed light-brown sugar Add deeper, molasses-like sweetness to the filling and support caramelization with a richer flavor profile than white sugar; pack lightly for accurate measurement and mix thoroughly into fruit.
- 1 1/4 tsp cinnamon Provide warm, aromatic spice that complements apples and other sweet flavors, rounding out the filling’s flavor profile; mix with sugars and flour to ensure even spice distribution.
- 1/4 tsp nutmeg Introduce subtle warmth and nutty complexity to the spice blend, enhancing overall aromatic depth; use sparingly to avoid overpowering the cinnamon and fruit flavors.
- 1 egg white Brush on pastry surfaces to promote glossy browning and help coarse sugars adhere, contributing a professional finish and slight richness without adding bulk.
- 1 1/2 tbsp Raw Turbinado sugar Add crunchy, sweet finishing texture and a hint of molasses on top of baked bars, enhancing mouthfeel and visual appeal; sprinkle evenly before baking to create a sparkling crust.
- 1/4 tsp cinnamon Provide an additional layer of warm spice often used for finishing or topping, reinforcing cinnamon flavor without altering structure when dusted on baked goods.
- 1 cup powdered sugar Create a sweet, smooth glaze when combined with liquid, adding sweetness and a silky finish to the bars while helping to seal in moisture; sift powdered sugar for lump-free icing.
- 2 tbsp half and half (milk could be substituted) Thin the glaze to a spreadable consistency and add richness; substitute with milk if necessary while adjusting quantity to achieve desired thickness.
- 1/2 tsp vanilla extract Enhance the glaze with warm aromatic notes and depth, rounding out the finish and complementing the apple filling without adding moisture.
Instructions
- To prepare pie crust:: The first sensory clue is the flour smelling faintly nutty and the dots of cold butter bleeding butter scent as you cut it in, creating a mixture that looks like coarse crumbs. Why this matters: the tiny butter pieces steam during baking, creating flakiness, so keeping the butter cold and not over mixing is essential. Expect a slightly sandy texture that still holds together when squeezed, and avoid the common mistake of handling the dough so much that it becomes greasy and dense, which will ruin the crust's tenderness. If your kitchen is warm, chill the bowl briefly to keep the butter firm.
- Preheat oven to 350 degrees.: You should feel the kitchen begin to warm and notice a faint oven hum, and the set temperature ensures even baking for both crust and filling. An accurate oven temperature is important because if the oven is too hot the crust may brown before the apples soften, and if too cool the filling may remain undercooked. A quick mistake is assuming the oven reaches temperature instantly, so always wait until the oven indicates it's ready, and consider using an oven thermometer for precision.
- In a large mixing bowl, whisk together 2 cups flour and salt. Cut butter into flour mixture with a pastry cutter or fork until mixture resembles coarse crumbs. Add buttermilk and egg yolk to mixture and stir until mixture comes together and you are able to form a ball. Cover bowl with plastic wrap and refrigerate dough while preparing apple filling.: The combined dry ingredients smell neutral but well blended, and whisking evenly distributes the salt for consistent flavor. This step primes the dough for even texture, and when you add the butter , the flour pieces will cling to the fat, creating that coarse crumb structure you want. Avoid adding butter that has already softened to room temperature, because it will incorporate too smoothly and yield a less flaky crust.
- To prepare apple filling:: You will see a mixture dotted with pea sized pieces of cold butter , and the flour will have a dry, sandy feel. Those visual cues tell you the lamination will happen in the oven, producing flakiness. The main pitfall here is overworking the butter , which can cause the dough to become greasy rather than crumbly. If you notice the butter melting, chill the mixture before continuing.
- Peel, core and dice apples into thin and small pieces. Place diced apples in a large mixing bowl. Add orange juice and 1 tsp vanilla and toss apples to evenly coat. In a separate mixing bowl, whisk together 1/2 cup flour, granulated sugar, light-brown sugar, 1 1/4 tsp cinnamon and nutmeg. Pour flour mixture over apple mixture and toss to evenly coat, set aside.: The dough will transform from dry crumbs to a cohesive, slightly tacky ball that holds shape when pressed. The cold buttermilk and egg yolk hydrate the flour and bind the dough, improving flavor and crumb. If the dough stays too dry, a spoonful of chilled buttermilk can rescue it; conversely, too much liquid makes it sticky and hard to roll, so add sparingly. A common error is over mixing at this stage, which develops gluten and yields a tough crust.
- To assemble pie:: Chilling firms the dough so it is easier to roll, and you might notice the dough cools and becomes less tacky to the touch. Resting also allows the flour to fully hydrate, improving texture. Do not skip this rest, many find the crust becomes greasy or tears if rolled when warm, so plan ahead and chill for at least 20 minutes if possible.
- Divide pie dough into 2 equal portions. Roll one portion into a 13 x 9 inch rectangle on a lightly floured surface. Lift rolled dough into an ungreased 13 x 9 inch baking dish (the easiest way to do this is to fold the dough in half and then fold in half again, then transfer folded dough to one corner of the dish and unfold to its original shape to cover entire baking dish).: The apples emit a crisp, fresh aroma as you peel and dice them, and their exposed edges should look bright not brown once tossed with the orange juice . This acid helps preserve color and adds a bright note in the filling. When the apples are mixed with the dry sugar and spice blend, you will see them take on a glossy sheen as juices begin to release. A common mistake is cutting pieces unevenly, which creates inconsistent cooking; aim for thin, small dice so the apples soften uniformly.
- Toss apple mixture once more and pour into baking dish over pie crust. Roll remaining dough into a 13 1/2 x 9 1/2 inch rectangle and place rolled dough over apples (folding and unfolding as previously noted). In a small mixing bowl whisk egg white until foamy, brush egg white over top pie crust (you will only need about half of the egg white).: The tactile cue is a firm, crisp resistance when cutting, and the pieces should be uniform to ensure even baking. Smaller dice warms through faster and melds with the sugars to create a cohesive filling. Avoid leaving large chunks which can remain undercooked in the center of the bars, and if you notice any tough or mealy spots in apples, discard them.
- In a separate small mixing bowl whisk together 1 1/2 tbsp Raw Turbinado sugar with 1/4 tsp cinnamon. Sprinkle cinnamon sugar mixture evenly over top pie crust. Bake in preheated oven 50 - 60 minutes until golden brown and apples are tender when pierced with a toothpick.: As you toss the apples in the bowl they should glisten slightly from the applied orange juice and vanilla , and there will be a faint citrus perfume. This is the moment to evenly distribute those bright flavors so every bite tastes balanced. A frequent error is under tossing, which leaves uneven seasoning pockets, so ensure each piece is coated.
- Remove from oven and allow to cool at least 30 minutes before cutting into squares. Drizzle with optional glaze or serve with vanilla ice cream. Store bars in refrigerator in an airtight container, rewarm in microwave if desired.: The orange juice will brighten the apple flavor and prevent oxidation, while vanilla rounds the aroma. Tossing should leave a thin film over the fruit, not a puddle of liquid. Too much juice can thin the filling and make the bars soggy, so measure carefully; if the apples look watery, sprinkle the flour gradually to absorb excess moisture.
- Combine all ingredients in a small mixing bowl, whisk until smooth. Add an additional 1/2 Tbsp half and half if you'd prefer a thinner consistency.: The dry mixture should smell warmly spiced and have a slightly sandy texture. This blend will thicken the apple juices and caramelize as it bakes, so getting the ratios right impacts both texture and sweetness. The typical error here is skipping the whisking step, which can cause clumps of sugar or uneven spice pockets in the filling.
- Pour flour mixture over apple mixture and toss to evenly coat, set aside: You will see the dry mix cling to the apples, leaving them lightly dusted and ready to release cohesive filling juices while baking. Coating evenly prevents grainy pockets and assures the final bars are uniformly flavored. Avoid letting the apples sit too long after coating, as too much time may draw excessive liquid out and alter the final texture.
- To assemble pie: As you roll the dough, it should feel cool and slightly elastic, and the bottom crust will lay smoothly into the pan when transferred. Lifting the dough folded helps prevent tearing and keeps the surface tidy. If you rush and the dough sticks or tears, patch with a small piece of chilled dough instead of overworking the whole sheet, which can make it tough.
- Divide pie dough into 2 equal portions: The dough should look uniform and divide cleanly without crumbling. Equal portions ensure the top and bottom layers bake evenly and the bars have consistent thickness. If one portion is noticeably smaller, the top may brown faster, so take an extra minute to eyeball and remeasure if needed.
- Roll one portion into a 13 x 9 inch rectangle on a lightly floured surface: The dough should roll smoothly without sticking, and the surface will show a matte, slightly floured finish that indicates the right consistency. Rolling to an even thickness prevents thin spots that could burn and thick areas that could remain raw. If the dough resists stretching, let it rest chilled for a few minutes rather than forcing it, which can cause shrinkage during baking.
- Lift rolled dough into an ungreased 13 x 9 inch baking dish: Folding the dough into quarters helps transfer it without tearing; when unfolded, it should cover the pan evenly. An ungreased dish allows the crust to cling slightly and develop a crisp bottom. If the dough tears during transfer, patch gently with leftover dough pieces rather than overworking the patch, which will create dense spots.
- Toss apple mixture once more and pour into baking dish over pie crust: The apples should look glossy and slightly compacted as they settle into the crust, and you might hear a soft thump as they fill the pan. Even distribution prevents gaps and ensures every bar has a balanced filling to crust ratio. A mistake is overpacking the filling, which can cause juices to bubble over, so leave a little space along edges for expansion.
- Roll remaining dough into a 13 1/2 x 9 1/2 inch rectangle and place rolled dough over apples: The top dough should lay gently over the apples without trapping large air pockets; folding and unfolding helps manage this. The slight extra size ensures the edges meet for a neat seal. If the top slides unevenly, tuck and press gently at the edges for a tidy finish rather than stretching the dough aggressively.
- In a small mixing bowl whisk egg white until foamy, brush egg white over top pie crust: Brushing with foamy egg white gives a glossy sheen and helps the turbinado sugar adhere, producing a sparkly, crunchy surface. The visual cue is a light gloss that dries quickly before baking. Avoid using the entire egg white if the recipe calls for half, over application can pool and create uneven browning.
- In a separate small mixing bowl whisk together 1 1/2 tbsp Raw Turbinado sugar with 1/4 tsp cinnamon: This coarse sugar mixture should smell sweet and spicy and have a gritty texture that will provide a crunchy topping once baked. Sprinkling evenly gives a consistent color and bite on the crust. A common slip is dumping the sugar in clumps; use your fingers or a small spoon to distribute it evenly for uniform caramelization.
- Sprinkle cinnamon sugar mixture evenly over top pie crust: The topping should glint under light and sit uniformly on the surface, creating a decorative and textural finish. Even coverage ensures consistent browning and a pleasant crunch in every square. If you notice large piles of sugar, gently redistribute them so no section becomes overly sweet or burns.
- Bake in preheated oven 50 to 60 minutes until golden brown and apples are tender when pierced with a toothpick: The oven will fill with a warm spiced aroma as the crust browns and the filling bubbles gently, and the top should develop an even golden hue. A tester inserted into the filling should slide through softened apple pieces without resistance. If the top browns too quickly, tent with foil to prevent burning while the interior finishes cooking. Do not underbake, or the center will be gummy once cooled.
- Remove from oven and allow to cool at least 30 minutes before cutting into squares: Cooling lets the filling set so the bars slice cleanly, and you will notice the bubbling slow and the aroma mellow as they rest. Cutting too soon causes the filling to run and the slices to lose shape, so patience here preserves neat edges. A mistake is refrigerating immediately; abrupt cooling can make the crust tough.
- Drizzle with optional glaze or serve with vanilla ice cream: The glaze should be smooth and creamy, creating a thin, sweet layer that contrasts the tart apples, while a scoop of ice cream adds cold creaminess that complements the warm spices. Drizzle in a steady stream for an elegant look, and avoid over glazing which can mask the apple flavor.
- Store bars in refrigerator in an airtight container, rewarm in microwave if desired: Stored properly, the bars keep for several days and reheating briefly brings back the warm, freshly baked aroma. Let them come to room temperature for best texture before serving cold, and reheat in short intervals to avoid drying out. A common error is leaving them uncovered, which causes the crust to stale faster.
- Combine all ingredients in a small mixing bowl, whisk until smooth: The glaze should be silky and pourable with a faint vanilla fragrance, and whisking removes lumps for a glossy finish. If you want a thinner glaze, add up to an extra 1/2 Tbsp half and half , but add sparingly to avoid a runny consistency that will not set. Over thinning the glaze makes it difficult to achieve a pretty drizzle.
Notes
- Keep ingredients cold, especially the butter and buttermilk, to ensure a flaky crust. If the butter softens, chill the dough briefly before rolling to prevent greasy, dense pastry.
- Measure flour correctly by spooning it into the cup and leveling it off, rather than scooping directly, to avoid a dry, tough crust from too much flour.
- Uniform apple dice ensures even cooking and prevents some pieces from being underdone while others are mushy. Aim for thin, small pieces about the size of a pea to a small cube.
- Don’t over mix the dough once liquid is added, as overworking develops gluten and leads to a tough crust rather than a tender one.
- Tent with foil if browning too quickly during baking, this allows the interior to finish cooking without burning the top crust.
- Cool before slicing for neat bars; the filling needs time to set, and premature slicing will cause juices to run and sloppy squares.
- Adjust glaze consistency by adding up to 1/2 Tbsp extra half and half if needed, but add slowly to avoid a glaze that will not set.
- Store in an airtight container in the refrigerator to preserve texture, and reheat briefly to revive that fresh baked aroma before serving.
- Use turbinado sugar on top for a crunchy, jewel like finish that adds texture contrast to the tender crust.
- Prepare a day ahead to allow flavors to meld, which often improves the taste and makes serving stress free for gatherings.