3 Ingredient Chili Cheese Dip
3 Ingredient Chili Cheese Dip is my go to party starter when I need something fast, cheesy, and crowd pleasing. The first time I made it I remember juggling kids homework and a ring of hungry friends in the living room, and this little dish vanished before I could refill my own plate. I still grin remembering the way the melted cheddar cheese bubbled at the edges while the aroma of seasoned Hormel Chili with No Beans warmed the kitchen, calling everyone in.
Whenever I bring out 3 Ingredient Chili Cheese Dip I like to tell the story of how simple food can feel celebratory. I often prep the cream cheese ahead so it softens and spreads like a cloud across the pie plate, and then I top it with the savory chili and a snowy blanket of shredded cheddar cheese. The result is creamy, a little tangy, and perfectly gooey. Guests always ask for the recipe, and I love that it takes fewer than five minutes to assemble, but still looks like I worked all afternoon.
What I appreciate most about 3 Ingredient Chili Cheese Dip is its nostalgia factor. It hits the comfortable notes of bowl food I grew up with, while staying modern and kitchen friendly. You can set it on the table with crunchy tortilla or corn chips, and it instantly becomes the centerpiece. Over the years I’ve learned a couple of small tweaks that make the texture silkier and the top melt more evenly, and I share them below so your version turns out exactly the way you want.
Recipe Snapshot
25 mins
5 mins
20 mins
Easy
180 kcal
American
Gluten-Free, Low FODMAP
Appetizers
Pie Plate
Why We Love This 3 Ingredient Chili Cheese Dip
Fast to the Table
I adore how quickly 3 Ingredient Chili Cheese Dip comes together, which is huge for busy nights or unexpected guests. I can usually have it in the oven within five minutes, and that speed means more time to chat, set out plates, and relax. The clock friendly nature of this dip makes it a reliable option when you want flavor without the fuss.
Big Flavor From Few Ingredients
There is something magical about combining softened cream cheese, a flavorful can of Hormel Chili with No Beans, and shredded cheddar cheese. Each ingredient plays a clear role, building a layered taste profile. The cream cheese provides a silky base, the chili delivers seasoning and body, and the cheddar cheese offers that sharp, melty finish. Together they create more than the sum of their parts.
Perfect for Gatherings
I always reach for this recipe for potlucks and game days because it travels well and serves a crowd. It’s easy to reheat if needed, and it pairs naturally with chips and crudites. When I bring it, I know people will gravitate to the table, giving me a warm, social kitchen moment each time.
Comforting and Familiar
There is a comfort factor here that I find irresistible. The creamy texture and cheesy pull trigger the same happy reactions I remember from childhood snacks. I like recipes that feel like home, and 3 Ingredient Chili Cheese Dip does that without being fussy.
Flexible and Forgiving
While the recipe is already minimal, it tolerates small adjustments, like swapping chip types or using a different cheddar. I appreciate recipes that forgive tiny missteps, and this one does. If you underbake by a couple minutes, it still tastes great; if you leave it a touch longer it develops a golden top that some people prefer.
What to Gather for 3 Ingredient Chili Cheese Dip

The ingredients here are intentionally simple, built around creamy texture and savory depth. I think of the cream cheese as the smooth foundation, the Hormel Chili with No Beans as the seasoned backbone, and the shredded cheddar cheese as the melty finishing touch. Together they create contrast in mouthfeel and a satisfying, cheesy pull that makes the dip irresistible. Keep the chips on hand for crunch and salt, they complete the experience.
- 8 oz . cream cheese softened: Soften and spreadable, provides a rich and creamy base that binds the dip together and adds silky texture and tangy flavor when melted.
- 10.5 oz . Hormel Chili with No Beans: Hearty and savory, supplies well-seasoned chili flavor and meaty texture without beans, contributing bulk and robust spice notes to the dip.
- 2 cups shredded cheddar cheese: Sharp and melty, offers cheesy flavor and gooey stretchiness when melted, enhancing richness and creaming the overall mouthfeel.
- Tortilla or corn chips for serving: Crunchy and salty, used for scooping and contrasting the dip’s creaminess while adding texture and a satisfying bite.
Recipe Directions for 3 Ingredient Chili Cheese Dip

I like to keep the directions straightforward so the dip turns out consistent every time. These steps are written to guide your senses, so you know what to watch and smell as the dip goes from assembled to bubbling and irresistible.
- Preheat oven to 350 and spread cream cheese into the bottom of a pie plate.: As the oven warms to 350 degrees you should notice a gentle warmth in the kitchen that primes the air for baking, and the preheating ensures an even, steady heat for melting. When you spread the softened cream cheese into the pie plate, use a rubber spatula or the back of a spoon to create a smooth, level layer so the chili sits evenly on top. The cream cheese should be very soft but not melted, which helps it keep structure while allowing the top to meld into the other layers. One mistake is trying to spread cold cream cheese, which tears and leaves lumps. If that happens, give it a few more minutes to soften rather than overworking it, and you will avoid an uneven base.
- Top cream cheese with chili and spread evenly.: When you spoon the Hormel Chili with No Beans over the cream cheese , aim for a uniform layer so every bite has both components. You will notice the chili has a rich aroma of spices, and spreading it evenly prevents thick pockets that might stay colder in the center. Smooth it gently so it covers the base without pushing the cream cheese out of place. A common error is piling too much chili in one spot, which creates uneven heating and can lead to a center that takes longer to bubble. Spread steadily and check the edges to keep a consistent thickness.
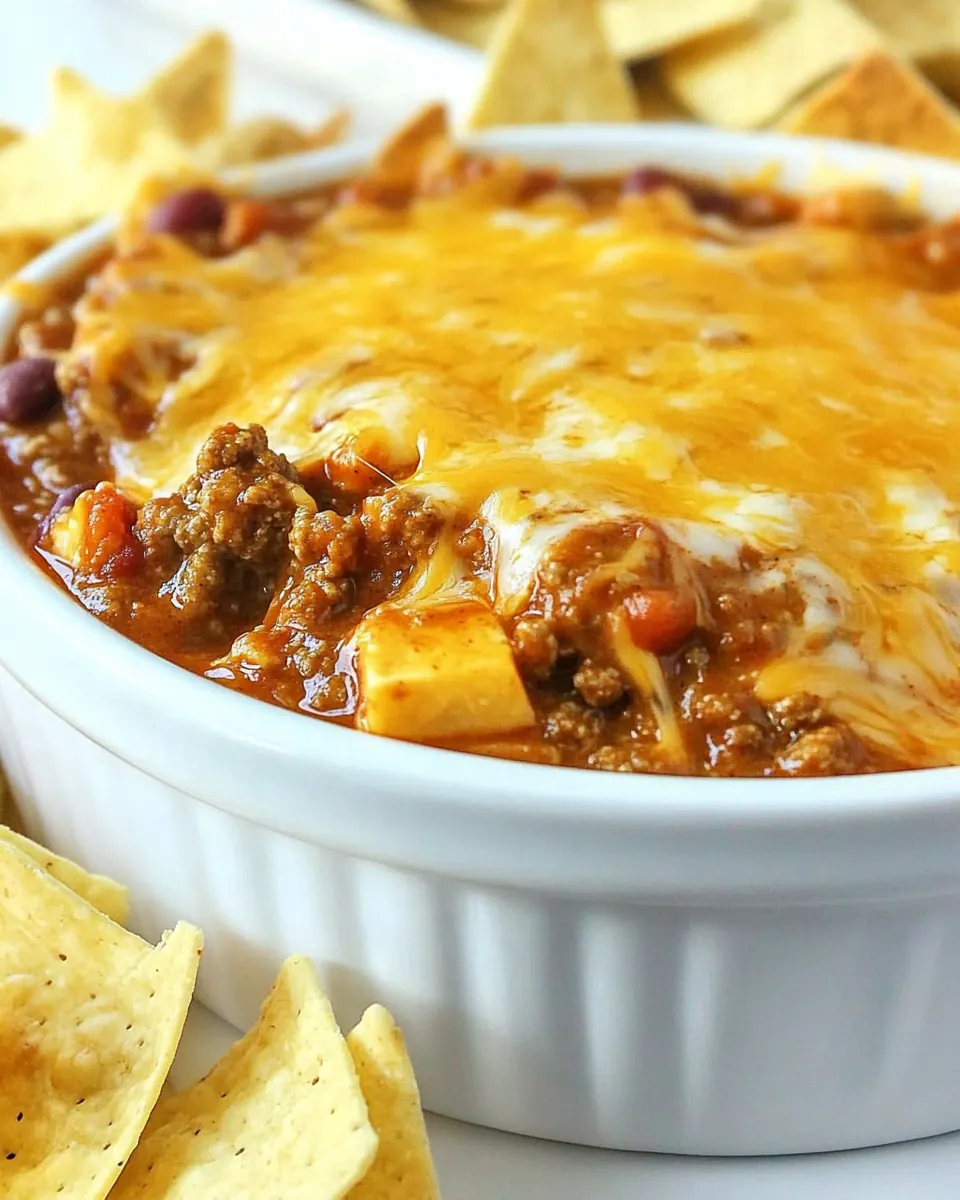
- Sprinkle shredded cheese on the top and bake in the oven for 20 minutes.: As you scatter the shredded cheddar cheese over the chili, listen for the slight rustle of the cheese settling and watch for an even coating that will melt uniformly. Once in the oven at 350 degrees, you will begin to smell the cheeses warming within about ten minutes, and by twenty minutes the top should be bubbling and turning lightly golden around the edges. This bubbling indicates the fats are melting and flavors are marrying. Avoid opening the oven repeatedly, because the heat loss can extend baking time and prevent a consistent melt. If the top browns too quickly, lower the rack or tent with foil for a few minutes to maintain a smooth, gooey finish.
- Remove Hormel chili dip from the oven and serve immediately with tortilla chips.: When you pull the dish from the oven, the surface should be glossy and bubbling, with occasional golden spots. Let it rest for just a minute so the layers settle, but serve while still hot so taps of cheddar cheese stretch and the texture is irresistible. The aroma will be warm and savory, drawing people in. A frequent mistake is letting it cool too long, which causes the cheese to firm up and lose that silky pull. If that happens, a quick ten to fifteen second zap in the microwave will revive the gooey texture.
Ways to Customize

This dip is a simple canvas, and small adjustments can tailor it to your crowd. Below are practical, tested ideas to vary texture, heat, and presentation while staying true to the original three ingredient spirit.
- Try a sharper cheddar: Using a sharper cheddar cheese will add a tangier bite that contrasts nicely with the creamy base.
- Swap the chili brand: If you prefer more heat, select a spicier can of Hormel Chili with No Beans or a similar brand to increase warmth without changing the method.
- Topping ideas: Add a light sprinkle of additional cheddar cheese halfway through baking for extra crust, but keep the assembly otherwise unchanged.
- Presentation upgrade: Serve the dip in a shallow, wide pie plate for more melting surface and easier scooping with chips.
- Make ahead strategy: Assemble and refrigerate the layered dip for up to twenty four hours, then bring to room temperature before baking to reduce uneven heating.
What Goes Well With This 3 Ingredient Chili Cheese Dip
This dip pairs easily with crunchy sides and casual occasions, making it great for gatherings throughout the year. I often plan a simple spread so the dip is the star, but you can complement it with light salads or hearty sides depending on the event. Consider the serving environment, and choose chips or dippers that can hold a generous scoop.
- Sturdy tortilla chips: These are the classic companion, offering the right crunch and salt to balance the creamy dip.
- Corn chips for a stronger crunch: If you want a heartier bite, corn chips hold up well and provide a pleasing texture contrast.
- Game day spread: Pair the dip with simple finger foods and cold drinks to create a relaxed, communal table where people can graze.
- Potluck friendly: Transport the baked dip in a covered pie plate and reheat briefly before serving to ensure it arrives warm and bubbly.
- Seasonal pairing: For fall gatherings, place warm napkins nearby and serve with a mix of chips and sliced vegetables for variety.
FAQ
Conclusion
What makes 3 Ingredient Chili Cheese Dip special is its combination of simplicity and big, comforting flavor. With just a creamy base, savory chili, and melty cheese you get a crowd pleasing appetizer that feels both nostalgic and fresh. Give it a try for your next gathering, and enjoy how easily it becomes the table conversation starter. I promise that once you taste that warm, cheesy pull, you will find many occasions to bake it again.

3 Ingredient Chili Cheese Dip
Equipment
- Pie Plate
Ingredients
- 8 oz . cream cheese softened Soften and spreadable, provides a rich and creamy base that binds the dip together and adds silky texture and tangy flavor when melted.
- 10.5 oz . Hormel Chili with No Beans Hearty and savory, supplies well-seasoned chili flavor and meaty texture without beans, contributing bulk and robust spice notes to the dip.
- 2 cups shredded cheddar cheese Sharp and melty, offers cheesy flavor and gooey stretchiness when melted, enhancing richness and creaming the overall mouthfeel.
- Tortilla or corn chips for serving Crunchy and salty, used for scooping and contrasting the dip’s creaminess while adding texture and a satisfying bite.
Instructions
- Preheat oven to 350 and spread cream cheese into the bottom of a pie plate.: As the oven warms to 350 degrees you should notice a gentle warmth in the kitchen that primes the air for baking, and the preheating ensures an even, steady heat for melting. When you spread the softened cream cheese into the pie plate, use a rubber spatula or the back of a spoon to create a smooth, level layer so the chili sits evenly on top. The cream cheese should be very soft but not melted, which helps it keep structure while allowing the top to meld into the other layers. One mistake is trying to spread cold cream cheese, which tears and leaves lumps. If that happens, give it a few more minutes to soften rather than overworking it, and you will avoid an uneven base.
- Top cream cheese with chili and spread evenly.: When you spoon the Hormel Chili with No Beans over the cream cheese , aim for a uniform layer so every bite has both components. You will notice the chili has a rich aroma of spices, and spreading it evenly prevents thick pockets that might stay colder in the center. Smooth it gently so it covers the base without pushing the cream cheese out of place. A common error is piling too much chili in one spot, which creates uneven heating and can lead to a center that takes longer to bubble. Spread steadily and check the edges to keep a consistent thickness.
- Sprinkle shredded cheese on the top and bake in the oven for 20 minutes.: As you scatter the shredded cheddar cheese over the chili, listen for the slight rustle of the cheese settling and watch for an even coating that will melt uniformly. Once in the oven at 350 degrees, you will begin to smell the cheeses warming within about ten minutes, and by twenty minutes the top should be bubbling and turning lightly golden around the edges. This bubbling indicates the fats are melting and flavors are marrying. Avoid opening the oven repeatedly, because the heat loss can extend baking time and prevent a consistent melt. If the top browns too quickly, lower the rack or tent with foil for a few minutes to maintain a smooth, gooey finish.
- Remove Hormel chili dip from the oven and serve immediately with tortilla chips.: When you pull the dish from the oven, the surface should be glossy and bubbling, with occasional golden spots. Let it rest for just a minute so the layers settle, but serve while still hot so taps of cheddar cheese stretch and the texture is irresistible. The aroma will be warm and savory, drawing people in. A frequent mistake is letting it cool too long, which causes the cheese to firm up and lose that silky pull. If that happens, a quick ten to fifteen second zap in the microwave will revive the gooey texture.
Notes
- Try a sharper cheddar: Using a sharper cheddar cheese will add a tangier bite that contrasts nicely with the creamy base.
- Swap the chili brand: If you prefer more heat, select a spicier can of Hormel Chili with No Beans or a similar brand to increase warmth without changing the method.
- Topping ideas: Add a light sprinkle of additional cheddar cheese halfway through baking for extra crust, but keep the assembly otherwise unchanged.
- Presentation upgrade: Serve the dip in a shallow, wide pie plate for more melting surface and easier scooping with chips.
- Make ahead strategy: Assemble and refrigerate the layered dip for up to twenty four hours, then bring to room temperature before baking to reduce uneven heating.