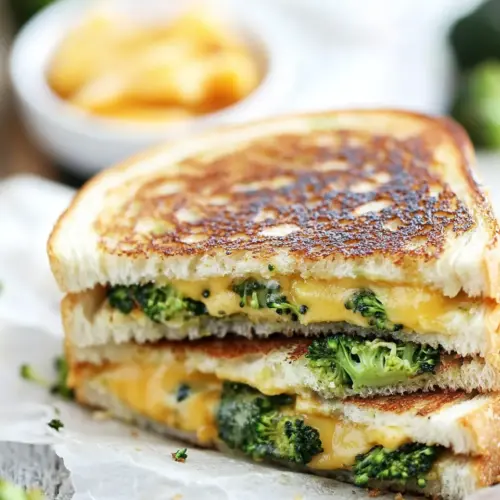
Roasted Broccoli Grilled Cheese
Roasted Broccoli Grilled Cheese is a creamy, crispy sandwich that balances gooey cheddar with lightly charred broccoli. This easy weeknight dinner comes together fast, delivering melty texture and savory depth in every bite. It’s perfect for a quick lunch or cozy evening meal, and it gives a smart, veggie forward twist to a classic comfort favorite.
Equipment
- Oven
- Sheet Pan
- Skillet
- Spatula
Ingredients
- Florets from 1 medium head broccoli about 1/2 pound, chopped small Chopped small to an even size so florets cook quickly and fit inside the sandwich; provides a tender, roasted vegetable texture and fresh, slightly nutty flavor after roasting. Helps add volume, nutrition, and a mild earthiness that balances the richness of cheese and butter. Retains some bite when roasted, contributing pleasant contrast to melted cheddar.
- 2 tablespoons olive oil Used to coat broccoli florets so they roast evenly and develop caramelized edges; brings a fruity, smooth fat that aids browning and flavor dispersion. Also helps prevent bread from sticking to pans when grilling and enhances mouthfeel in each bite. Adds a subtle savory backbone without overpowering other flavors.
- 1/2 teaspoons salt Measured to season the broccoli and overall sandwich for balanced savoriness; helps bring out natural flavors and enhance the cheddar’s depth. Sprinkled during roasting to improve caramelization and used sparingly so the sandwich doesn’t become overly salty. Works with butter and oil to elevate taste complexity.
- 1/4 teaspoon freshly cracked black pepper Added in small amount to provide a bright, slightly sharp heat that complements the richness of cheese and butter. Cracked for fresher, more aromatic pepper than pre-ground, it livens the roasted broccoli and grilled bread. Used sparingly to avoid overwhelming the sandwich’s milder flavors.
- Unsalted butter softened Softened for easy spreading on bread to ensure even browning and a crisp, golden exterior when grilling; imparts a rich, creamy flavor that complements cheddar and roasted broccoli. Applied to the outside of slices for frying or grilling and can also be used inside for extra richness. Allows the sandwich to develop a satisfying crunch while keeping the interior moist.
- 6 to 8 slices bread Sliced to assemble sandwiches and provide the sturdy structure needed to hold cheese and broccoli; chosen types affect texture and toasting performance. Used in the specified quantity to make multiple sandwiches for serving, with slices placed around fillings to create even grilling contact. Absorbs butter and crisps to a golden finish while encasing the melted cheese.
- 1 cup cheddar cheese shredded or thinly sliced Shredded or thinly sliced to melt evenly and bind the broccoli filling together; contributes sharp, creamy, and tangy flavor that defines the grilled cheese character. Distributed across bread slices so it melts uniformly and creates gooey, cohesive layers with roasted florets. Provides the primary cheesy richness and savory profile of the sandwich.
Instructions
- Preheat the oven to 400 degrees F.: As you warm your oven to 400 degrees F , you should notice the faint hum of heat beginning to circulate. Preheating ensures the broccoli starts roasting immediately, producing even caramelization rather than steaming, which preserves texture. A common mistake is not preheating, which can lead to soggy florets, so always wait until the oven reaches temperature before putting the pan in. The hot air transforms the edges to golden brown, and you will smell the first hints of sweetness as sugars begin to react.
- On a sheet pan, mix the broccoli, oil, salt, and pepper. Roast for 8 to 10 minutes, or until the broccoli is evenly roasted but not burnt. Remove from the oven and allow to cool.: Right after tossing the broccoli with olive oil , salt , and black pepper , spread it in a single layer on a sheet pan so each floret sees direct heat. During the first few minutes the kitchen will start to smell green and slightly sweet; by the eighth to tenth minute, the tips should show golden spots and the stems should be tender when pierced. Cooling is crucial because hot roasted florets can release steam that makes the sandwich soggy, so let them rest briefly. Avoid crowding the pan, which causes steaming instead of roasting, and check early if your oven runs hot to prevent bitter burnt bits.
- Heat a skillet over medium-low heat.: Bringing your skillet to a steady medium low temperature gives you control as the butter browns and the bread crisps. You want a gentle sizzle when the sandwich hits the pan, not an aggressive roar, because moderate heat lets the cheddar melt thoroughly while the exterior achieves an even golden color. A frequent error is using too high heat, which burns the bread before the cheese melts. Listen for a soft crackle and watch for the butter foaming but not smoking, that indicates the right range.
- Spread butter evenly on one side of each slice of bread. Dividing the ingredients evenly, layer cheese on the unbuttered side of half of the bread slices, then add chopped broccoli in the middle and more cheese on top so that the broccoli lies between two layers of cheese. This keeps the small pieces of broccoli from falling out as the cheese melts. Top each with another slice of bread, butter side out.: When you spread softened unsalted butter on the outer faces of the bread , aim for a thin, even coating so the crust browns uniformly. As you assemble, start with a layer of cheddar on the unbuttered side, then mound the cooled roasted broccoli , and finish with more cheddar . The double layer of cheese acts like glue, anchoring the florets as it liquefies. If the broccoli is too hot or steaming, your cheddar can separate and produce a watery pocket, so using cooled florets helps. Keep the sandwich snug but not overstuffed to maintain even contact with the skillet.
- Grill in the skillet, turning sandwiches over once, until the cheese melts and the bread is evenly toasted.: As soon as the sandwich meets the warm skillet, you will hear a gentle sizzle and smell butter toasting; that is your cue. Press lightly with a spatula to ensure even contact and patience pays off here because a slow melt yields silky cheddar that binds the broccoli . After several minutes, lift an edge to check for deep golden color, then flip carefully and repeat. The ideal interior will be bubbling and molten, while the exterior is crisp and evenly browned. Avoid flipping too often; that prevents consistent browning and can tear the bread. If your heat is slightly high and the bread is darkening too fast, lower the flame and continue slowly until the center is fully melted.
- Note-for gluten-free use gluten-free bread.: If you choose gluten free bread , treat it the same way but be aware many gluten free loaves brown faster, and their crumb can be more delicate. Toast over slightly lower heat to avoid over darkening, and you may prefer pressing lightly rather than heavy flipping to keep the sandwich intact. One common pitfall is not accounting for the different moisture absorption of gluten free slices, which can affect crispness, so adjust timing accordingly and check often to reach that balance of crisp crust and creamy interior.
Notes
- Trim and size matters, cut the broccoli into consistent, small florets so they roast evenly and sit neatly inside the sandwich.
- Cool before assembling, allow the roasted broccoli to cool briefly to avoid releasing steam that makes the sandwich soggy.
- Even buttering, spread softened unsalted butter thinly and evenly on the outer slices of bread for uniform browning without greasy spots.
- Medium low heat, cook on moderate heat so the cheddar melts into a silky layer while the bread turns golden but not burnt.
- Double up the cheese, placing cheddar both under and over the broccoli helps keep bits from escaping and improves melt coverage.