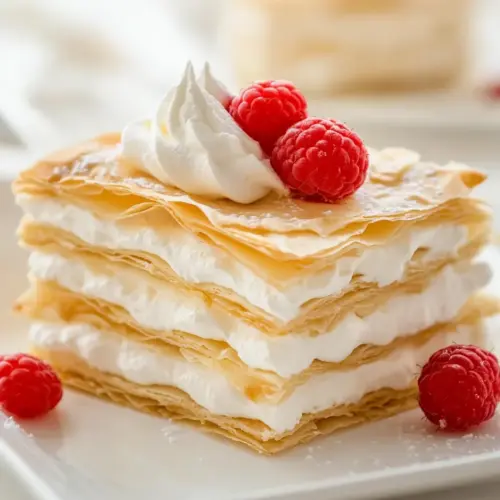
Phyllo Napoleon
Phyllo Napoleon is a crispy layered dessert combining flaky phyllo dough and airy whipped heavy cream, finished with fresh strawberries and a dusting of powdered sugar. The contrast of textures and bright fruit makes it a show stopping yet approachable treat, perfect for an easy weeknight dessert or an elegant gathering. Make it for when you want something impressive but simple to pull together.
Equipment
- Oven
- Baking Sheet
- Parchment Paper
- Mixing Bowl
- Electric Mixer
- Piping Bag
Ingredients
- 9 sheets phyllo dough thawed if frozen Thawed and delicate, provides the light, flaky layers that form the pastry’s crisp structure when baked; handle gently to avoid tearing and brush with butter between layers for golden browning.
- 4 tablespoons unsalted butter melted Melted and rich, contributes to browning and separates phyllo layers while adding a silky, savory richness that balances the dessert’s sweetness; distribute evenly to ensure even crispness.
- 1 cup heavy cream chilled Chilled and voluminous, whips into a stable cream that creates the airy, creamy filling between phyllo layers; keep cold to achieve firm peaks and a smooth texture.
- 2 tablespoons powdered sugar Finely sweetened and powdery, stabilizes and lightly sweetens whipped cream without adding graininess; sift in gradually while whipping to maintain a consistent sweetness.
- 1/3 cup powdered sugar or more, for dusting Finely milled and decorative, used to dust the finished napoleon for a delicate, sweet finish and visual contrast; apply sparingly to avoid sogginess on the pastry surface.
- 4 -8 strawberries fresh, hulled & sliced, or berries of choice Fresh and juicy, provides bright acidity and fruity freshness to cut through the rich cream and flaky pastry while adding color and texture when sliced and arranged.
Instructions
- Preheat the oven to 350° F.: You will notice a warm, even heat filling the kitchen as the oven reaches 350° F , which is perfect for crisping phyllo dough without burning it. Preheating ensures the sheets begin to brown immediately and evenly, creating that sought after golden color. A common mistake is placing cold sheets into a partially heated oven, which causes uneven texture, so wait until the temperature stabilizes before baking.
- Line a baking sheet with parchment paper or a silicone mat.: Lining the pan gives a smooth surface and prevents sticking, which helps the phyllo dough lift easily after baking. You will feel the smoothness under the sheets and hear a more delicate crack as they cool. Avoid using an unlined pan, because direct contact can cause uneven browning and sticking, which damages the fragile layers when you remove them.
- Cut stacked phyllo sheets into rectangles (about 3×5 inches).: When you slice the stacked sheets into rectangles, the clean edges help the final presentation look intentional and sharp. Use a sharp knife or pizza cutter to glide through layers, and you will see tidy edges that make assembly simpler. Cutting on an unstable surface or with a dull blade can shred the sheets, leading to irregular pieces that are harder to layer neatly.
- Separate 2–3 sheets per layer, brushing melted butter between each layer.: As you separate and brush with melted butter , the sheets should shimmer slightly, and you will smell a warm, toasty butter aroma when brushed consistently. This step creates thin pockets that crisp independently during baking. A pitfall is overloading with butter, which makes layers greasy and prevents that delicate crisp snap, so use a thin, even coating.
- Place stacks on the baking sheet. Cover with another silicone mat or parchment and a second tray to weigh them down.: Weighing the stacks keeps the layers flat and ensures even contact with heat, resulting in uniform crisping and a consistent golden tone. You may notice a faint press mark from the weight as the layers bake, which is normal. Skipping the weight can lead to uneven puffing and warped sheets that will be harder to stack; using a heavy tray helps avoid that.
- Bake for 10–15 minutes, until golden and crisp. Let cool completely.: During baking you will see the color move from pale to a deep golden brown, and the aroma will shift to nutty and toasty. The sound of cooled sheets is a satisfying brittle crack, which indicates they are done. Pulling sheets out too early results in limp pastry, while leaving them too long risks burning, so watch for even golden edges and dryness across the surface.
- In a cold bowl, beat heavy cream with powdered sugar until soft peaks form. Transfer to a piping bag if using.: As you whip chilled heavy cream with powdered sugar , it will thicken and become glossy, with soft peaks that hold shape but still have a gentle bend. Using a cold bowl and cold heavy cream speeds whipping and improves stability. Overwhipping turns the cream grainy and buttery, so stop when soft peaks appear and keep it chilled until ready to use.
- Layer: phyllo → whipped cream → phyllo → whipped cream → phyllo.: When you assemble, the first contact is the fragile crisp of baked phyllo dough followed by the cool, velvety feel of whipped heavy cream , creating a contrast of temperature and texture. I press lightly to even the layers without compressing them flat, preserving air pockets for crunch. A common error is adding too much cream, which can cause slippage and sogginess, so aim for balanced portions that maintain structure.
- Dust with powdered sugar and top fresh sliced strawberries, or berries of choice.: The final dusting of powdered sugar and bright placement of strawberries adds visual contrast and a sweet finish. You will see a soft white veil over the top layer, and the fruit will glisten against it. If you dust too early or use overly wet fruit, the sugar can dissolve into a paste, so dust just before serving and arrange fruit last for the best look and texture.
Notes
- Use different berries Swap strawberries for raspberries, blueberries, or sliced stone fruit to change acidity and color while preserving texture contrast.
- Adjust sweetness Increase or reduce the powdered sugar in the whipped heavy cream to match the ripeness of your fruit and personal preference.
- Toast the butter Briefly brown the unsalted butter before brushing for a deeper, nuttier aroma that complements the toasted phyllo dough.
- Make smaller portions Cut the rectangles into bite sized pieces for party servings, assembling mini Napoleons for easy finger food.
- Keep components separate Bake and store the phyllo dough sheets in an airtight container, then whip the heavy cream and assemble just before serving to maximize crispness.