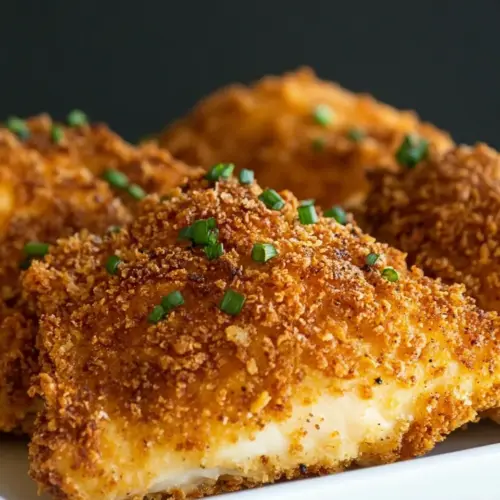
Oven Fried Chicken
Oven Fried Chicken delivers crispy, golden crust and juicy meat without deep frying. This easy weeknight dinner uses panko and a light egg whites wash for maximum crunch and simple spices for warm flavor. Its an approachable crowd pleaser that reheats well, perfect when you want comfort food with less fuss.
Equipment
- Wire Rack
- Baking Sheet
- Mixing Bowls
- Instant read thermometer
Ingredients
- 2 cups Panko bread crumbs Provide a crunchy, airy coating that crisps in the oven; panko yields a lighter, flakier texture than regular breadcrumbs and helps achieve a restaurant-style crust. Combine with seasonings and a little oil to promote even browning and prevent dryness during baking.
- 2 tbsp olive oil Moisten the panko and encourage browning; tossing breadcrumbs with olive oil helps crisp the exterior while adding a subtle fruity flavor. Use sparingly so the crust becomes golden without becoming greasy.
- 1 tsp paprika Add warmth and mild smokiness that complements savory poultry; paprika deepens color and enhances overall flavor without overpowering. Sprinkle into the breadcrumb mix to balance other herbs and spices.
- 1/2 tsp dried thyme Introduce an aromatic, slightly floral note that pairs well with chicken; dried thyme offers depth and a savory herbal backbone. Use in the coating blend where it will release flavor as it heats.
- 1/2 tsp garlic powder Bring gentle savory garlic essence to the coating; garlic powder disperses evenly for consistent flavor throughout the crust. Use to enhance umami and round out the spice mix without adding moisture.
- 1/4 tsp cayenne pepper Contribute a sharp, warming heat to the seasoning blend; cayenne pepper provides a controlled kick that livens the crust. Use a modest amount to avoid overpowering the herbs and paprika.
- Salt and freshly ground black pepper Season to taste and balance flavors; salt enhances all other seasonings while black pepper adds a fragrant, mild heat. Apply evenly to the chicken and coating to ensure a well-seasoned finish.
- 3 large egg whites Bind the dry coating to the chicken and help form a crisp exterior; egg whites create an adhesive, low-fat layer that allows crumbs to stick without added yolk fat. Whisk lightly before dredging and dip each piece thoroughly for even coverage.
- 8 (5 - 6 oz each) bone-in, skinless chicken thighs, visible excess fat trimmed Provide the main protein and substantial portions for serving; bone-in, skinless thighs offer juicy, flavorful meat that stays moist during baking. Trim excess fat for a cleaner finish and ensure pieces are uniformly sized for even cooking.
Instructions
- Preheat oven to 400 degrees F. Place a large wire rack over an 18 by 13-inch baking sheet, spray wire rack with non-stick cooking spray.: The moment before you start to coat is when the oven needs to be ready, so preheating to 400 degrees F ensures the heat is consistent. You will notice warm air hitting the panko crust as soon as the pieces go in, which initiates browning. The wire rack allows hot air to circulate around each piece, preventing soggy bottoms and encouraging even color. A common mistake is skipping the rack and placing the chicken directly on the sheet, which often leads to steaming and a limp crust. If you do not have a rack, elevate the chicken slightly so air can flow beneath the pieces.
- Pour Panko into a shallow mixing bowl. Drizzle with olive oil and toss and rub with fingertips to evenly moisten.: Start by feeling the texture as you rub the olive oil into the panko . The crumbs should become slightly clustered and take on a faint sheen, which is the visual cue for even oil distribution. The oil promotes golden browning in the oven and helps the spices adhere. If the crumbs seem too oily, add a few more dry crumbs to rebalance. Avoid overworking them, because overly compacted crumbs will not produce the same airy crunch.
- Add paprika, thyme, garlic powder, cayenne pepper and season with salt and pepper to taste then toss.: Mix the spices through the crumbs until the color is uniform and you can smell the garlic and paprika when you lift the bowl. This aromatic signal tells you the seasoning is evenly distributed. Tossing ensures each flake of panko carries flavor, which translates into more depth in each bite. A typical oversight is not tasting a pinch of the seasoned crumbs; do this carefully to gauge salt and heat levels before coating the chicken .
- In a separate shallow mixing bowl, whisk together egg whites, salt and pepper until slightly frothy.: Whisking the egg whites until they are just frothy creates surface tension that helps crumbs stick. You want a light foam, not soft peaks. The texture should be slightly bubbly and easy to coat the meat with. If the egg whites are over whisked and stiff, they will not act the same as a binder. Seasoning the whites lightly ensures the coating is seasoned from the inside out.
- Working with one pieces of chicken at a time, dip both sides of chicken in egg white then transfer to Panko mixture and dredge both sides in mixture while pressing crumbs to adhere, sprinkle some crumbs over top as well and press.: When you pick up a piece, notice how the egg white clings and creates a tacky surface. Pressing the seasoned panko into the surface with your fingertips ensures thorough coverage and encourages the crumbs to remain attached during baking. Sprinkle extra crumbs on top for a more robust crust. A frequent error is shaking off excess eggs before pressing, which can lead to sparse adhesion. Be decisive when pressing, but avoid compressing the crumbs into a paste, you still want a light, fractured texture.
- Transfer to prepared wire rack spacing evenly apart.: As you place each coated piece on the rack, listen for the quiet clack of crumbs settling, and look for even spacing so hot air circulates. Crowding causes steaming, which will soften the crust and reduce browning. If your pan looks crowded, use a second sheet to give each piece room. Also, try to place thicker pieces toward the center of the sheet where heat is most consistent.
- Bake in preheated oven until golden brown and cooked through (center of thickest portion should register 165ºF on an instant read thermometer), about 50 minutes. Serve warm.: As the chicken bakes, you will see the panko turn a toasty golden brown and the kitchen will fill with roasted, savory aromas. The sound is more of a gentle crackle than a sizzle, and juices will run clear when the center reaches 165ºF . The internal temperature is the most reliable doneness cue, so use an instant read thermometer toward the thicker parts. A common slip is relying on color alone, which can be misleading with dark meat. If the crust is browning too quickly, tent loosely with foil and continue until the thermometer reads safe temperature.
Notes
- Prep a shallow assembly station, with one bowl for the seasoned panko and another for the whisked egg whites, so you can move quickly and coat uniformly without overhandling the meat.
- Adjust spice to taste, start with the listed amounts and taste a tiny pinch of seasoned panko before coating to tweak salt or heat, this prevents surprises at the table.
- Use a reliable thermometer to confirm the thickest part of each thigh reaches 165ºF, which ensures safety and prevents overcooking that dries the meat.
- Space pieces evenly on the wire rack to allow hot air circulation; overcrowding leads to steaming and a limp crust instead of a crisp one.
- Tent with foil if necessary when the crust is browning faster than the meat cooks through, this stops further browning while allowing internal temperature to rise.
- Repurpose leftovers by warming in a 350 degree F oven to revive crispness, rather than microwaving which makes the crust soggy.