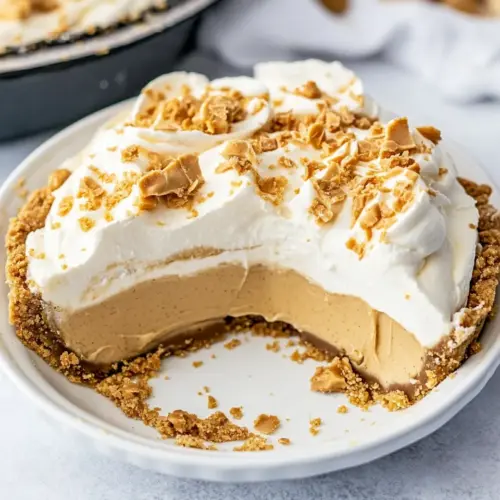
No Bake Peanut Butter Pie
No Bake Peanut Butter Pie is a creamy, easy to assemble dessert that combines rich peanut butter and silky instant vanilla pudding for a luscious, sliceable filling. Perfect for gatherings or make ahead treats, this pie offers a crisp graham cracker base and cloudlike whipped topping for delightful textural contrast, ideal for anyone seeking an effortless, crowd pleasing dessert to share.
Equipment
- Whisk
- Mixing Bowl
- Spatula
- Pie Dish
- Refrigerator
Ingredients
- 19 -inch graham cracker crust from scratch or store bought, see note Provide a sturdy sweet base for the pie and can be homemade or purchased ready-made; presses into the pan to hold the filling and adds a crunchy texture contrast to the creamy filling.
- 13.4 ounces box instant vanilla pudding mix see note Create instant structure and vanilla flavor in the filling while thickening quickly when mixed with milk; dissolves into a smooth custard-like base that stabilizes the whipped topping and peanut butter.
- 3/4 cup (200 g) peanut butter creamy or chunky Add rich, nutty flavor and creamy texture to the filling while contributing body and a slightly savory balance; can be smooth or chunky to vary mouthfeel and richness.
- 1 1/4 cup (296 ml) milk see note Contribute liquid to hydrate and activate the instant pudding mix, determining the final consistency of the filling; use the specified amount for correct set and creaminess.
- 1 teaspoon vanilla extract Provide aromatic sweetness that enhances the vanilla pudding and peanut butter flavors; small amount rounds out the filling’s overall flavor profile without overpowering it.
- 28 -ounce containers whipped topping divided Supply light, airy volume and creamy texture to lighten the dense peanut butter-pudding mixture; reserve a portion as garnish or for layering to create a fluffy, stable pie topping.
Instructions
- Whisk pudding mix, milk, peanut butter, and vanilla together. Fold in one container of whipped topping. Pour into prepared pie crust. Cover with plastic wrap. Chill for at least 2 hours.: Warm aromas of peanut butter become more pronounced as the mixture smooths, and you should feel the whisk breaking down any tiny lumps so the batter looks glossy. The sound is a steady, light whisking rhythm, and visually you want a homogeneous pale tan that reflects light slightly. This step matters because a smooth base prevents graininess in the final filling, ensuring each bite is creamy. If the mixture separates or looks curdled, continue whisking patiently and scrape the sides of the bowl, adding a splash more milk if it seems too stiff. Common mistake to avoid: rushing and leaving undissolved pudding streaks which will create uneven pockets of texture.
- Before serving: top with additional whipped topping.: As you gently fold, you will notice the batter lighten and develop a softer sheen, almost like clouds melding into the pudding base. The visual cue to stop folding is when streaks of white disappear into an even, airy tan color without streaks. The technique preserves trapped air, making the filling light instead of dense, and that lightness contrasts beautifully with the crunchy crust. Troubleshooting note: if you overfold the mixture will slump and lose volume, so use a wide spatula and fold with gentle sweeping motions rather than stirring aggressively.
- Store in refrigerator for up to 3 days. Pie can also be frozen for a cold treat or to store.: Pouring the filling in, you will hear a quiet thud as the mixture settles into the graham cracker crust , and you should see the surface self level as the filling finds the edges. Press the filling gently with the back of a spoon if you need to coax it to the rim, but avoid compressing the air out. This step sets the geometry for neat slices and ensures an even set across the pie. A common error is overfilling, which can cause overflow when chilled, so stop just shy of the rim.
- Cover with plastic wrap: The wrap traps moisture and prevents the pie from absorbing fridge aromas, and you will want the wrap to barely touch the filling surface to avoid blemishes. The sealed environment helps the pudding set into a sliceable texture, and it keeps the topping fresh. If droplets collect on the wrap, that is normal, but if they run onto the crust it may soften edges excessively. Avoid pressing the wrap into the filling which will leave imprints on the top.
- Chill for at least 2 hours: During chilling the filling firms and the flavors marry, and you will notice the filling go from silky loose to sliceable with a gentle jiggle. The cool, clean smell of the fridge will calm the creaminess and allow the peanut butter to sit beautifully with the vanilla. This period is crucial because insufficient chilling yields a runny slice, so be patient and let the structure set fully. A typical mistake is cutting too early which gives you sloppy portions instead of clean wedges.
- Before serving: top with additional whipped topping : Adding the reserved whipped topping creates visual contrast and a soft pillow on each slice, and you can pipe or dollop depending on your mood. The cold topping should feel featherlight against the denser filling and will slightly melt into the surface for a glossy finish. This finishing touch makes every forkful alternately creamy and fluffy, enhancing the eating experience. Avoid applying the topping too early or it may weep; add it just before serving for best texture.
- Store in refrigerator for up to 3 days: Keeping the pie chilled preserves the texture and flavor, and you will notice the edges firming slightly over time which can be desirable. Cover the pie lightly with plastic or place it in an airtight container to prevent fridge odors from altering the taste. If you see any weeping on the surface, blot it gently before adding fresh whipped topping. A storage mistake is leaving the pie uncovered which dries the crust and dulls the filling aromas.
- Pie can also be frozen for a cold treat or to store: Freezing yields a firmer, almost ice cream like texture that some people adore, and it makes the dessert travel ready. Wrap tightly to avoid freezer burn and thaw in the refrigerator for gentler melting. When partially thawed the pie slices are easier to cut cleanly. Avoid refreezing after thawing which negatively affects texture, and label with a date so you use it within a reasonable window.
Notes
- Use a different crust Swap to an Oreo crust or a shortbread crust for a chocolatey or buttery foundation. Each crust shifts the flavor balance, with Oreo adding a bold chocolate contrast and shortbread giving a tender, biscuit like base that pairs beautifully with the nutty filling.
- Chunky versus creamy peanut butter Choosing chunky adds little pockets of crunch that play against the smooth pudding, while creamy yields a velvety filling. Both are valid; pick based on whether you want a textural surprise in every bite.
- Adjust sweetness If your peanut butter is already sweetened, reduce the amount of added sugar in related notes or choose a lower sugar instant pudding to keep the profile balanced and avoid cloying richness.
- Make mini versions Prepare the filling in small jars or tart pans for individual servings that are travel friendly. These set faster and make portion control simple for gatherings.
- Freeze for a different texture Frozen slices become a cool, firm treat that resembles semifreddo. Freeze fully for a few hours and slice with a warm knife for clean portions, but do not refreeze after thawing.
- Play with toppings Use a sprinkle of chopped nuts on the whipped topping for a visual and textural accent, but add them just before serving so they keep their crunch.