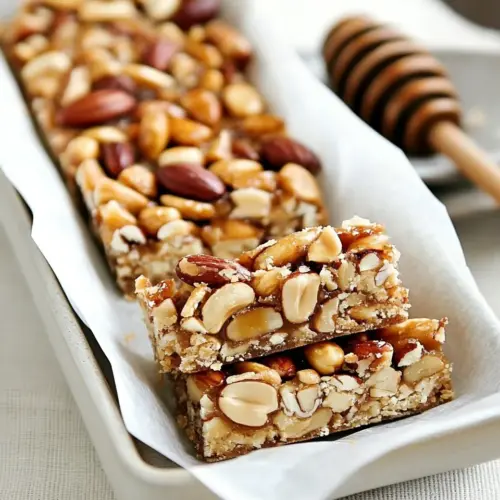
Honey Nut Bars
Honey Nut Bars are chewy, crunchy, and irresistibly buttery with toasted nuts and a glossy honey caramel topping. This easy bar recipe balances a tender, almond infused crust with a sticky, nut studded layer for a snack that’s perfect for gatherings or grab and go treats. Make a pan for entertaining or weeknight dessert because they store beautifully and always disappear fast.
Equipment
- Oven
- 9 x 13-inch baking pan
- Aluminum Foil
- Food Processor
- Medium Saucepan
- Wire Rack
- Sharp Knife
Ingredients
- 1/2 cup whole blanched almonds, toasted 1/2 cup granulated sugar 11-1/4 oz. (2-1/2 cups) unbleached all-purpose flour 1/2 tsp. baking powder 1/2 tsp. kosher salt 6 oz. (3/4 cup) cold unsalted butter, cut into 1/2-inch pieces 1 large egg, lightly beaten Provide structure and flaky texture by combining toasted whole blanched almonds, granulated sugar, unbleached all-purpose flour, baking powder, kosher salt, cold unsalted butter, and a lightly beaten egg to form a rich shortbread-like base; toasting the almonds concentrates their flavor and adds crunch, while cold butter cut into pieces yields tender, crumbly layers when baked. Balance sweetness and leavening by creaming the sugar with egg and incorporating the dry ingredients until just combined, producing a sturdy crust that supports the sticky nut topping without becoming soggy.
- 3/4 cup packed light brown sugar 3 oz. (6 Tbs.) unsalted butter 1/3 cup clover honey 1/2 tsp. table salt 2 Tbs. heavy cream 1 teaspoon pure vanilla extract 3 cups whole salted mixed nuts, toasted Create a glossy, caramel-like topping using packed light brown sugar, unsalted butter, clover honey, table salt, heavy cream, and pure vanilla extract, then fold in toasted whole salted mixed nuts to provide a sweet, sticky, and crunchy layer that contrasts the buttery base; cooking the sugar, butter, and honey together develops depth of flavor while cream and vanilla enrich the texture and taste. Adjust salt and toasting level of the mixed nuts to enhance savory notes and ensure a satisfying bite that adheres well to the shortbread foundation.
Instructions
- Position a rack in the center of the oven and heat the oven to 350°F. Line a 9 x 13-inch baking pan with aluminum foil and spray the foil with cooking spray. Be sure to leave a bit of foil extending on the shorter sides of the pan, the foil will act as 'handles' when you remove the finished bars from the pan.: The warm oven gives you an immediate, reliable environment so the crust bakes evenly; you should feel the oven heat and hear the faint hum as it holds temperature. The foil lining will glint in the light and the sprayed surface prevents sticking, making removal a breeze. Leaving foil 'handles' is a smart move, because once the bars cool they can be lifted out cleanly, avoiding tugging that could crumble the crust. A common mistake is skipping the foil or spraying it unevenly, which can lead to the bars sticking and breaking when you try to remove them.
- In a food processor, finely grind the almonds and sugar. Add the flour, baking powder, and salt and pulse to blend. Add the butter and pulse until it's the size of small peas, 5 to 6 one-second pulses. Add the egg and pulse just until the dough begins to gather into large clumps.: The moment you grind the almonds with the granulated sugar , a fragrant almond aroma will lift from the machine; that nuttiness is key for the crust. When you pulse in the butter , aim for small pebble sized bits, because those pieces will melt during baking and create pockets of tender flakiness. The dough should look shaggy and just start to collect when you add the egg , not overworked into a smooth ball. Overmixing will activate gluten and make the crust tough, so stop pulsing as soon as large clumps form. A frequent pitfall is running the processor too long, which warms the butter and changes the texture.
- Using your fingertips, press the dough into the bottom of the prepared pan and about 1 inch up the sides to form a 1/4-inch-thick side crust. Using the tines of a fork, dock the crust evenly all over.: As you press the dough, the surface will feel cool and slightly tacky; use gentle, even pressure so the thickness is uniform from center to edge. Docking with a fork creates tiny vents that prevent the crust from puffing and ensures an even bake, producing a flat surface for the topping to sit on. When pressing up the sides, keep the edge consistent so the bars cut uniformly later. A common error is pressing too thin in some areas, which can lead to overly browned or brittle edges, so check visually that the layer looks even before baking.
- Bake until light golden brown on the edges and the center looks dry, 15 to 20 minutes. Cool the crust on a rack.: During baking you will notice the aroma of toasted almonds and butter filling the kitchen, and the edges will deepen to a gentle golden color. The center should lose its glossy wet look and appear set, though not overly dark. Cooling on a rack allows air to circulate and avoids steam making the crust soggy; if you skip this it risks a limp base that will not support the topping properly. One trap is underbaking, which leaves a gummy center that makes slicing messy; if in doubt, give it the full 20 minutes and let it cool fully.
- Bring the sugar, butter, honey, and salt to a boil in a medium saucepan over medium-high heat, stirring often. Slowly and carefully add the cream and return to a boil. Remove from the heat and carefully add the vanilla and nuts, stirring to coat.: As the light brown sugar , unsalted butter , and clover honey come together, the mixture will transform into a shimmering, syrupy concoction with a toffee like scent. When you add the heavy cream , do so slowly, because contact with the hot syrup can bubble vigorously; stir calmly until it smooths out. Once you stir in the vanilla extract and the toasted whole salted mixed nuts , the mixture will glisten and the nuts should be evenly coated. The 'why' here is that boiling briefly concentrates the sugars to create that sticky binding quality for the topping. A frequent mistake is rushing the process and not bringing it fully back to a boil after adding the cream, which can leave the topping too loose.
- Pour the nut mixture over the crust and spread evenly with a spatula. Tilt the pan to help spread the liquid to the edges and corners. Bake until the topping has just started to bubble slowly in the center, about 20 minutes.: As you pour the mixture, it should cascade into a thick, glossy layer that slowly settles over the base; the sound is a soft pour, not a splash. Using a spatula and tilting the pan helps the topping reach every edge, ensuring even distribution of nuts . In the oven the top will lose its high gloss slightly and small, slow bubbles will appear in the center, signaling readiness. This step creates the chewy, bonded layer that defines the bars; undercooking here yields a runny topping, while overbaking can make the nuts hard and brittle. Watch closely during the final minutes to avoid hard caramelization.
- Use the foil 'handles' to remove the bars from the pan and place on a wire rack to cool completely.: Lifting the pan by the foil handles feels satisfying and prevents stress on the bar edges. Cooling on a wire rack ensures air circulates beneath so the topping sets without trapping steam. The surface will firm and the aroma of toasted nuts will mellow into a warm, rich perfume. A common slip up is trying to cut while still warm, which leads to messy, deformed pieces; patience with cooling ensures clean slices.
- Place bars onto a cutting board and cut into 16 bars with a sharp knife. Take care to peel the foil away from the bars before serving.: Once cooled, the bars will have a shiny, set top and a firm but tender crust; using a sharp knife will produce neat edges. Peeling the foil away carefully prevents tearing the sides, and slicing into 16 equal pieces gives nice, shareable portions. You may wipe the knife between cuts for clean edges. One typical error is using a dull knife, which drags the topping and creates ragged pieces, so always use a sharp blade and steady pressure.
Notes
- Check nut doneness visually: When toasting the mixed nuts, watch for an even golden color and aromatic scent, because they can go from perfect to bitter in seconds.
- Pulse carefully: In the food processor, pulse in short bursts to avoid warming the butter, which helps maintain a tender crust texture.
- Even pressing technique: Use the bottom of a measuring cup to press the dough evenly into the pan for consistent thickness across the crust.
- Slow cream addition: Add the heavy cream slowly to the boiling sugar and honey mixture to prevent an aggressive boil over and to achieve a smooth sauce.
- Sharp knife for slicing: Use a well sharpened knife and wipe it between cuts for clean, attractive bars that hold their shape.