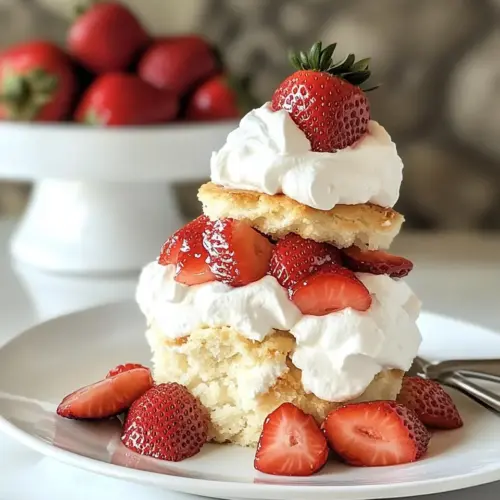
Classic Strawberry Shortcake
Classic Strawberry Shortcake bursts with bright strawberries, flaky biscuits, and airy whipped cream. This easy spring dessert layers juicy macerated fruit and tender biscuits for a crowd pleasing treat, perfect as an easy weeknight dessert or festive gathering finale. Make it for its fresh flavors and simple, showy presentation.
Equipment
- Oven
- Box grater
- Mixing Bowl
- Biscuit cutter
- Whisk
Ingredients
- 3 -4 cups fresh strawberries, sliced Provide bright, juicy sweetness and vibrant color to the shortcake, adding natural flavor and a slightly tart contrast to the cream and biscuit; slice to release juices that can be macerated with sugar to create a syrupy topping; contribute texture and freshness that balances the rich components of the dessert.
- 1/4 cup plus 2 tablespoons sugar Add controlled sweetness and help macerate the fruit when combined with strawberries, drawing out juices to enhance flavor and create a glossy sauce; measure precisely to avoid over-sweetening while allowing the natural berry character to shine; offer versatility by adjusting quantity to taste or recipe preference.
Instructions
- Mix crushed and sliced berries with sugar. Let it sit while preparing biscuits.: The aroma here is immediate as the sugar pulls glossy juices from the strawberries , creating a fragrant, ruby liquid that sings of spring. I usually use a fork to lightly crush a portion of the fruit, releasing more juice without pulverizing everything, which preserves texture. You should see the syrup thicken slightly and bubbles of juice along the edges; that visual cue means the sugar is doing its job. Why this matters, the syrup soaks into the biscuit and seasons every layer, offering an even, juicy bite. A common mistake is rushing this step, which leaves the berries dry and prevents that lovely saucy finish.
- Preheat oven to 425º.: Heat translates to texture here, so get your oven to a steady 425 degrees, which yields a crisp exterior while keeping interiors tender. I preheat early because a hot oven ensures the butter layers steam quickly, creating flakiness. You might notice a faint, warm smell as the oven comes up to temperature, which is reassuring. If the oven is cooler than advertised, biscuits will spread and become dense, so use an oven thermometer if you suspect your dial is off.
- Whisk together flour, salt, baking powder, and sugar in a medium bowl.: As you whisk, the dry mixture should look evenly pale and aerated, with no clumps. This even distribution is crucial so the leavening reacts uniformly during baking. The flour will have a slightly powdery scent and a light texture. A frequent error is skipping the whisk, which can leave pockets of baking powder that create uneven rising.
- Using the largest holes on a box grater, grate frozen butter into dry ingredients.: The sound of butter grating is almost therapeutic, a soft, metallic rasp. Those coarse bits look like snowflakes in the flour and are essential for creating flaky layers. The butter must be frozen so it stays separate from the flour until baking; if it softens, it will smear and yield a dense biscuit. If your kitchen is warm, work quickly or chill the bowl between steps.
- Toss butter with flour, then using your hands, rub the butter into the dry ingredients till the mixture looks like cornmeal.: Your hands will feel the cool, crumbly texture as you palm the butter into the flour. The mixture should resemble coarse cornmeal with visible butter flecks, which melt into pockets during baking. This is why texture matters, because those pockets steam and lift the layers. Don’t overwork it, or the butter will incorporate too thoroughly and you will lose flakiness.
- Beat egg slightly and add to the half and half. Pour into the flour mixture.: The beaten egg blended with half and half adds richness and helps bind the dough. When poured, the mixture should glisten and create pockets that are tacky but not wet. The egg also helps with color, giving a golden top. If your liquid is too warm, it can start softening the butter prematurely, so keep ingredients cold.
- Toss together till most of the flour is incorporated. Lightly flour the counter or work surface and gently knead the biscuit dough till it comes together.: The dough will feel shaggy at first, then gradually smooth into a soft ball. Gentle kneading brings together the mixture without developing gluten, which keeps the biscuits tender. You want to press and fold rather than aggressively knead; overworking will create a tough texture. Watch for a slightly tacky surface that holds shape without sticking excessively.
- Pat into a 3/4-inch thick rectangle and cut rounds with a 2 3/4-inch biscuit cutter.: As you pat the dough, you will see distinct layers and small butter pockets; those are great signs. Cut straight down rather than twisting the cutter to keep the edges defined, which helps the biscuits rise evenly. The height of the dough matters because thicker rounds yield taller, flakier biscuits. A common slip is rolling too thin, producing flat, heavy results.
- Gently gather leftover dough and fold and roll to a 3/4-inch thickness and cut out another biscuit or two.: The remaining dough often makes the best biscuits because it is worked slightly more, creating layered flakiness. Fold it gently to maintain pockets of butter and roll just enough to form another round. Keep the pieces cool, because warmed dough loses structure. If you find the scraps are sticking, chill them briefly to firm up the butter.
- Place biscuits on a baking dish, brush with beaten egg white, and sprinkle with coarse sugar. Bake for about 12-14 minutes. Cool for about 10 minutes before serving.: The brush of egg white gives a glossy finish while coarse sugar adds a pleasing crunch. In the oven you will see the tops puff and color to a warm golden hue, and a faint, buttery aroma fills the kitchen. Baking time is where lift transforms into texture, and pulling them too early leaves underdone centers. After baking, the cooling period lets the interiors set so they slice cleanly without crumbling.
- Whip cream with sugar and vanilla.: As you whip the cream , it will shift from liquid to soft peaks, growing silkier and holding shape. The sound is quiet, and the texture should feel dense yet airy. The sugar and vanilla balance the cream, making it lush without cloying. Overwhipping turns it grainy and butter like, so stop when it holds gentle peaks.
- To serve, cut the biscuits in half, top the bottom half with berries and juices, followed by a big dollop of whipped cream and the top of the biscuit.: The assembly is where all the elements converge, offering a sweet, citrus scented syrup soaking into tender biscuit layers with a cloud of cream. The first bite should be a contrast of warm, flaky biscuit, bright strawberries , and cool cream. A typical mistake is assembling too early, which can make the biscuit soggy; assemble just before serving for the best texture.
Notes
- Use very cold butter to maximize flakiness, freezing it if your kitchen is warm and grating directly into the dry mix.
- Adjust sugar on berries if your fruit is exceptionally sweet, reduce the added sugar slightly to preserve brightness.
- Chill the dough briefly if it feels too sticky, a 10 minute rest in the fridge firms the butter and makes cutting easier.
- Whip cream to soft peaks for a lighter mouthfeel, stopping just as peaks form to avoid grainy texture.
- Use a sharp biscuit cutter and press straight down to achieve tall, even biscuits rather than twisting the cutter.