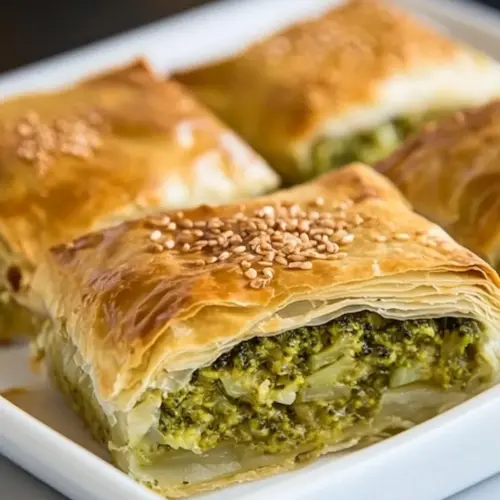
Broccoli Spanakopita
Broccoli Spanakopita is a crispy, savory roll featuring flaky filo layered with a bright broccoli and creamy feta cheese filling. This easy weeknight dish delivers crunchy, buttery texture and a tender, seasoned interior, perfect for gatherings or a light dinner. Make a batch to impress guests or to enjoy as a make ahead snack, because these rolls reheat beautifully and travel well.
Equipment
- Sauté Pan
- Oven
- Baking Sheet
- Brush
Ingredients
- 2 tablespoons olive oil Heat and sauté other aromatics while adding a rich, fruity base flavor that helps cook and soften vegetables and filo; contributes to a golden, crisp finish when brushed on pastry edges.
- 1/2 onion, diced Sweat and provide a sweet, savory backbone that becomes translucent and melds with garlic and broccoli; finely dicing ensures even cooking and distribution throughout the filling.
- 1 clove garlic, finely minced Infuse and brighten the filling with a pungent, aromatic note; finely mincing allows it to release flavor quickly and evenly during sautéing.
- 1 head broccoli, finely chopped Chop and serve as the primary vegetable component offering texture, bulk, and a slightly earthy, green flavor; finely chopping speeds cooking and helps the filling bind together.
- pinch ground nutmeg Season and add a warm, slightly sweet, aromatic undertone that complements the greens without overpowering; use sparingly to enhance depth of flavor.
- salt and freshly ground black pepper Season and balance flavors by enhancing natural tastes and controlling bitterness; freshly ground black pepper adds a pungent, bright bite for contrast.
- 1/2 teaspoon fresh lemon juice Brighten and lift the filling with a touch of acidity that balances richness and cuts through the saltiness of cheese; fresh lemon juice contributes a clean, zesty note.
- 3/4 cup feta cheese Crumble and contribute a salty, tangy, creamy element that binds with egg and seasonings to create a savory filling; feta also adds textural contrast.
- 1 egg, whisked Bind and enrich the filling by adding structure and a silky texture that helps the filling set during baking; whisking ensures uniform distribution for consistent results.
- 20 sheets filo dough (about 1/2 package), covered with barely-damp towel Layer and form the pastry component that provides flakiness and structure; keeping sheets covered with a barely-damp towel prevents drying and tearing while assembling.
- 4 tablespoons melted butter Brush and create a golden, crisp finish while adding a rich, buttery flavor to the filo layers; melting ensures even application and prevents soggy spots.
Instructions
- Heat a large saute pan over medium-high heat. Swirl in the olive oil and saute the onions until translucent. Add in the garlic and the broccoli and saute for 3 minutes, or until the broccoli is just starting to get tender but still bright green. Season with nutmeg, salt, pepper and lemon juice. Remove from heat and let cool until no longer steaming. Stir in the egg and the feta cheese.: The pan will give off a warm, savory aroma as the olive oil heats and onion softens, with the garlic releasing a nutty, fragrant note; when you add the chopped broccoli , you will hear a gentle sizzle and see the green brighten to a vivid hue which signals that the vegetable is cooking properly. The reason to stop at that tender crisp stage is to preserve texture and fresh flavor, and letting the mixture cool prevents the egg from scrambling when mixed in, which could create an uneven curd in the filling. A frequent mistake here is cooking the broccoli until mushy, which yields a watery filling and dulls the visual appeal; aim for a lively green and slight bite. When you stir in the crumbled feta cheese , notice how its salty creaminess melds with the other aromatics, and fold gently to keep the mixture light. If the pan smells acrid at any point, you likely overheated the garlic , so reduce the heat and add the broccoli promptly next time. The cool, bound filling should hold together without being wet, and that texture is what gives each roll a clean bite.
- Preheat oven to 400 F.: As the filling cools, set the oven to 400 F so it reaches a steady, high heat for crisping the tops. A hot oven is crucial because it creates rapid steam in the thin layers of filo dough , helping them puff and separate into crisp, flaky sheets while the interior sets pleasantly. If your oven does not preheat fully, the rolls can absorb more fat and become greasy instead of crisp, so allow ample time for the temperature to stabilize. You should also position a rack in the center to promote even browning. A common oversight is starting to bake before the oven is truly hot, resulting in pale, under-crisped pastry.
- Lay 1 filo sheet on clean surface. Brush completely with melted butter. Lay another sheet on top. Spoon 2 tablespoons of the broccoli filling 1" from the bottom edge, in the middle. Fold the left side of the filo sheet over, then fold the right side over. Fold the bottom edge towards to top and roll. Place on baking sheet seam side down. Brush the top with melted butter. Repeat with remaining to make 10 rolls.: Working with the filo dough is tactile and rewarding, you will feel the paper thin sheets as you lay them and the gentle resistance as you fold; brushing with warmed butter adds a glossy sheen and separates the layers so they crisp individually. Placing the filling one inch from the bottom edge helps ensure a clean roll and prevents filling leakage; folding sides in first creates a tidy, compact cylinder that bakes evenly. You will hear a faint flake of filo dough tearing if a sheet is too dry, so keep the stack covered and move briskly. If a sheet tears while rolling, patch it by overlapping another brushed sheet rather than forcing the roll, which can cause a soggy seam. As you spoon the filling, notice its texture and season it slightly if needed before rolling; consistent two tablespoon portions help all rolls finish baking at the same moment.
- Bake for 20 minutes or until tops are golden brown and crispy.: The oven will fill with buttery, toasty aromas as the filo dough browns and the filling sets; look for a deep golden color and an audible crisp when you tap a top, both signs that the pastry is done. The short, focused baking time ensures the outside becomes shatteringly crisp while the inside warms through without drying. Pulling them out too early yields pale, floppy tops, and leaving them too long risks an overly dark, brittle crust and drier filling, so check visually at about 15 minutes and then again at 20. Letting the rolls rest briefly on the baking sheet before transferring to a rack helps the interior finish setting and keeps them intact when moved. If the bottoms seem too brown, lower the rack slightly next time or reduce oven temperature by 10 F to control browning.
Notes
- Work quickly with filo because it dries fast; keep the stack covered with a barely-damp towel to prevent cracking and tearing which can lead to uneven rolls.
- Control moisture in the filling by chopping the broccoli finely and cooking it just until tender so excess water does not make the rolls soggy during baking.
- Adjust feta saltiness by tasting the cooled filling before rolling, this helps you avoid over-salting since feta cheese can vary widely in brininess.
- Brush filo layers generously with melted butter to get crisp, golden sheets; a thin brush will produce paler, less flaky results.
- Use small, even portions of filling for consistent rolls; two tablespoons per roll ensures uniform baking and a nice ratio of filling to pastry.