Bang Bang Shrimp
Bang Bang Shrimp brings creamy, crispy, and spicy elements together in an easy weeknight dinner that thrills every time. Juicy shrimp get a glossy, tangy sauce that makes each bite pop, perfect for quick family meals or summer gatherings. Make it when you want big flavor with minimal fuss, and you will understand why it is a crowd pleaser.
Equipment
- Bamboo skewers (optional)
Ingredients
- 1 pounds shrimp 26-30, peeled & deveined Provide succulent, firm seafood that forms the main protein; ensure shrimp are peeled and deveined for easy eating and even cooking. Use 26-30 size to maintain a meaty bite and consistent cook time. Pat dry before cooking to promote a crisp exterior when battered or sautéed.
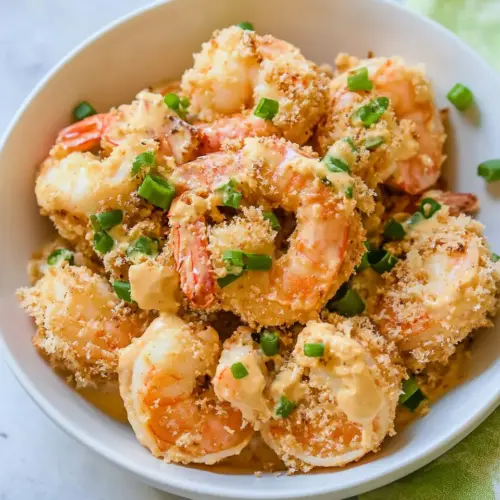
- 1/2 cup Bang Bang Sauce Add creamy, spicy-sweet flavor and moistness that coats the shrimp; Bang Bang Sauce balances heat and sweetness for signature taste. Use as a generous coating or dipping sauce to deliver the dish’s characteristic tangy kick. Fold in gradually to coat evenly without overwhelming texture.
- 2 tablespoons chopped green onions sliced at an angle, divided Offer fresh, sharp oniony notes and a pop of color when sliced at an angle; reserve half for garnish to finish the dish. Chop finely to distribute mild allium flavor through the shrimp without overpowering the sauce. Sprinkle over just before serving to preserve crispness and visual appeal.
Instructions
- If using skewers, place them in a shallow baking dish and cover them with water and soak them 10 minutes prior to using.: You will notice the wood absorbing water, which prevents burning and keeps a steady cook when placed over heat, and the smell is neutralized instead of smoky. This soaking technique prevents charred edges that can taste bitter, and it helps the skewers stay intact, avoiding splintering. A common oversight is skipping the soak, which makes the skewers vulnerable to burning and can impart an unpleasant burnt aroma to the shrimp . Be sure the skewers feel saturated in the middle before using.
- Pour half the sauce in a smaller bowl to use as a dipping sauce. Set aside.: When you separate the sauce you preserve a glossy, flavorful dip, and the remaining glaze will concentrate on the shrimp giving each piece a clingy coating. The aroma of the sauce will be sweet and tangy, hinting of spice and cream. Mistake to avoid is using all the sauce for glazing, leaving nothing for dipping, which reduces the interactive pleasure of the dish.
- If using skewers, thread 4-5 peeled and deveined shrimp on each and brush the remaining sauce over the shrimp.: As you thread each shrimp , listen for the faint slap as it hits the skewer and feel the slight resistance, which tells you the shrimp is held securely. Brushing the sauce now ensures the heat caramelizes sugars and spices, creating a lacquered surface. The sensory cue to watch for is the sauce beginning to bubble gently on the surface when it hits the hot pan later. Avoid overcrowding the skewers, which prevents even browning and causes steaming rather than searing.
- Heat a skillet or griddle over medium heat. Drizzle 2 tablespoons oil onto the skillet or griddle and place the shrimp in the skillet.: The pan should shimmer slightly when the oil is hot, giving off a faint nutty aroma depending on the oil. This preheat is essential because a properly heated surface creates a quick sear that locks juices in the shrimp . If the pan is not hot enough the shrimp will release moisture and steam, yielding a rubbery texture. A frequent error is adding shrimp to a cool pan, which ruins the texture profile of the dish.
- Cook the shrimp 1-2 minutes per side, or until shrimp is opaque and 120°F internally. (Adjust the cooking time if using different size shrimp.) The shrimp cooks quickly.: You will hear a soft sizzle and see the edges go from translucent to pearly white, and when pressed lightly the shrimp offers a springy resistance. Using a thermometer helps because shrimp can go from perfect to overdone in moments; 120°F gives a plump, juicy interior. Avoid the temptation to cook longer for perceived safety, which creates a tough bite. If your shrimp are larger, extend the time slightly but check frequently.
- Transfer shrimp to a serving dish and brush lightly with the reserved sauce. Garnish with extra chopped green onions.: The finished shrimp should glisten, and brushing them while warm helps the sauce meld into the surface for a silky sheen. The aroma of warm sauce and fresh green onions is inviting, and the contrast between glossy glaze and bright garnish makes the plate pop visually. A common mistake is waiting too long to brush the sauce, which cools the shrimp and prevents proper adhesion of the glaze.
- Serve immediately, with a dollop of dipping sauce, on the side.: Serve while the shrimp are still warm so the texture remains crisp at the edges and tender within. Presenting the extra dipping sauce invites guests to adjust heat and creaminess to their taste, and that interaction is part of the dish's charm. Do not let the prepared plate sit too long, as extended resting will soften the crisped edges and dilute the lively mouthfeel.
Notes
- Preheat the pan properly Start with medium heat and wait until the skillet is shimmering, not smoking, so the oil can sear the shrimp instantly and lock in juices.
- Dry your shrimp thoroughly Moisture prevents a good sear, so use paper towels to pat each piece dry before seasoning or saucing.
- Reserve sauce for dipping Keep half of the sauce aside so guests can add extra creaminess or spice to taste, which enhances the dining experience.
- Use a thermometer for precision Aim for 120°F internal temperature for juicy, tender shrimp, and avoid guessing based solely on color.
- Do not overcrowd the pan Cook in batches if needed so each shrimp gets direct contact with the hot surface for even browning.
- Garnish at the last second Add the green onions right before serving to preserve their fresh crunch and bright flavor.