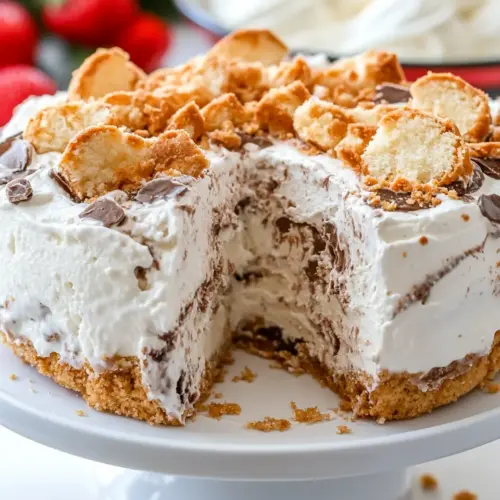
Angel Food Ice Cream Cake
Angel Food Ice Cream Cake is a creamy, airy summer dessert that combines pillowy angel food cake with layers of cold, scoopable ice cream. This easy, make ahead treat offers playful texture contrast and customizable flavors, perfect for parties and potlucks. Serve chilled for clean slices and crowd pleasing results, a simple showstopper worth making again and again.
Equipment
- Angel food cake pan
- Spatula
- Large Bowl
- Plate
Ingredients
- 1 (16-ounce) box angel food cake mix plus any ingredients listed on the box Provides the light, airy cake base and structure when prepared according to the box directions; follow included instructions to whip and bake into a tender angel food layer that supports the ice cream without overpowering its texture. Adds subtle sweetness and vanilla notes that balance richer ice cream flavors, and creates a sponge-like contrast between creamy and cakey components. Can be baked ahead and cooled completely before assembling the cake to ensure clean layers and easier slicing.
- 4 quarts ice cream ideally 2–3 different flavors Creates the creamy frozen filling and primary flavor components of the cake; choose 2–3 complementary flavors to layer for visual contrast and varied taste in each slice. Provides smooth texture and cold temperature that contrasts with the airy cake, and softens slightly when served to meld with the sponge. Can be softened briefly for spreading and refrozen to set layers firmly before decorating.
- sprinkles, candies, crushed cookies or chocolates (optional) Adds visual appeal, texture, and extra flavor when used as optional toppings; use sprinkles, candies, crushed cookies, or chocolates to personalize the cake and provide crunch or chew. Enhances presentation with color and theme-appropriate adornment while also contributing small bursts of sweetness or saltiness depending on the choice. Should be applied after the assembled cake is frozen or just before serving so decorations adhere without melting the ice cream.
Instructions
- Make angel food cake as directed on the box and let cool completely.: When the cake is baking, your kitchen will smell faintly sweet and vanilla like; watch for a pale golden top that springs back lightly when pressed. Cooling fully is essential so the crumb firms and will break into pieces rather than smearing when you handle it. A common error is trying to assemble while the cake is still warm, which leads to melted ice cream and a soggy texture; be patient and allow the pan to reach room temperature before proceeding.
- While cake is cooling, remove ice cream tubs from the freezer to soften just enough to be able to spread.: As the ice cream softens, it will lose its immaculate scoop shape and become glossy and pliable, perfect for smoothing into the pan. The aroma of the flavors becomes more pronounced as they warm slightly, which helps you decide placement. Avoid letting tubs get too soft and oily, because that makes clean layers impossible and can cause the cake to slump when frozen again.
- Remove cake from the pan and tear it into small pieces.: The cake should come away from the pan walls cleanly; tearing it into small, bite sized pieces gives you a better distribution of sponge through the ice cream layers. The texture should be airy and springy, making it easy to break apart by hand. If you cut uniform slices instead of tearing, the pieces may slide in the assembly and create dense pockets rather than an even crumb distribution.
- To layer the cake: Spread about one-third of the softened ice cream in the bottom of an angel food cake pan, then add half the cake pieces from one of the bowls. Repeat layering, adding another layer of ice cream followed by the remaining half of the cake, and then finish with a final layer of ice cream. Freeze overnight.: Spread about one-third of the softened ice cream in the bottom of an angel food cake pan, then add half the cake pieces from one of the bowls : As you spread the first layer, you will hear soft spreading sounds and see the pale surface gain a glossy sheen, signaling the right consistency. The initial ice cream layer should act like glue, cradling cake pieces and creating strata of flavor. Pressing too hard when adding pieces compresses the airy crumb, so work gently to preserve lift and let the ice cream fill gaps.
- To remove the cake from the pan, fill a large bowl with hot water and dip the bottom of the pan into the hot water for a few seconds. Place a plate on the top of the pan, then flip it over. The cake should slide right out onto the plate. The outer layer of the cake will be a little melted. Add any desired toppings at this point, then place cake back into the freezer to firm it up.: Each subsequent layer should feel colder and firmer at the edges as the lower layers begin to set. Visually you want distinct bands of creamy color and sponge texture, which makes slices attractive. A common mistake is uneven spreading that creates bulges; smooth each layer with a spatula and rotate the pan to check for balance.
- Freeze for at least 2 hours before cutting and serving.: Overnight freezing allows the layers to knit together and reach a uniformly firm texture, resulting in cleaner slices. You will notice the final surface losing any sheen and becoming matte and hard to the touch, which indicates a properly frozen cake. Rushing this step by slicing too soon causes the cake to crumble and the ice cream to smear, so plan ahead and give it ample time.
- To remove the cake from the pan, fill a large bowl with hot water and dip the bottom of the pan into the hot water for a few seconds: The brief warmth loosens the outer rim, causing a slight steam and a softening of the pan edge, which helps the cake slide out cleanly. Place a plate on top and flip, supporting the base as the cake transfers; you may hear a soft gliding sound as the cake releases. Keep the dip quick, because too much heat will melt the outermost layer and create a wet ring around the cake, making it messy to decorate.
- Place a plate on the top of the pan, then flip it over: Once inverted, the cake should settle onto the plate with the smooth surface up, though the outer edge might show a hint of melting that will re firm in the freezer. This is the moment to add any decorative toppings while the outer layer is slightly tacky and they will adhere. Avoid waiting too long, since the cake can become fully solid and toppings won’t stick, but also avoid working while it is overly soft as that causes slipping.
- The cake should slide right out onto the plate: When the release works well you will see the whole form come free without tearing, leaving a clean, rounded silhouette. If you notice sticking, return the pan to a brief dip and try again gently. Forcing the cake free when the pan edge still clings can break the delicate cake structure and mar the presentation.
- The outer layer of the cake will be a little melted: That slight melting is helpful for attaching sprinkles or crushed candies, which will press into the tacky surface and stay in place once the cake refreezes. The outer sheen should quickly lose gloss as it returns to the freezer, becoming firm and sliceable. If the melt is excessive and pooling occurs, blot gently with a clean paper towel and re freeze until firm to avoid sogginess.
- Add any desired toppings at this point, then place cake back into the freezer to firm it up: Decorate while the edge is tacky for best adhesion, and keep the toppings balanced so they enhance without overwhelming the central flavors. After decorating, return the cake to the cold for at least two hours to ensure everything sets properly. A typical misstep is decorating too late when the cake is fully frozen, because toppings will not adhere and may slide off when served.
- Freeze for at least 2 hours before cutting and serving: The final chill firms the interior to the perfect scoopable texture and guarantees clean slices. You will hear a dull thud when pressing a knife through a well set cake, and the cut surfaces should appear neat with distinct layers. Cutting prematurely results in smudged layers and uneven portions, so allow the recommended rest time for best results.
Notes
- Use complementary ice cream pairings, like a vanilla based flavor with a fruit based choice, so the flavors do not compete; choose one flavor that is mildly sweet and another that is bold to create contrast and interest.
- Make it dairy free, by selecting non dairy frozen desserts that behave similarly when softened and refrozen, keeping in mind texture differences when slicing; test one tub first to ensure it firms appropriately in your freezer.
- Keep layers uniform, by measuring the amount of softened ice cream used in each layer to achieve even height and cleaner slices after freezing; uneven layering leads to lopsided servings and inconsistent texture.
- Transport with dry ice, placing the cake in a sturdy cooler with a block of dry ice to maintain a firm temperature during outdoor events, and allow partial thawing time before serving at the destination for best slicing.
- Let children decorate, by offering bowls of sprinkles and crushed cookies; give them a small window to add toppings while the cake is slightly melted so they can take pride in the final look without causing a mess.