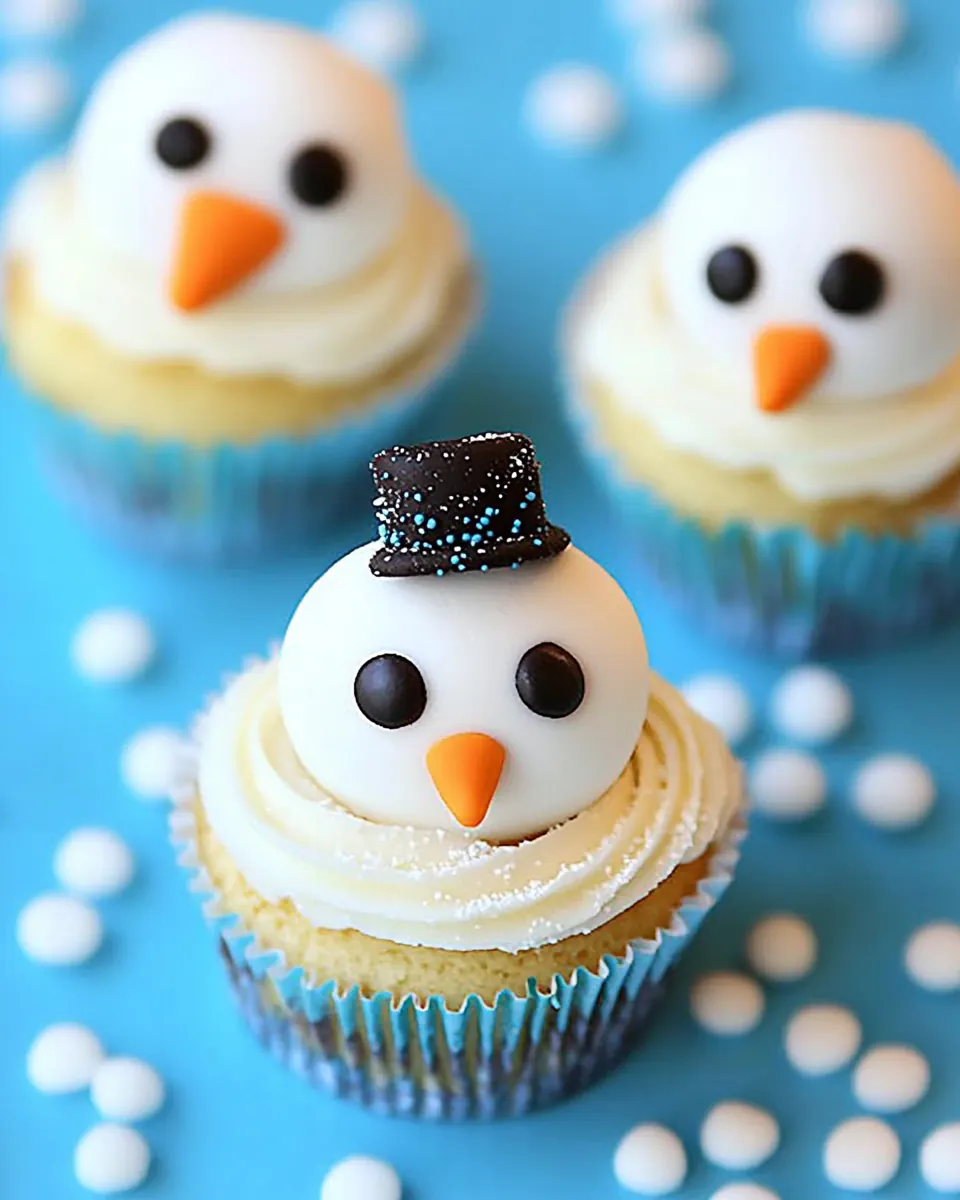
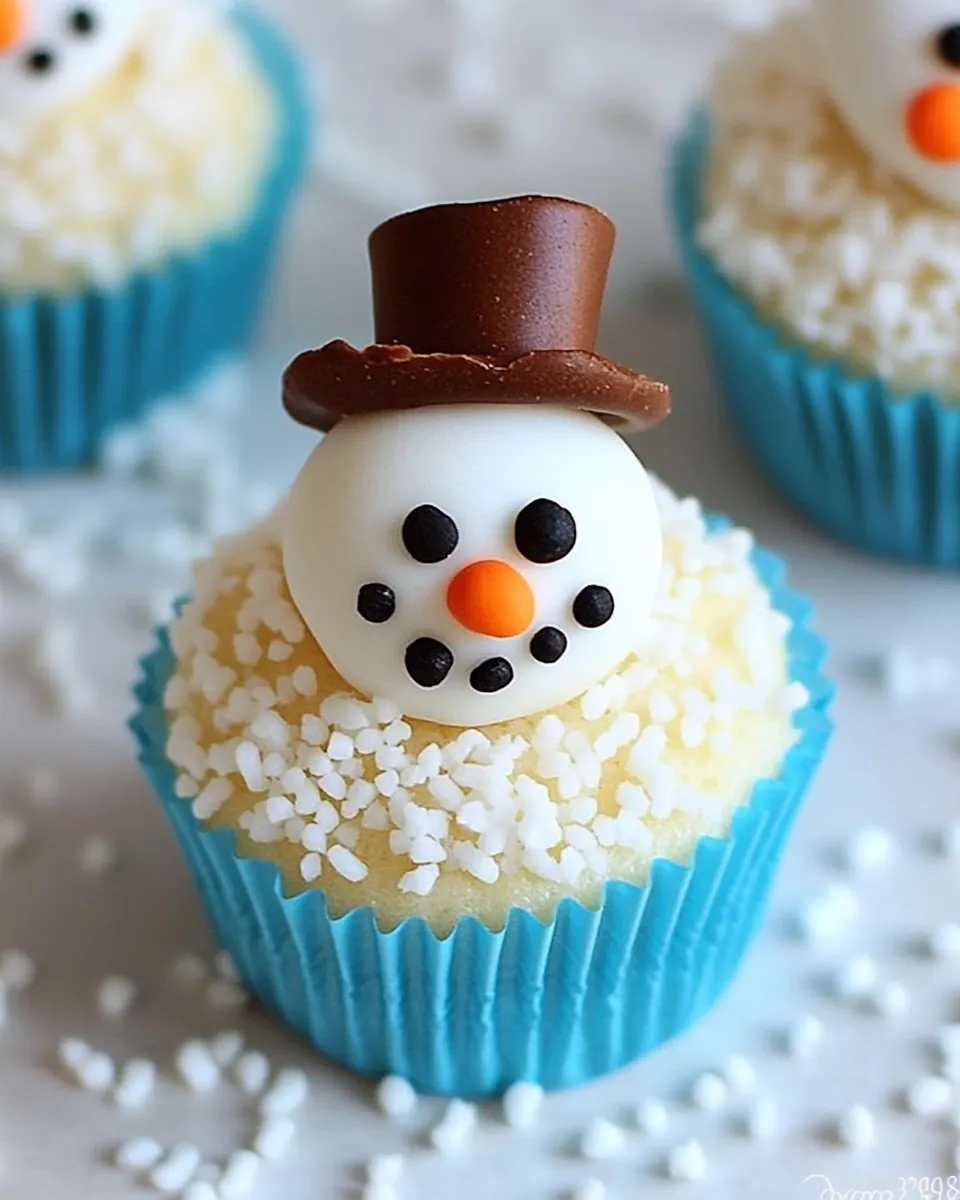
Vanilla Snowman Cupcakes
Vanilla Snowman Cupcakes began as a hurried holiday craft in my tiny kitchen the year my neighbor brought over a tin of mismatched candy. I wanted something cheerful that my kids could assemble, yet still taste like real cake, not just a craft project disguised as dessert. I remember the warm scent of vanilla wafting through the house as the cupcakes baked, and how sticky little fingers carefully pressed candy eyes into soft icing, proud of their tiny edible snowmen.
The ritual of making Vanilla Snowman Cupcakes turned into a quiet family tradition, one that made crowded mornings feel gentle and festive. We would line up the toppings like a tiny candy buffet, and each child would pick eyes, noses, and hats with solemn deliberation. Over the years I learned to simplify the process so the cupcakes are fun to decorate and reliably tender, even when I am juggling a dozen other holiday tasks. These cupcakes have that soft, reassuring crumb and a just-sweet-enough icing that sets up quickly, so assembly does not become a meltdown.
Recipe Snapshot
55 mins
30 mins
25 mins
Medium
200 kcal
American
Gluten-Free, Low FODMAP
Desserts
Mixing bowl, Cupcake tin, Cupcake liners, Spoon or ice cream scoop, Wire cooling rack
What You’ll Enjoy About This Vanilla Snowman Cupcakes
They are instant holiday charm
I adore how Vanilla Snowman Cupcakes bring joy without fuss. A simple tray of these cupcakes changes the mood of any holiday table, and I love watching friends smile when they see a line of tiny faces staring back at them. The design is approachable, so you do not need to be a baker to create something memorable.
Kid friendly assembly
We always involve kids, and these cupcakes are perfect for little hands. The icing firms fast enough so candies stick, but it is forgiving while you work. I find that the quick assembly keeps energy high and frustration low, which transforms decorating into a story time instead of a production line.
Reliable base and texture
The cake mix plus a few pantry additions gives a moist, tender crumb every time. I count on the combination to produce cupcakes that hold up under decoration, yet stay light when you bite into them. That balance between structure and softness is what keeps people coming back for seconds.
Simple swap friendly
If you want to adapt the look, the template is forgiving. You can change candy or use color accents for different occasions, and the core cake and icing still behave the same. I appreciate recipes that allow playful tweaks without breaking the result.
Fast and festive
From mixing to decorated tray, these feel speedy, which matters during holiday rush. I often make a batch while dinner finishes, and we decorate after clearing plates, turning clean up into an opportunity for creativity. That combination of speed and charm is a big reason these cupcakes are a repeat request in my family.
Key Ingredients for Vanilla Snowman Cupcakes
These ingredients were chosen so the cupcakes are cheerful, tender, and easy to assemble. The cake mix provides a reliable structure, while yogurt and egg whites keep the crumb moist but not dense. For the icing, a little melted butter and boiling water give a shiny, spreadable finish that sets quickly to hold candy decorations. The candies are the stars for personality and visual contrast.
- 18.25 oz Duncan Hines French Vanilla cake mix, or yellow, classic white: Provides a pre-blended dry base for the cake batter and contributes structure, flavor, and leavening when combined with wet ingredients. Offers a consistent French vanilla flavor profile; can be substituted with yellow or classic white as listed. Simplifies mixing and ensures reliable cupcake texture for shaping snowman features.
- 6 oz fat free plain Chobani yogurt: Creates moisture and a tangy richness that lightens the cake crumb while reducing fat content. Acts as a partial fat replacement to keep cupcakes tender and slightly denser for stable decoration. Helps incorporate dry mix without adding heavy oils that could affect frosting adherence.
- 1 1/3 cups water: Adds necessary hydration to activate the cake mix’s leavening agents and create proper batter consistency. Controls batter thickness to ensure even cupcake rise and uniform cupcake size. Balances moisture so cupcakes bake through without dense centers.
- 2 large egg whites: Provides lift and stability with extra protein for structure while keeping yolk fats out, resulting in lighter-colored cupcakes. Enhances aeration when whipped slightly, improving crumb lightness for delicate snowman shapes. Helps create a dryer surface better suited for frosting and decoration.
- 2 cups powdered sugar: Forms the sweet, smooth base of the frosting or glaze when sifted to remove lumps and combined with liquids. Stabilizes texture and sweetness level so decorations adhere and contrast well with the cake. Allows control over frosting consistency to pipe or spread for snowman details.
- 2 tbsp unsalted butter, melted: Adds richness and silky mouthfeel to the frosting once melted and mixed, contributing to flavor depth and spreadability. Helps set the frosting slightly as it cools, promoting a smooth finish for decorating. Works with powdered sugar and liquid to achieve desired consistency.
- 1 tsp clear vanilla extract: Imparts a concentrated vanilla aroma and enhances overall flavor without altering color, keeping frosting bright white for snowman appearance. Strengthens sweet profile subtly and harmonizes with the cake mix’s vanilla notes. Small amount delivers noticeable fragrance and rounded taste.
- 2 3 tbsp boiling water: Thins and adjusts the frosting or glaze to a spreadable or pipeable texture while activating powdered sugar to dissolve completely. Allows fine-tuning of consistency for drizzling, spreading, or piping precise facial features and hat details. Using hot water helps create a glossy finish quickly.
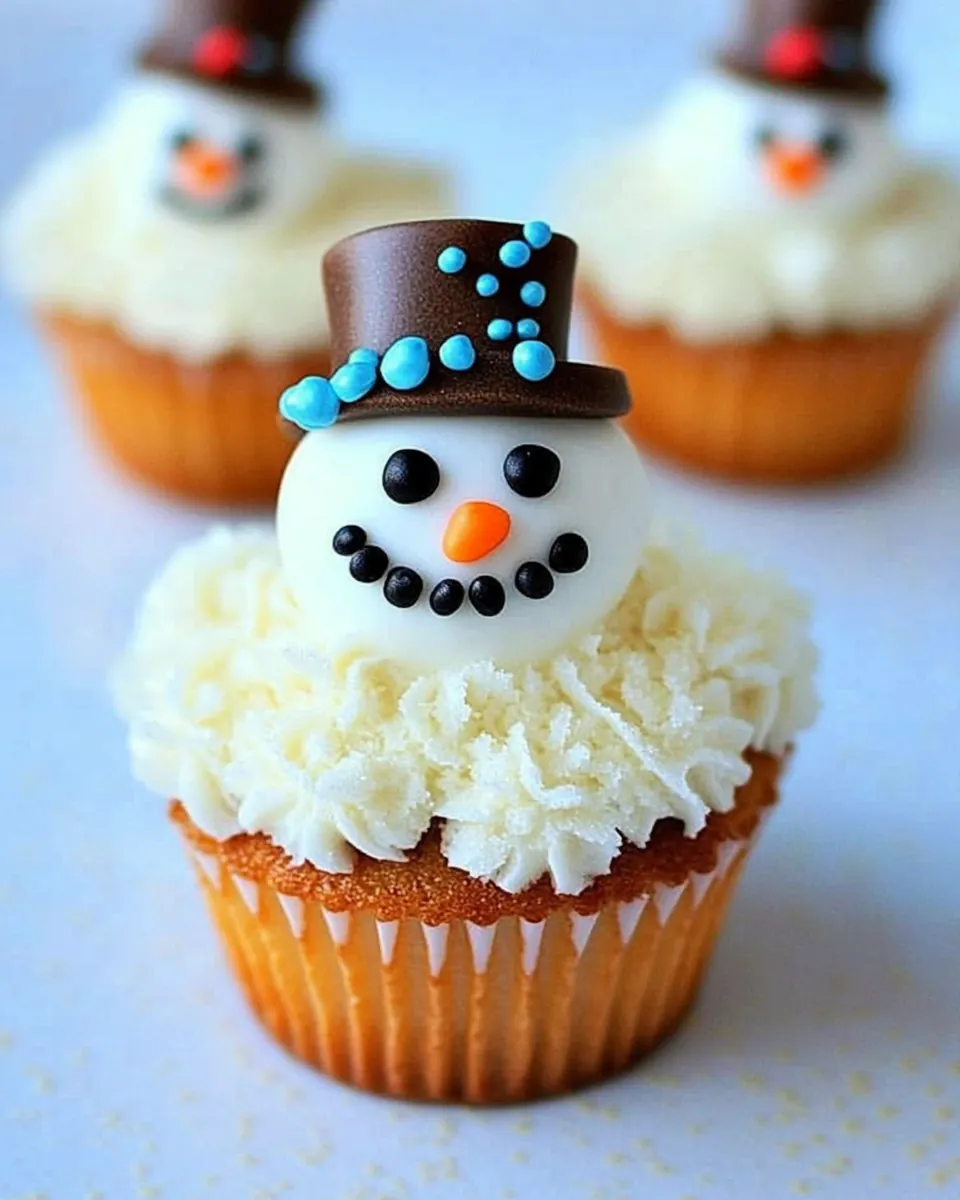
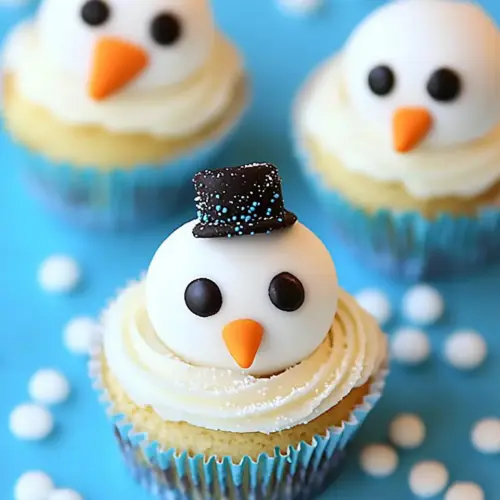
- m&m's for the eyes: Provides small, round chocolate accents that serve as eyes or buttons, offering contrast and visual detail for the snowman face. Adds a sweet, crunchy texture element and instant recognition that’s easy to press into frosting. Available in various sizes to suit different scale decorations.
- orange jellybeans or candy corns for the nose: Delivers a bright, carrot-like or candy-shaped nose that creates a focal point on the snowman face, providing color and shape contrast. Offers a chewy or firm texture depending on choice, and is easy to position into frosting without sliding. Sizes and shapes can be selected for proportionate facial features.
- sprinkles for the hat: Adds colorful decorative detail to the hat area, creating visual interest and festive accents that contrast with white frosting. Provides crunchy or sugary texture and helps define hat shape when pressed into the frosting. Available in many colors and styles to match holiday themes.
- mini marshmallows for the cotton part of hat: Creates a fluffy, snowy trim on the hat to mimic cottony snow, offering soft texture and a playful finish. Helps anchor hat decorations and adds three-dimensional interest while being easy to attach to frosting. Miniature size allows precise placement around hat edges.
How to Cook Vanilla Snowman Cupcakes

These directions are straightforward and written so you can move confidently from batter to decorated tray. I like to set out all toppings before the cupcakes cool so decorating becomes a smooth, shared activity. Keep your workspace organized and have a damp cloth on hand for sticky fingers.
- Preheat oven to 350°.: When the oven warms, you will notice the faint warm hum and a steady rise in kitchen warmth, which primes the cupcake structure for even rise and tender crumb. Preheating ensures the moment the batter hits the oven, it begins setting properly, so the edges do not spread before the center has time to rise. A common mistake is placing cupcakes into an oven still coming up to temperature, which can yield uneven domes and dense centers. To check your oven is ready, use an oven thermometer or wait the full preheating cycle, and avoid opening the door in the first fifteen minutes, as that sudden temperature drop can deflate the tops.
- Line cupcake tins with liners.: Lining tins makes removal simple and keeps bottoms from over browning, and you will hear a soft clink as each liner settles into its cup. Proper liners help the cupcakes bake with even sides, and they also make decorating less messy. Avoid overfilling the cups, which can cause spillover and uneven bake patterns. If liners do stick, allow cupcakes to cool slightly before removing; rushing the removal can tear the tops.
- Combine all the ingredients in a large mixing bowl and beat until combined.: Once you start beating, you will hear the batter thicken and see it change from lumpy to smooth with ribbons of batter falling from the paddle, indicating well hydrated flour. This step creates uniform crumb and incorporates air gently, which supports a tender texture. Overbeating can create tough cupcakes, so mix until smooth and no dry pockets remain. If the batter looks curdled, stop and fold gently until uniform, as excessive high speed can cause the batter to become too elastic, leading to tunnels while baking.
- Pour into prepared liners.: As you spoon or pour the batter, watch it settle into each liner and form domes rather than pooling unevenly. Consistent portioning helps cupcakes bake at the same rate; I use an ice cream scoop to measure identical amounts, yielding uniform tops. A common oversight is leaving variable amounts in cups, which produces some cupcakes that finish early while others remain underbaked. Clean drips from the tray before baking, because spattered batter can smoke and create uneven heat.
- Bake about 25 minutes, or until a toothpick inserted comes out clean.: During baking, your kitchen will fill with a warm vanilla aroma and you may hear a faint crackle as the edges set. The visual cue is lightly golden edges with slightly domed centers. Testing with a toothpick tells you the interior is set; if batter clings, return to the oven in small increments. Overbaking dries cupcakes, while underbaking leaves them gummy, so err on the side of shorter checks to avoid overshoot. If tops brown too fast, lower the rack or tent lightly with foil to finish the interior without additional color.
- Allow to cool before frosting.: Cooling transforms the crumb from fragile to stable, and you will notice the cupcakes stop steaming as they reach room temperature. Frosting warm cupcakes will melt the icing and cause decorations to slide, so patience here prevents a messy outcome. One error is rushing this step because warm cakes seem tempting, but that usually results in runny icing and poorly adhered candies. For fastest cooling, set pans on a wire rack and rotate once for even air circulation.
- For the vanilla icing, combine powdered sugar, melted butter and water and beat until smooth.: As you beat the icing, it will go from dusty to glossy, and the texture should be silky and thick but spreadable. The melted butter adds sheen and a slightly richer flavor, while boiling water helps dissolve the sugar, creating that smooth finish that sets quickly. If the icing is too stiff, add water a teaspoon at a time to reach the right flow; too much water makes it runny and unable to hold candies. A common slip is mixing too vigorously with a stand mixer, which can introduce air and make the icing frothy rather than smooth, so stir until combined and then finish by hand if needed.
- To make snowman face, spread 2 1/2 teaspoons of icing on each cupcake; working quickly, press the candy face into the icing before it hardens. It's best to make one at a time.: When you apply the icing, the smell of butter and sugar is immediate and the glossy surface gives you a narrow window to place candies. Press an m&m's pair for eyes, then an orange jellybeans or candy corns nose, followed by sprinkles for the hat and mini marshmallows as the hat trim. The key is speed, because the icing sets as it cools and candies will not adhere if you wait too long. The frequent error is piling icing thickly, which delays set time and can cause decorations to sink; stick to the measured amount and decorate briskly, doing each cupcake one at a time for best results.
Helpful Hints
These tips help you get consistent, festive results and make assembly with children easier. I wrote these from repeated kitchen trials and family decorating sessions, so they focus on practical adjustments and shortcuts that keep the process joyful.
- Line up toppings: Arrange your m&m’s, orange jellybeans or candy corns, sprinkles, and mini marshmallows in small bowls before you start so decorating goes smoothly and feels like a station rather than chaos.
- Start with cooled cupcakes: Ensure the cupcakes are completely cooled, because thawed warmth will melt the icing, making decorations slide off and creating a sticky mess for little hands.
- Sift the powdered sugar: For the silkiest icing, sift the 2 cups powdered sugar to remove lumps, which helps the icing set with a smooth, glossy finish rather than gritty pockets.
- Adjust icing consistency: If frosting seems too thick, add a teaspoon of the 2-3 tbsp boiling water at a time until it spreads easily; if too thin, add a bit more powdered sugar to regain body.
- Mildly chill for faster set: After decorating a few cupcakes, a quick fifteen minute chill in a single layer in the fridge helps the icing firm and hold additional toppings, but avoid stacking during this step.
- Involve kids in small tasks: Give children one decorating element to place repeatedly such as the eyes or marshmallow trim to keep them engaged without overwhelming them.
What to Pair With Vanilla Snowman Cupcakes
These cupcakes suit casual holiday gatherings and kid centric parties, and they pair well with simple beverages and light sides. Serve them on a platter with napkins and a small trash bowl for wrappers so little decorators can drop debris and return to decorating. They are versatile across seasonal events and work well as a dessert or party activity.
- Warm drinks: Pairing with a hot beverage like tea or a warm cocoa alternative is comforting and keeps the focus on cozy flavors, especially during winter gatherings.
- Kid friendly plates: Use small paper plates and napkins so children can carry a single cupcake, making the decorating activity easy to manage at a table or counter.
- Party trays: Arrange cupcakes on a tiered stand for a festive centerpiece, alternating decorated faces to create visual interest and encourage guests to sample more than one.
- Occasion pairing: These are ideal for Christmas cookie exchanges, classroom parties, or family brunches where a playful sweet is welcome and small hands will be present.
- Storage tips: Keep leftover cupcakes in an airtight container at room temperature for up to two days, or refrigerate to extend life up to four days, letting them come to room temperature before serving to restore tenderness.
- Seasonal tweaks: For other winter celebrations, swap the sprinkles color or candy accents while keeping the same assembly method so the recipe adapts to different themes.
FAQ
Conclusion
What makes these Vanilla Snowman Cupcakes special is their combination of reliable, tender cake and a quick setting vanilla icing that lets you create charming, edible characters in minutes. The recipe balances convenience with a hand crafted feel, so you can enjoy family time without complicated techniques. Give them a try at your next holiday gathering, and you may find this simple activity becomes a warm tradition that draws smiles and second helpings.
Vanilla Snowman Cupcakes
Equipment
- Mixing Bowl
- Cupcake Tin
- cupcake liners
- Spoon or Ice Cream Scoop
- wire cooling rack
Ingredients
- 18.25 oz Duncan Hines French Vanilla cake mix, or yellow, classic white Provides a pre-blended dry base for the cake batter and contributes structure, flavor, and leavening when combined with wet ingredients. Offers a consistent French vanilla flavor profile; can be substituted with yellow or classic white as listed. Simplifies mixing and ensures reliable cupcake texture for shaping snowman features.
- 6 oz fat free plain Chobani yogurt Creates moisture and a tangy richness that lightens the cake crumb while reducing fat content. Acts as a partial fat replacement to keep cupcakes tender and slightly denser for stable decoration. Helps incorporate dry mix without adding heavy oils that could affect frosting adherence.
- 1 1/3 cups water Adds necessary hydration to activate the cake mix’s leavening agents and create proper batter consistency. Controls batter thickness to ensure even cupcake rise and uniform cupcake size. Balances moisture so cupcakes bake through without dense centers.
- 2 large egg whites Provides lift and stability with extra protein for structure while keeping yolk fats out, resulting in lighter-colored cupcakes. Enhances aeration when whipped slightly, improving crumb lightness for delicate snowman shapes. Helps create a dryer surface better suited for frosting and decoration.
- 2 cups powdered sugar Forms the sweet, smooth base of the frosting or glaze when sifted to remove lumps and combined with liquids. Stabilizes texture and sweetness level so decorations adhere and contrast well with the cake. Allows control over frosting consistency to pipe or spread for snowman details.
- 2 tbsp unsalted butter, melted Adds richness and silky mouthfeel to the frosting once melted and mixed, contributing to flavor depth and spreadability. Helps set the frosting slightly as it cools, promoting a smooth finish for decorating. Works with powdered sugar and liquid to achieve desired consistency.
- 1 tsp clear vanilla extract Imparts a concentrated vanilla aroma and enhances overall flavor without altering color, keeping frosting bright white for snowman appearance. Strengthens sweet profile subtly and harmonizes with the cake mix’s vanilla notes. Small amount delivers noticeable fragrance and rounded taste.
- 2 -3 tbsp boiling water Thins and adjusts the frosting or glaze to a spreadable or pipeable texture while activating powdered sugar to dissolve completely. Allows fine-tuning of consistency for drizzling, spreading, or piping precise facial features and hat details. Using hot water helps create a glossy finish quickly.
- m&m's for the eyes Provides small, round chocolate accents that serve as eyes or buttons, offering contrast and visual detail for the snowman face. Adds a sweet, crunchy texture element and instant recognition that’s easy to press into frosting. Available in various sizes to suit different scale decorations.
- orange jellybeans or candy corns for the nose Delivers a bright, carrot-like or candy-shaped nose that creates a focal point on the snowman face, providing color and shape contrast. Offers a chewy or firm texture depending on choice, and is easy to position into frosting without sliding. Sizes and shapes can be selected for proportionate facial features.
- sprinkles for the hat Adds colorful decorative detail to the hat area, creating visual interest and festive accents that contrast with white frosting. Provides crunchy or sugary texture and helps define hat shape when pressed into the frosting. Available in many colors and styles to match holiday themes.
- mini marshmallows for the cotton part of hat Creates a fluffy, snowy trim on the hat to mimic cottony snow, offering soft texture and a playful finish. Helps anchor hat decorations and adds three-dimensional interest while being easy to attach to frosting. Miniature size allows precise placement around hat edges.
Instructions
- Preheat oven to 350°.: When the oven warms, you will notice the faint warm hum and a steady rise in kitchen warmth, which primes the cupcake structure for even rise and tender crumb. Preheating ensures the moment the batter hits the oven, it begins setting properly, so the edges do not spread before the center has time to rise. A common mistake is placing cupcakes into an oven still coming up to temperature, which can yield uneven domes and dense centers. To check your oven is ready, use an oven thermometer or wait the full preheating cycle, and avoid opening the door in the first fifteen minutes, as that sudden temperature drop can deflate the tops.
- Line cupcake tins with liners.: Lining tins makes removal simple and keeps bottoms from over browning, and you will hear a soft clink as each liner settles into its cup. Proper liners help the cupcakes bake with even sides, and they also make decorating less messy. Avoid overfilling the cups, which can cause spillover and uneven bake patterns. If liners do stick, allow cupcakes to cool slightly before removing; rushing the removal can tear the tops.
- Combine all the ingredients in a large mixing bowl and beat until combined.: Once you start beating, you will hear the batter thicken and see it change from lumpy to smooth with ribbons of batter falling from the paddle, indicating well hydrated flour. This step creates uniform crumb and incorporates air gently, which supports a tender texture. Overbeating can create tough cupcakes, so mix until smooth and no dry pockets remain. If the batter looks curdled, stop and fold gently until uniform, as excessive high speed can cause the batter to become too elastic, leading to tunnels while baking.
- Pour into prepared liners.: As you spoon or pour the batter, watch it settle into each liner and form domes rather than pooling unevenly. Consistent portioning helps cupcakes bake at the same rate; I use an ice cream scoop to measure identical amounts, yielding uniform tops. A common oversight is leaving variable amounts in cups, which produces some cupcakes that finish early while others remain underbaked. Clean drips from the tray before baking, because spattered batter can smoke and create uneven heat.
- Bake about 25 minutes, or until a toothpick inserted comes out clean.: During baking, your kitchen will fill with a warm vanilla aroma and you may hear a faint crackle as the edges set. The visual cue is lightly golden edges with slightly domed centers. Testing with a toothpick tells you the interior is set; if batter clings, return to the oven in small increments. Overbaking dries cupcakes, while underbaking leaves them gummy, so err on the side of shorter checks to avoid overshoot. If tops brown too fast, lower the rack or tent lightly with foil to finish the interior without additional color.
- Allow to cool before frosting.: Cooling transforms the crumb from fragile to stable, and you will notice the cupcakes stop steaming as they reach room temperature. Frosting warm cupcakes will melt the icing and cause decorations to slide, so patience here prevents a messy outcome. One error is rushing this step because warm cakes seem tempting, but that usually results in runny icing and poorly adhered candies. For fastest cooling, set pans on a wire rack and rotate once for even air circulation.
- For the vanilla icing, combine powdered sugar, melted butter and water and beat until smooth.: As you beat the icing, it will go from dusty to glossy, and the texture should be silky and thick but spreadable. The melted butter adds sheen and a slightly richer flavor, while boiling water helps dissolve the sugar, creating that smooth finish that sets quickly. If the icing is too stiff, add water a teaspoon at a time to reach the right flow; too much water makes it runny and unable to hold candies. A common slip is mixing too vigorously with a stand mixer, which can introduce air and make the icing frothy rather than smooth, so stir until combined and then finish by hand if needed.
- To make snowman face, spread 2 1/2 teaspoons of icing on each cupcake; working quickly, press the candy face into the icing before it hardens. It's best to make one at a time.: When you apply the icing, the smell of butter and sugar is immediate and the glossy surface gives you a narrow window to place candies. Press an m&m's pair for eyes, then an orange jellybeans or candy corns nose, followed by sprinkles for the hat and mini marshmallows as the hat trim. The key is speed, because the icing sets as it cools and candies will not adhere if you wait too long. The frequent error is piling icing thickly, which delays set time and can cause decorations to sink; stick to the measured amount and decorate briskly, doing each cupcake one at a time for best results.
Notes
- Line up toppings: Arrange your m&m's, orange jellybeans or candy corns, sprinkles, and mini marshmallows in small bowls before you start so decorating goes smoothly and feels like a station rather than chaos.
- Start with cooled cupcakes: Ensure the cupcakes are completely cooled, because thawed warmth will melt the icing, making decorations slide off and creating a sticky mess for little hands.
- Sift the powdered sugar: For the silkiest icing, sift the 2 cups powdered sugar to remove lumps, which helps the icing set with a smooth, glossy finish rather than gritty pockets.
- Adjust icing consistency: If frosting seems too thick, add a teaspoon of the 2-3 tbsp boiling water at a time until it spreads easily; if too thin, add a bit more powdered sugar to regain body.
- Mildly chill for faster set: After decorating a few cupcakes, a quick fifteen minute chill in a single layer in the fridge helps the icing firm and hold additional toppings, but avoid stacking during this step.
- Involve kids in small tasks: Give children one decorating element to place repeatedly such as the eyes or marshmallow trim to keep them engaged without overwhelming them.