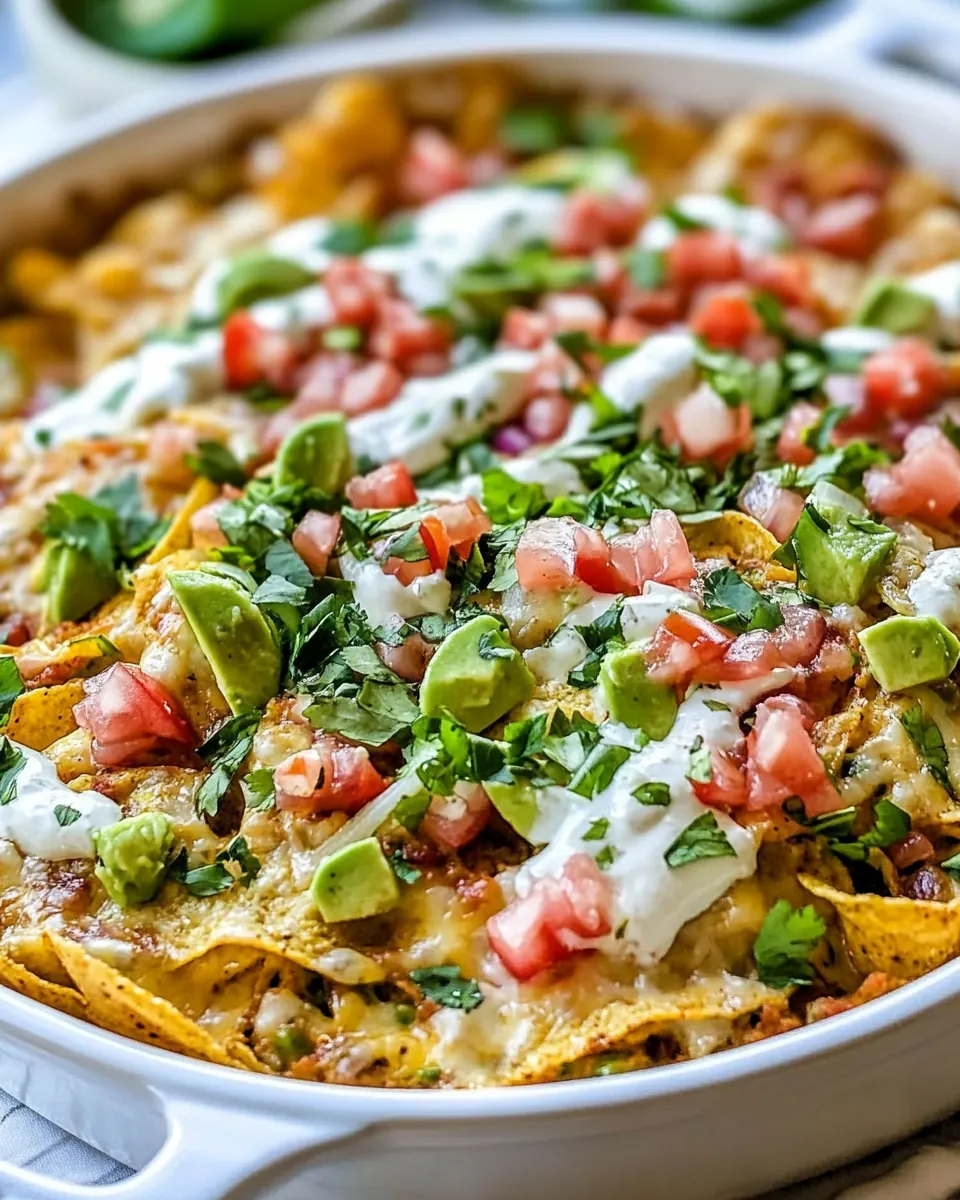
Tex Mex Chilaquiles
Tex Mex Chilaquiles are one of those recipes I turn to when I want comfort with a little kick, a skillet full of layered textures and bright verde flavor that feels like home. The first time I made these, I was feeding a scattershot weekend crowd of friends who arrived hungry and curious. I remember pulling a hot skillet from the oven and watching everyone lean in as the aroma of green enchilada sauce and melted Monterey Jack cheese rose into the room. The sound of the baking cheese settling, and the soft chew of warmed tortilla chips, made for instant happy faces.
Another memory sticks with me: I made a simplified version for a lazy Sunday brunch, swapping shredded turkey for leftover roast and letting a few optional chopped tomato jewels pop on top. The contrast between creamy sour cream and the slight tang of crumbled feta cheese was unexpectedly lovely. I learned that the layering matters, not because it is strict, but because each layer traps sauce and heat differently, so each bite varies in texture. Over time I developed little rituals around making this dish, like spreading the first cup of sauce slowly, tasting the sauce straight from the spoon, and always using a sturdy skillet for even heating.
When I serve Tex Mex Chilaquiles, I like to let people personalize their plates at the table. Some want more cilantro, others want an extra crack of black pepper, and a few insist on the optional chopped scallions. Those small choices turn one pan into a communal experience. Cooking it taught me to trust simple, bold ingredients and to embrace imperfect layers, because those layers create pockets of sauce, melted cheese, and crunchy chip that are the essence of the dish. Every time I make it I find a slightly different rhythm, and that keeps it feeling fresh.
Recipe Snapshot
20 mins
10 mins
10 mins
Easy
350 kcal
Mexican
Gluten-Free, Low FODMAP
Dinner
12-inch Cast Iron Skillet
What We Adore About This Tex Mex Chilaquiles
Bold, layered flavor in every bite
I love how Tex Mex Chilaquiles layers green enchilada sauce, tortilla chips, shredded turkey, creamy sour cream, and melted Monterey Jack cheese so each forkful hits you with a different texture. The sauce soaks into the chips just enough to soften edges while leaving delightful pockets of crisp. That contrast is what keeps me coming back, and it makes this an ideal easy weeknight dinner.
Comfort food that travels from brunch to dinner
I’ve served this dish for brunch, casual dinners, and midweek meals, and it works every time. You can make it feel bright and fresh with chopped tomato and cilantro, or more indulgent with extra cheese and a dollop of sour cream. The flexibility is a huge plus when I need something that pleases a crowd without fuss.
Speed plus simplicity
The technique is straightforward, and you can rely on pantry items and leftovers like shredded turkey. It takes minutes to assemble and a short bake in a hot oven to bring everything together. That quick turnaround is why I reach for this recipe when I want a satisfying meal without spending hours in the kitchen.
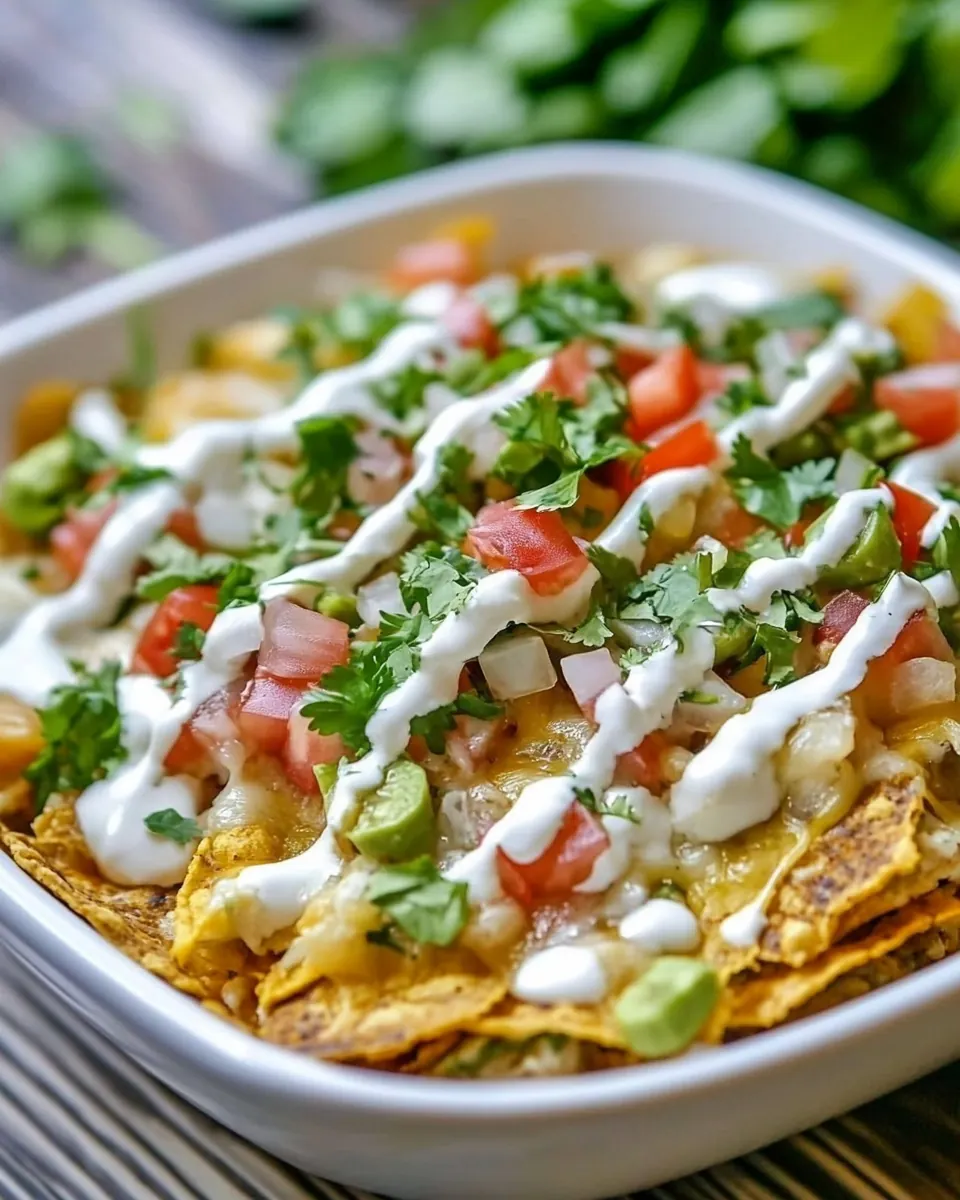
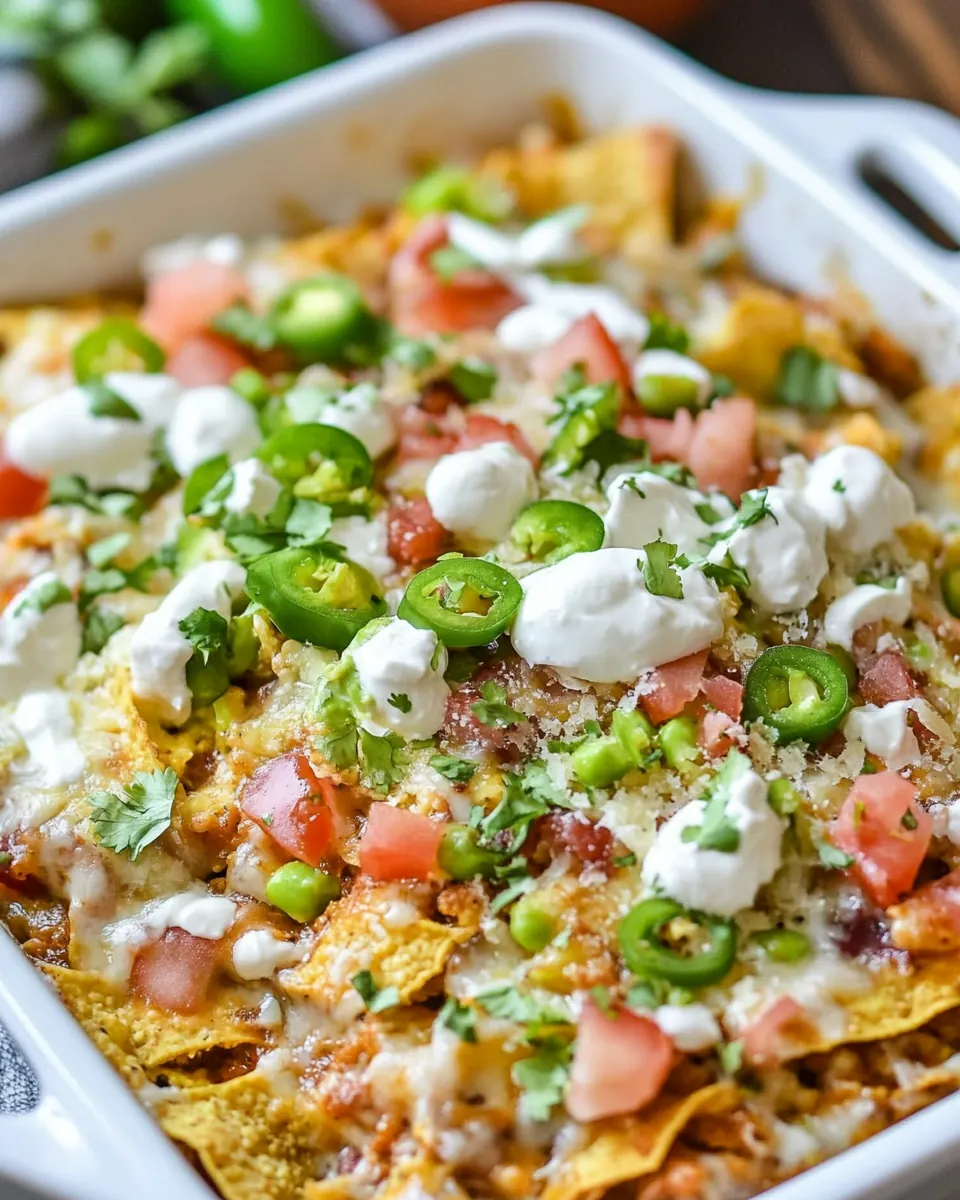
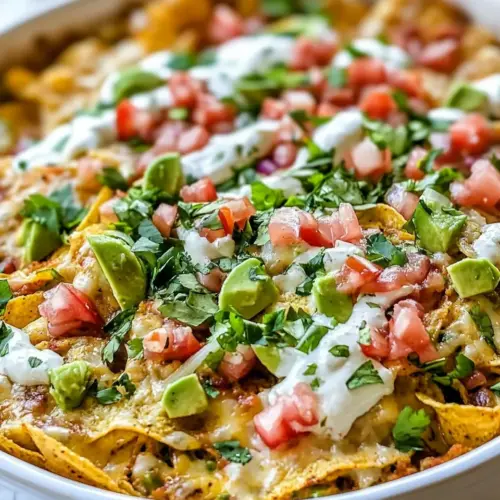
Textural joy and visual appeal
There is real pleasure in the way the melted Monterey Jack cheese strings between pieces, and how bright green sauce brightens the whole pan. A sprinkle of crumbled feta cheese and chopped green onions finishes it with a pop of color and tang, making it look as good as it tastes. I always enjoy the moment when I pull the skillet out of the oven and let the aromas roll over the table.
Easy to personalize
You can add an egg on top, swap cheeses, or change the protein, and each tweak changes the vibe of the dish. That freedom keeps it exciting and adaptable to what I have on hand, which is something I really appreciate in a favorite recipe.
Ingredients to Make Tex Mex Chilaquiles

These ingredients are about bold, cooperative flavors. The star is the green enchilada sauce, which soaks into the tortilla chips and brings everything together. Shredded turkey adds savory body, while creamy sour cream and melty Monterey Jack cheese create richness. Small fresh touches like tomato, green onions, and cilantro brighten each bite. Together they build layers of texture and flavor that make the skillet sing.
- 3 cups green enchilada sauce (or green salsa): Provide a tangy, slightly spicy base that binds the dish and infuses corn chips with bright green chile flavor; use a smooth enchilada sauce or a chunky green salsa to adjust texture and heat, simmering briefly so the chips soften without becoming mushy.
- 3 cups cooked turkey (or chicken, shredded or cut in small pieces): Add a hearty, protein-rich component that makes the chilaquiles a satisfying main course; shredded or small pieces absorb sauce flavors and distribute savory turkey or chicken throughout each bite.
- 5 ounce tortilla chips: Contribute a crunchy, salty foundation that soaks up sauce and creates the signature layered texture; add chips just before serving to balance crispness and tenderness without turning completely soggy.
- 1 cup sour cream: Bring creamy tang and cool contrast that mellows the sauce's acidity and spice; spoon over hot chilaquiles to add richness and a silky mouthfeel that complements the tortillas and protein.
- 10 ounce Monterey Jack cheese (shredded): Provide a gooey, melty element that adds depth and richness when melted over the warmed chips and sauce; shredded Monterey Jack offers mild, creamy flavor and attractive stretch.
- 1 tomato (chopped, ) (optional): Offer fresh juiciness and subtle acidity to brighten the finished dish when used as an optional garnish; chopped tomato adds color and light texture against the warm, saucy chips.
- 2 green onions (chopped, ) (optional): Add a mild oniony bite and fresh green color as a finishing touch; chopped green onions lend crispness and a gentle sharpness that complements the creamy and spicy components.
- 2 tablespoon feta cheese (crumbled, ) (optional): Contribute a salty, tangy crumbly accent when sprinkled on top; feta introduces a briny contrast that pairs well with green sauce and creamy sour cream if used as an optional topping.
- 1 tablespoon fresh cilantro (chopped): Provide a bright herbaceous note that lifts the overall flavor when chopped and scattered over the dish; fresh cilantro adds aromatic lift and visual freshness to each serving.
- 1/4 teaspoon black pepper (or to taste): Season the dish with a gentle heat and aroma that enhances flavors without overpowering; freshly ground black pepper adjusts the final taste and can be tailored to personal preference.
Tex Mex Chilaquiles Instructions
I like to walk into this assembly with my mise en place ready, because layering moves quickly. The following steps guide you through oven temperature, layering technique, and finishing touches so every bite has a mix of saucy, cheesy, and crisp textures. Keep the skillet within reach for a smooth transfer to the oven.
- Preheat your oven to 425 ℉.: When the oven is heating, you will smell the residual warmth from previous bakes or the faint metallic scent of a cold oven waking up; that preheat sets the stage for rapid melting and even bubbling once the skillet goes in. Getting the oven fully to 425 ℉ ensures the cheese melts quickly and the layers heat through without turning the chips limp. Common pitfalls include placing the pan in before the oven is hot, which yields uneven melting, so wait until the meter reaches temperature. Use an oven thermometer if your appliance runs cool. A properly preheated oven helps create those golden spots on the cheese that add visual appeal and a subtle toasted flavor.
- Spray a large skillet with cooking spray. Spread 1 cup of the green enchilada sauce on the bottom of the skillet then start layering with 1/3 of the turkey, 1/3 of the tortilla chips, top with 1/3 of the sour cream and 1/3 of the cheese. Repeat with remaining enchilada sauce, turkey, chips, sour cream and cheese 2 more times, to make a total of 3 layers of each ingredient.: The faint hiss of the spray and the glossy sheen across the pan create a nonstick surface that helps the layers release after baking. A light coating prevents sticking without adding flavor, and it promotes even heat contact on the bottom layer. If you skip this step, the sauce and cheese can adhere and make serving messy, so take a moment to coat the skillet evenly. For cast iron, a tiny smear of neutral oil rubbed with a paper towel will achieve the same result while preserving seasoning.
- Bake for 10 minutes or until hot inside and all the cheese has melted.: You will notice the vivid green sauce creating a slick foundation that immediately softens the edges of the chips. The initial layer traps heat at the base and prevents chips from scorching, while small mounds of shredded turkey add savory pockets. The sound is subtle here, a soft settling rather than a sizzle, and visually you should see distinct strata forming. The reason for this order is distribution; it guarantees every bite gets sauce, protein, and dairy. Avoid piling too much in one spot, which causes uneven heating and soggy clusters. When you place chips, overlap them gently so they catch sauce without collapsing into a mushy mass.
- Top with chopped tomatoes, green onions, feta cheese, cilantro and black pepper.: As you build the second and third layers, notice how the sauce softens the chips differently each round, creating zones of tender and crunchy texture. The sour cream between layers provides cool ribbons that temper the heat and add a creamy mouthfeel. Layering three times ensures depth and variety in every serving, allowing the cheese to weave through the interior as it melts. A common mistake is compressing layers too tightly, which prevents sauce penetration and yields a dense interior, so keep the layers relaxed to retain air and texture. Visually, the layers will look chunky and promising, with pockets of cheese peeking through.
- Serve while hot.: Shortly after placing the skillet in the oven you may hear a low bubbling and smell the green sauce warming up, with the cheese beginning to flow. Ten minutes at a high temperature allows the center to heat through while the top develops melting and slight browning; if your oven runs cool, you may need an extra minute or two. Watch closely to avoid overbrowning which can dry the chips. The internal temperature should be steaming and the cheese should be fully melted and cohesive. If a cheese rim starts to burn, reduce the heat slightly on future attempts or move the skillet to a lower rack to get even heating without charring.
- Top with chopped tomatoes, green onions, feta cheese, cilantro and black pepper.: Once out of the oven the pan will exhale a herbaceous, tangy aroma that invites those finishing touches. The fresh tomato and green onions cool and brighten each portion, while crumbled feta cheese adds a salty pop against the creamy melted Monterey Jack cheese . Freshly chopped cilantro perfumes the whole dish with green brightness, and a dusting of black pepper lifts the back end of the flavor. Avoid adding toppings before baking if you want them to remain vibrant, because extended oven time wilts fresh herbs and softens tomatoes. Arrange toppings evenly so each diner can enjoy a balanced bite.
- Serve while hot.: The first spoonful should present a contrast of textures, the smell of warmed sauce, and the stretch of melted cheese . Serving right away captures the moment when melted cheese is stringy and chips retain some crispness. If you let it cool too long, the chips will continue to absorb sauce and the dish becomes uniformly soft, which changes the intended texture. Use a wide spatula to scoop through layers so you get a mix of chip, protein, and sauce on each plate, and encourage guests to add extra black pepper or cilantro to taste.
Tips and Tricks about Tex Mex Chilaquiles
I always keep a few reliable tricks up my sleeve for making this dish sing from the first bite. These tips cover ingredient swaps, timing, and how to preserve texture so the final skillet is both saucy and pleasantly crisp. Read them before assembly for smoother execution.
- Choose a flavorful green enchilada sauce: A robust sauce makes the dish, so taste it first and adjust with a pinch of salt or a squeeze of lime if needed.
- Refresh stale chips: If your tortilla chips are less crisp, warm them briefly in the oven for a few minutes to revive crunch before layering.
- Shred your own cheese: Freshly shredded Monterey Jack cheese melts more smoothly than pre shredded varieties, giving a better stretch and creaminess.
- Keep toppings fresh: Add chopped tomato, green onions, and cilantro after baking so they retain bright color and texture.
- Use leftover cooked turkey wisely: Cut the turkey into small pieces to distribute evenly and prevent dry pockets; toss with a little sauce if it seems dry.
- Try the egg option carefully: If you add an egg on top before baking, watch the oven closely so the white sets while the yolk stays runny, or fry an egg separately to place on each portion.
What Complements This Tex Mex Chilaquiles
This dish pairs well with bright, cooling sides and is versatile across occasions. Whether it is a casual brunch, a family dinner, or a relaxed holiday gathering, you can tailor accompaniments to the moment. Below are serving ideas, storage notes, and seasonal pairings to help you present it with confidence.
- Serve with a simple green salad: A crisp salad with lime vinaigrette provides a refreshing counterpoint to the rich skillet.
- Offer extra toppings on the side: Bowls of chopped tomato, sliced green onions, crumbled feta cheese, and fresh cilantro let guests customize each plate.
- Good for brunch or dinner: It works equally well for a weekend brunch spread or a cozy weeknight dinner, adaptable to both occasions.
- Storage for leftovers: Store in an airtight container in the refrigerator for up to 1 day; the chips will soften, so reheat gently in a warm oven to revive some texture, but freezing is not recommended.
- Seasonal pairing: In warmer months, keep toppings light and fresh, while in cooler months you can add heartier accompaniments like roasted vegetables to make the meal more substantial.
- Occasion ideas: Great for casual gatherings, family meals during Ramadan if served after the fast, or a relaxed weekend brunch with friends.
FAQ
Conclusion
Tex Mex Chilaquiles stand out because they combine saucy, cheesy, and crunchy elements into one easy, layered skillet that feels both comforting and exciting. I encourage you to try this recipe because it adapts well to leftovers, comes together quickly, and invites personalization with simple toppings. Make it for a casual weekend brunch or a lively weeknight dinner, and enjoy the satisfying contrast of textures and bright verde flavors that make this dish a reliable favorite.
Tex Mex Chilaquiles
Equipment
- 12-inch Cast Iron Skillet
Ingredients
- 3 cups green enchilada sauce (or green salsa) Provide a tangy, slightly spicy base that binds the dish and infuses corn chips with bright green chile flavor; use a smooth enchilada sauce or a chunky green salsa to adjust texture and heat, simmering briefly so the chips soften without becoming mushy.
- 3 cups cooked turkey (or chicken, shredded or cut in small pieces) Add a hearty, protein-rich component that makes the chilaquiles a satisfying main course; shredded or small pieces absorb sauce flavors and distribute savory turkey or chicken throughout each bite.
- 5 ounce tortilla chips Contribute a crunchy, salty foundation that soaks up sauce and creates the signature layered texture; add chips just before serving to balance crispness and tenderness without turning completely soggy.
- 1 cup sour cream Bring creamy tang and cool contrast that mellows the sauce's acidity and spice; spoon over hot chilaquiles to add richness and a silky mouthfeel that complements the tortillas and protein.
- 10 ounce Monterey Jack cheese (shredded) Provide a gooey, melty element that adds depth and richness when melted over the warmed chips and sauce; shredded Monterey Jack offers mild, creamy flavor and attractive stretch.
- 1 tomato (chopped, optional) Offer fresh juiciness and subtle acidity to brighten the finished dish when used as an optional garnish; chopped tomato adds color and light texture against the warm, saucy chips.
- 2 green onions (chopped, optional) Add a mild oniony bite and fresh green color as a finishing touch; chopped green onions lend crispness and a gentle sharpness that complements the creamy and spicy components.
- 2 tablespoon feta cheese (crumbled, optional) Contribute a salty, tangy crumbly accent when sprinkled on top; feta introduces a briny contrast that pairs well with green sauce and creamy sour cream if used as an optional topping.
- 1 tablespoon fresh cilantro (chopped) Provide a bright herbaceous note that lifts the overall flavor when chopped and scattered over the dish; fresh cilantro adds aromatic lift and visual freshness to each serving.
- 1/4 teaspoon black pepper (or to taste) Season the dish with a gentle heat and aroma that enhances flavors without overpowering; freshly ground black pepper adjusts the final taste and can be tailored to personal preference.
Instructions
- Preheat your oven to 425 ℉.: When the oven is heating, you will smell the residual warmth from previous bakes or the faint metallic scent of a cold oven waking up; that preheat sets the stage for rapid melting and even bubbling once the skillet goes in. Getting the oven fully to 425 ℉ ensures the cheese melts quickly and the layers heat through without turning the chips limp. Common pitfalls include placing the pan in before the oven is hot, which yields uneven melting, so wait until the meter reaches temperature. Use an oven thermometer if your appliance runs cool. A properly preheated oven helps create those golden spots on the cheese that add visual appeal and a subtle toasted flavor.
- Spray a large skillet with cooking spray. Spread 1 cup of the green enchilada sauce on the bottom of the skillet then start layering with 1/3 of the turkey, 1/3 of the tortilla chips, top with 1/3 of the sour cream and 1/3 of the cheese. Repeat with remaining enchilada sauce, turkey, chips, sour cream and cheese 2 more times, to make a total of 3 layers of each ingredient.: The faint hiss of the spray and the glossy sheen across the pan create a nonstick surface that helps the layers release after baking. A light coating prevents sticking without adding flavor, and it promotes even heat contact on the bottom layer. If you skip this step, the sauce and cheese can adhere and make serving messy, so take a moment to coat the skillet evenly. For cast iron, a tiny smear of neutral oil rubbed with a paper towel will achieve the same result while preserving seasoning.
- Bake for 10 minutes or until hot inside and all the cheese has melted.: You will notice the vivid green sauce creating a slick foundation that immediately softens the edges of the chips. The initial layer traps heat at the base and prevents chips from scorching, while small mounds of shredded turkey add savory pockets. The sound is subtle here, a soft settling rather than a sizzle, and visually you should see distinct strata forming. The reason for this order is distribution; it guarantees every bite gets sauce, protein, and dairy. Avoid piling too much in one spot, which causes uneven heating and soggy clusters. When you place chips, overlap them gently so they catch sauce without collapsing into a mushy mass.
- Top with chopped tomatoes, green onions, feta cheese, cilantro and black pepper.: As you build the second and third layers, notice how the sauce softens the chips differently each round, creating zones of tender and crunchy texture. The sour cream between layers provides cool ribbons that temper the heat and add a creamy mouthfeel. Layering three times ensures depth and variety in every serving, allowing the cheese to weave through the interior as it melts. A common mistake is compressing layers too tightly, which prevents sauce penetration and yields a dense interior, so keep the layers relaxed to retain air and texture. Visually, the layers will look chunky and promising, with pockets of cheese peeking through.
- Serve while hot.: Shortly after placing the skillet in the oven you may hear a low bubbling and smell the green sauce warming up, with the cheese beginning to flow. Ten minutes at a high temperature allows the center to heat through while the top develops melting and slight browning; if your oven runs cool, you may need an extra minute or two. Watch closely to avoid overbrowning which can dry the chips. The internal temperature should be steaming and the cheese should be fully melted and cohesive. If a cheese rim starts to burn, reduce the heat slightly on future attempts or move the skillet to a lower rack to get even heating without charring.
- Top with chopped tomatoes, green onions, feta cheese, cilantro and black pepper.: Once out of the oven the pan will exhale a herbaceous, tangy aroma that invites those finishing touches. The fresh tomato and green onions cool and brighten each portion, while crumbled feta cheese adds a salty pop against the creamy melted Monterey Jack cheese . Freshly chopped cilantro perfumes the whole dish with green brightness, and a dusting of black pepper lifts the back end of the flavor. Avoid adding toppings before baking if you want them to remain vibrant, because extended oven time wilts fresh herbs and softens tomatoes. Arrange toppings evenly so each diner can enjoy a balanced bite.
- Serve while hot.: The first spoonful should present a contrast of textures, the smell of warmed sauce, and the stretch of melted cheese . Serving right away captures the moment when melted cheese is stringy and chips retain some crispness. If you let it cool too long, the chips will continue to absorb sauce and the dish becomes uniformly soft, which changes the intended texture. Use a wide spatula to scoop through layers so you get a mix of chip, protein, and sauce on each plate, and encourage guests to add extra black pepper or cilantro to taste.
Notes
- Choose a flavorful green enchilada sauce: A robust sauce makes the dish, so taste it first and adjust with a pinch of salt or a squeeze of lime if needed.
- Refresh stale chips: If your tortilla chips are less crisp, warm them briefly in the oven for a few minutes to revive crunch before layering.
- Shred your own cheese: Freshly shredded Monterey Jack cheese melts more smoothly than pre shredded varieties, giving a better stretch and creaminess.
- Keep toppings fresh: Add chopped tomato, green onions, and cilantro after baking so they retain bright color and texture.
- Use leftover cooked turkey wisely: Cut the turkey into small pieces to distribute evenly and prevent dry pockets; toss with a little sauce if it seems dry.
- Try the egg option carefully: If you add an egg on top before baking, watch the oven closely so the white sets while the yolk stays runny, or fry an egg separately to place on each portion.