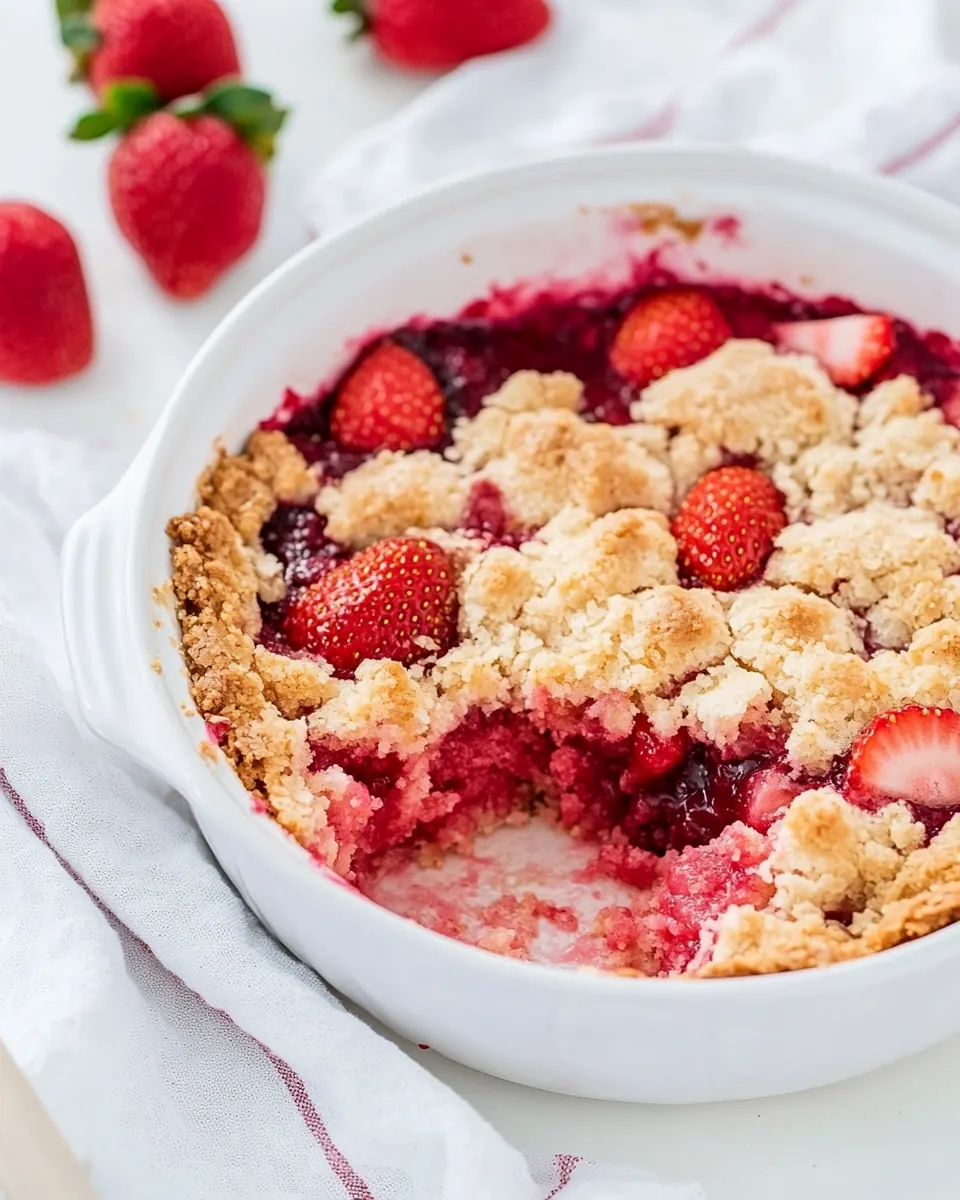
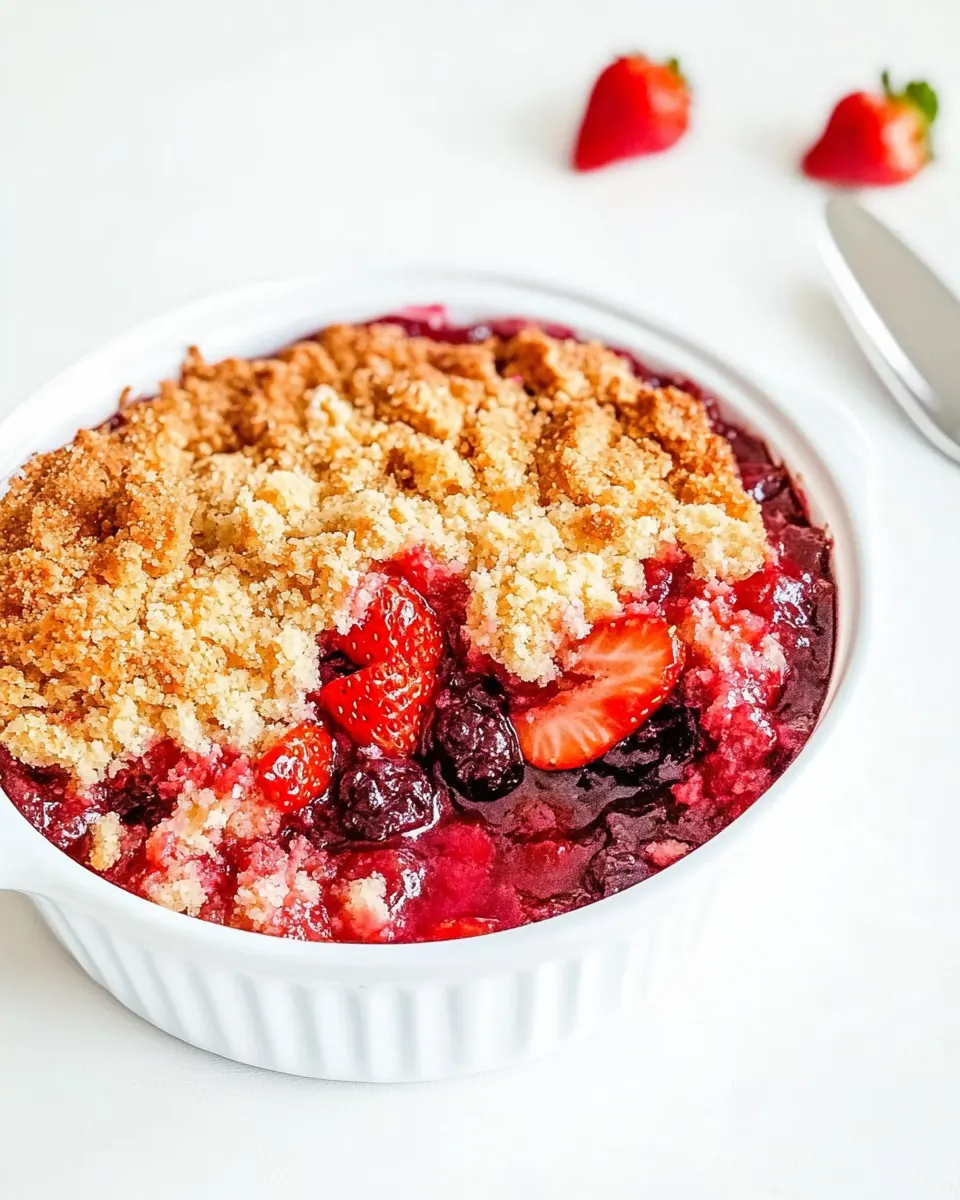
Strawberry Dump Cake
Strawberry Dump Cake is one of those sweet, forgiving desserts I reach for when I want maximum comfort with minimal fuss.
I remember the first time I made this, squeezing a hectic week into a single baking sheet and laughing that something so simple could earn such praise from friends. The bubbling strawberry filling smelled bright and jammy as it met the hot melted butter, while the boxed cake mix transformed into a golden, crunchy topping that somehow felt both nostalgic and indulgent. I love that it requires almost no assembly, and yet it produces layers of texture, from syrupy fruit at the bottom to crisp, buttery cake on top.
Over the years I have varied how I serve it, sometimes spooning warm portions into bowls, other times letting it cool so the layers firm up for neat slices. Guests always ask for the recipe, which makes me happy because it is the sort of dish that invites sharing and conversation. When life is busy, this is the recipe I tuck into the rotation, because the payoff feels much larger than the effort.
Recipe Snapshot
55 mins
5 mins
50 mins
Medium
300 kcal
American
Keto, Gluten-Free
Desserts
9×13 inch baking pan, Oven, Spatula, Measuring cup
Why This Strawberry Dump Cake Shines
Effortless, yet impressive
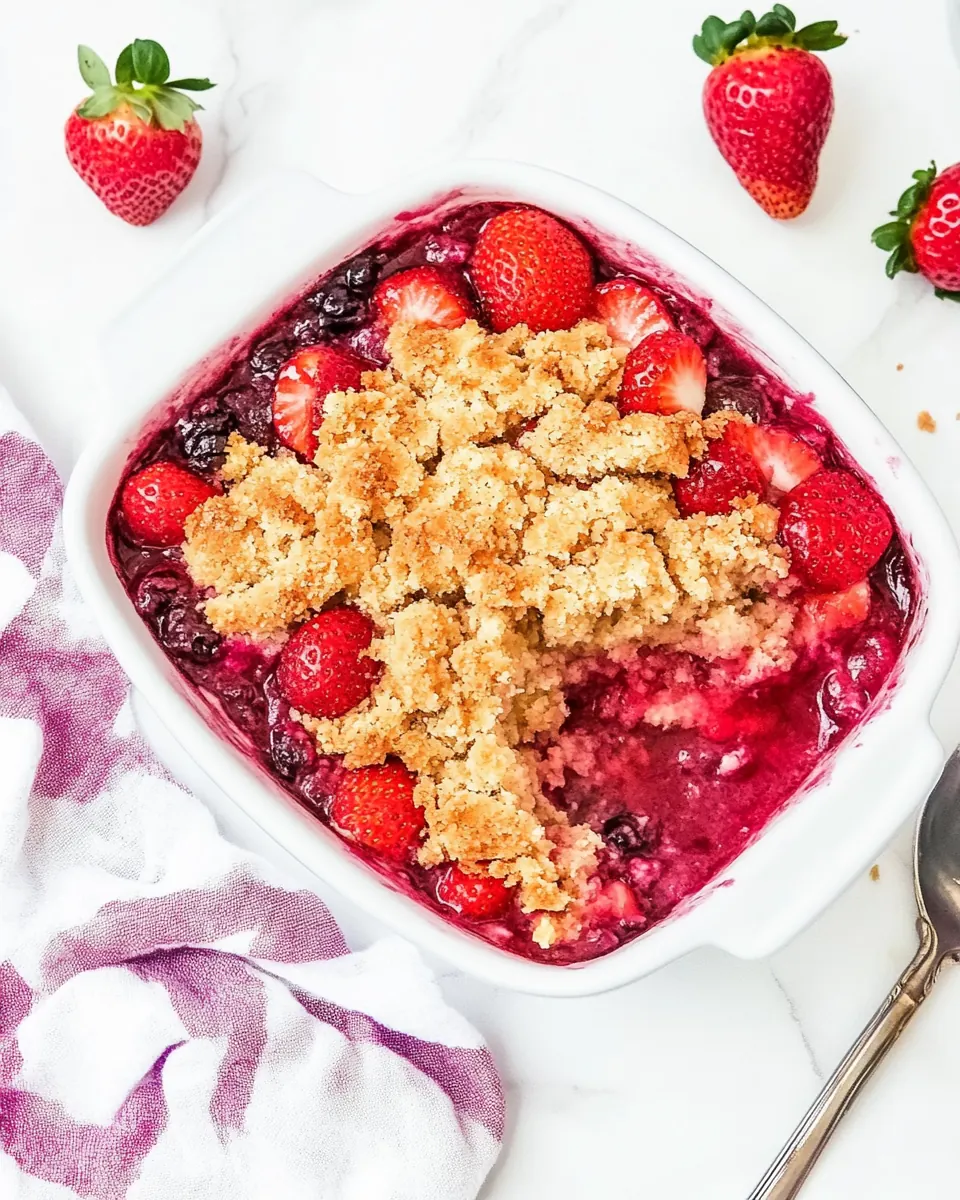
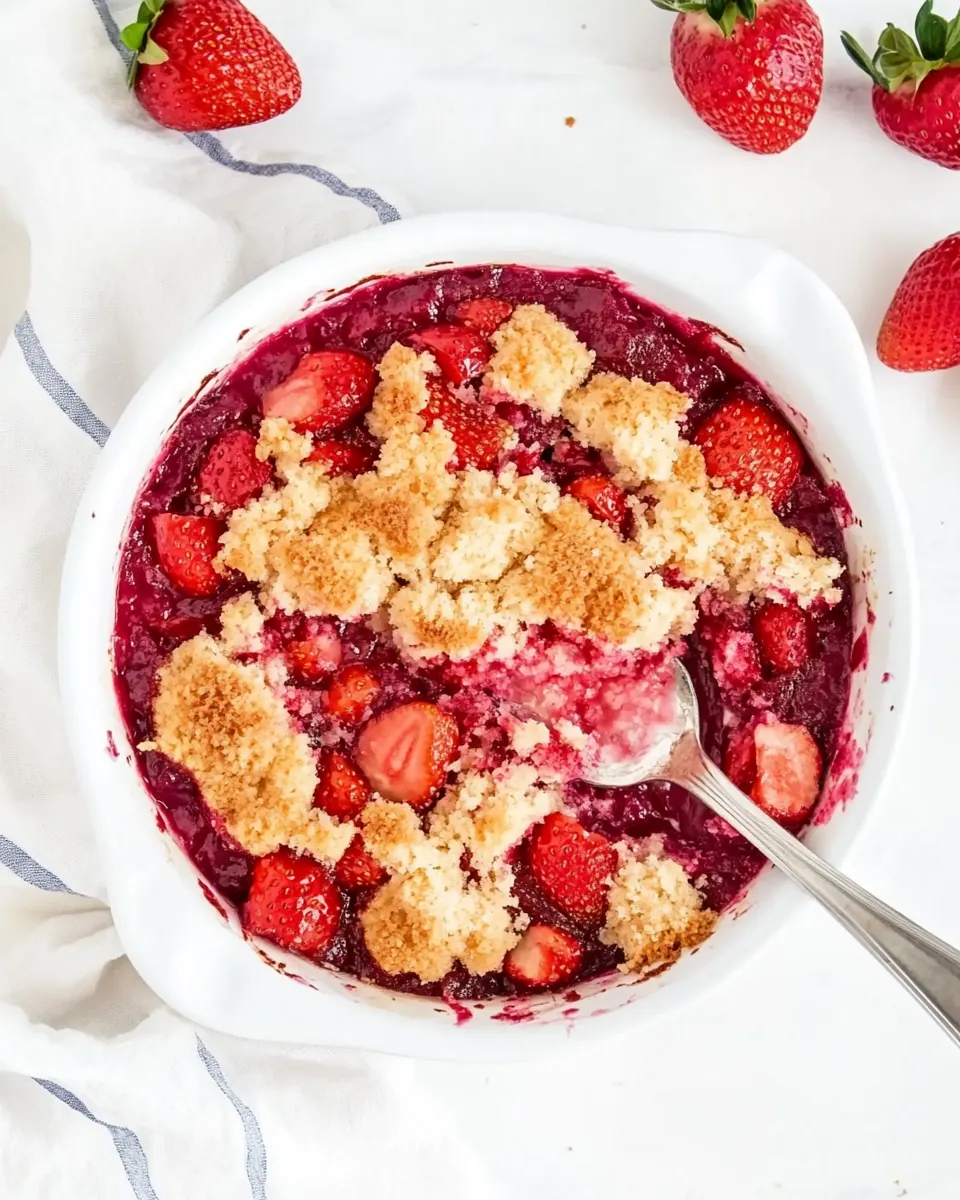
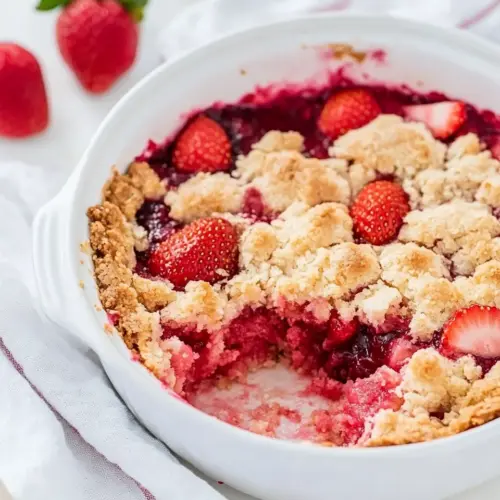
I adore how Strawberry Dump Cake looks and tastes like it took hours, but it really takes only minutes to assemble. The contrast between the syrupy strawberry filling and the crisp cake mix topping creates a multilayered dessert that feels special without complicated steps.
Perfect for last minute gatherings
When I get an invite with short notice, this is my go to. You can scale it up easily, and because it uses pantry friendly items like canned strawberry filling and boxed cake mix, you can throw it together without a trip to the store. I find it especially useful for casual potlucks, where people appreciate something homey and shareable.
Reliable texture every bake
One reason I keep coming back to Strawberry Dump Cake is the consistency. The melted butter soaks into the dry cake mix and creates a top that browns evenly while the fruit bubbles below. That reliable change in texture is what makes each bite interesting, and it usually yields rave reviews even from picky guests.
Flexible to serve however you like
I often serve it warm with a scoop of cold vanilla ice cream, which creates a wonderful hot and cold contrast. Alternatively, letting it cool makes it easier to slice for a buffet. The recipe is forgiving, so slight timing differences rarely ruin the result, which is a comfort when you are juggling other dishes.
Minimal cleanup
Because everything goes into one baking pan, cleanup is quick. I value recipes that free up time for conversation instead of leaving me at the sink. That practical ease, combined with delicious flavor, is why this dessert is a staple in my repertoire.
Strawberry Dump Cake Ingredients
These ingredients are intentionally simple. The filling provides the fruit and syrup, the cake mix gives structure and crispness, and the melted butter ties everything together. Together they create distinct layers that bake into a warm, comforting dessert with minimal effort.
- 21 ounces canned strawberry pie filling: Adds sweet, fruity filling and provides moisture and large strawberry pieces that create the jammy base for the dump cake; contributes sweetness and a glossy texture when baked, melding with cake topping to form pockets of soft fruit that balance the buttery crust.
- 15.25 ounce boxed yellow cake mix: Supplies the dry, sweetened cake mix that forms a crumbly, golden topping; offers structure through flour and leavening agents so the melted butter can create a tender, slightly crisp cake layer over the fruit, simplifying preparation compared with from-scratch batters.
- 3/4 cup melted butter: Provides rich fat that melts through the cake mix to bind dry particles into a cohesive, browned crust; enhances flavor and mouthfeel while promoting even browning and a slightly crisp exterior that contrasts the soft strawberry filling.
Putting Together Strawberry Dump Cake
This is a hands on but relaxed bake. The following steps walk you through the process with sensory cues and small troubleshooting notes so you can feel confident as the dessert transforms from pantry items to a bubbling, golden pan of goodness.
- Preheat the oven to 350 degrees and spray a 9×13 inch baking pan with cooking spray and set aside.: As the oven warms, you should feel a gentle heat radiating from it when you open the door, and the air will begin to smell faintly toasted. Preheating ensures even baking so the cake mix becomes golden at the same rate the strawberry filling bubbles, preventing a raw center. A common mistake is putting the pan into a cold oven, which leads to a soggy top, so always wait until the gauge reaches the right temperature. If your oven runs hot or cool, an inexpensive oven thermometer helps you nail the target.
- Add the strawberry pie filling to the baking pan and spread out evenly on bottom of pan.: When you spoon the glossy strawberry filling into the pan you will see a thick, ruby colored layer that glistens. Use an offset spatula or the back of a spoon to create an even bed, which will encourage uniform bubbling and prevent thin areas that dry out. Be mindful of air pockets; tamp gently to create contact across the pan. If the filling seems unusually watery, let it sit uncovered for a few minutes to thicken slightly before assembling.
- Sprinkle the cake mix over the top of the pie filling in an even layer until the pie filling is completely covered.: The dry cake mix should fall like sand across the strawberry layer, forming a uniform sheet that will crisp as it bakes. Work quickly and try not to press the mix into the filling, you want it to remain dry so the melted butter can create pockets of richness as it soaks. Uneven sprinkling can create overly wet spots or dry clumps, so aim for a consistent blanket. If you see visible gaps, gently fill them in to avoid large wet spots in the final bake.
- Pour the melted butter on top of the cake mix, making sure to cover as much as possible to avoid dry spots.: As you drizzle the warm, golden butter , watch it bead and soak into the dry cake mix , leaving darker, moist patches where the fat saturates the crumbs. Pour in a slow, controlled stream and use the back of a spoon to guide butter into any dry corners. The butter promotes browning and adds richness, so don't skimp. If you miss spots they can remain dry and unbrowned, which is the most frequent issue at this stage.
- Place the baking pan in the preheated oven and bake for 45-50 minutes or until top is golden brown.: You will hear a soft bubbling from the fruit, and the aroma will shift to warm, caramelized strawberry and toasted butter. Look for an even golden brown across the top and active bubbling at the edges as signals of doneness. If the center still looks very pale after time is up, tent loosely with foil to prevent overbrowning while it finishes. Avoid opening the oven too often, which drops the heat and elongates baking time.
- Remove the baking pan from the oven and let it cool slightly.: Once out of the oven, the sound of bubbling will subside, and steam will rise gently from the pan. Allowing it to rest helps the syrup set a bit, making serving neater and allowing flavors to settle. A common impatience is cutting immediately, which results in runny slices, so give it ten to fifteen minutes to stabilize. Use oven mitts and set the pan on a heat resistant surface to cool safely.
- This can be served warm or room temperature. Top with Cool Whip, Vanilla Ice Cream or Homemade Whipped Cream.: Warm servings release the most aroma and pair beautifully with cold accompaniments like ice cream, while room temperature slices hold shape better for buffet style service. When serving warm, you will notice a contrast of hot fruit and crisp topping; when cooled, the layers feel denser and easier to slice. A frequent serving mistake is reheating at too high a temperature which can dry the top, so warm gently if needed.
- Top with Cool Whip, Vanilla Ice Cream or Homemade Whipped Cream: The final flourish brings creaminess that balances the sweet, tart strawberry layer and buttery topping. A scoop of cold ice cream will melt slightly against the warm cake, creating ribbons of cream that mingle with fruit. If you prefer whipped cream, whip to soft peaks so it retains loft without being stiff. Avoid overly dense or flavored toppings that can overpower the fresh fruit character.
Variations to Try
This dessert is forgiving and adaptable. Below are ideas to personalize texture, sweetness, and presentation while keeping the core method intact.
- Warm with ice cream Serve a hot scoop of Strawberry Dump Cake with a cold scoop of vanilla ice cream to create a pleasing hot and cold contrast that enhances both texture and flavor.
- Whipped cream finish Top with lightly sweetened whipped cream for a softer, airier contrast to the crisp cake mix topping, which is especially nice if guests prefer less sweetness than ice cream offers.
- Make ahead You can assemble the pan and refrigerate for a few hours before baking; bring it to room temperature before baking so the top browns evenly and the center cooks through.
- Even baking If your oven has hot spots, rotate the pan halfway through baking to encourage a uniformly golden top and consistent bubbling from the strawberry filling.
- Presentation tweak For a rustic look, bake in an enamel or ceramic 9 by 13 pan and serve straight from the dish, letting guests scoop portions as they like.
Accompaniments for Strawberry Dump Cake
This dessert is versatile across occasions and seasons. Below I describe serving ideas, storage tips, and pairing suggestions to make the most of the flavors.
- Casual family dessert Serve warm from the oven with a scoop of cold vanilla ice cream for a comforting after dinner treat that feels familiar and satisfying.
- Potluck friendly Bake in a sturdy 9 by 13 pan and bring it to a gathering at room temperature, where guests can slice or scoop. It holds up well for buffet style service.
- Seasonal pairing In spring, pair with light beverages and fresh salads to balance the sweetness, and use it as a cheerful finale for outdoor meals.
- Storage tips Cover and refrigerate leftovers for up to four days. Rewarm gently in a low oven to crisp the top again, or microwave single servings briefly if you prefer a quick warm up.
- Make ahead option Assemble the pan and keep it chilled for a few hours before baking. Bring to room temperature before placing in the oven to ensure consistent baking.
- Serving style Offer spoons and bowls for warm servings with ice cream, or plates and forks if you have allowed the dessert to cool and set for neater slices.
FAQ
Conclusion
Strawberry Dump Cake stands out because it turns pantry staples into a warm, comforting dessert with minimal effort. It combines syrupy strawberry filling and a golden, buttery topping for delightful contrast in every bite. I hope you give this recipe a try the next time you want something quick but impressive, whether for family dinner or an impromptu gathering. It always feels like a small celebration when it comes out of the oven bubbling and golden.
Strawberry Dump Cake
Equipment
- 9x13-inch Baking Pan
- Oven
- Spatula
- Measuring Cup
Ingredients
- 21 ounces canned strawberry pie filling Adds sweet, fruity filling and provides moisture and large strawberry pieces that create the jammy base for the dump cake; contributes sweetness and a glossy texture when baked, melding with cake topping to form pockets of soft fruit that balance the buttery crust.
- 15.25 ounce boxed yellow cake mix Supplies the dry, sweetened cake mix that forms a crumbly, golden topping; offers structure through flour and leavening agents so the melted butter can create a tender, slightly crisp cake layer over the fruit, simplifying preparation compared with from-scratch batters.
- 3/4 cup melted butter Provides rich fat that melts through the cake mix to bind dry particles into a cohesive, browned crust; enhances flavor and mouthfeel while promoting even browning and a slightly crisp exterior that contrasts the soft strawberry filling.
Instructions
- Preheat the oven to 350 degrees and spray a 9×13 inch baking pan with cooking spray and set aside.: As the oven warms, you should feel a gentle heat radiating from it when you open the door, and the air will begin to smell faintly toasted. Preheating ensures even baking so the cake mix becomes golden at the same rate the strawberry filling bubbles, preventing a raw center. A common mistake is putting the pan into a cold oven, which leads to a soggy top, so always wait until the gauge reaches the right temperature. If your oven runs hot or cool, an inexpensive oven thermometer helps you nail the target.
- Add the strawberry pie filling to the baking pan and spread out evenly on bottom of pan.: When you spoon the glossy strawberry filling into the pan you will see a thick, ruby colored layer that glistens. Use an offset spatula or the back of a spoon to create an even bed, which will encourage uniform bubbling and prevent thin areas that dry out. Be mindful of air pockets; tamp gently to create contact across the pan. If the filling seems unusually watery, let it sit uncovered for a few minutes to thicken slightly before assembling.
- Sprinkle the cake mix over the top of the pie filling in an even layer until the pie filling is completely covered.: The dry cake mix should fall like sand across the strawberry layer, forming a uniform sheet that will crisp as it bakes. Work quickly and try not to press the mix into the filling, you want it to remain dry so the melted butter can create pockets of richness as it soaks. Uneven sprinkling can create overly wet spots or dry clumps, so aim for a consistent blanket. If you see visible gaps, gently fill them in to avoid large wet spots in the final bake.
- Pour the melted butter on top of the cake mix, making sure to cover as much as possible to avoid dry spots.: As you drizzle the warm, golden butter , watch it bead and soak into the dry cake mix , leaving darker, moist patches where the fat saturates the crumbs. Pour in a slow, controlled stream and use the back of a spoon to guide butter into any dry corners. The butter promotes browning and adds richness, so don't skimp. If you miss spots they can remain dry and unbrowned, which is the most frequent issue at this stage.
- Place the baking pan in the preheated oven and bake for 45-50 minutes or until top is golden brown.: You will hear a soft bubbling from the fruit, and the aroma will shift to warm, caramelized strawberry and toasted butter. Look for an even golden brown across the top and active bubbling at the edges as signals of doneness. If the center still looks very pale after time is up, tent loosely with foil to prevent overbrowning while it finishes. Avoid opening the oven too often, which drops the heat and elongates baking time.
- Remove the baking pan from the oven and let it cool slightly.: Once out of the oven, the sound of bubbling will subside, and steam will rise gently from the pan. Allowing it to rest helps the syrup set a bit, making serving neater and allowing flavors to settle. A common impatience is cutting immediately, which results in runny slices, so give it ten to fifteen minutes to stabilize. Use oven mitts and set the pan on a heat resistant surface to cool safely.
- This can be served warm or room temperature. Top with Cool Whip, Vanilla Ice Cream or Homemade Whipped Cream.: Warm servings release the most aroma and pair beautifully with cold accompaniments like ice cream, while room temperature slices hold shape better for buffet style service. When serving warm, you will notice a contrast of hot fruit and crisp topping; when cooled, the layers feel denser and easier to slice. A frequent serving mistake is reheating at too high a temperature which can dry the top, so warm gently if needed.
- Top with Cool Whip, Vanilla Ice Cream or Homemade Whipped Cream: The final flourish brings creaminess that balances the sweet, tart strawberry layer and buttery topping. A scoop of cold ice cream will melt slightly against the warm cake, creating ribbons of cream that mingle with fruit. If you prefer whipped cream, whip to soft peaks so it retains loft without being stiff. Avoid overly dense or flavored toppings that can overpower the fresh fruit character.
Notes
- Warm with ice cream Serve a hot scoop of Strawberry Dump Cake with a cold scoop of vanilla ice cream to create a pleasing hot and cold contrast that enhances both texture and flavor.
- Whipped cream finish Top with lightly sweetened whipped cream for a softer, airier contrast to the crisp cake mix topping, which is especially nice if guests prefer less sweetness than ice cream offers.
- Make ahead You can assemble the pan and refrigerate for a few hours before baking; bring it to room temperature before baking so the top browns evenly and the center cooks through.
- Even baking If your oven has hot spots, rotate the pan halfway through baking to encourage a uniformly golden top and consistent bubbling from the strawberry filling.
- Presentation tweak For a rustic look, bake in an enamel or ceramic 9 by 13 pan and serve straight from the dish, letting guests scoop portions as they like.