Strawberry Crisp
Strawberry Crisp has been one of those comforting desserts I fall back on whenever I want summer on a plate. The first time I made it, I brought a warm pan to a potluck and watched people crowd the serving table, spoons poised, faces lighting up when that first forkful delivered the crackle of topping and the bright strawberry juices. I still remember the mix of textures, and how the aroma of browned butter and cinnamon drew everyone in from the backyard.
Over the years I’ve tweaked the balance between tartness and sweetness, and learned to read strawberries the way a baker reads dough. Some seasons the berries hold their shape, giving you neat wedges under a crunchy topping. Other times they turn jammy and lush, sinking into a glossy, spoonable filling that pairs beautifully with cold cream. I like recipes that tolerate a bit of improvisation, and Strawberry Crisp is forgiving in the best possible way, so if life hands you very sweet or very soft berries, this dessert still shines.
Recipe Snapshot
60 mins
20 mins
40 mins
Medium
250 kcal
American
Gluten-Free, Low FODMAP
Desserts
Oven, 8×11 or 9 inch baking dish, Large bowl, Wire rack
What We Adore About This Strawberry Crisp
One pan, maximum comfort
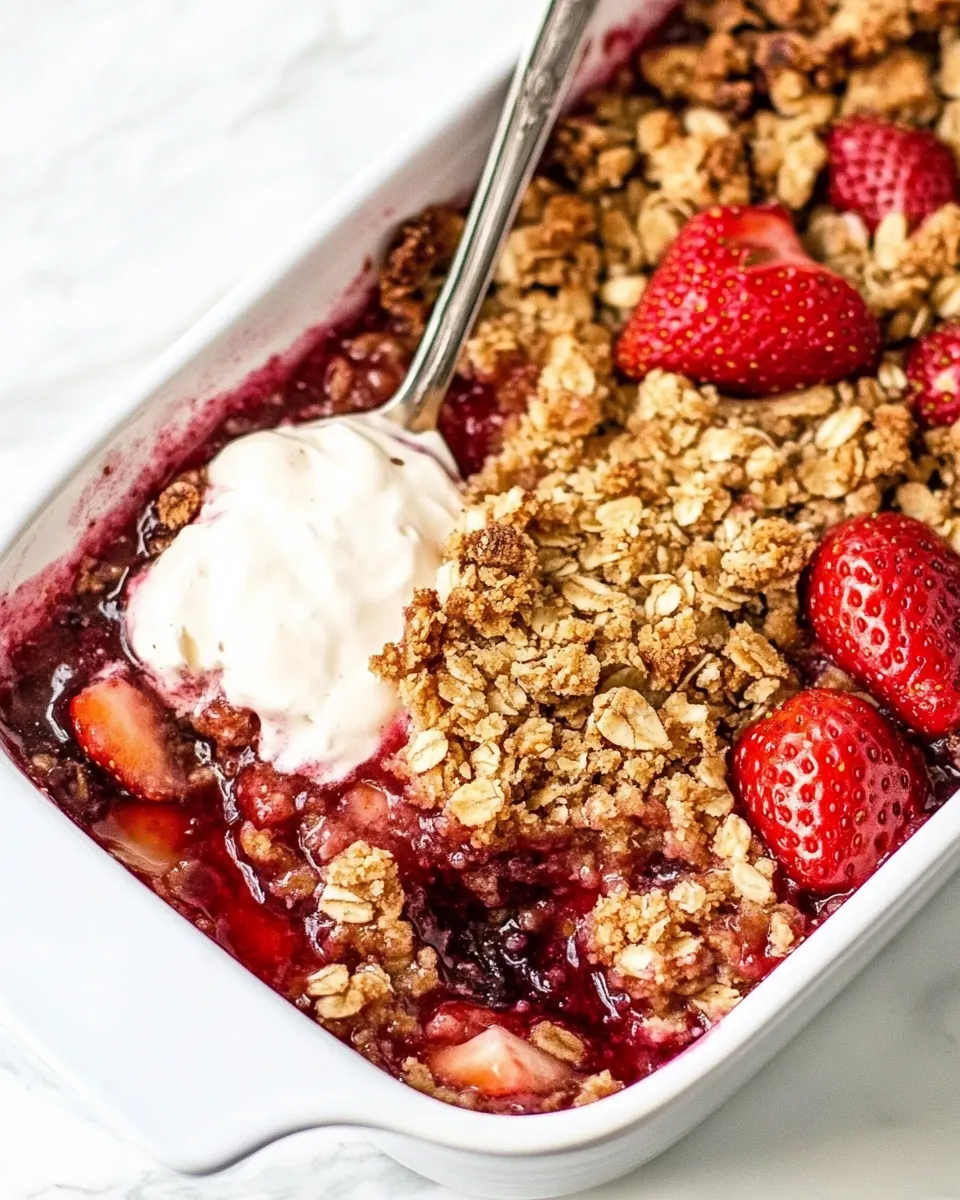
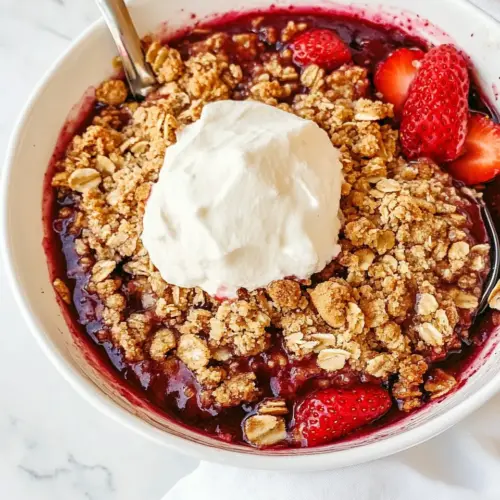
I love that Strawberry Crisp comes together in a single baking dish, so cleanup is minimal and the presentation is homey and direct. The contrast between a bubbling fruit center and a crunchy, nut studded topping is the reason I reach for this recipe on casual weeknights and for more celebratory gatherings. You get texture, color, and warmth from one pan.
Simple pantry ingredients, big payoff
Most of the components are things I usually have on hand, so this feels like a spontaneous treat rather than a long baking project. Strawberry flavor is amplified by just a few smart additions like lemon juice and cornstarch, which help the filling thicken and brighten without masking the fruit. The topping uses familiar staples to create that coveted crumble.
Flexible to the fruit you have
Whether your berries are firm or borderline jammy, Strawberry Crisp adapts. If strawberries are on the softer side, a touch more cornstarch keeps the filling from becoming too runny. If they are firm and slightly underripe, a splash of granulated white sugar and lemon zest coax out the best flavor. That flexibility makes it a reliable recipe across the season.
Textural layering that sings
The topping combines old fashioned rolled oats, flour, and chopped pecans to deliver crunch, chew, and a toasty nutty note. I love that you can still get small clusters in the crumble, so each bite offers a little surprise. The melted unsalted butter seals everything together and browns beautifully in the oven, creating those golden shards you want on top.
Comfort food that feels light
Even though it’s indulgent, Strawberry Crisp never feels heavy. The bright acidity from lemon juice and zest lifts the whole dish, and serving it with a small scoop of something cold lets the contrast pop. For me this is the dessert I bring when I want something nostalgic but not fussy.
Strawberry Crisp Shopping List

I think of the ingredient list as a team where each player has a clear job. The strawberries carry the flavor and juiciness, the cornstarch and lemon juice regulate texture and brightness, and the topping ingredients create the crunchy counterpoint. With just a handful of pantry staples you get a finished dessert that tastes layered and thoughtful.
- 2 pounds fresh, ripe strawberries (not soft): Wash and hull thoroughly, providing firm texture and natural sweetness to the filling while offering structural integrity so slices hold together when baked; choose ripe but not soft berries to prevent an overly mushy result and to maintain attractive presentation after cooking.
- 1/3 cup granulated white sugar: Sweeten and balance the fruit's tartness while helping to draw out juices; granulated sugar also aids in creating a syrupy consistency as it dissolves into the strawberries during maceration and baking.
- 2 1/2 tablespoons cornstarch (3 T for softer/juicier strawberries): Thicken the strawberry juices by absorbing excess liquid and producing a glossy, jam-like filling; adjust amount (use 3 tablespoons for softer, juicier berries) to control final filling consistency and prevent a runny crisp.
- 2 tablespoons lemon juice: Add bright acidity to balance sweetness and enhance the strawberries' fresh flavors; lemon juice also helps preserve color and can activate the cornstarch for better thickening.
- 1 1/2 teaspoons vanilla extract: Impart warm, rounded flavor to the filling and deepen the berry aroma; vanilla extract complements the strawberries and pairs well with other spices in the topping.
- 2/3 cup flour: Provide structure and body to the crunchy topping by creating a tender crumb when combined with butter and oats; all-purpose flour binds the topping ingredients and browns during baking.
- 1/3 cup packed light brown sugar: Add rich, caramel-like sweetness and moistness to the topping while aiding browning; packed light brown sugar contributes depth of flavor that contrasts nicely with the bright filling.
- 3 tablespoons granulated sugar: Provide additional sweetness and help the topping caramelize for crisp edges; granulated sugar works with butter and flour to form a slightly crunchy texture.
- 2/3 cup old-fashioned rolled oats (NOT quick oats*): Contribute hearty chewiness and rustic texture to the topping while absorbing some butter for cohesion; old-fashioned rolled oats yield a substantial bite and toasty flavor when baked (avoid quick oats for best results).
- 3/4 cup chopped pecans, (increase oats to 1 C if not using) (optional): Introduce crunchy, nutty flavor and a buttery richness to the topping as an optional mix-in; if omitted, increase oats to maintain topping volume and texture as noted.
- 1 teaspoon vanilla extract: Enhance sweetness and aromatic depth with a second addition of vanilla in the topping, tying the flavors between filling and crumble; this small amount lifts the overall profile without overpowering fruit notes.
- 1 teaspoon baking powder: Lighten the topping slightly and contribute gentle rise and aeration for a tender, crumbly texture; baking powder helps create small air pockets in the crisp mixture during baking.
- 1/2 teaspoon ground cinnamon: Add warm, aromatic spice that complements strawberries and nuts while giving the topping a subtle complexity; ground cinnamon pairs well with brown sugar and oats.
- 1/4 teaspoons salt: Balance sweetness and enhance overall flavor perception by providing a subtle savory counterpoint; salt also strengthens other flavors and supports proper seasoning throughout the dessert.
- zest of one lemon: Provide bright citrus oils and fragrant aroma that elevate the filling and add a lively contrast to the sweet strawberries; lemon zest intensifies freshness without adding extra acidity.
- 8 tablespoons unsalted butter (1 stick), melted: Bind the topping ingredients, impart rich mouthfeel, and promote browning for a buttery, crisp finish as the melted butter coats the oats, flour, and sugars during baking.
How to Cook Strawberry Crisp
These instructions are written like I would guide a friend through the bake, step by step. Follow the sensory cues and trust the visual signs as much as the minutes on a timer, and you will come away with a crisp that is golden and bubbly with a tender fruit interior.
- Prep: Preheat the oven to 350°F. Lightly grease an 8×11 baking dish or a 9-inch square baking dish. Set aside.: Preheat the oven to 350°F. Lightly grease an 8×11 baking dish or a 9-inch square baking dish. Set aside. : Warmth fills the kitchen as the oven comes up to temperature, and the light scent of heat primes the butter and sugars you will brown later, so preheating matters. I notice the oven is ready when the dial or digital readout reaches 350°F , and the air feels evenly warm if you carefully touch the oven door for a moment. Greasing the dish prevents the filling from sticking and makes serving easier, so use a thin layer of butter or a neutral spray. A common mistake is skipping the greasing; when that happens the edges can cling and break apart when you serve. If your oven runs hot, check it a bit early to avoid overbrowning.
- Topping: Add all of the topping ingredients to a large bowl EXCEPT the butter and stir until combined. Pour in the melted butter and stir with a spatula to combine then use your hands as needed to combine. Transfer to the refrigerator while you prep the filling.: Add all of the topping ingredients to a large bowl EXCEPT the butter and stir until combined. Pour in the melted butter and stir with a spatula to combine then use your hands as needed to combine. Transfer to the refrigerator while you prep the filling. : At this stage you want to notice the dry aroma of the oats and the sweet perfume of the light brown sugar , which signals they are well mixed. When the melted butter hits the dry mix it should moisten the particles but not make them soggy; think clumps and loose crumbs. Using your hands helps you form small clusters, which bake into those prized crunchy bits. Chilling the topping firms the clusters so they hold up better during assembly. A common slip is overmixing once the butter is added, which can produce a paste instead of crumbly clusters; stop as soon as you see small clumps.
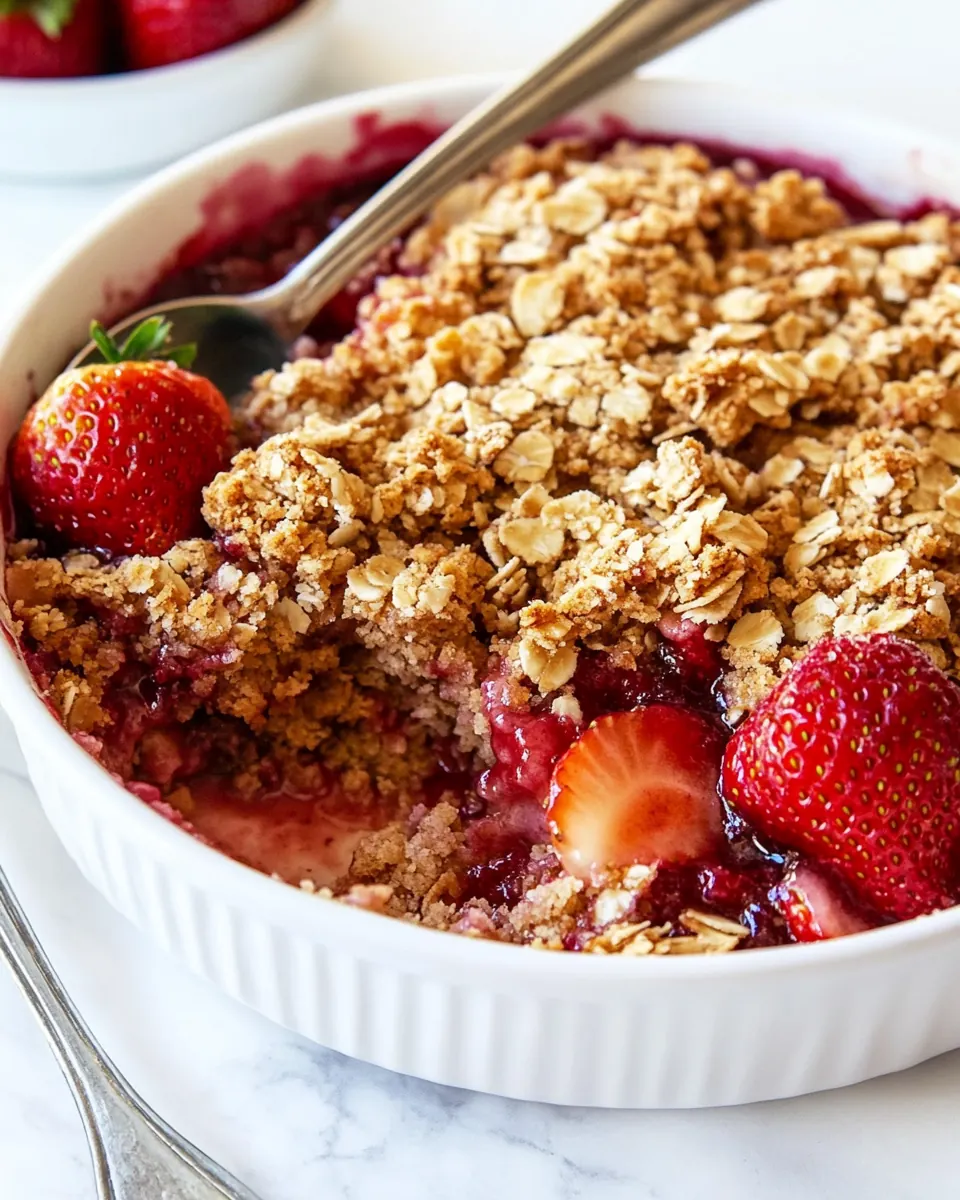
- Cut Strawberries: It is important that the strawberries aren’t cut too small otherwise they can practically disintegrate! You will want to leave super small strawberries whole, halve small berries and quarter large berries. We are aiming for about 3/4-1-inch-wide pieces. Transfer sliced strawberries to a large bowl.: It is important that the strawberries aren’t cut too small otherwise they can practically disintegrate! You will want to leave super small strawberries whole, halve small berries and quarter large berries. We are aiming for about 3/4-1-inch-wide pieces. Transfer sliced strawberries to a large bowl. : The texture of the finished filling depends on how you cut the strawberries . When you slice to roughly 3/4 to 1 inch, the fruit still offers pleasant tooth and visual appeal while releasing enough juice to meld with the thickener. You'll see bright red flesh exposed and smell fresh berry perfume when they're cut correctly. If pieces are too tiny they dissolve into a jammy mass, which is not wrong but different. A frequent error is overcutting; err on the larger side for a more pleasing bite.
- Filling: Add the remaining Strawberry Filling ingredients to the strawberries and stir until evenly combined. Transfer filling to the prepared baking dish and spread into an even layer. Sprinkle the topping over the filling, breaking up any large chunks (you still want some small chunks).: Add the remaining Strawberry Filling ingredients to the strawberries and stir until evenly combined. Transfer filling to the prepared baking dish and spread into an even layer. Sprinkle the topping over the filling, breaking up any large chunks (you still want some small chunks). : Once you add granulated white sugar , cornstarch , lemon juice , and vanilla extract to the berries, the mixture should look glossy and slightly thickened as the cornstarch coats the fruit. Stir gently so juices are distributed and the coating is uniform. Spread it evenly in the dish to ensure consistent baking; uneven thickness causes some spots to bubble sooner than others. When you scatter the topping, aim for a mix of large and small clusters; visually you want golden pockets surrounded by red peeking through. A common mistake is pressing the topping down; keep it loose so air can circulate and the topping crisps.
- Bake uncovered, at 350°F for 35-45 minutes, until the topping is golden and the strawberry juices are bubbling vigorously around the edges. Remove from the oven and let cool on a wire rack for 10 minutes before serving. Serve with vanilla and extra cinnamon if desired.: During baking, your kitchen will fill with the nutty aroma of toasted oats and the sweet perfume of cooked strawberries . Watch for the topping to develop a deep golden brown, and for the filling to bubble vigorously at the edges, which indicates the juices are thick and hot. The sound is a lively simmering and the visual cue is glossy fruit and bubbling syrup. Letting it rest for about ten minutes helps the filling set so slices hold their shape when scooped. One frequent misstep is pulling it from the oven too early; the topping may look pale and the filling undercooked. If the top browns too quickly, tent loosely with foil to finish cooking the interior.
Ways to Customize
I like to think of customizations as small nudges that shift the crisp from familiar to uniquely yours. Use the options below to adjust texture, flavor, and dietary needs while staying true to the simple pleasures of Strawberry Crisp.
- Swap nuts or omit: If you prefer a different crunch, replace pecans with chopped almonds or walnuts, or leave them out and increase oats to 1 cup for more body.
- Make it gluten free: Replace the flour with a 1 to 1 gluten free baking flour to accommodate sensitivities without changing ratios.
- Vegan option: Substitute melted vegan butter or coconut oil for the unsalted butter to make the topping dairy free while preserving richness.
- Adjust sweetness: If your berries are very sweet, reduce the granulated sugar in the filling by one to two tablespoons to keep the fruit bright rather than cloying.
- Boost citrus: Add an extra teaspoon of lemon zest for a more pronounced bright note if your berries are mild.
- Prep ahead: Prepare the filling and topping separately, refrigerate both, then assemble and bake when ready to serve for fresher texture.
Best Served With
Strawberry Crisp is wonderfully versatile when it comes to serving. Whether you are setting a casual dessert tray for a weekend brunch or pulling a comforting treat from the oven after dinner, small accompaniments elevate the experience and make it feel intentional.
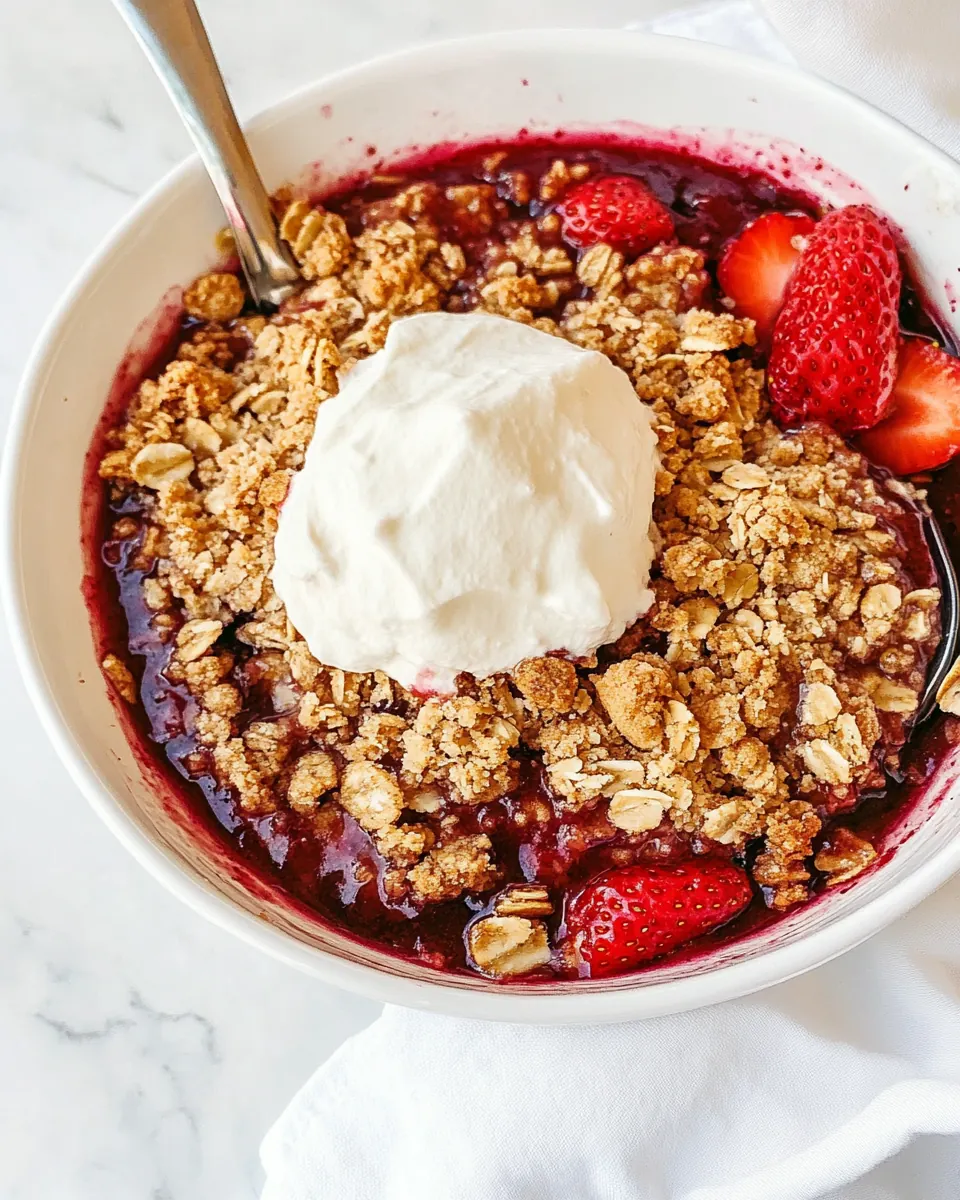
- Vanilla ice cream: A scoop of cold vanilla melts slightly into warm fruit, creating a contrast of temperature and a creamy counterpoint to the crunchy topping.
- Whipped cream: Lightly sweetened whipped cream adds airiness and pairs especially well if you want a less cold accompaniment than ice cream.
- Extra cinnamon: A light dusting of ground cinnamon enhances warmth and ties the topping spice to the fruit flavors.
- Casual gatherings: Serve family style in the baking dish for relaxed meals, letting guests help themselves with spoons or small plates.
- Special occasions: For brunch or celebrations, serve warmed portions with a small scoop of ice cream and a sprig of mint for a polished look.
- Storage tips: Refrigerate leftovers in an airtight container for 3 to 4 days; reheat in the oven at 350°F to revive some crispness, or microwave for single portions if convenience is your priority.
- Freezing: Freeze unbaked for up to 3 months; thaw overnight and bake according to directions to avoid a soggy topping.
FAQ
Conclusion
Strawberry Crisp shines because it pairs bright berry flavor with a buttery, crunchy topping that offers memorable contrasts in texture and temperature. It is easy to assemble, flexible with ingredient swaps, and reliably comforting whether you serve it straight from the oven or reheated the next day. Try it this weekend, and notice how a simple combination of pantry staples and fresh strawberries transforms into a dessert that feels both nostalgic and festive.
Strawberry Crisp
Equipment
- Oven
- 8x11 or 9 inch baking dish
- Large Bowl
- Wire Rack
Ingredients
- 2 pounds fresh, ripe strawberries (not soft) Wash and hull thoroughly, providing firm texture and natural sweetness to the filling while offering structural integrity so slices hold together when baked; choose ripe but not soft berries to prevent an overly mushy result and to maintain attractive presentation after cooking.
- 1/3 cup granulated white sugar Sweeten and balance the fruit's tartness while helping to draw out juices; granulated sugar also aids in creating a syrupy consistency as it dissolves into the strawberries during maceration and baking.
- 2 1/2 tablespoons cornstarch (3 T for softer/juicier strawberries) Thicken the strawberry juices by absorbing excess liquid and producing a glossy, jam-like filling; adjust amount (use 3 tablespoons for softer, juicier berries) to control final filling consistency and prevent a runny crisp.
- 2 tablespoons lemon juice Add bright acidity to balance sweetness and enhance the strawberries' fresh flavors; lemon juice also helps preserve color and can activate the cornstarch for better thickening.
- 1 1/2 teaspoons vanilla extract Impart warm, rounded flavor to the filling and deepen the berry aroma; vanilla extract complements the strawberries and pairs well with other spices in the topping.
- 2/3 cup flour Provide structure and body to the crunchy topping by creating a tender crumb when combined with butter and oats; all-purpose flour binds the topping ingredients and browns during baking.
- 1/3 cup packed light brown sugar Add rich, caramel-like sweetness and moistness to the topping while aiding browning; packed light brown sugar contributes depth of flavor that contrasts nicely with the bright filling.
- 3 tablespoons granulated sugar Provide additional sweetness and help the topping caramelize for crisp edges; granulated sugar works with butter and flour to form a slightly crunchy texture.
- 2/3 cup old-fashioned rolled oats (NOT quick oats*) Contribute hearty chewiness and rustic texture to the topping while absorbing some butter for cohesion; old-fashioned rolled oats yield a substantial bite and toasty flavor when baked (avoid quick oats for best results).
- 3/4 cup chopped pecans, optional (increase oats to 1 C if not using) Introduce crunchy, nutty flavor and a buttery richness to the topping as an optional mix-in; if omitted, increase oats to maintain topping volume and texture as noted.
- 1 teaspoon vanilla extract Enhance sweetness and aromatic depth with a second addition of vanilla in the topping, tying the flavors between filling and crumble; this small amount lifts the overall profile without overpowering fruit notes.
- 1 teaspoon baking powder Lighten the topping slightly and contribute gentle rise and aeration for a tender, crumbly texture; baking powder helps create small air pockets in the crisp mixture during baking.
- 1/2 teaspoon ground cinnamon Add warm, aromatic spice that complements strawberries and nuts while giving the topping a subtle complexity; ground cinnamon pairs well with brown sugar and oats.
- 1/4 teaspoons salt Balance sweetness and enhance overall flavor perception by providing a subtle savory counterpoint; salt also strengthens other flavors and supports proper seasoning throughout the dessert.
- zest of one lemon Provide bright citrus oils and fragrant aroma that elevate the filling and add a lively contrast to the sweet strawberries; lemon zest intensifies freshness without adding extra acidity.
- 8 tablespoons unsalted butter (1 stick), melted Bind the topping ingredients, impart rich mouthfeel, and promote browning for a buttery, crisp finish as the melted butter coats the oats, flour, and sugars during baking.
Instructions
- Prep: Preheat the oven to 350°F. Lightly grease an 8×11 baking dish or a 9-inch square baking dish. Set aside.: Preheat the oven to 350°F. Lightly grease an 8×11 baking dish or a 9-inch square baking dish. Set aside. : Warmth fills the kitchen as the oven comes up to temperature, and the light scent of heat primes the butter and sugars you will brown later, so preheating matters. I notice the oven is ready when the dial or digital readout reaches 350°F , and the air feels evenly warm if you carefully touch the oven door for a moment. Greasing the dish prevents the filling from sticking and makes serving easier, so use a thin layer of butter or a neutral spray. A common mistake is skipping the greasing; when that happens the edges can cling and break apart when you serve. If your oven runs hot, check it a bit early to avoid overbrowning.
- Topping: Add all of the topping ingredients to a large bowl EXCEPT the butter and stir until combined. Pour in the melted butter and stir with a spatula to combine then use your hands as needed to combine. Transfer to the refrigerator while you prep the filling.: Add all of the topping ingredients to a large bowl EXCEPT the butter and stir until combined. Pour in the melted butter and stir with a spatula to combine then use your hands as needed to combine. Transfer to the refrigerator while you prep the filling. : At this stage you want to notice the dry aroma of the oats and the sweet perfume of the light brown sugar , which signals they are well mixed. When the melted butter hits the dry mix it should moisten the particles but not make them soggy; think clumps and loose crumbs. Using your hands helps you form small clusters, which bake into those prized crunchy bits. Chilling the topping firms the clusters so they hold up better during assembly. A common slip is overmixing once the butter is added, which can produce a paste instead of crumbly clusters; stop as soon as you see small clumps.
- Cut Strawberries: It is important that the strawberries aren’t cut too small otherwise they can practically disintegrate! You will want to leave super small strawberries whole, halve small berries and quarter large berries. We are aiming for about 3/4-1-inch-wide pieces. Transfer sliced strawberries to a large bowl.: It is important that the strawberries aren’t cut too small otherwise they can practically disintegrate! You will want to leave super small strawberries whole, halve small berries and quarter large berries. We are aiming for about 3/4-1-inch-wide pieces. Transfer sliced strawberries to a large bowl. : The texture of the finished filling depends on how you cut the strawberries . When you slice to roughly 3/4 to 1 inch, the fruit still offers pleasant tooth and visual appeal while releasing enough juice to meld with the thickener. You'll see bright red flesh exposed and smell fresh berry perfume when they're cut correctly. If pieces are too tiny they dissolve into a jammy mass, which is not wrong but different. A frequent error is overcutting; err on the larger side for a more pleasing bite.
- Filling: Add the remaining Strawberry Filling ingredients to the strawberries and stir until evenly combined. Transfer filling to the prepared baking dish and spread into an even layer. Sprinkle the topping over the filling, breaking up any large chunks (you still want some small chunks).: Add the remaining Strawberry Filling ingredients to the strawberries and stir until evenly combined. Transfer filling to the prepared baking dish and spread into an even layer. Sprinkle the topping over the filling, breaking up any large chunks (you still want some small chunks). : Once you add granulated white sugar , cornstarch , lemon juice , and vanilla extract to the berries, the mixture should look glossy and slightly thickened as the cornstarch coats the fruit. Stir gently so juices are distributed and the coating is uniform. Spread it evenly in the dish to ensure consistent baking; uneven thickness causes some spots to bubble sooner than others. When you scatter the topping, aim for a mix of large and small clusters; visually you want golden pockets surrounded by red peeking through. A common mistake is pressing the topping down; keep it loose so air can circulate and the topping crisps.
- Bake uncovered, at 350°F for 35-45 minutes, until the topping is golden and the strawberry juices are bubbling vigorously around the edges. Remove from the oven and let cool on a wire rack for 10 minutes before serving. Serve with vanilla and extra cinnamon if desired.: During baking, your kitchen will fill with the nutty aroma of toasted oats and the sweet perfume of cooked strawberries . Watch for the topping to develop a deep golden brown, and for the filling to bubble vigorously at the edges, which indicates the juices are thick and hot. The sound is a lively simmering and the visual cue is glossy fruit and bubbling syrup. Letting it rest for about ten minutes helps the filling set so slices hold their shape when scooped. One frequent misstep is pulling it from the oven too early; the topping may look pale and the filling undercooked. If the top browns too quickly, tent loosely with foil to finish cooking the interior.
Notes
- Swap nuts or omit: If you prefer a different crunch, replace pecans with chopped almonds or walnuts, or leave them out and increase oats to 1 cup for more body.
- Make it gluten free: Replace the flour with a 1 to 1 gluten free baking flour to accommodate sensitivities without changing ratios.
- Vegan option: Substitute melted vegan butter or coconut oil for the unsalted butter to make the topping dairy free while preserving richness.
- Adjust sweetness: If your berries are very sweet, reduce the granulated sugar in the filling by one to two tablespoons to keep the fruit bright rather than cloying.
- Boost citrus: Add an extra teaspoon of lemon zest for a more pronounced bright note if your berries are mild.
- Prep ahead: Prepare the filling and topping separately, refrigerate both, then assemble and bake when ready to serve for fresher texture.