Strawberry Brownies
Strawberry Brownies came into my kitchen on a rainy afternoon when I wanted something that felt like both a celebration and a hug. I remember rooting through the fridge and pantry, thinking about the contrast between a dense, fudgy bite and a bright, juicy pop of fruit. That very contrast is why I fell for these bars the first time I made them, and why they keep showing up whenever friends drop by or I crave something a little indulgent but not over the top.
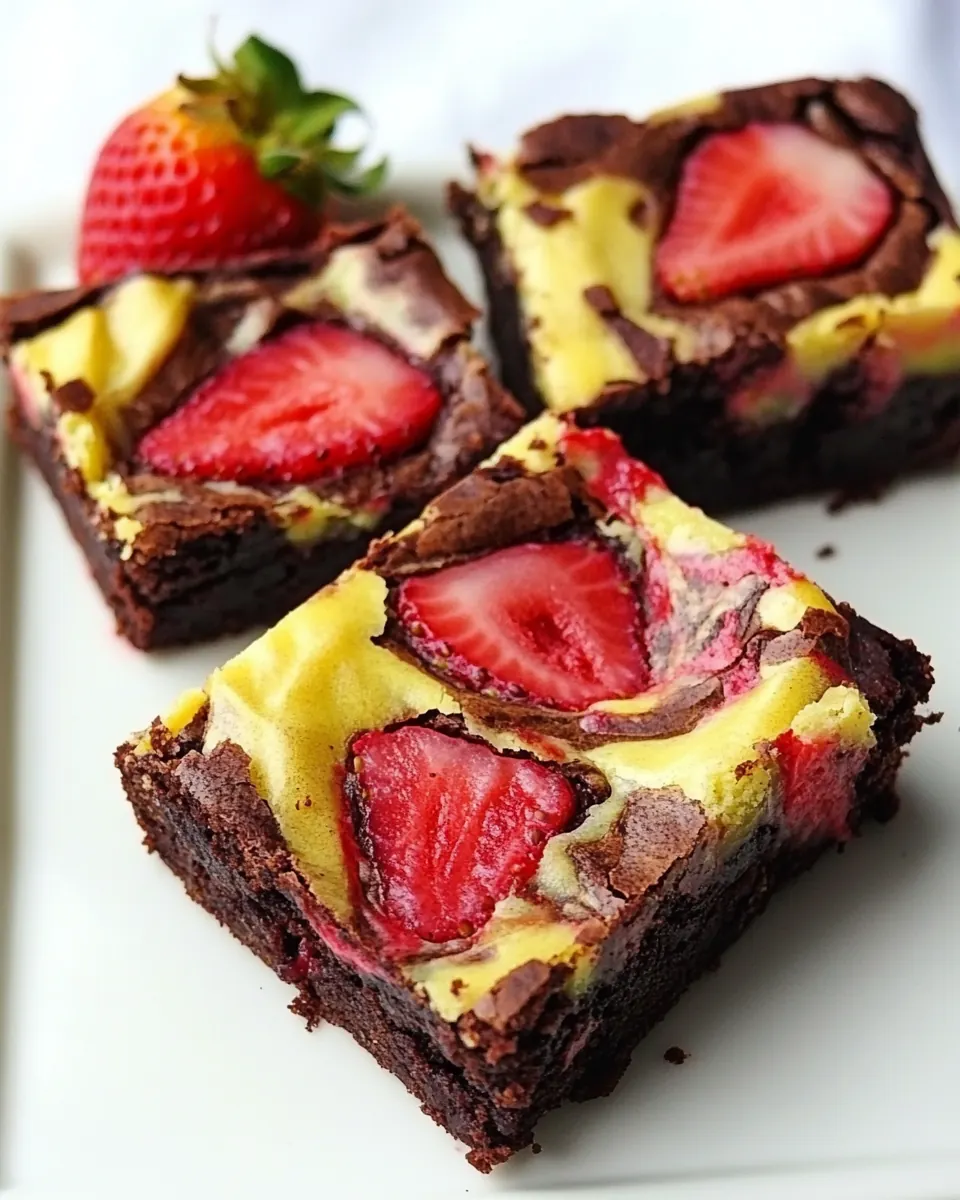
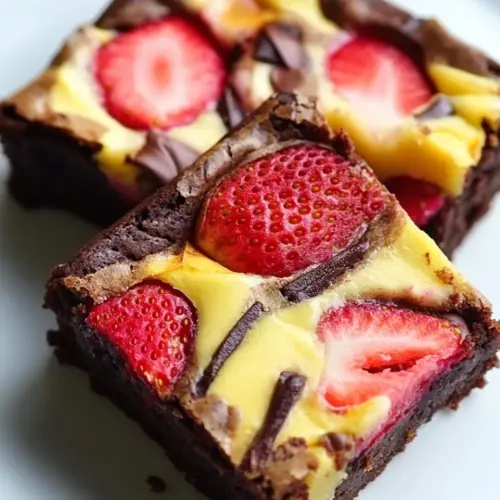
I have a soft spot for recipes that let me play with texture, and Strawberry Brownies give me just that. The dark chocolate base offers a deep, slightly bitter backbone, while the swirls of cream cheese bring a silky lift. Then the strawberries on top add a fresh, vibrant finish. I love how the oven pulls those flavors together, and how each slice looks like a little rustic work of art. Over the years I altered measurements, practiced techniques, and learned how to coax the best texture from each component.
Recipe Snapshot
50 mins
20 mins
30 mins
Medium
250 kcal
American
Gluten-Free, Low FODMAP
Desserts
20 cm baking tray, Parchment paper, Thick bottomed saucepan, Mixing bowls, Whisk, Spatula
The Magic of This Strawberry Brownies
Rich, balanced flavor
I adore how the deep notes of dark chocolate pair with the tang of the cream cheese. The chocolate is the anchor, while the cheese swirl brightens each bite, creating a contrast that keeps you going back for one more piece.
Playful texture
The recipe marries a fudgy brownie crumb with a smooth, almost custardy swirl from the cream cheese, and then finishes with the juicy snap of fresh strawberries. I love serving it to guests because each forkful gives a different mouthfeel.
Approachable technique
Even though it looks like a bakery treat, the steps are straightforward. You do some melting, folding, and gentle whisking. I find that people with basic kitchen experience can get excellent results if they follow the cues for texture and doneness.
Beautiful presentation
When you smooth the cream cheese dollops and place the strawberries on top, the tray becomes naturally photogenic. I often make a tray for a potluck because it travels well and looks special without a lot of effort.
Flexible for sharing
The recipe scales nicely, and the 8 by 8 tray yields neat squares that are easy to portion. I’ve taken it to picnics, birthday parties, and late night movie nights, and it always generates compliments.
Key Ingredients for Strawberry Brownies
These ingredients are deliberately simple yet purposeful. The recipe centers around a few key players: dark chocolate and butter build that dense, fudgy base, while the cream cheese swirl gives lift and tang. Fresh strawberries add brightness and a juicy counterpoint. Each component supports another, resulting in a bar that is rich but not cloying.
- 3 large eggs: Whisk firmly to incorporate air and provide structure to the brownie batter; eggs help bind ingredients and create a tender crumb. Use at room temperature for better emulsification with melted chocolate and butter.
- 160 g dark chocolate: Melt gently to create a rich chocolate base and impart deep cocoa flavor to the brownies; dark chocolate also contributes fat and firmness. Choose high-quality chocolate for an intense, glossy finish.
- 120 g butter: Melt together with chocolate to add richness and moisture while helping create a smooth, cohesive batter. Use unsalted butter to control overall salt level in the recipe.
- 100 g sugar: Dissolve into the chocolate–butter mixture to balance bitterness and provide sweetness; sugar also influences texture and helps achieve a tender crumb. Adjust slightly for desired sweetness but keep proportions for proper structure.
- 100 g flour: Sift into the batter to provide bulk and structure, developing the gluten needed for the brownie matrix. Use all-purpose flour measured properly to avoid a dense outcome.
- 20 g cocoa powder: Whisk with the flour to deepen chocolate flavor and add a slightly drier cocoa note while contributing to overall color and taste. Cocoa powder also affects batter consistency, so fold in evenly.
- a pinch of salt: Pinch lightly to enhance and balance the sweetness and chocolate flavors; salt also helps intensify taste without being detectable. Use sparingly to avoid overpowering the delicate cream cheese layer.
- 200 g cream cheese: Soften and beat to create a creamy swirl or filling that adds tanginess and contrast to the chocolate layers; cream cheese brings richness and a smooth mouthfeel. Ensure it's at room temperature to avoid lumps when mixing.
- 1 egg: Beat to help bind the cream cheese filling and add structure; an extra egg enriches and stabilizes the creamy layer. Incorporate fully to achieve a homogeneous, spreadable filling.
- 1 tbsp flour: Fold into the cream cheese mixture to slightly thicken and stabilize the filling, preventing it from being too runny. Use precise measurement to maintain proper creaminess.
- 2 tbsp sugar: Sprinkle into the cream cheese layer to add mild sweetness and help balance tang; small amounts of sugar also aid in stabilizing the filling's texture. Dissolve well to prevent graininess.
- 1 tsp vanilla extract: Add for aromatic depth and enhance the cream cheese filling with a warm, sweet vanilla note that complements strawberries and chocolate. Use pure vanilla extract for best flavor.
- 200 g fresh strawberries: Fold in at the end to provide fresh, bright fruity bursts and a juicy contrast to the dense chocolate base; strawberries add acidity, aroma, and color. Hull and roughly chop to distribute evenly without releasing too much moisture.
Cooking Instructions for Strawberry Brownies
I like to move methodically with these brownies, because the payoff is worth the gentle attention. Below I expand each direction into sensory cues, explanations, and troubleshooting tips so you can hit the perfect fudgy texture and pretty top every time.
- Line a 20/20 cm (8×8 inches) baking tray with parchment paper. Preheat the oven to 180 °C (356 °F).: You will notice the kitchen begin to warm as the oven comes up to temperature, a faint dry heat that promises even baking. Getting the tray ready with parchment prevents sticking and helps you lift the whole slab out for clean slicing. Use an oven thermometer if your oven runs hot or cold, because incorrect temperature is a leading cause of overbaked or underbaked centers. If the tray is not lined securely, the batter may bake unevenly along the edges, so tuck the paper into the corners firmly.
- In a thick-bottomed saucepan, melt the butter over low heat and add the broken chocolate pieces and sugar. When the mixture is homogeneous, turn off the heat.: As the butter softens and chocolate glosses, you will smell a deep, toasty cocoa aroma. Stir slowly until the mixture is smooth and shiny, then remove from heat to avoid overheating. This gentle melt preserves the chocolate temper and creates a silkier batter. If the mixture begins to steam heavily or smells burnt, the heat is too high and you should remove it immediately to prevent grainy texture.
- Add the egg yolks, one at a time, and mix well.: After the chocolate cools slightly, the yolks add a rich, velvety texture and glossy shine. Add them one by one so they incorporate smoothly without scrambling from residual heat. The batter should feel glossy and cohesive after each addition. A common mistake is adding cold yolks to very hot chocolate, which can curdle the mixture, so allow the chocolate to cool for a minute first.
- Separately combine the flour and cocoa powder. Add them to the chocolate cream, stirring gently.: When you fold in the dry ingredients you will notice the batter thicken and the chocolate deepen in color. Mixing gently preserves air and keeps the final crumb dense yet tender. Use a sieve to avoid lumps and fold with a spatula until just combined. Overmixing activates gluten and can turn fudgy brownies into a cakier texture, so stop as soon as streaks vanish.
- Whisk the egg whites well with a pinch of salt until they turn into a nice meringue. Incorporate them into the chocolate cream with upward movements. Place the whole mixture in the pan.: Whipping the whites adds lift and a delicate crumb. You will hear a change in sound as the mixer transitions to soft peaks, and the whites will look glossy. Folding them in with gentle upward motions keeps air intact while blending them evenly into the batter. If you fold aggressively you will deflate the whites and lose that lightness, so use patient strokes and stop when the batter is uniform.
- Mix the cream cheese, egg, flour, and sugar until it becomes a uniform cream. Now add the vanilla and mix.: The filling should feel smooth and slightly dense, with a mild tang and sweet edge. Softened cream cheese blends best, producing a velvety texture that bakes into a custard like swirl. Adding vanilla brightens the flavor, making it pop against the dark base. If the cream cheese is too cold you may get lumps, so let it sit at room temperature before mixing.
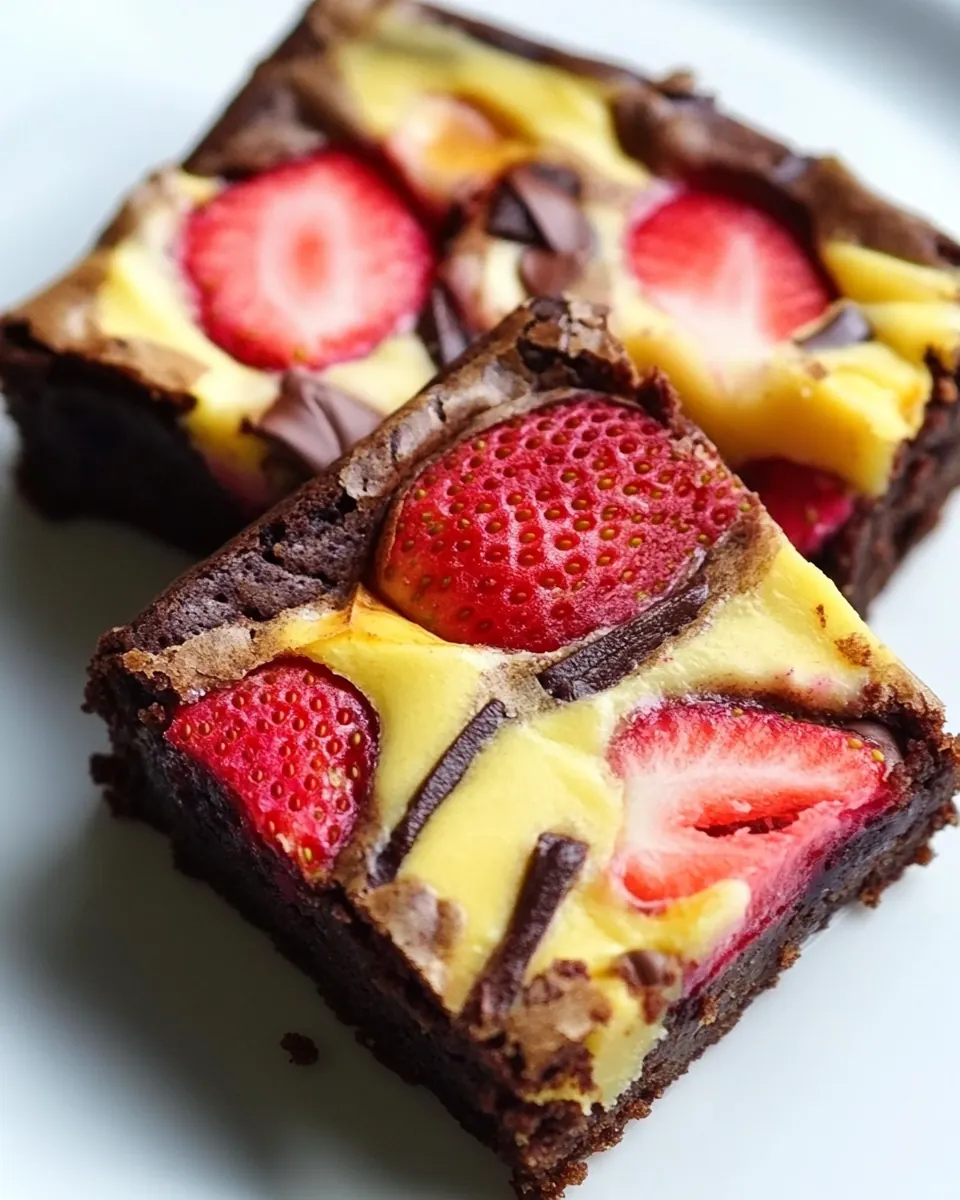
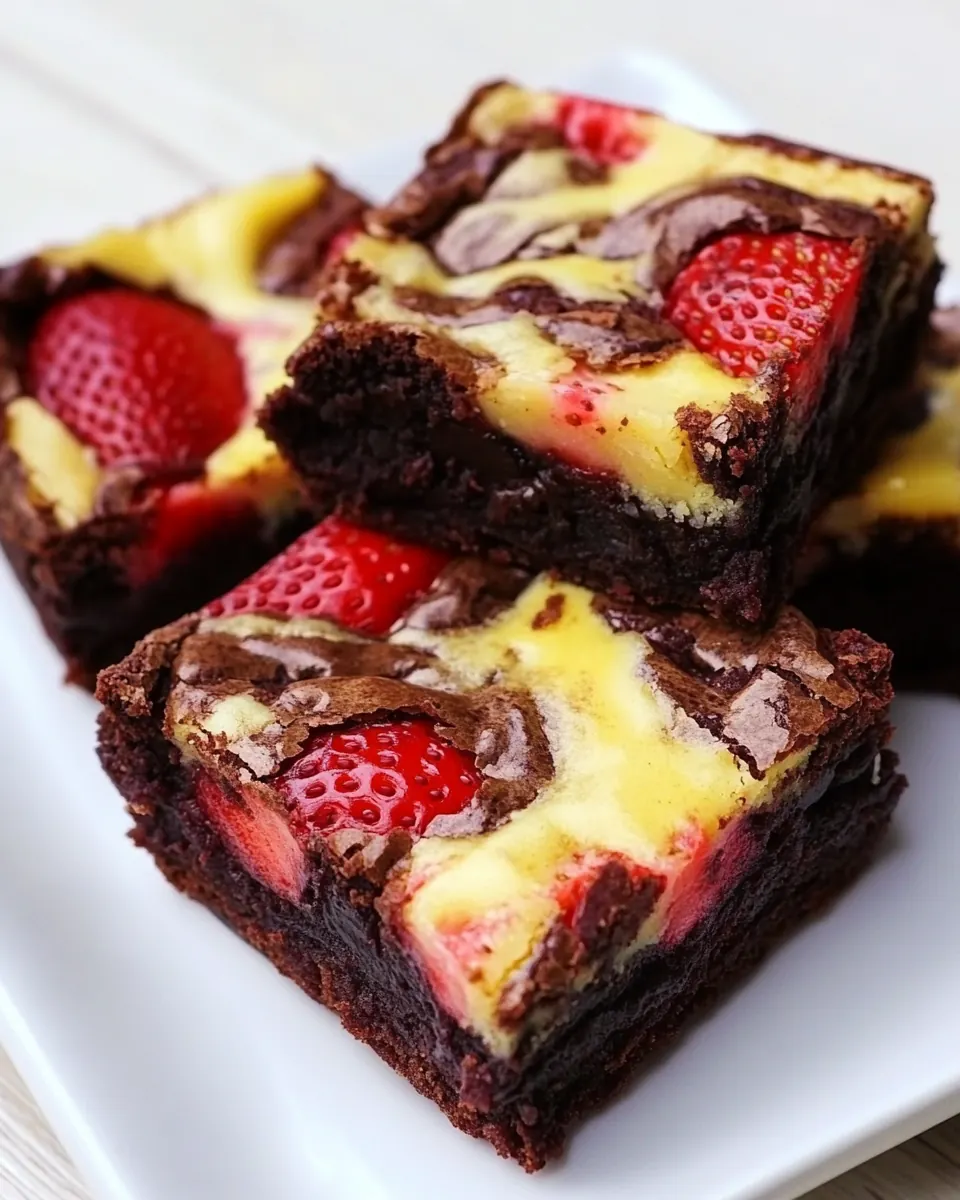
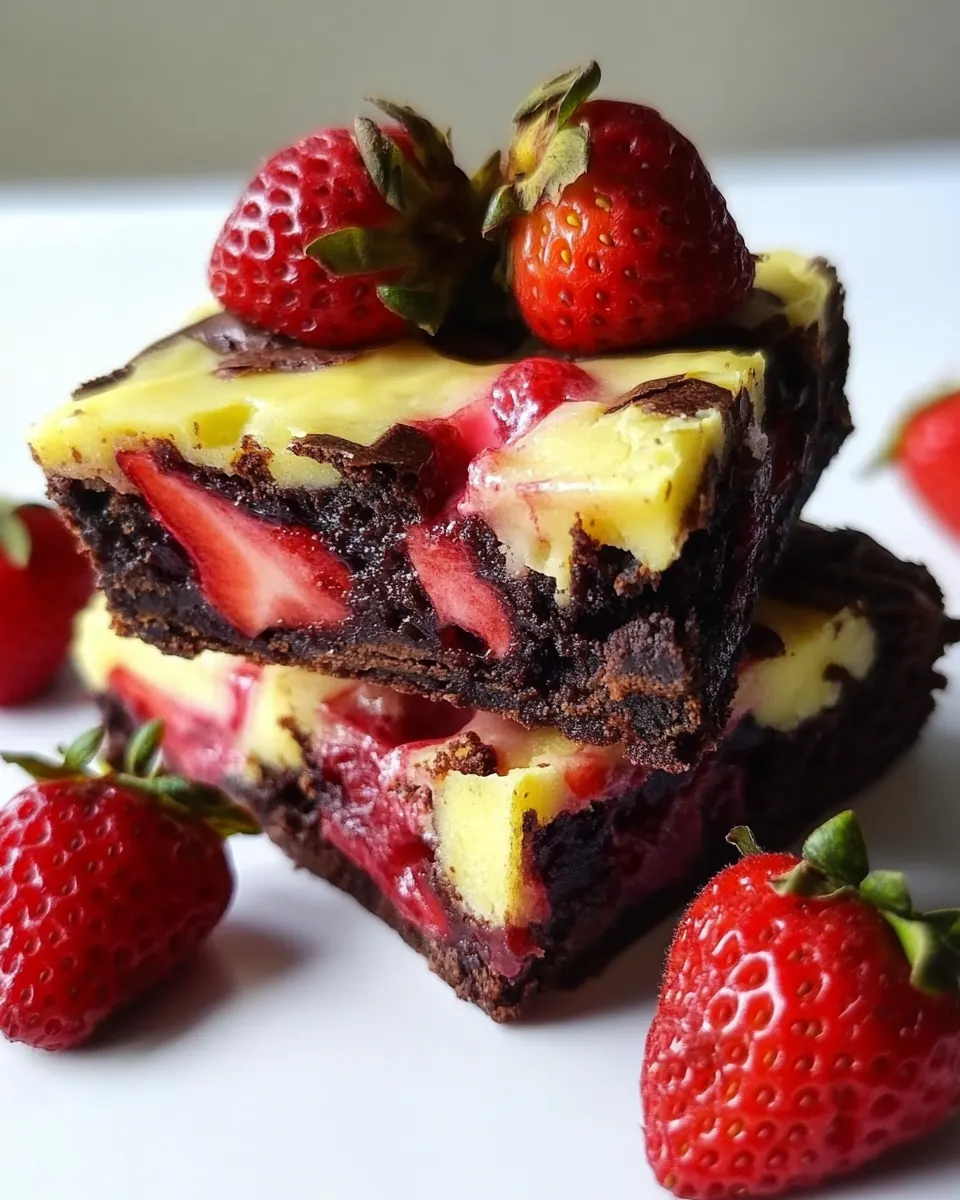
- Place dollops of the mixture on top of the brownie. Smooth it out with a knife with a sharp tip, creating a pattern when combined with the dark mixture.: As you dot and drag the filling you will see marbled patterns form, which gives the final bars a bakery style look. The contrast between matte chocolate and creamy white is visually appealing. Use a sharp knife to create sweeping motions, cleaning the blade between moves for crisp lines. If you overwork the surface the two mixtures may blend too much and lose distinct patterning.
- Wash the strawberries and remove their leaves. Place them on top of the cream cheese, one by one.: Fresh strawberries should be firm and fragrant, adding a bright scent as you arrange them. Press each berry gently into the filling so it adheres but does not sink entirely. The fruit will roast slightly in the oven, concentrating its sweetness. If the berries are too soft they can release too much juice, making the top soggy, so pick ones with a little resistance.
- Bake in the oven for 25-30 minutes, until the top is cooked through and the inside is still slightly soft. Remove and leave to cool in the pan. After about 2 hours (if you can be that patient), slice it up. Serve as it is or with generous portions of ice cream.: During baking the aroma of chocolate will deepen and the cream cheese will set with a faint jiggle in the center. Watch for a set edge and a slightly soft middle, which indicates fudgy doneness. Cooling in the pan allows the structure to firm up, making cleaner slices. A common problem is overbaking, which dries the interior; remove a few minutes earlier if your oven runs hot and let residual heat finish the set.
Customization Ideas
These ideas help you personalize Strawberry Brownies without changing the recipe structure. Small adjustments can shift texture, sweetness, or presentation to suit your mood or occasion.
- Swap chocolate intensity Try a slightly less bitter dark chocolate if you prefer a sweeter finish, or go darker for a more adult bittersweet profile.
- Make mini servings Bake in a muffin tin for individual portions that are great for parties and easier to serve.
- Chill before slicing Refrigerate the cooled pan for 30 to 60 minutes to get razor clean edges when cutting.
- Decorative patterns Use a toothpick or skewer to drag through the fillings for different marbling effects that look impressive.
- Strawberry placement Arrange whole berries for visual impact or slice them thin for even fruit distribution across each square.
Serving Ideas for Strawberry Brownies
This section focuses on practical serving suggestions and pairings for Strawberry Brownies. Think about occasions, sides, and storage to make the most of each tray.
- Casual gatherings Serve squares on a simple platter with napkins for an easy grab and go dessert at picnics or potlucks.
- Celebrations Place the brownies on a tiered dessert stand as part of a birthday spread, pairing with other small confections.
- After dinner Offer warm slices with a scoop of vanilla ice cream for a comforting finish to a meal, the contrast of warm and cold is delightful.
- Brunch accompaniment Include a few squares in a brunch spread alongside coffee and fruit for a sweet counterpoint to savory dishes.
- Storing tips Keep leftovers in an airtight container in the refrigerator for up to four days, and bring to room temperature before serving so the texture softens.
- Make ahead Bake the day before a party and decorate with fresh strawberries just before serving to keep the fruit looking its best.
- Seasonal pairing In spring serve with a light sparkling water or herbal tea to keep the palate refreshed between bites.
FAQ
Conclusion
What makes this recipe special is the interplay between a deep, fudgy dark chocolate base, a silky cream cheese swirl, and the bright pop of fresh strawberries. The result feels both indulgent and light because of those contrasting textures and flavors. I encourage you to give these brownies a try, paying attention to the sensory cues I mentioned, from the glossy chocolate mixture to the slight jiggle in the center. They are a satisfying bake that looks impressive and feeds a crowd with minimal fuss.
Strawberry Brownies
Equipment
- 20 cm baking tray
- Parchment Paper
- Thick bottomed saucepan
- Mixing Bowls
- Whisk
- Spatula
Ingredients
- 3 large eggs Whisk firmly to incorporate air and provide structure to the brownie batter; eggs help bind ingredients and create a tender crumb. Use at room temperature for better emulsification with melted chocolate and butter.
- 160 g dark chocolate Melt gently to create a rich chocolate base and impart deep cocoa flavor to the brownies; dark chocolate also contributes fat and firmness. Choose high-quality chocolate for an intense, glossy finish.
- 120 g butter Melt together with chocolate to add richness and moisture while helping create a smooth, cohesive batter. Use unsalted butter to control overall salt level in the recipe.
- 100 g sugar Dissolve into the chocolate-butter mixture to balance bitterness and provide sweetness; sugar also influences texture and helps achieve a tender crumb. Adjust slightly for desired sweetness but keep proportions for proper structure.
- 100 g flour Sift into the batter to provide bulk and structure, developing the gluten needed for the brownie matrix. Use all-purpose flour measured properly to avoid a dense outcome.
- 20 g cocoa powder Whisk with the flour to deepen chocolate flavor and add a slightly drier cocoa note while contributing to overall color and taste. Cocoa powder also affects batter consistency, so fold in evenly.
- a pinch of salt Pinch lightly to enhance and balance the sweetness and chocolate flavors; salt also helps intensify taste without being detectable. Use sparingly to avoid overpowering the delicate cream cheese layer.
- 200 g cream cheese Soften and beat to create a creamy swirl or filling that adds tanginess and contrast to the chocolate layers; cream cheese brings richness and a smooth mouthfeel. Ensure it's at room temperature to avoid lumps when mixing.
- 1 egg Beat to help bind the cream cheese filling and add structure; an extra egg enriches and stabilizes the creamy layer. Incorporate fully to achieve a homogeneous, spreadable filling.
- 1 tbsp flour Fold into the cream cheese mixture to slightly thicken and stabilize the filling, preventing it from being too runny. Use precise measurement to maintain proper creaminess.
- 2 tbsp sugar Sprinkle into the cream cheese layer to add mild sweetness and help balance tang; small amounts of sugar also aid in stabilizing the filling's texture. Dissolve well to prevent graininess.
- 1 tsp vanilla extract Add for aromatic depth and enhance the cream cheese filling with a warm, sweet vanilla note that complements strawberries and chocolate. Use pure vanilla extract for best flavor.
- 200 g fresh strawberries Fold in at the end to provide fresh, bright fruity bursts and a juicy contrast to the dense chocolate base; strawberries add acidity, aroma, and color. Hull and roughly chop to distribute evenly without releasing too much moisture.
Instructions
- Line a 20/20 cm (8×8 inches) baking tray with parchment paper. Preheat the oven to 180 °C (356 °F).: You will notice the kitchen begin to warm as the oven comes up to temperature, a faint dry heat that promises even baking. Getting the tray ready with parchment prevents sticking and helps you lift the whole slab out for clean slicing. Use an oven thermometer if your oven runs hot or cold, because incorrect temperature is a leading cause of overbaked or underbaked centers. If the tray is not lined securely, the batter may bake unevenly along the edges, so tuck the paper into the corners firmly.
- In a thick-bottomed saucepan, melt the butter over low heat and add the broken chocolate pieces and sugar. When the mixture is homogeneous, turn off the heat.: As the butter softens and chocolate glosses, you will smell a deep, toasty cocoa aroma. Stir slowly until the mixture is smooth and shiny, then remove from heat to avoid overheating. This gentle melt preserves the chocolate temper and creates a silkier batter. If the mixture begins to steam heavily or smells burnt, the heat is too high and you should remove it immediately to prevent grainy texture.
- Add the egg yolks, one at a time, and mix well.: After the chocolate cools slightly, the yolks add a rich, velvety texture and glossy shine. Add them one by one so they incorporate smoothly without scrambling from residual heat. The batter should feel glossy and cohesive after each addition. A common mistake is adding cold yolks to very hot chocolate, which can curdle the mixture, so allow the chocolate to cool for a minute first.
- Separately combine the flour and cocoa powder. Add them to the chocolate cream, stirring gently.: When you fold in the dry ingredients you will notice the batter thicken and the chocolate deepen in color. Mixing gently preserves air and keeps the final crumb dense yet tender. Use a sieve to avoid lumps and fold with a spatula until just combined. Overmixing activates gluten and can turn fudgy brownies into a cakier texture, so stop as soon as streaks vanish.
- Whisk the egg whites well with a pinch of salt until they turn into a nice meringue. Incorporate them into the chocolate cream with upward movements. Place the whole mixture in the pan.: Whipping the whites adds lift and a delicate crumb. You will hear a change in sound as the mixer transitions to soft peaks, and the whites will look glossy. Folding them in with gentle upward motions keeps air intact while blending them evenly into the batter. If you fold aggressively you will deflate the whites and lose that lightness, so use patient strokes and stop when the batter is uniform.
- Mix the cream cheese, egg, flour, and sugar until it becomes a uniform cream. Now add the vanilla and mix.: The filling should feel smooth and slightly dense, with a mild tang and sweet edge. Softened cream cheese blends best, producing a velvety texture that bakes into a custard like swirl. Adding vanilla brightens the flavor, making it pop against the dark base. If the cream cheese is too cold you may get lumps, so let it sit at room temperature before mixing.
- Place dollops of the mixture on top of the brownie. Smooth it out with a knife with a sharp tip, creating a pattern when combined with the dark mixture.: As you dot and drag the filling you will see marbled patterns form, which gives the final bars a bakery style look. The contrast between matte chocolate and creamy white is visually appealing. Use a sharp knife to create sweeping motions, cleaning the blade between moves for crisp lines. If you overwork the surface the two mixtures may blend too much and lose distinct patterning.
- Wash the strawberries and remove their leaves. Place them on top of the cream cheese, one by one.: Fresh strawberries should be firm and fragrant, adding a bright scent as you arrange them. Press each berry gently into the filling so it adheres but does not sink entirely. The fruit will roast slightly in the oven, concentrating its sweetness. If the berries are too soft they can release too much juice, making the top soggy, so pick ones with a little resistance.
- Bake in the oven for 25-30 minutes, until the top is cooked through and the inside is still slightly soft. Remove and leave to cool in the pan. After about 2 hours (if you can be that patient), slice it up. Serve as it is or with generous portions of ice cream.: During baking the aroma of chocolate will deepen and the cream cheese will set with a faint jiggle in the center. Watch for a set edge and a slightly soft middle, which indicates fudgy doneness. Cooling in the pan allows the structure to firm up, making cleaner slices. A common problem is overbaking, which dries the interior; remove a few minutes earlier if your oven runs hot and let residual heat finish the set.
Notes
- Swap chocolate intensity Try a slightly less bitter dark chocolate if you prefer a sweeter finish, or go darker for a more adult bittersweet profile.
- Make mini servings Bake in a muffin tin for individual portions that are great for parties and easier to serve.
- Chill before slicing Refrigerate the cooled pan for 30 to 60 minutes to get razor clean edges when cutting.
- Decorative patterns Use a toothpick or skewer to drag through the fillings for different marbling effects that look impressive.
- Strawberry placement Arrange whole berries for visual impact or slice them thin for even fruit distribution across each square.