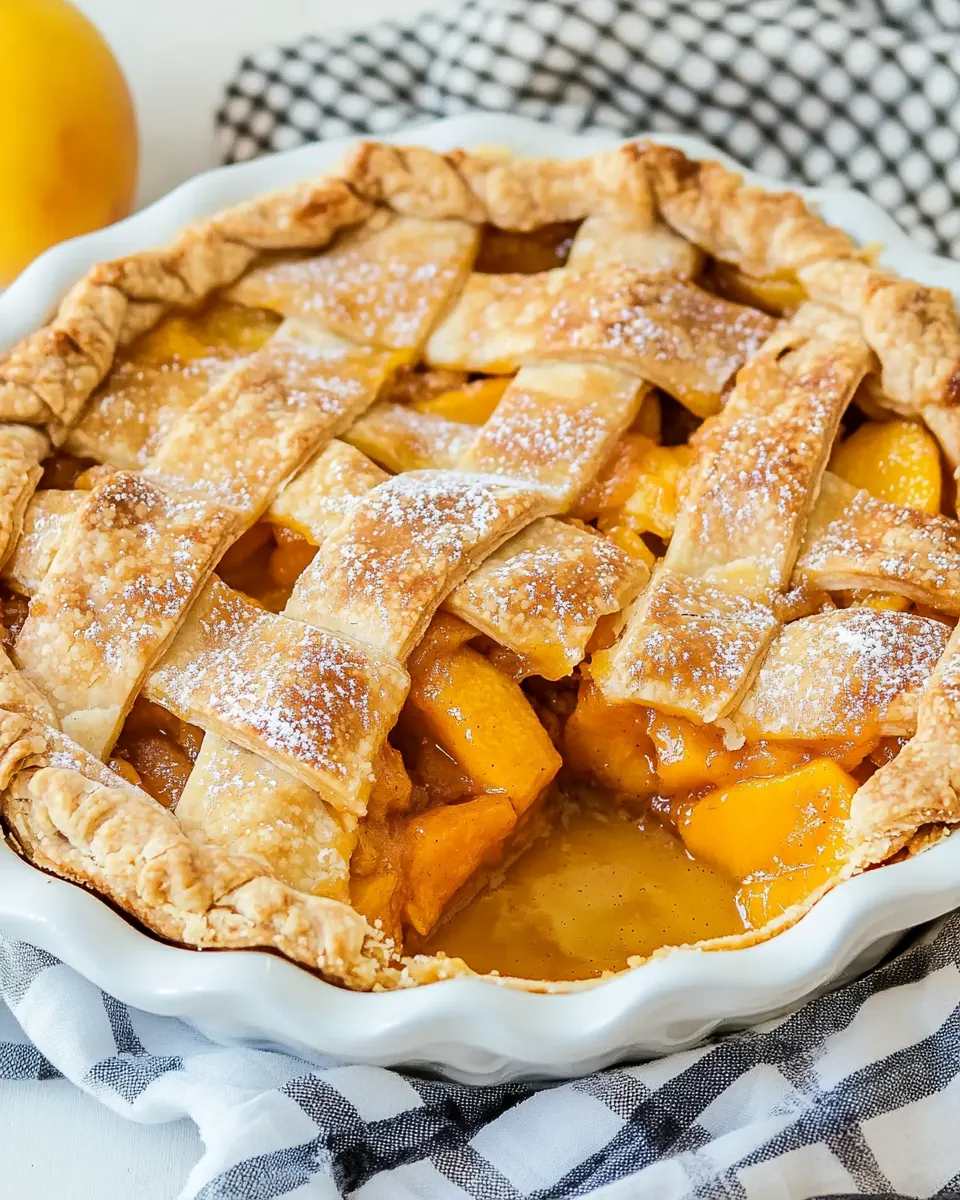
Perfect Peach Pie
Perfect Peach Pie is the kind of dessert that takes me right back to sun warmed afternoons in my grandmother’s kitchen, where the scent of butter and sugar seemed to hang in the air all afternoon. The first time I made this pie on my own I remember juggling a hot pan, a stubborn lattice top, and an overly enthusiastic dog underfoot, and somehow the messy, joyful chaos made the final slice taste even better than I expected.
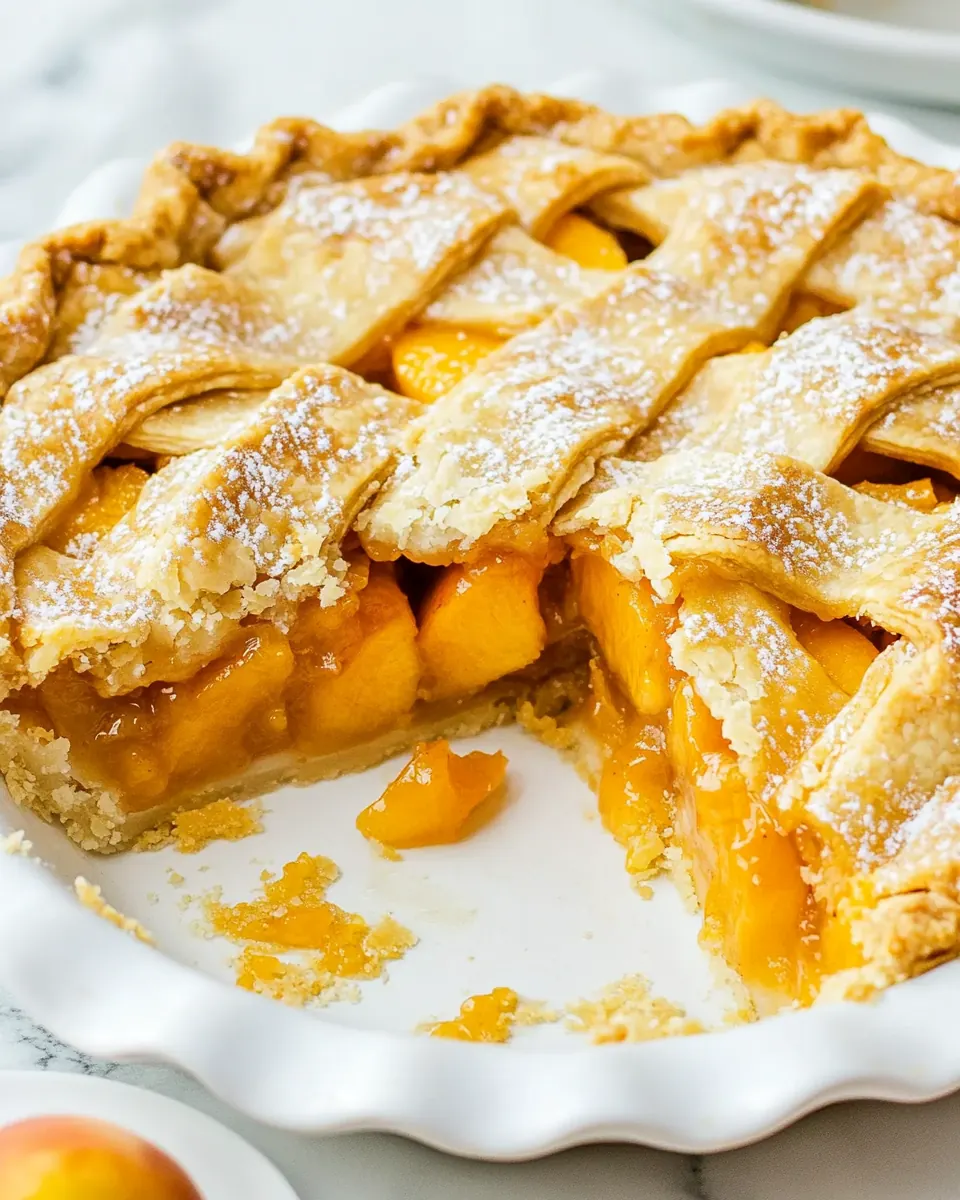
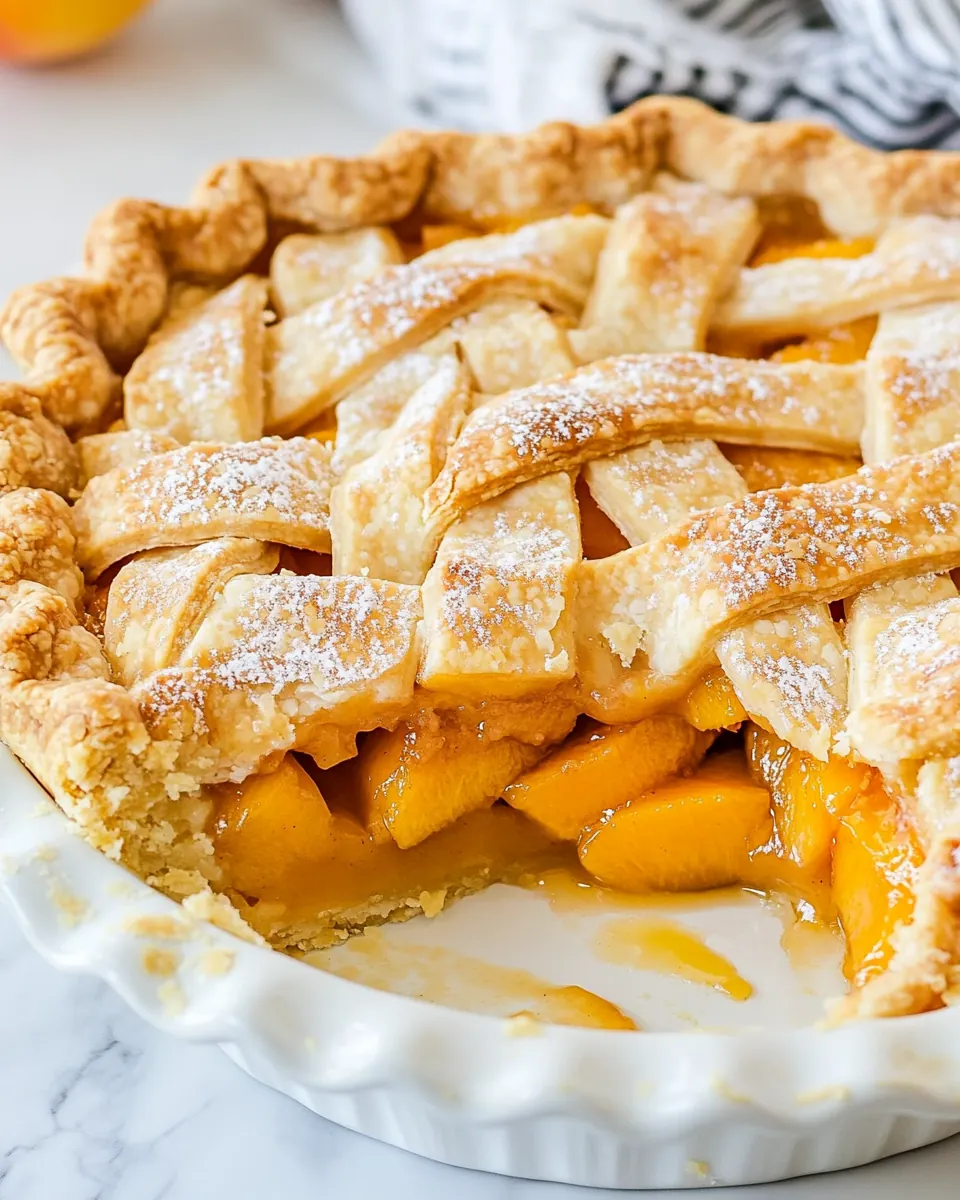
I tend to choose recipes that let fruit really sing, and with Perfect Peach Pie the peaches are the star. I love how the fleshy slices soften but still hold a little bite, and how the filling bubbles through a golden crust. Over the years I learned little tricks, like letting the crust rest just long enough so it rolls without tearing, and adding a splash of lemon juice to lift the sweetness of the peaches. Those tiny decisions change everything.
Sharing this pie has become my go to for summer gatherings, because it is comforting but still feels a little celebratory. Whether you are making it for a holiday table or a quiet weekend treat, the balance between a crisp, flaky crust and a warm, juicy peach filling is reliably crowd pleasing. I hope my notes and the way I describe each step help you feel confident tackling the recipe, even if you are new to making pies.
Recipe Snapshot
1 hr 15 mins
15 mins
60 mins
Medium
320 kcal
American
Gluten-Free, Paleo
Desserts
Oven, Pie plate, Rolling pin, Mixing bowls, Parchment paper, Pie weights or dry beans
The Charm of This Perfect Peach Pie
Fresh seasonal flavor
I love that Perfect Peach Pie showcases ripe summer peaches in a simple, honest way. The fruit is not masked by heavy spices, so the bright, sun warmed flavor sings through. When peaches are at their peak, the filling becomes naturally fragrant and juicy, making every bite feel like a small celebration of the season.
Texture contrast
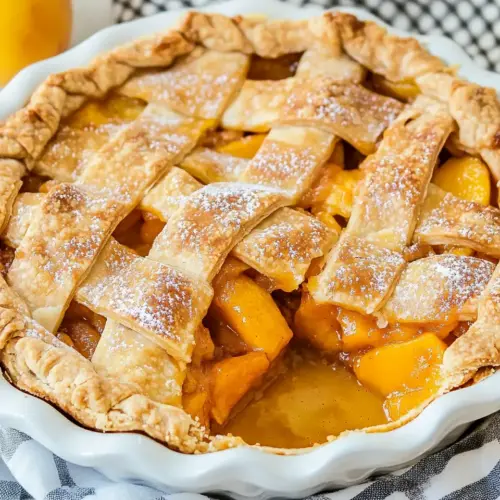
The interplay of a flaky, buttery crust and a tender, slightly jammy filling is why I keep returning to this recipe. That crack of a golden crust as you slice into warm filling is incredibly satisfying. I find that the little pieces of butter tucked into the filling melt into pockets of richness, giving the pie depth and a glossy finish.
Approachable technique
Even if you are new to pie making, this recipe is forgiving. The steps break down into doable actions, and techniques like blind baking the bottom crust and using an egg wash are straightforward. I like showing home cooks that with small, deliberate moves they can make a pie that looks and tastes like it came from a bakery.
Make ahead friendly
This pie travels well and stores nicely, which is why I often make it a day ahead for gatherings. You can bake it and let it rest, or prepare the filling and assemble the pie to bake the next day. That flexibility makes Perfect Peach Pie a reliable choice for busy hosts.
Comfort with a touch of elegance
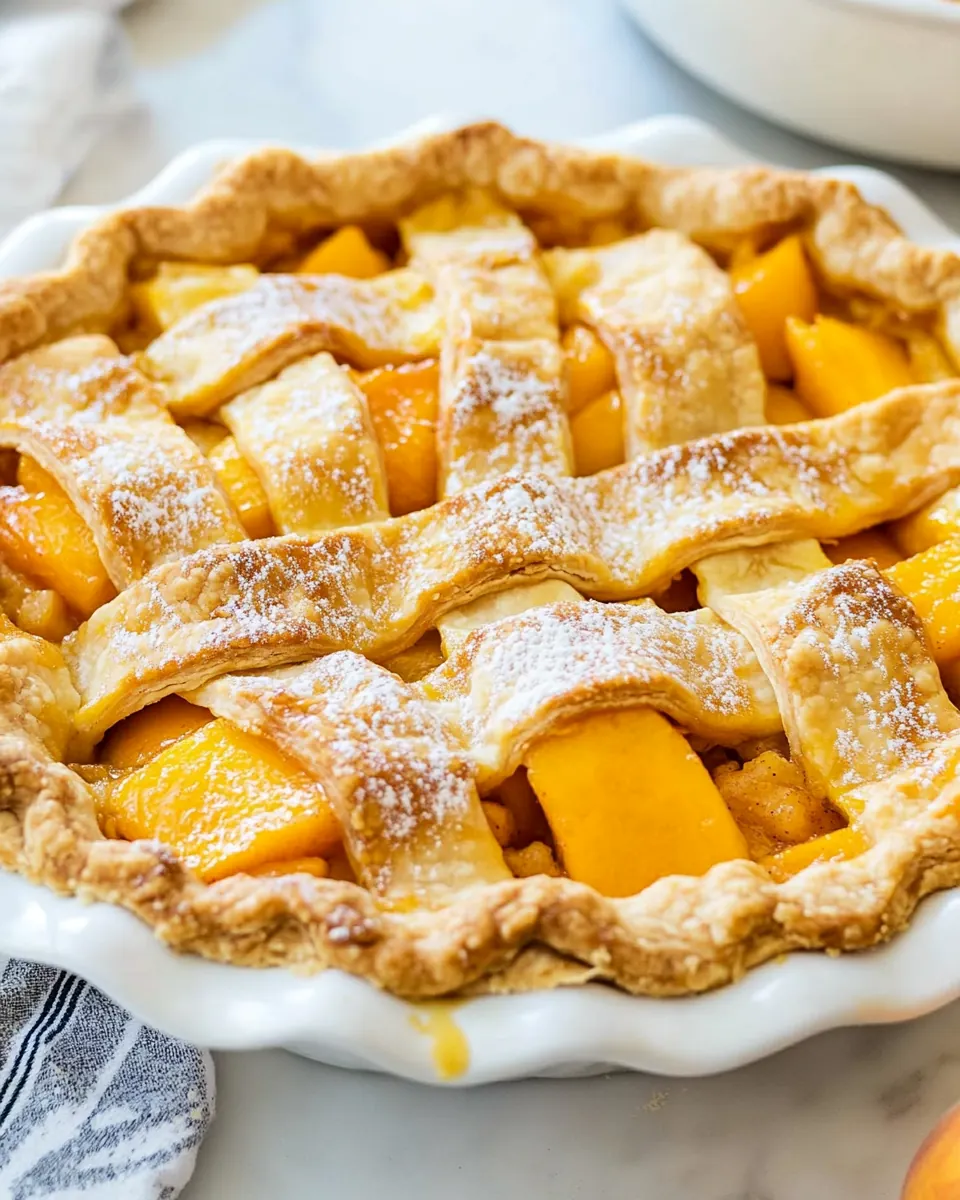
There is something comforting about a familiar fruit pie, yet this version can look elegant on the table. A beautifully crimped edge or a woven lattice turns simple pantry ingredients into a centerpiece. I always feel pleased when guests pause to admire the crust before digging in.
What’s In This Perfect Peach Pie
I think of the ingredient list as a small team where each player has a clear job. The crust provides structure and buttery flak, the peaches bring the primary flavor and texture, and the flour and spices help the filling hold together and taste balanced. Bright lemon juice lifts the sweetness, while the egg wash ensures a glossy, deeply browned crust that looks irresistible.
- 1 pie crust (whole recipe for top and bottom): Provide a flaky, tender pastry shell that holds the filling; use a whole recipe to line the pan and create a top crust, chilling the dough briefly helps prevent shrinking during baking.
- 5 cups peaches (sliced and peeled, about 8 peaches): Supply juicy, sweet fruit flavor and texture when peeled and sliced; choose ripe peaches for maximum aroma and macerate slightly with sugar to release their juices before adding to the pie.
- 2 tablespoon lemon juice: Add bright acidity to balance sweetness and prevent browning; toss sliced peaches with lemon juice to maintain color and enhance the overall flavor profile.
- 1/2 cup all purpose flour: Thicken the peach juices into a cohesive filling by absorbing liquid released during baking; mix the flour evenly with sugar and spices to avoid lumps and ensure proper consistency.
- 1 cup sugar: Sweeten the filling and help create a syrupy consistency as sugar draws juices from the peaches; adjust amount slightly based on peach ripeness and desired sweetness.
- 1/2 teaspoon ground cinnamon: Complement the fruit with warm, aromatic spice; a subtle sprinkle of ground cinnamon enhances depth without overpowering the natural peach flavor.
- 1/4 teaspoon ground nutmeg: Introduce a warm, nutty background note to the spice blend; a small amount of ground nutmeg pairs well with cinnamon and enriches the overall aroma.
- 1/4 teaspoon salt: Balance sweetness and round out flavors while enhancing other seasonings; a pinch of salt elevates the fruit and spices and improves the pie’s overall taste.
- 2 tablespoon butter (unsalted, cut into small pieces): Contribute small pockets of richness and buttery flavor within the filling; dotting the top of the fruit with small pieces melts during baking and adds a glossy, savory finish.
- 1 egg (beaten): Provide a glossy egg wash to the crust that promotes even browning and a golden finish; beat the egg and brush over the top crust before baking for visual appeal.
Step by Step Instructions for Perfect Peach Pie
These steps move you from chilled dough to a warm, bubbling pie. I break each action into clear pieces and explain what to look for so you gain confidence as you go. Keep a bowl for scraps and a clean work surface handy; pie assembly becomes much more enjoyable when you stay organized.
- Preheat the oven: Preheat the oven to 425°F.: As the oven warms you will notice a steady, dry heat building inside, which is important for an even bake and crisp crust. Set your oven precisely to 425°F , and allow it to fully reach temperature, because a cold oven can lead to a soggy bottom. A properly preheated oven helps the crust set quickly, locking in flakiness while encouraging the filling to start bubbling. A common mistake is not waiting for full preheat, which causes uneven browning and longer cook times.
- Craft your crust: After removing your homemade or store bought crust from the fridge you’ll want to allow it to rest for up to 10 minutes, this will make it easier to roll out. Once it’s softened you’ll want to flour your rolling pin, to prevent the dough from sticking, and get to work. Each disc will need to be 1/8 of an inch thick. Place the dough gently onto the pie plate before crimping the edges and removing any excess dough.: When you let the dough rest briefly after refrigeration it relaxes and becomes much easier to roll, producing a smoother, more even crust surface. Flour your rolling pin lightly so the dough does not drag or tear, and roll each disc to about 1/8 of an inch thickness for a balanced crunch and tenderness. As you place the crust on the pie plate, press gently to avoid stretching, this preserves flakiness during baking. If you stretch the dough while fitting it, it will shrink back in the oven, leaving gaps between crust and filling.
- Blind bake the bottom: Place a piece of parchment paper over the pie shell and fill it with pie weights. If you don't have pie weights, you can use dry beans. Place the pie shell into the oven and blind bake it for 15 minutes. Read more about blind baking here. Once done, remove the pie weights and the parchment paper from the pie shell.: Lining the shell with parchment and pie weights creates gentle, uniform pressure so the bottom holds its shape and avoids bubbling. As the pie shell heats, you should see the edges take on a faintly golden hue after about 15 minutes , a cue that the crust is setting. Remove the weights carefully; the shell will be sturdy but still flexible enough to handle the filling. A pitfall here is skipping the weights, which can lead to a collapsed or uneven bottom.
- Prepare the filling: In a large bowl place the sliced peaches and sprinkle with the lemon juice. Mix gently with a wooden spoon. In another bowl mix the flour, sugar, cinnamon, nutmeg and salt. Add the flour mixture to the peaches and toss well.: Tossing the sliced peaches with lemon juice immediately after peeling keeps the fruit bright and fragrant while it sits. When you whisk together the flour , sugar , cinnamon , nutmeg , and salt , you are building a balance of sweetness, spice, and thickening power that will coat each slice. Mixing these dry ingredients thoroughly ensures even distribution so each bite has consistent flavor. A common error is undercoating the fruit, which can result in a filling that becomes too watery.
- Assemble your pie: Add the filling to your bottom crust, and dollop with butter pieces all over the filling. Roll out your top crust in the same way described above and drape it over your pie. Crimp and seal your edges before slicing vents in the top crust with a knife or if you really want to impress, cut into long strips and weave a lattice crust. From there you will brush with the beaten egg, making sure to seal the edges.: As you mound the filling into the blind baked shell, you will hear a soft rustle as fruit nests into the crust, and the air will fill with a fresh peach aroma. Dotting the surface with pieces of butter adds pockets of richness that melt into the fruit. When you roll and place the top crust, crimp the edges firmly to seal, then cut slits or weave a lattice so steam can vent and the filling can bubble without overflowing. Brushing the top with the beaten egg will give a glossy, deeply browned finish. A misstep here is not sealing the edges well, which can let juices leak out and burn on the oven floor.
- Bake the pie: Preheat your oven first to 425°F. Add the pie to the oven, on the bottom rack and bake for 10 minutes. Reduce the heat to 350°F and bake for another 45 minutes to an hour or until the crust is golden brown and the filling is bubbling.: Start the bake on the bottom rack at 425°F so the crust gets an initial lift and color, then reduce to 350°F for a prolonged finish that allows the filling to thicken and the crust to brown evenly. You will notice a lively bubbling near the vents and a golden brown edge when the pie is nearly done, visual cues that the sugars are caramelizing and the filling has set. Bake for 10 minutes at the higher temp, then 45 minutes to an hour at the lower temp, checking for a deeply golden top and bubbling filling. Avoid opening the oven too often, which drops heat and extends bake time.
- Cool and serve: Cool before serving, though I prefer this pie warm with a scoop of ice cream.: As the pie rests, the filling will thicken and the juices will settle, turning from runny to spoonable. You will still smell warm peaches and butter, and the crust softens slightly at the edges while maintaining a satisfying crisp. Cooling also prevents a slice from collapsing when cut, so allow adequate time before serving; I personally enjoy it slightly warm with a scoop of ice cream. A frequent mistake is cutting too soon, which leads to a loose, liquid center.
Tips for Success
A few targeted tips can make the difference between a good pie and a great one. These are practical, tested notes that I return to every time I make Perfect Peach Pie, and they cover ingredients, timing, and presentation so you feel confident from start to finish.
- Choose peaches at peak ripeness – Look for fruit that is fragrant with a slight give when pressed, but not mushy. Peak peaches offer the best balance of sweetness and structure for baking.
- Keep everything cold – Chill your dough and even your mixing bowl if possible; cold butter creates steam pockets as it melts, producing flakier layers in the crust.
- Measure thickener carefully – Use the listed flour amount to avoid under or over thickening; too little leads to runny filling, too much gives a pasty texture.
- Don’t skip the blind bake – Parbaking the bottom shell prevents a soggy center, especially with juicy fruit fillings like peaches.
- Vent the top properly – Make sure the steam can escape through slits or a lattice, this prevents overflow and helps the filling concentrate.
- Rest before slicing – Allow the pie to cool enough so the filling firms up; this yields neat, satisfying slices that hold together.
Great Combinations for Perfect Peach Pie
This pie is versatile on the table, fitting casual family meals and festive gatherings alike. The following suggestions cover pairings, serving occasions, and storage options so you can plan around the moment you will present the pie.
- Serve warm with ice cream – A scoop of vanilla complements the warm, bubbling peach filling for a classic dessert pairing suitable for summer dinners and backyard parties.
- Make it for holiday or casual occasions – Perfect Peach Pie works well for weekend lunches, potlucks, or holiday tables when you want a bright, seasonal dessert.
- Storage at room temperature – Cover the pie loosely with foil and it will keep for about 2 days at room temperature, ideal for short term serving plans.
- Refrigerate for longer keeping – If you need more longevity, store the pie in the refrigerator where it will last 4 to 5 days, wrapped to prevent the crust from absorbing other flavors.
- Freezing method – Wrap tightly in aluminum foil or plastic freezer wrap for long term storage; frozen pies can last 6 to 8 months and are convenient for preparing ahead.
- Presentation tip – A woven lattice or fluted edge gives the pie an elegant look, and a glossy egg wash ensures the crust looks bakery worthy before serving.
FAQ
Conclusion
What makes this recipe special is the straightforward celebration of ripe peaches wrapped in a flaky, buttery crust that yields a warm, comforting dessert. I encourage you to give Perfect Peach Pie a try, whether you are baking for a casual family meal or a special gathering, because the results are reliably delicious and satisfying. With a few simple techniques like blind baking and a careful egg wash, you can create a pie that looks beautiful and tastes like summer on a plate. Enjoy the process, and don’t be afraid to make it your own.
Perfect Peach Pie
Equipment
- Oven
- Pie Plate
- Rolling Pin
- Mixing Bowls
- Parchment Paper
- Pie weights or dry beans
Ingredients
- 1 pie crust (whole recipe for top and bottom) Provide a flaky, tender pastry shell that holds the filling; use a whole recipe to line the pan and create a top crust, chilling the dough briefly helps prevent shrinking during baking.
- 5 cups peaches (sliced and peeled, about 8 peaches) Supply juicy, sweet fruit flavor and texture when peeled and sliced; choose ripe peaches for maximum aroma and macerate slightly with sugar to release their juices before adding to the pie.
- 2 tablespoon lemon juice Add bright acidity to balance sweetness and prevent browning; toss sliced peaches with lemon juice to maintain color and enhance the overall flavor profile.
- 1/2 cup all purpose flour Thicken the peach juices into a cohesive filling by absorbing liquid released during baking; mix the flour evenly with sugar and spices to avoid lumps and ensure proper consistency.
- 1 cup sugar Sweeten the filling and help create a syrupy consistency as sugar draws juices from the peaches; adjust amount slightly based on peach ripeness and desired sweetness.
- 1/2 teaspoon ground cinnamon Complement the fruit with warm, aromatic spice; a subtle sprinkle of ground cinnamon enhances depth without overpowering the natural peach flavor.
- 1/4 teaspoon ground nutmeg Introduce a warm, nutty background note to the spice blend; a small amount of ground nutmeg pairs well with cinnamon and enriches the overall aroma.
- 1/4 teaspoon salt Balance sweetness and round out flavors while enhancing other seasonings; a pinch of salt elevates the fruit and spices and improves the pie’s overall taste.
- 2 tablespoon butter (unsalted, cut into small pieces) Contribute small pockets of richness and buttery flavor within the filling; dotting the top of the fruit with small pieces melts during baking and adds a glossy, savory finish.
- 1 egg (beaten) Provide a glossy egg wash to the crust that promotes even browning and a golden finish; beat the egg and brush over the top crust before baking for visual appeal.
Instructions
- Preheat the oven: Preheat the oven to 425°F.: As the oven warms you will notice a steady, dry heat building inside, which is important for an even bake and crisp crust. Set your oven precisely to 425°F , and allow it to fully reach temperature, because a cold oven can lead to a soggy bottom. A properly preheated oven helps the crust set quickly, locking in flakiness while encouraging the filling to start bubbling. A common mistake is not waiting for full preheat, which causes uneven browning and longer cook times.
- Craft your crust: After removing your homemade or store bought crust from the fridge you’ll want to allow it to rest for up to 10 minutes, this will make it easier to roll out. Once it’s softened you’ll want to flour your rolling pin, to prevent the dough from sticking, and get to work. Each disc will need to be 1/8 of an inch thick. Place the dough gently onto the pie plate before crimping the edges and removing any excess dough.: When you let the dough rest briefly after refrigeration it relaxes and becomes much easier to roll, producing a smoother, more even crust surface. Flour your rolling pin lightly so the dough does not drag or tear, and roll each disc to about 1/8 of an inch thickness for a balanced crunch and tenderness. As you place the crust on the pie plate, press gently to avoid stretching, this preserves flakiness during baking. If you stretch the dough while fitting it, it will shrink back in the oven, leaving gaps between crust and filling.
- Blind bake the bottom: Place a piece of parchment paper over the pie shell and fill it with pie weights. If you don't have pie weights, you can use dry beans. Place the pie shell into the oven and blind bake it for 15 minutes. Read more about blind baking here. Once done, remove the pie weights and the parchment paper from the pie shell.: Lining the shell with parchment and pie weights creates gentle, uniform pressure so the bottom holds its shape and avoids bubbling. As the pie shell heats, you should see the edges take on a faintly golden hue after about 15 minutes , a cue that the crust is setting. Remove the weights carefully; the shell will be sturdy but still flexible enough to handle the filling. A pitfall here is skipping the weights, which can lead to a collapsed or uneven bottom.
- Prepare the filling: In a large bowl place the sliced peaches and sprinkle with the lemon juice. Mix gently with a wooden spoon. In another bowl mix the flour, sugar, cinnamon, nutmeg and salt. Add the flour mixture to the peaches and toss well.: Tossing the sliced peaches with lemon juice immediately after peeling keeps the fruit bright and fragrant while it sits. When you whisk together the flour , sugar , cinnamon , nutmeg , and salt , you are building a balance of sweetness, spice, and thickening power that will coat each slice. Mixing these dry ingredients thoroughly ensures even distribution so each bite has consistent flavor. A common error is undercoating the fruit, which can result in a filling that becomes too watery.
- Assemble your pie: Add the filling to your bottom crust, and dollop with butter pieces all over the filling. Roll out your top crust in the same way described above and drape it over your pie. Crimp and seal your edges before slicing vents in the top crust with a knife or if you really want to impress, cut into long strips and weave a lattice crust. From there you will brush with the beaten egg, making sure to seal the edges.: As you mound the filling into the blind baked shell, you will hear a soft rustle as fruit nests into the crust, and the air will fill with a fresh peach aroma. Dotting the surface with pieces of butter adds pockets of richness that melt into the fruit. When you roll and place the top crust, crimp the edges firmly to seal, then cut slits or weave a lattice so steam can vent and the filling can bubble without overflowing. Brushing the top with the beaten egg will give a glossy, deeply browned finish. A misstep here is not sealing the edges well, which can let juices leak out and burn on the oven floor.
- Bake the pie: Preheat your oven first to 425°F. Add the pie to the oven, on the bottom rack and bake for 10 minutes. Reduce the heat to 350°F and bake for another 45 minutes to an hour or until the crust is golden brown and the filling is bubbling.: Start the bake on the bottom rack at 425°F so the crust gets an initial lift and color, then reduce to 350°F for a prolonged finish that allows the filling to thicken and the crust to brown evenly. You will notice a lively bubbling near the vents and a golden brown edge when the pie is nearly done, visual cues that the sugars are caramelizing and the filling has set. Bake for 10 minutes at the higher temp, then 45 minutes to an hour at the lower temp, checking for a deeply golden top and bubbling filling. Avoid opening the oven too often, which drops heat and extends bake time.
- Cool and serve: Cool before serving, though I prefer this pie warm with a scoop of ice cream.: As the pie rests, the filling will thicken and the juices will settle, turning from runny to spoonable. You will still smell warm peaches and butter, and the crust softens slightly at the edges while maintaining a satisfying crisp. Cooling also prevents a slice from collapsing when cut, so allow adequate time before serving; I personally enjoy it slightly warm with a scoop of ice cream. A frequent mistake is cutting too soon, which leads to a loose, liquid center.
Notes
- Choose peaches at peak ripeness - Look for fruit that is fragrant with a slight give when pressed, but not mushy. Peak peaches offer the best balance of sweetness and structure for baking.
- Keep everything cold - Chill your dough and even your mixing bowl if possible; cold butter creates steam pockets as it melts, producing flakier layers in the crust.
- Measure thickener carefully - Use the listed flour amount to avoid under or over thickening; too little leads to runny filling, too much gives a pasty texture.
- Don’t skip the blind bake - Parbaking the bottom shell prevents a soggy center, especially with juicy fruit fillings like peaches.
- Vent the top properly - Make sure the steam can escape through slits or a lattice, this prevents overflow and helps the filling concentrate.
- Rest before slicing - Allow the pie to cool enough so the filling firms up; this yields neat, satisfying slices that hold together.