Mexican Chocolate Babka with Rhubarb Glaze
Mexican Chocolate Babka with Rhubarb Glaze is one of those loaves I reach for when I want a dessert that feels handcrafted and a little bit theatrical.
I remember the first time I combined the warm, slightly smoky notes of cocoa powder and ground cinnamon with a tangy, fresh rhubarb glaze. I was testing flavors in my small city kitchen, windows open to a spring breeze, and the aroma of baking dough mingled with roasted fruit. That day, a neighbor popped in and we shared a slice with coffee while I told the story behind the filling. The loaf felt like more than pastry, it was a conversation starter.
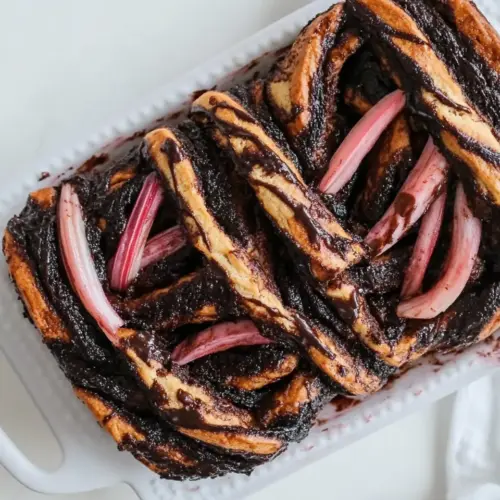
Over the years, my version of Mexican Chocolate Babka with Rhubarb Glaze became the recipe I bring to brunches when I want to impress without making things complicated. The dough is pillowy and tender because of the careful kneading and generous unsalted butter. The filling is bold but balanced, thanks to a trio of sugars and a whisper of aromatic spices. And the glaze, made from gently roasted rhubarb, brightens every bite with acidity and shine. When I slice into the finished loaf, the twisted layers show flecks of cocoa and sugar, and the first forkful always feels like a small celebration.
Recipe Snapshot
3 hr 5 mins
150 mins
35 mins
Hard
300 kcal
Mexican
Gluten-Free, Low FODMAP
Desserts
Stand-up Mixer fitted with hook attachment, 1 medium bowl, 1 (8×4-inch or 9×5-inch) loaf pan, 1 Rolling Pin, 1 Serrated knife, 1 baking dish
What’s Great About This Mexican Chocolate Babka with Rhubarb Glaze
1. A balance of texture and flavor
I love how Mexican Chocolate Babka with Rhubarb Glaze marries a soft enriched dough with a slightly dense, chocolatey filling, and then finishes with a glossy, tart glaze. The contrast between the tender crumb and swirled filling keeps each bite interesting. The chocolate brings depth while the spices lift the profile, and the rhubarb glaze slices through the richness with bright acidity.
2. A friendly make ahead baker
This recipe is forgiving on timing. You can prepare the dough and chill it overnight, or shape and bake the loaf the same day. I often mix the filling in minutes with a bowl or my stand up mixer fitted with hook attachment, and if the day gets away from me, the dough tastes even better after a slow overnight rise. That flexibility makes it a go to when I want to plan ahead for gatherings.
3. Layered spice and chocolate intrigue
The filling uses cocoa powder, brown sugar, and warming spices like ground cinnamon and ground cloves to create a deep, aromatic profile. I appreciate how these flavors are familiar but slightly unexpected together, giving each slice a hint of warmth that feels cozy yet refined.
4. A glaze that brightens the whole loaf
Roasting the rhubarb concentrates its flavor and softens its fibers, making a glaze that is vibrant and silky. Sifting powdered sugar into the puree yields a glossy finish that clings to each ridge of the babka. A squeeze of citrus at the end, whether lemon or lime, balances the sweetness and keeps the glaze lively.
5. Great for sharing and gifting
I always find that a loaf of Mexican Chocolate Babka with Rhubarb Glaze disappears quickly at a table. It slices neatly, travels well, and feels special enough for holidays or casual next door sharing. When I hand someone a slice, they tell me it tastes like effort and warmth without the fuss.
Everything You Need for Mexican Chocolate Babka with Rhubarb Glaze
These ingredients are purposeful, each one playing a role in structure, flavor, or finish. The base all-purpose flour and eggs provide the crumb and lift. Butter enriches the dough and the filling, while the trio of sugars and spices builds the filling s profile. The rhubarb and powdered sugar transform into a glaze that adds brightness and balance. Together they create a loaf that is tender, flavorful, and irresistibly glazed.
- 2 3/4 cups all-purpose flour: Provide structure, gluten development, and the bulk of the dough; measure carefully to ensure proper hydration and a tender crumb during fermentation and baking.
- 3 tablespoons sugar: Add subtle sweetness to the dough mass; sprinkle into the flour mixture to feed the yeast slightly and balance flavors without making the bread overly sweet.
- 1 1/4 teaspoons salt: Enhance flavor depth and regulate yeast activity; distribute evenly in the dry mix to control fermentation and strengthen overall taste profile.
- 1 tablespoon instant yeast: Leaven the dough rapidly and reliably; blend with dry ingredients to activate fermentation and create lift and airy texture in the babka.
- 3 large eggs: Contribute richness, moisture, and tender crumb; whisk into the dough for fat and protein that improve elasticity and flavor complexity.
- 1/4 cup lukewarm water or warm milk: Adjust dough hydration and temperature; use as needed to bring dough together and create the desired pliability for kneading and rising.
- 8 tablespoons room-temperature unsalted butter: Provide richness and tender mouthfeel; cut into the dough matrix to add fat that yields a soft crumb and improved flavor.
- 1/2 cup unsalted butter, room temperature: Create the chocolate filling's buttery texture and help achieve a glossy, spreadable paste when combined with cocoa and sugars.
- 1/3 cup cocoa powder: Deliver deep chocolate flavor and slight bitterness; sift into the filling to build cocoa intensity and balance sweetness in the swirl.
- 3 tablespoons brown sugar: Sweeten and add molasses notes to the chocolate filling; dissolve with butter and cocoa to create a layered, caramelized flavor.
- 3 tablespoons white granulated sugar: Add bright sweetness and help sweeten the filling while contributing a slight granular texture that melts during baking.
- 1 tablespoon honey: Introduce floral sweetness and enhance depth; stir into the filling to complement chocolate and spice with sticky texture and shine.
- 1 teaspoon ground cinnamon: Provide warm spice character and aroma; mix into the filling to support the Mexican chocolate profile with fragrant notes.
- 1/2 teaspoon ground all-spice: Add warm, slightly sweet peppery undertones; combine with other spices to round out the Mexican chocolate spice blend.
- 1/2 teaspoons salt: Balance and enhance filling seasoning; include a pinch to heighten flavors and provide necessary savory contrast to sweet elements.
- 1/4 teaspoon ground cloves: Offer sharp warm-clove aroma to the filling; use sparingly to avoid overpowering other spices and to complete the flavor profile.
- 1 large egg yolk, whisked: Enrich the glaze or egg wash with color and shine; brush or fold in to improve appearance and contribute a silky texture.
- 1/4 pound rhubarb, about 1 to 2 stalks, trimmed and cut into pieces: Bring tart, vegetal brightness for the glaze; simmer down to a jammy consistency to cut through the rich chocolate and butter.
- 1/2 cup white granulated sugar: Sweeten and preserve the rhubarb glaze; dissolve into cooked fruit to balance acidity and provide a glossy finish for the babka.
- Juice from 1/2 lemon or 1 lime + a squeeze more right before serving: Add bright acidity to the glaze; squeeze in to lift flavors, stabilize color, and balance the rhubarb's sweetness before serving.
- Pinch of salt: Enhance balance and amplify flavors in the glaze; sprinkle a small pinch to round out sweetness and brighten the overall taste.
- 2 1/2 cups powdered sugar: Create a smooth, sweet icing to finish the babka; whisk into the rhubarb reduction to form a pourable glaze that adds sweetness and sheen.
Step by Step Instructions for Mexican Chocolate Babka with Rhubarb Glaze
These directions describe how I build the dough, fill and shape the loaf, bake it to a golden finish, and make the vibrant rhubarb glaze. I ve written them to help you notice key sensory cues and avoid common mishaps, so you feel confident at every stage.
- In a stand mixer, with the dough hook, mix together all of the dough ingredients to form a mostly smooth, shiny dough. Don’t worry; what starts out as a sticky mess becomes beautifully satiny as it kneads. Knead this dough on medium speed for about 5 minutes.: The bowl will sound like gentle churning as the eggs and liquids incorporate into the flour , and you ll see the dough transform from shaggy to soft and slightly tacky, with a faint sheen on the surface. This sheen signals the gluten has started to align, which is what gives structure and elasticity. If the dough seems too dry, add a teaspoon of the specified liquid at a time; if it s too wet and sticks to your fingers heavily, dust the work surface lightly with a tablespoon of all-purpose flour . A common mistake here is rushing and adding too much flour, which yields a dense loaf, so be patient and let the mixer do the work until the dough cleans the sides of the bowl.
- Spray a medium bowl with cooking spray. Transfer the dough into the greased bowl, using a spatula because the dough will be a bit sticky. Cover the bowl with a clean kitchen towel and let it rise for 1 hour. If you want to make this ahead, you can cover the bowl with plastic wrap and transfer it to the fridge and continue with the recipe the next morning. Or, you can continue with it immediately.: As you continue, the sound will even out and the dough will become smoother and stretchier, a tactile change I always look for. You should be able to pull a small piece and see a thin, translucent window when stretched, indicating adequate gluten development. Kneading too long makes the dough tight and harder to shape, while under kneading yields a crumb that falls apart, so aim for that satin texture around five minutes.
- Place all of the filling ingredients to the clean bowl of a stand-up mixer and beat until thoroughly combined. Note: I use the stand-up mixer because I’m lazy but you can totally just mix this with a fork, too.: After transferring the dough, I wipe a thin film of oil or cooking spray on the bowl to prevent sticking and to allow easy removal after rising. The dough will feel slightly tacky to the touch but should release from the bowl easily when you slide a spatula around the sides. A common oversight is skipping this step and then tearing the dough when removing it, which can deflate the rising dough.
- Grease and line a 8×4-inch or 9 x-5-inch loaf pan.: You ll notice the dough clinging to the spatula initially, then easing off as it rests. Covering it with a clean kitchen towel creates a humid microclimate that encourages a steady rise. If you plan to refrigerate overnight, seal tightly with plastic wrap to prevent a crust forming; otherwise a towel is fine for a one hour rise.
- On a liberally floured surface, dump the dough out and roll it into a rectangle that’s about 10-inches x 12-inches. Don’t be shy to break out a measuring tape. Spread the filling evenly onto the rectangle and stop about 1/4-inch before you reach the edge. Roll the rectangle tightly, in a horizontal fashion, into a log. Transfer the log to a lightly floured cutting board and transfer to the freezer (this will help when we cut and form the babka) for about 10 minutes.: During this time the dough should double, a visual cue that the yeast has produced gas and the gluten network has strengthened. The surface may have dimples and a pillowy look, and the aroma will be mildly yeasty and sweet. Rushing this stage leads to dense texture, and overproofing can collapse structure, so keep an eye on volume not just time.
- After the log has chilled, remove it from the freezer. Using a serrated knife, slice off the ends and discard. Slice the log in half and lay the two halves next to each other, cut side up. Pinch the tops together to seal them. And then lift one strand over the other, forming a twist. Try your hardest to keep the cut sides up. Repeat until you’ve worked your way down the entire log. Carefully transfer it to the prepared loaf pan. Cover with a clean kitchen towel and place in a draft-free place in your home until it doubles in size, about 1 hour.: The slow cold ferment deepens flavor and makes the dough easier to work with, since chilled dough is less sticky. When you remove it from the fridge, give it 30 to 45 minutes to come closer to room temperature so it s pliable. A trap is trying to roll cold dough immediately, which can crack the surface and resist shaping.
- Preheat the oven to 350 degrees F. Gently brush the tops of the buns with egg wash and transfer to the oven to bake for about 30 to 35 minutes, until lightly golden brown.: As the butter, cocoa powder , and sugars whip together, they thicken and take on a satiny sheen, and you ll smell chocolate and warming spices. This homogeneous texture spreads evenly over the dough and bakes into consistent ribbons. If you mix by hand, press and stir until smooth, but be sure there are no dry pockets of cocoa or sugar, which would create uneven spots in the filling.
- In a baking dish, combine the pieces of rhubarb, sugar, citrus juice. Transfer to the oven to bake to roast for about 10 minutes, until very softened.: Lining with parchment makes removal straightforward and protects the loaf s sides as it expands. The greased parchment also encourages a nice release and helps maintain the loaf s shape. Forgetting to line or grease the pan can result in sticking and tearing when you try to unmold the babka.
- Spoon the rhubarb out and transfer it to a blender. Pulse until smooth, scraping down the sides as needed. Place the puree in a bowl of a stand-up mixer and sift in the powdered sugar and salt. Beat until smooth. If it’s stiff, you may need to add a teaspoon or two of lemon juice or lime juice. If it’s too thin, feel free to add 1/4 or 1/2 cup of powdered sugar. Set aside.: Rolling should feel smooth under the pin, with occasional gentle resistance from the butter in the dough. The rectangle s edges need not be perfect, but aim for even thickness so the filling bakes uniformly. If the dough resists rolling or shrinks back, let it rest for five to ten minutes to relax the gluten; forcing it will create uneven layers.
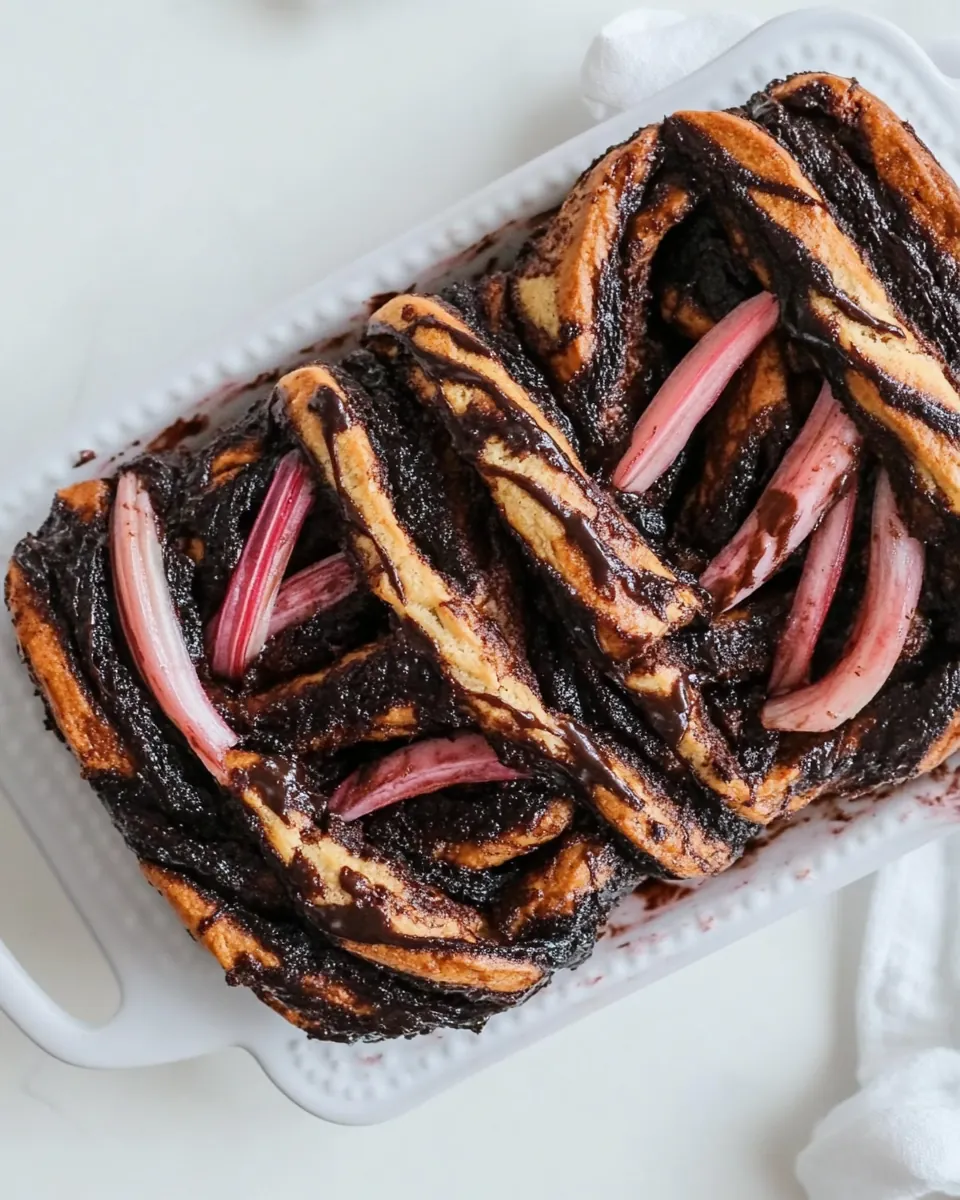
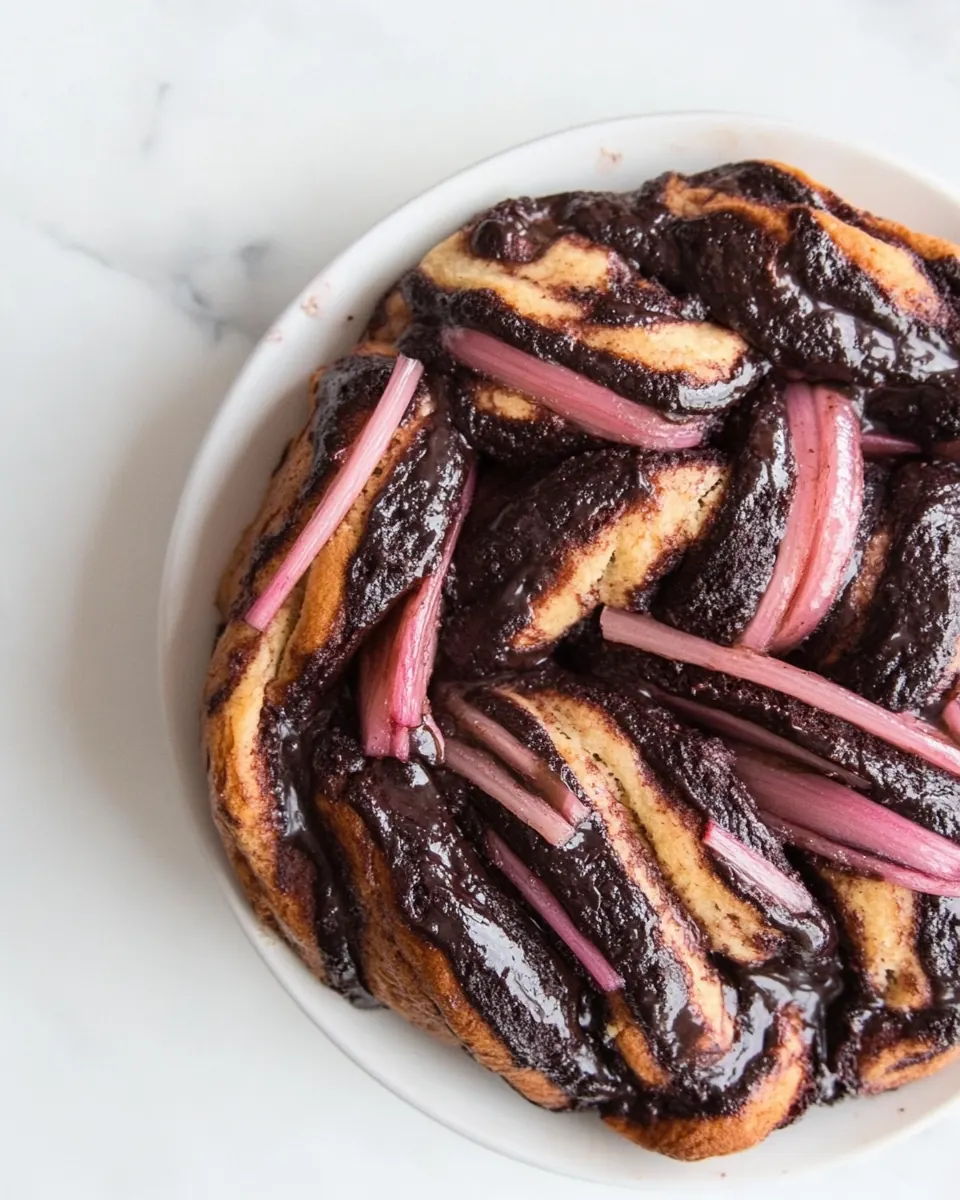
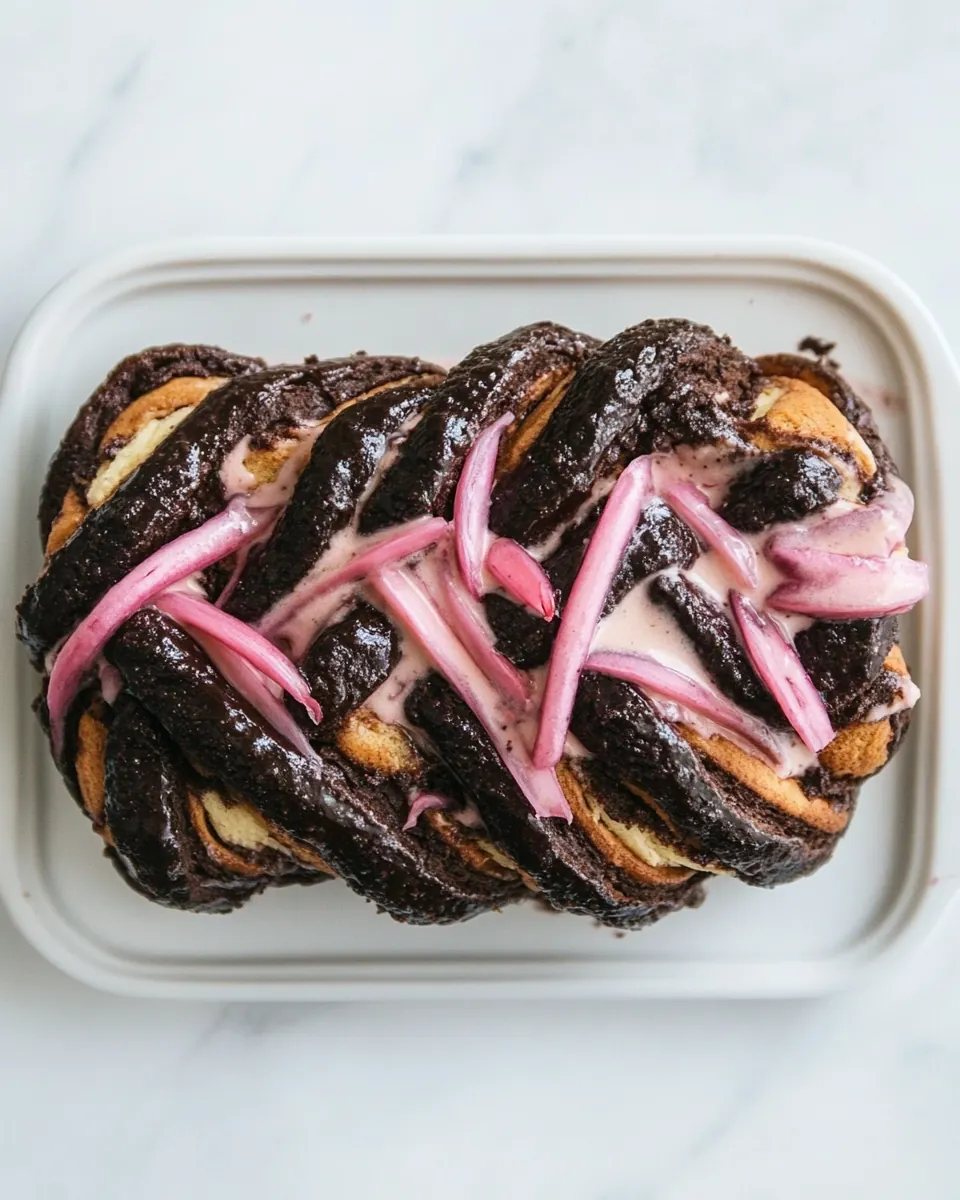
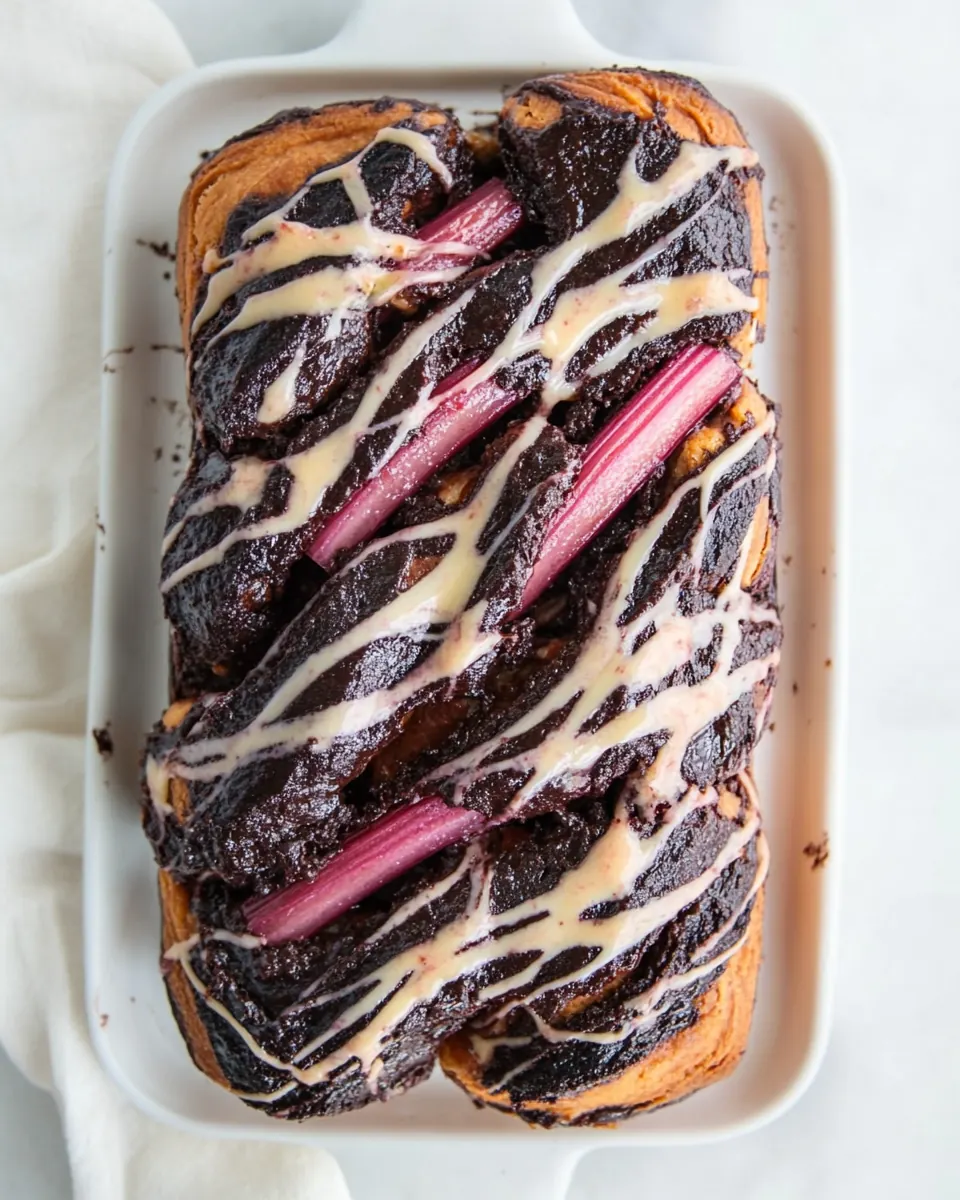
- Remove the babka loaf from the loaf pan and allow to cool. Drizzle the rhubarb glaze all over the babka however you like. I did a couple options.: You ought to see a glossy layer of filling with tiny flecks of spice across the dough; this margin prevents leakage when rolling. Use an offset spatula for control and keep the filling at room temperature so it spreads smoothly. Overfilling can cause the log to split during baking, so less is more if you re unsure.
- Fun fact: I transferred the glaze to a piping bag and I snipped off the end and did the drizzle that way. It made for very even stripes. Feel free to use the designs as inspo!: As you roll, the filling will coil into neat spirals and you ll feel slight resistance as air escapes from the dough. A tight roll produces distinct layers, but don t compress it so firmly that air is forced out completely. One common error is rolling too loosely, which yields large air pockets and an uneven crumb, so aim for snug tension without crushing the dough.
- Transfer the log to a lightly floured cutting board and transfer to the freezer for about 10 minutes: Chilling the log firms the butter and makes slicing cleaner, preventing smearing of the filling. You ll appreciate the firmer texture when you cut and braid the loaf. Skipping this chill step can result in noisy, ragged cuts and a less tidy appearance.
- After the log has chilled, remove it from the freezer: At this point the dough should be cool but still pliable; the filling will be set enough to slice without dollops oozing out. If it feels too frozen, wait a few minutes so it softens slightly, because cutting ice cold dough can shatter the layers.
- Using a serrated knife, slice off the ends and discard: Slicing the ends evens out the log and removes any untidy edges, ensuring a neat visual when you braid. Use a clean, sawing motion to avoid dragging filling. Tossing the ends is normal, and you can save them for a test bite or discard if the recipe instructs.
- Slice the log in half and lay the two halves next to each other, cut side up: Exposing the filled spiral reveals beautiful striations of chocolate and spice, and keeping the cut sides up helps you maintain those layers while braiding. If the layers start to separate, press gently to reconnect; too much force will flatten the design.
- Pinch the tops together to seal them: This small move keeps the braid unified and prevents the strands from sliding apart as the loaf rises. It also creates a neat focal point at the top of the braid. Failing to seal can lead to a loaf that unravels in the pan and bakes into an irregular shape.
- And then lift one strand over the other, forming a twist: As you cross the strands, you ll notice the cut sides remain visible; that s the aesthetic you want. Continue the alternating lifts to the end, keeping the tension even so the braid sits compactly in the pan. Uneven twisting can cause the loaf to bake lopsidedly, so maintain steady hands and a rhythm.
- Carefully transfer it to the prepared loaf pan: Tuck the ends under slightly so the braid fills the pan neatly, and press gently to ensure contact with the pan base. The loaf should sit snugly but not cramped, allowing room to expand during proofing. Crowding the pan leads to an overfilled loaf that spills during baking.
- Cover with a clean kitchen towel and place in a draft-free place in your home until it doubles in size, about 1 hour: The final rise should yield a puffy loaf that springs back slowly when touched. Watch for volume rather than strictly time, since room temperature affects proofing. Under proofing produces a tight crumb, and over proofing risks collapse, so aim for that gentle spring.
- Preheat the oven to 350 degrees F: A fully preheated oven ensures even baking and proper oven spring, giving the loaf a golden exterior while baking the layers inside. Place the rack in the center so heat circulates evenly. Baking in an underheated oven results in a dense interior and pale crust.
- Gently brush the tops of the buns with egg wash: Brushing with the whisked egg yolk gives the loaf a glossy, deep golden finish and helps the glaze adhere later. Use a light hand to avoid pooling, and if you see drips, dab them with a paper towel to prevent excessive browning.
- Transfer to the oven to bake for about 30 to 35 minutes, until lightly golden brown: The loaf will fill the kitchen with a warm chocolate and spice aroma while the crust turns golden. An internal temperature around 190 to 200 degrees F signals doneness, or a skewer inserted into the center should come out mostly clean. Watch the top; if it browns too quickly, tent with foil to avoid burning.
- In a baking dish, combine the pieces of rhubarb, sugar, citrus juice: Once combined, the fruit will glisten and start releasing juices as it roasts, creating a fragrant steam with bright tart notes. This step softens the rhubarb and concentrates its flavor, essential for a thick, balanced glaze. Skipping sufficient roasting can leave the glaze gritty or fibrous.
- Transfer to the oven to roast for about 10 minutes, until very softened: Roasting caramelizes the edges and intensifies the fruit s flavor, and you ll see the pieces collapse and become jam like. Let them cool slightly before blending, since piping hot puree can steam and loosen the powdered sugar too much.
- Spoon the rhubarb out and transfer it to a blender: As you pulse, the puree will turn smooth and fragrant, with a bright pink hue and a concentrated tartness that counterbalances the chocolate. If the texture feels grainy, blend a bit longer, scraping down the sides to ensure uniformity.
- Pulse until smooth, scraping down the sides as needed: A silky texture signals that the fibers have broken down completely, which gives the glaze a sleek finish. If the puree seems too thin for glazing, add a little more powdered sugar; if too stiff, a teaspoon of lemon or lime juice loosens it gently. Avoid overheating the puree, which can thin the glaze excessively.
- Place the puree in a bowl of a stand-up mixer and sift in the powdered sugar and salt: Sifting prevents lumps and yields a glossy, lump free glaze. As you beat, the powdered sugar dissolves into the puree, creating a smooth viscosity that will cling to the loaf. If it becomes too runny, add up to a 1/4 cup more powdered sugar to thicken it without over sweetening.
- Beat until smooth: The finished glaze should be velvety and pourable, with a bright tang and balanced sweetness. Taste and add a squeeze of citrus if it needs brightness. Overbeating can incorporate air and make the glaze frothy, so stop when smooth and glossy.
- Set aside: Allow the glaze to rest at room temperature while the loaf cools slightly so the glaze won t run right off; it should still be pourable for easy drizzle. If it firms up too much, a teaspoon of citrus juice will loosen it again.
- Remove the babka loaf from the loaf pan and allow to cool: Cooling helps the crumb set, making slicing cleaner and preventing the glaze from sinking into a hot interior. The aroma of chocolate, butter, and spices will be strongest now; resist the urge to slice immediately, since a hot loaf can smear the layers.
- Drizzle the rhubarb glaze all over the babka however you like: You can spoon it, drizzle with a fork, or use a piping bag for neat stripes. The contrast of the glossy pink glaze against the chocolate swirls looks dramatic and delicious. If you want sharper lines, let the glaze thicken slightly before decorating.
- Fun fact: I transferred the glaze to a piping bag and I snipped off the end and did the drizzle that way : This technique creates even, controlled stripes that look professional with minimal effort. If you don t have a piping bag, a resealable plastic bag with the corner snipped works just as well. Be careful not to over decorate, which can hide the loaf s beautiful twisted layers.
Helpful Notes about Mexican Chocolate Babka with Rhubarb Glaze
This section collects practical, real world tips I rely on when baking this babka. I ve expanded each suggestion so you can apply it confidently in your own kitchen, from mixing the dough to glazing the finished loaf.
- Measure flour by weight, if possible, for consistent dough hydration and texture. Cup measurements vary by how you scoop, which can make dough too dry or too wet. If you only have cups, scoop gently and level with a knife.
- Keep butter at room temperature for the filling so it creams smoothly with the sugars and cocoa powder. Cold butter will break up and create uneven pockets, while melted butter changes the filling s consistency and may soak into the dough.
- Proof dough in a warm, draft free spot to achieve reliable rising. I often preheat my oven for 30 seconds and then turn it off, placing the covered bowl inside to speed the process. Avoid overheating which can kill the yeast.
- Chill the log briefly before slicing to firm the filling and make cleaner cuts; a ten minute rest in the freezer does wonders. If you skip this, your sliced strands might smear and make braiding messy.
- Sift powdered sugar into the rhubarb puree for a lump free glaze that is glossy and smooth. If the glaze becomes too thin after mixing, add powdered sugar a tablespoon at a time to reach desired thickness.
- Tent with foil if the top browns too fast during baking to ensure the inside finishes before the crust over darkens. Place foil loosely over the loaf around the last ten to fifteen minutes if needed.
Perfect Matches for Mexican Chocolate Babka with Rhubarb Glaze
This loaf is versatile for many occasions and pairings. Below I outline serving ideas, occasions, storage tips, and seasonal pairings so you can present it beautifully or store it thoughtfully.
- Morning brunch pairing, serve slices with strong coffee or black tea for a breakfast style treat where the chocolate and rhubarb shine as a centerpiece.
- Afternoon tea or snack, pair thin slices with a light citrusy tea or sparkling water to balance the richness and bring a refreshing contrast.
- Gift loaf, wrap a cooled loaf in parchment and twine for a neighborly or holiday gift, ideal for spring when rhubarb is at its peak.
- Party platter, slice and arrange alongside fruit and small cheeses for a dessert board; the sweet and tart elements complement softer accompaniments.
- Storage tip, keep wrapped at room temperature for up to two days, or refrigerate for up to five days; reheat gently to revive the texture before serving.
- Freezing, slice and freeze individual portions on a tray before transferring to a sealed bag, then thaw at room temperature and warm briefly in a low oven.
- Seasonal pairing, this loaf sings in spring when rhubarb is bright, but it also feels cozy in cooler months thanks to the warming spices in the filling.
FAQ
Conclusion
This Mexican Chocolate Babka with Rhubarb Glaze stands out for its contrast of rich spiced chocolate and bright, tangy fruit glaze. It s a loaf that looks impressive but is approachable to make, with flexible timing and techniques that suit both same day baking and make ahead plans. Give it a try the next time you want a dessert that feels homemade and special; share slices with friends or keep a warm piece for yourself, and enjoy how the flavors unfold with each bite.
Mexican Chocolate Babka with Rhubarb Glaze
Equipment
- Stand-up Mixer fitted with hook attachment
- 1 medium bowl
- 1 (8×4-inch or 9×5-inch) loaf pan
- 1 Rolling Pin
- 1 Serrated knife
- 1 baking dish
Ingredients
- 2 3/4 cups all-purpose flour Provide structure, gluten development, and the bulk of the dough; measure carefully to ensure proper hydration and a tender crumb during fermentation and baking.
- 3 tablespoons sugar Add subtle sweetness to the dough mass; sprinkle into the flour mixture to feed the yeast slightly and balance flavors without making the bread overly sweet.
- 1 1/4 teaspoons salt Enhance flavor depth and regulate yeast activity; distribute evenly in the dry mix to control fermentation and strengthen overall taste profile.
- 1 tablespoon instant yeast Leaven the dough rapidly and reliably; blend with dry ingredients to activate fermentation and create lift and airy texture in the babka.
- 3 large eggs Contribute richness, moisture, and tender crumb; whisk into the dough for fat and protein that improve elasticity and flavor complexity.
- 1/4 cup lukewarm water or warm milk Adjust dough hydration and temperature; use as needed to bring dough together and create the desired pliability for kneading and rising.
- 8 tablespoons room-temperature unsalted butter Provide richness and tender mouthfeel; cut into the dough matrix to add fat that yields a soft crumb and improved flavor.
- 1/2 cup unsalted butter, room temperature Create the chocolate filling's buttery texture and help achieve a glossy, spreadable paste when combined with cocoa and sugars.
- 1/3 cup cocoa powder Deliver deep chocolate flavor and slight bitterness; sift into the filling to build cocoa intensity and balance sweetness in the swirl.
- 3 tablespoons brown sugar Sweeten and add molasses notes to the chocolate filling; dissolve with butter and cocoa to create a layered, caramelized flavor.
- 3 tablespoons white granulated sugar Add bright sweetness and help sweeten the filling while contributing a slight granular texture that melts during baking.
- 1 tablespoon honey Introduce floral sweetness and enhance depth; stir into the filling to complement chocolate and spice with sticky texture and shine.
- 1 teaspoon ground cinnamon Provide warm spice character and aroma; mix into the filling to support the Mexican chocolate profile with fragrant notes.
- 1/2 teaspoon ground all-spice Add warm, slightly sweet peppery undertones; combine with other spices to round out the Mexican chocolate spice blend.
- 1/2 teaspoons salt Balance and enhance filling seasoning; include a pinch to heighten flavors and provide necessary savory contrast to sweet elements.
- 1/4 teaspoon ground cloves Offer sharp warm-clove aroma to the filling; use sparingly to avoid overpowering other spices and to complete the flavor profile.
- 1 large egg yolk, whisked Enrich the glaze or egg wash with color and shine; brush or fold in to improve appearance and contribute a silky texture.
- 1/4 pound rhubarb, about 1 to 2 stalks, trimmed and cut into pieces Bring tart, vegetal brightness for the glaze; simmer down to a jammy consistency to cut through the rich chocolate and butter.
- 1/2 cup white granulated sugar Sweeten and preserve the rhubarb glaze; dissolve into cooked fruit to balance acidity and provide a glossy finish for the babka.
- Juice from 1/2 lemon or 1 lime + a squeeze more right before serving Add bright acidity to the glaze; squeeze in to lift flavors, stabilize color, and balance the rhubarb's sweetness before serving.
- Pinch of salt Enhance balance and amplify flavors in the glaze; sprinkle a small pinch to round out sweetness and brighten the overall taste.
- 2 1/2 cups powdered sugar Create a smooth, sweet icing to finish the babka; whisk into the rhubarb reduction to form a pourable glaze that adds sweetness and sheen.
Instructions
- In a stand mixer, with the dough hook, mix together all of the dough ingredients to form a mostly smooth, shiny dough. Don’t worry; what starts out as a sticky mess becomes beautifully satiny as it kneads. Knead this dough on medium speed for about 5 minutes.: The bowl will sound like gentle churning as the eggs and liquids incorporate into the flour , and you ll see the dough transform from shaggy to soft and slightly tacky, with a faint sheen on the surface. This sheen signals the gluten has started to align, which is what gives structure and elasticity. If the dough seems too dry, add a teaspoon of the specified liquid at a time; if it s too wet and sticks to your fingers heavily, dust the work surface lightly with a tablespoon of all-purpose flour . A common mistake here is rushing and adding too much flour, which yields a dense loaf, so be patient and let the mixer do the work until the dough cleans the sides of the bowl.
- Spray a medium bowl with cooking spray. Transfer the dough into the greased bowl, using a spatula because the dough will be a bit sticky. Cover the bowl with a clean kitchen towel and let it rise for 1 hour. If you want to make this ahead, you can cover the bowl with plastic wrap and transfer it to the fridge and continue with the recipe the next morning. Or, you can continue with it immediately.: As you continue, the sound will even out and the dough will become smoother and stretchier, a tactile change I always look for. You should be able to pull a small piece and see a thin, translucent window when stretched, indicating adequate gluten development. Kneading too long makes the dough tight and harder to shape, while under kneading yields a crumb that falls apart, so aim for that satin texture around five minutes.
- Place all of the filling ingredients to the clean bowl of a stand-up mixer and beat until thoroughly combined. Note: I use the stand-up mixer because I’m lazy but you can totally just mix this with a fork, too.: After transferring the dough, I wipe a thin film of oil or cooking spray on the bowl to prevent sticking and to allow easy removal after rising. The dough will feel slightly tacky to the touch but should release from the bowl easily when you slide a spatula around the sides. A common oversight is skipping this step and then tearing the dough when removing it, which can deflate the rising dough.
- Grease and line a 8×4-inch or 9 x-5-inch loaf pan.: You ll notice the dough clinging to the spatula initially, then easing off as it rests. Covering it with a clean kitchen towel creates a humid microclimate that encourages a steady rise. If you plan to refrigerate overnight, seal tightly with plastic wrap to prevent a crust forming; otherwise a towel is fine for a one hour rise.
- On a liberally floured surface, dump the dough out and roll it into a rectangle that’s about 10-inches x 12-inches. Don’t be shy to break out a measuring tape. Spread the filling evenly onto the rectangle and stop about 1/4-inch before you reach the edge. Roll the rectangle tightly, in a horizontal fashion, into a log. Transfer the log to a lightly floured cutting board and transfer to the freezer (this will help when we cut and form the babka) for about 10 minutes.: During this time the dough should double, a visual cue that the yeast has produced gas and the gluten network has strengthened. The surface may have dimples and a pillowy look, and the aroma will be mildly yeasty and sweet. Rushing this stage leads to dense texture, and overproofing can collapse structure, so keep an eye on volume not just time.
- After the log has chilled, remove it from the freezer. Using a serrated knife, slice off the ends and discard. Slice the log in half and lay the two halves next to each other, cut side up. Pinch the tops together to seal them. And then lift one strand over the other, forming a twist. Try your hardest to keep the cut sides up. Repeat until you’ve worked your way down the entire log. Carefully transfer it to the prepared loaf pan. Cover with a clean kitchen towel and place in a draft-free place in your home until it doubles in size, about 1 hour.: The slow cold ferment deepens flavor and makes the dough easier to work with, since chilled dough is less sticky. When you remove it from the fridge, give it 30 to 45 minutes to come closer to room temperature so it s pliable. A trap is trying to roll cold dough immediately, which can crack the surface and resist shaping.
- Preheat the oven to 350 degrees F. Gently brush the tops of the buns with egg wash and transfer to the oven to bake for about 30 to 35 minutes, until lightly golden brown.: As the butter, cocoa powder , and sugars whip together, they thicken and take on a satiny sheen, and you ll smell chocolate and warming spices. This homogeneous texture spreads evenly over the dough and bakes into consistent ribbons. If you mix by hand, press and stir until smooth, but be sure there are no dry pockets of cocoa or sugar, which would create uneven spots in the filling.
- In a baking dish, combine the pieces of rhubarb, sugar, citrus juice. Transfer to the oven to bake to roast for about 10 minutes, until very softened.: Lining with parchment makes removal straightforward and protects the loaf s sides as it expands. The greased parchment also encourages a nice release and helps maintain the loaf s shape. Forgetting to line or grease the pan can result in sticking and tearing when you try to unmold the babka.
- Spoon the rhubarb out and transfer it to a blender. Pulse until smooth, scraping down the sides as needed. Place the puree in a bowl of a stand-up mixer and sift in the powdered sugar and salt. Beat until smooth. If it’s stiff, you may need to add a teaspoon or two of lemon juice or lime juice. If it’s too thin, feel free to add 1/4 or 1/2 cup of powdered sugar. Set aside.: Rolling should feel smooth under the pin, with occasional gentle resistance from the butter in the dough. The rectangle s edges need not be perfect, but aim for even thickness so the filling bakes uniformly. If the dough resists rolling or shrinks back, let it rest for five to ten minutes to relax the gluten; forcing it will create uneven layers.
- Remove the babka loaf from the loaf pan and allow to cool. Drizzle the rhubarb glaze all over the babka however you like. I did a couple options.: You ought to see a glossy layer of filling with tiny flecks of spice across the dough; this margin prevents leakage when rolling. Use an offset spatula for control and keep the filling at room temperature so it spreads smoothly. Overfilling can cause the log to split during baking, so less is more if you re unsure.
- Fun fact: I transferred the glaze to a piping bag and I snipped off the end and did the drizzle that way. It made for very even stripes. Feel free to use the designs as inspo!: As you roll, the filling will coil into neat spirals and you ll feel slight resistance as air escapes from the dough. A tight roll produces distinct layers, but don t compress it so firmly that air is forced out completely. One common error is rolling too loosely, which yields large air pockets and an uneven crumb, so aim for snug tension without crushing the dough.
- Transfer the log to a lightly floured cutting board and transfer to the freezer for about 10 minutes: Chilling the log firms the butter and makes slicing cleaner, preventing smearing of the filling. You ll appreciate the firmer texture when you cut and braid the loaf. Skipping this chill step can result in noisy, ragged cuts and a less tidy appearance.
- After the log has chilled, remove it from the freezer: At this point the dough should be cool but still pliable; the filling will be set enough to slice without dollops oozing out. If it feels too frozen, wait a few minutes so it softens slightly, because cutting ice cold dough can shatter the layers.
- Using a serrated knife, slice off the ends and discard: Slicing the ends evens out the log and removes any untidy edges, ensuring a neat visual when you braid. Use a clean, sawing motion to avoid dragging filling. Tossing the ends is normal, and you can save them for a test bite or discard if the recipe instructs.
- Slice the log in half and lay the two halves next to each other, cut side up: Exposing the filled spiral reveals beautiful striations of chocolate and spice, and keeping the cut sides up helps you maintain those layers while braiding. If the layers start to separate, press gently to reconnect; too much force will flatten the design.
- Pinch the tops together to seal them: This small move keeps the braid unified and prevents the strands from sliding apart as the loaf rises. It also creates a neat focal point at the top of the braid. Failing to seal can lead to a loaf that unravels in the pan and bakes into an irregular shape.
- And then lift one strand over the other, forming a twist: As you cross the strands, you ll notice the cut sides remain visible; that s the aesthetic you want. Continue the alternating lifts to the end, keeping the tension even so the braid sits compactly in the pan. Uneven twisting can cause the loaf to bake lopsidedly, so maintain steady hands and a rhythm.
- Carefully transfer it to the prepared loaf pan: Tuck the ends under slightly so the braid fills the pan neatly, and press gently to ensure contact with the pan base. The loaf should sit snugly but not cramped, allowing room to expand during proofing. Crowding the pan leads to an overfilled loaf that spills during baking.
- Cover with a clean kitchen towel and place in a draft-free place in your home until it doubles in size, about 1 hour: The final rise should yield a puffy loaf that springs back slowly when touched. Watch for volume rather than strictly time, since room temperature affects proofing. Under proofing produces a tight crumb, and over proofing risks collapse, so aim for that gentle spring.
- Preheat the oven to 350 degrees F: A fully preheated oven ensures even baking and proper oven spring, giving the loaf a golden exterior while baking the layers inside. Place the rack in the center so heat circulates evenly. Baking in an underheated oven results in a dense interior and pale crust.
- Gently brush the tops of the buns with egg wash: Brushing with the whisked egg yolk gives the loaf a glossy, deep golden finish and helps the glaze adhere later. Use a light hand to avoid pooling, and if you see drips, dab them with a paper towel to prevent excessive browning.
- Transfer to the oven to bake for about 30 to 35 minutes, until lightly golden brown: The loaf will fill the kitchen with a warm chocolate and spice aroma while the crust turns golden. An internal temperature around 190 to 200 degrees F signals doneness, or a skewer inserted into the center should come out mostly clean. Watch the top; if it browns too quickly, tent with foil to avoid burning.
- In a baking dish, combine the pieces of rhubarb, sugar, citrus juice: Once combined, the fruit will glisten and start releasing juices as it roasts, creating a fragrant steam with bright tart notes. This step softens the rhubarb and concentrates its flavor, essential for a thick, balanced glaze. Skipping sufficient roasting can leave the glaze gritty or fibrous.
- Transfer to the oven to roast for about 10 minutes, until very softened: Roasting caramelizes the edges and intensifies the fruit s flavor, and you ll see the pieces collapse and become jam like. Let them cool slightly before blending, since piping hot puree can steam and loosen the powdered sugar too much.
- Spoon the rhubarb out and transfer it to a blender: As you pulse, the puree will turn smooth and fragrant, with a bright pink hue and a concentrated tartness that counterbalances the chocolate. If the texture feels grainy, blend a bit longer, scraping down the sides to ensure uniformity.
- Pulse until smooth, scraping down the sides as needed: A silky texture signals that the fibers have broken down completely, which gives the glaze a sleek finish. If the puree seems too thin for glazing, add a little more powdered sugar; if too stiff, a teaspoon of lemon or lime juice loosens it gently. Avoid overheating the puree, which can thin the glaze excessively.
- Place the puree in a bowl of a stand-up mixer and sift in the powdered sugar and salt: Sifting prevents lumps and yields a glossy, lump free glaze. As you beat, the powdered sugar dissolves into the puree, creating a smooth viscosity that will cling to the loaf. If it becomes too runny, add up to a 1/4 cup more powdered sugar to thicken it without over sweetening.
- Beat until smooth: The finished glaze should be velvety and pourable, with a bright tang and balanced sweetness. Taste and add a squeeze of citrus if it needs brightness. Overbeating can incorporate air and make the glaze frothy, so stop when smooth and glossy.
- Set aside: Allow the glaze to rest at room temperature while the loaf cools slightly so the glaze won t run right off; it should still be pourable for easy drizzle. If it firms up too much, a teaspoon of citrus juice will loosen it again.
- Remove the babka loaf from the loaf pan and allow to cool: Cooling helps the crumb set, making slicing cleaner and preventing the glaze from sinking into a hot interior. The aroma of chocolate, butter, and spices will be strongest now; resist the urge to slice immediately, since a hot loaf can smear the layers.
- Drizzle the rhubarb glaze all over the babka however you like: You can spoon it, drizzle with a fork, or use a piping bag for neat stripes. The contrast of the glossy pink glaze against the chocolate swirls looks dramatic and delicious. If you want sharper lines, let the glaze thicken slightly before decorating.
- Fun fact: I transferred the glaze to a piping bag and I snipped off the end and did the drizzle that way : This technique creates even, controlled stripes that look professional with minimal effort. If you don t have a piping bag, a resealable plastic bag with the corner snipped works just as well. Be careful not to over decorate, which can hide the loaf s beautiful twisted layers.
Notes
- Measure flour by weight, if possible, for consistent dough hydration and texture. Cup measurements vary by how you scoop, which can make dough too dry or too wet. If you only have cups, scoop gently and level with a knife.
- Keep butter at room temperature for the filling so it creams smoothly with the sugars and cocoa powder. Cold butter will break up and create uneven pockets, while melted butter changes the filling s consistency and may soak into the dough.
- Proof dough in a warm, draft free spot to achieve reliable rising. I often preheat my oven for 30 seconds and then turn it off, placing the covered bowl inside to speed the process. Avoid overheating which can kill the yeast.
- Chill the log briefly before slicing to firm the filling and make cleaner cuts; a ten minute rest in the freezer does wonders. If you skip this, your sliced strands might smear and make braiding messy.
- Sift powdered sugar into the rhubarb puree for a lump free glaze that is glossy and smooth. If the glaze becomes too thin after mixing, add powdered sugar a tablespoon at a time to reach desired thickness.
- Tent with foil if the top browns too fast during baking to ensure the inside finishes before the crust over darkens. Place foil loosely over the loaf around the last ten to fifteen minutes if needed.