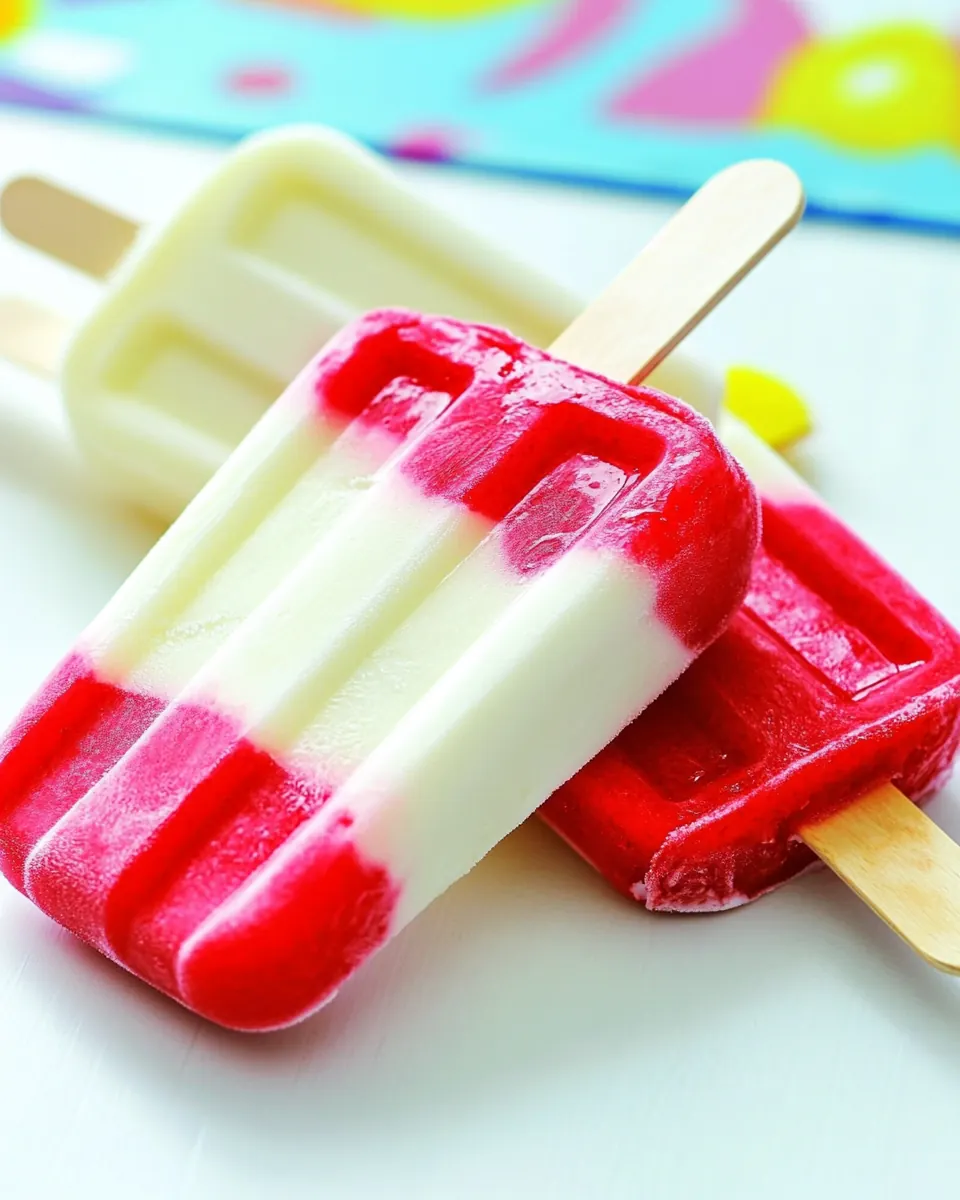
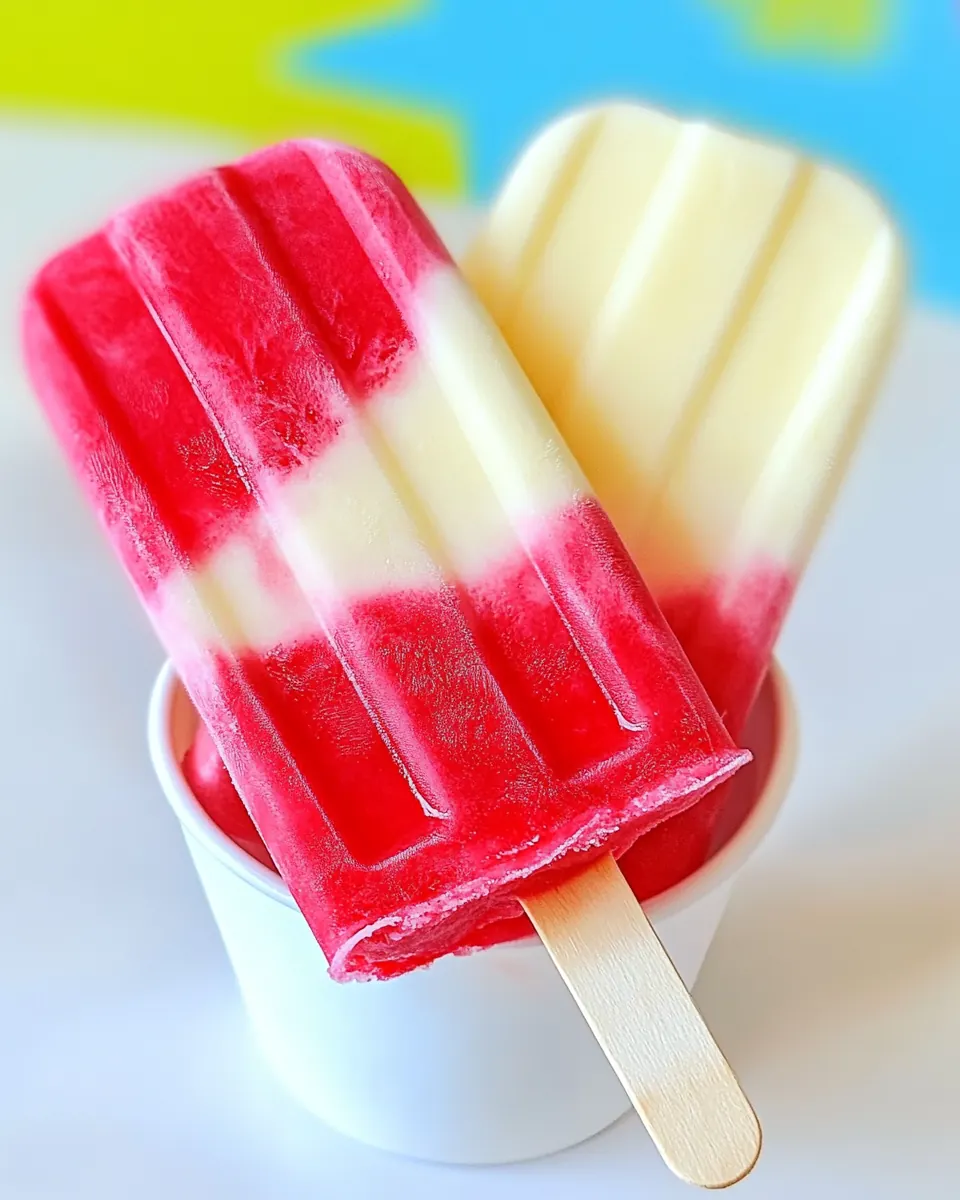
Lava Flow Homemade Popsicles
Lava Flow Homemade Popsicles came into my summer rotation the minute I chased down a childhood memory of backyard treats with a grown up twist, and I still get a little thrill every time I pull a frozen mold from the freezer. The first sentence I said to myself when experimenting was that a simple two part purée could create both drama and flavor, and that idea carried me through a few messy, joyful afternoons mixing bright strawberries with creamy tropical pineapple and coconut milk. I love how this snack feels playful, like a frozen adult treat that still belongs on a kid’s plate.
My kitchen smelled like a beach snack the day I perfected the swirl, with the sweet tang of strawberries wafting up followed by a lush coconut perfume. I tested a few ratios to get the texture right so the popsicles are silky but still hold a clear lava effect when you layer the two purées. Friends who tried them said they were surprised at how refreshing and satisfying a simple fruit and coconut combo could be. That made me keep the recipe true to its core, no fuss, just good components played against each other.
Recipe Snapshot
20 mins
10 mins
10 mins
Easy
150 kcal
American
Gluten-Free, Paleo
Desserts
Blender, Popsicle molds
Why This Lava Flow Homemade Popsicles Is So Good
Vibrant visual appeal
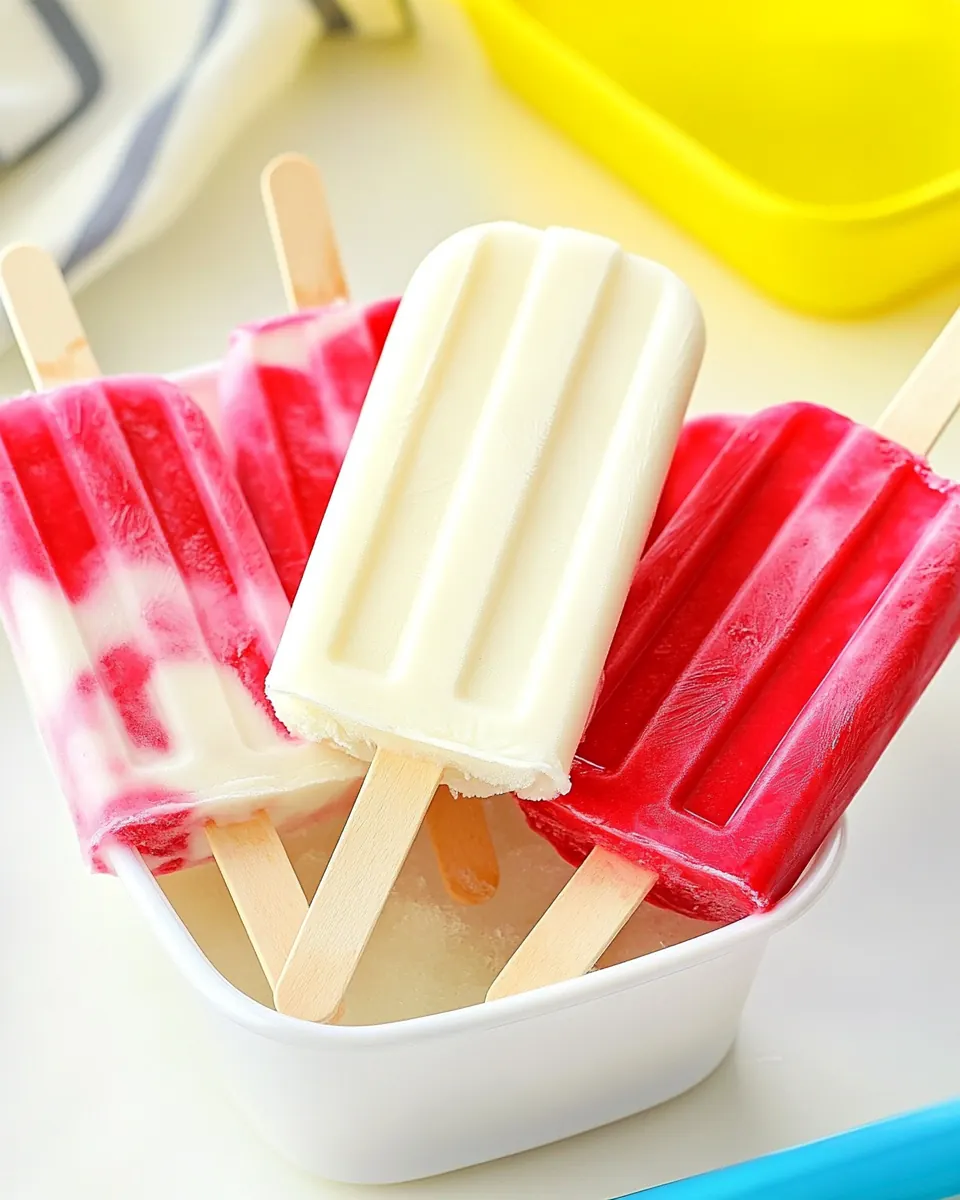
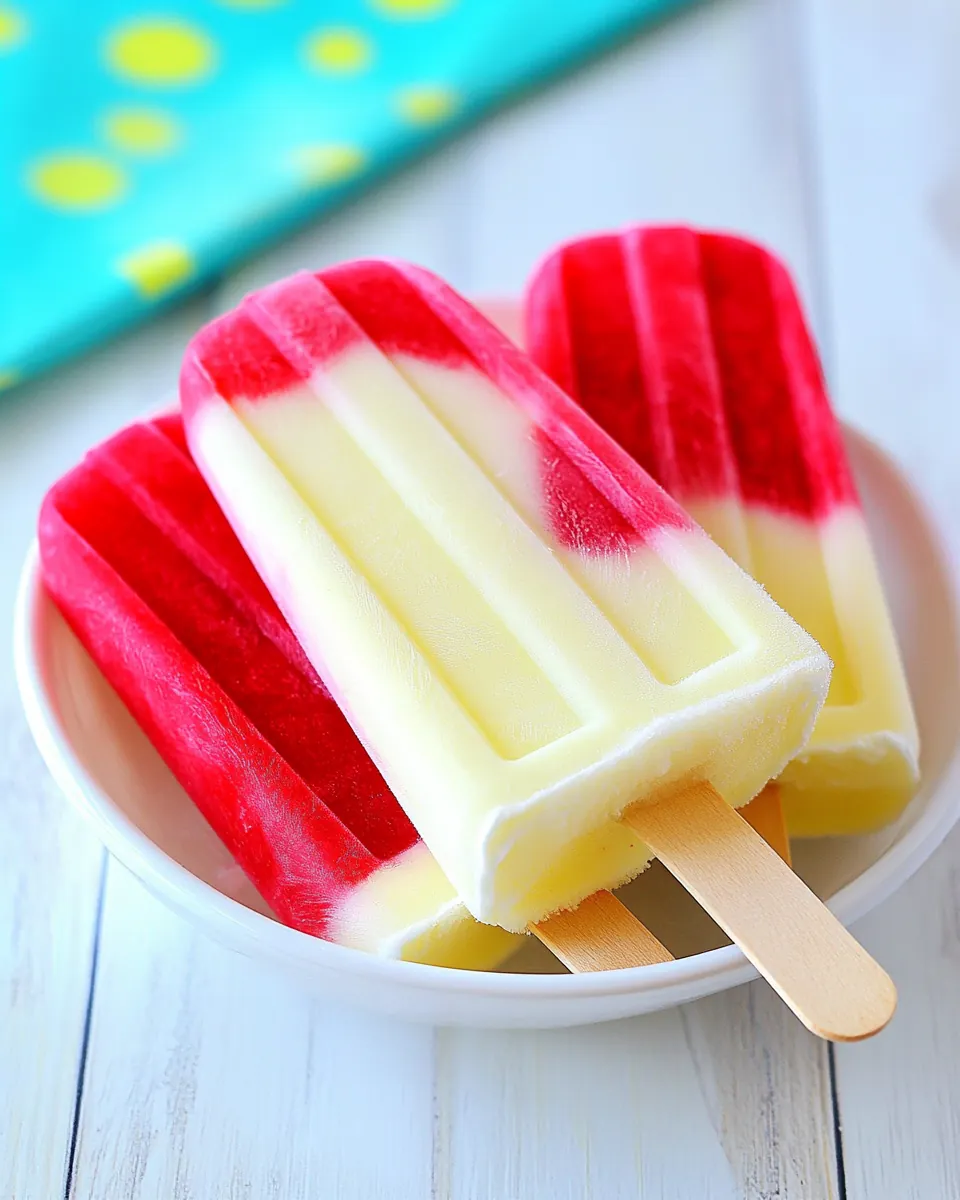
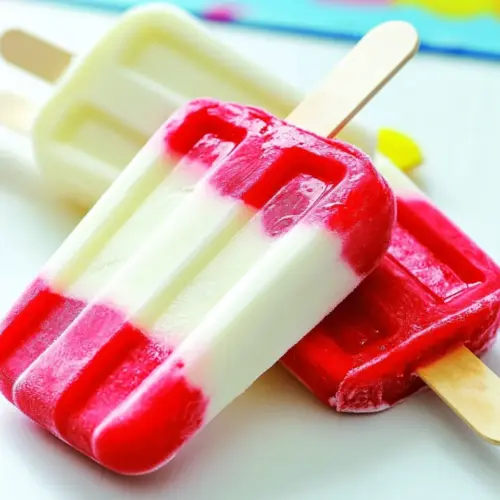
I love how Lava Flow Homemade Popsicles look in the freezer, with the bright strawberry red layered against creamy white piña colada tones. The contrast makes them feel special, even if you are only whipping them up for an ordinary afternoon.
Fresh fruit forward flavor
We get real fruit flavor here. Using whole strawberries, pineapple, and banana means the sweetness is natural and bright, not cloying. I always prefer the way fresh fruit tastes compared with bottled mixes, and you can really taste the difference.
Simple, pantry friendly technique
This recipe trusts your blender and basic molds, so you can make it without hunting down special tools. I like that you can riff on quantities, but the method remains straightforward, so it is approachable for cooks of any level.
Flexible for dietary needs
The inclusion of coconut milk gives creamy body without dairy, which I find makes these popsicles a friendly option for people avoiding milk. I also appreciate that the optional honey lets you nudge sweetness without overpowering the fruit.
Great for gatherings
These are fun to bring to a picnic or to keep on hand for hot afternoons. They look festive and are easy to double or triple, which is a plus when I have neighbors popping by.
Ingredients Required for Lava Flow Homemade Popsicles
These ingredients are chosen to balance bright acidity, tropical creaminess, and natural sweetness. The strawberries provide a vivid color and tartness, while the pineapple and banana build body and tropical flavor. The coconut milk ties everything together with a silky mouthfeel, and the optional honey lets you calibrate sweetness without masking fruit nuances.
- 1 cup fresh or frozen strawberries: Adds bright, sweet-tart flavor and natural color; purées smoothly for a vibrant red base. Provides antioxidants and a fresh aroma that balances the creaminess of coconut milk.
- 1 1/2 cups fresh, canned, or frozen cubed pineapple: Provides tropical sweetness and juicy texture when blended; delivers a milder acidity that complements strawberries. Adds body and natural sugars to help create a slushy, refreshing middle layer.
- 1 cup full-fat coconut milk: Contributes rich, creamy texture and subtle coconut flavor to create a silky white layer; stabilizes frozen popsicles for a smooth mouthfeel. Supplies healthy fats that prevent icy crystals and enhance richness.
- 1 ripe fresh or frozen banana: Imparts natural sweetness and creamy consistency when mashed or blended; helps bind and thicken the coconut layer for a smooth finish. Adds potassium and a mellow banana flavor that rounds out the tropical profile.
- 1 tablespoon honey (optional): Enhances overall sweetness and balances tartness when needed; dissolves easily into purées to refine flavor. Optional use allows control over sugar level and final taste intensity.
Instructions for Lava Flow Homemade Popsicles
These instructions walk you through creating two distinct purées and layering them into molds to achieve that lava flow swirl. I like to work with chilled fruit when possible to reduce melting, and to clean the blender between purées so the colors stay distinct.
- Blitz the strawberries in a blender, and transfer the purée to a measuring cup.: The moment you blend the strawberries you will notice a bright, fragrant smell that is both sweet and slightly tart, which signals a fresh base for the lava effect. Use short pulses to break the berries down until you have a smooth but slightly textured purée that still holds color, and transfer it promptly to a measuring cup so it cools slightly. This step matters because a warm purée can melt the piña colada layer and blur the design, and a common mistake is overworking the blender which heats the fruit; stop blending as soon as it is smooth.
- Rinse the blender, and throw in the pineapple, coconut milk, and banana. (Add the honey, too, if you’re using it.) Blitz until smooth.: After rinsing the blender you will eliminate lingering red streaks so the piña colada mixture stays pristine. When you add the cubed pineapple , creamy coconut milk , and ripe banana , the aroma shifts to tropical coconut and bright pineapple, a scent I always associate with vacation. Blend until the mixture is silky and uniform, watching for a glossy sheen that shows the fruit and fat have emulsified. Poor blending leads to grainy texture or uneven freezing; if you spot chunks, pulse a few more times and scrape down the sides.
- Grab some popsicle molds and pour in a little of the strawberry purée into the bottom of each mold. Add the piña colada mixture until it reaches 3/4 of the way to the top. Add a little more strawberry purée to each mold, and then top off with the piña colada mixture.: Starting with a small amount of strawberry purée forms that vivid lava anchor at the base; visually it will look like a bright red button at the bottom of every mold. Pour carefully and use a spoon to nudge the purée into place if needed, because an even base helps the final swirl read clearly. Be mindful not to overfill at this stage, as the next layers require room to create the effect, and a frequent misstep is pouring too much strawberry which prevents proper layering.
- Gently insert the popsicle sticks and put the filled molds in the freezer. Chill for 6 hours or until solid.: As you pour the blended pineapple , coconut milk , and banana mixture, watch the texture settle into the mold with a creamy, pale tone. Filling to about three quarters lets you alternate layers for maximum visual contrast while leaving space for the final strawberry accents. The piña colada layer should feel silky and slightly thick on the spoon, indicating adequate body; if it seems watery, check fruit ratios and consider a few extra seconds of blending. A common error here is filling too cautiously and ending up with too little contrast in the layers.
- When the ice pops are frozen solid, quickly run them under hot water to loosen them from the molds. Devour immediately!: Alternating the strawberry and piña colada layers creates the lava effect, and when you drip a small bit of red back in you will see it sink slightly and create veins that look like lava flowing through cream. Finish by topping with the piña colada mix so there is a creamy cap; this helps the popsicle hold the stick upright. If you rush, the layers will blend too much, so pour slowly and let each addition settle for a beat. Avoid swirling vigorously, which eliminates the defined streaks that make the treat special.
- Gently insert the popsicle sticks and put the filled molds in the freezer. Chill for 6 hours or until solid.: When the sticks are placed the molds will start to give off a faint coconut scent as they begin to freeze; set them on a level surface so they freeze straight. The freezing time is crucial for texture, six hours is a reliable baseline though factors like freezer temperature and mold thickness can extend this; I always plan overnight for peace of mind. A typical mistake is trying to unmold too early, which results in broken or slushy popsicles, so resist the urge and allow ample time to become solid.
- When the ice pops are frozen solid, quickly run them under hot water to loosen them from the molds.: The final step rewards patience, as a quick run under warm water loosens the edges without melting the interior, producing a clean release and a satisfying snap. You will notice steam rise from the mold briefly and then the pop should slide free, unveiling the lava pattern in all its glory. Enjoy immediately for the best texture, because refreezing after partial thaw can create icier crystals. Common troubleshooting here is leaving the water too hot which softens the popsicle excessively, so use just warm water for a few seconds at the base.
How to Switch It Up
These ideas help you customize the base recipe while staying within the same simple workflow. I like to tweak texture, sweetness, and presentation depending on the season or who I am serving.
- Try different berry bases Swap strawberries for raspberries or a mixed berry blend if you want a deeper red and tangy complexity, adjusting sweetness only if needed.
- Adjust creaminess Use a bit more or less coconut milk to create firmer or silkier popsicles depending on your freezer and preference.
- Sweetness control Taste before adding the optional honey, and add in small increments to avoid oversweetening the natural fruit flavors.
- Layering technique For a marbled look, pour alternating thin streams of each purée and lift the mold gently to encourage veins without full mixing.
- Storage tip Store frozen pops in an airtight container or freezer bag, separated by parchment if stacking to prevent sticking and preserve the lava pattern.
What to Pair With Lava Flow Homemade Popsicles
These popsicles work well across casual gatherings and poolside snacks, and they pair with simple bites that complement their tropical profile. I often serve them with light finger foods and chilled drinks during warm afternoons. They are also a playful finish to a light lunch or a kid friendly treat after an outdoor activity.
- Serve with fresh fruit A small bowl of sliced melons or berries complements the fruity notes and adds variety to the plate.
- Poolside snack Bring a batch to a pool party as a refreshing palate cleanser between bites of grilled items, keeping them in a cooler until ready to serve.
- Seasonal occasion These popsicles are perfect for summer barbecues, picnics, or informal gatherings when you want something cool and easy to hand out.
- Storage advice Keep extras frozen in a single layer until fully solid, then transfer to an airtight container for up to four months as noted in the recipe notes.
- Kid friendly dessert They make a balanced sweet treat for children when you rely on the natural fruit sugars and limit added honey.
FAQ
Conclusion
Lava Flow Homemade Popsicles stand out because they combine vivid color, pure fruit flavor, and a creamy tropical base into an easy to execute frozen treat. I encourage you to try this recipe because it is forgiving, fun to make, and impressive to serve whether you are feeding family or friends. Once you taste the bright strawberry and silky coconut pairing you may find yourself making popsicles all summer long.
Lava Flow Homemade Popsicles
Equipment
- Blender
- Popsicle Molds
Ingredients
- 1 cup fresh or frozen strawberries Adds bright, sweet-tart flavor and natural color; purées smoothly for a vibrant red base. Provides antioxidants and a fresh aroma that balances the creaminess of coconut milk.
- 1 1/2 cups fresh, canned, or frozen cubed pineapple Provides tropical sweetness and juicy texture when blended; delivers a milder acidity that complements strawberries. Adds body and natural sugars to help create a slushy, refreshing middle layer.
- 1 cup full-fat coconut milk Contributes rich, creamy texture and subtle coconut flavor to create a silky white layer; stabilizes frozen popsicles for a smooth mouthfeel. Supplies healthy fats that prevent icy crystals and enhance richness.
- 1 ripe fresh or frozen banana Imparts natural sweetness and creamy consistency when mashed or blended; helps bind and thicken the coconut layer for a smooth finish. Adds potassium and a mellow banana flavor that rounds out the tropical profile.
- 1 tablespoon honey optional Enhances overall sweetness and balances tartness when needed; dissolves easily into purées to refine flavor. Optional use allows control over sugar level and final taste intensity.
Instructions
- Blitz the strawberries in a blender, and transfer the purée to a measuring cup.: The moment you blend the strawberries you will notice a bright, fragrant smell that is both sweet and slightly tart, which signals a fresh base for the lava effect. Use short pulses to break the berries down until you have a smooth but slightly textured purée that still holds color, and transfer it promptly to a measuring cup so it cools slightly. This step matters because a warm purée can melt the piña colada layer and blur the design, and a common mistake is overworking the blender which heats the fruit; stop blending as soon as it is smooth.
- Rinse the blender, and throw in the pineapple, coconut milk, and banana. (Add the honey, too, if you’re using it.) Blitz until smooth.: After rinsing the blender you will eliminate lingering red streaks so the piña colada mixture stays pristine. When you add the cubed pineapple , creamy coconut milk , and ripe banana , the aroma shifts to tropical coconut and bright pineapple, a scent I always associate with vacation. Blend until the mixture is silky and uniform, watching for a glossy sheen that shows the fruit and fat have emulsified. Poor blending leads to grainy texture or uneven freezing; if you spot chunks, pulse a few more times and scrape down the sides.
- Grab some popsicle molds and pour in a little of the strawberry purée into the bottom of each mold. Add the piña colada mixture until it reaches 3/4 of the way to the top. Add a little more strawberry purée to each mold, and then top off with the piña colada mixture.: Starting with a small amount of strawberry purée forms that vivid lava anchor at the base; visually it will look like a bright red button at the bottom of every mold. Pour carefully and use a spoon to nudge the purée into place if needed, because an even base helps the final swirl read clearly. Be mindful not to overfill at this stage, as the next layers require room to create the effect, and a frequent misstep is pouring too much strawberry which prevents proper layering.
- Gently insert the popsicle sticks and put the filled molds in the freezer. Chill for 6 hours or until solid.: As you pour the blended pineapple , coconut milk , and banana mixture, watch the texture settle into the mold with a creamy, pale tone. Filling to about three quarters lets you alternate layers for maximum visual contrast while leaving space for the final strawberry accents. The piña colada layer should feel silky and slightly thick on the spoon, indicating adequate body; if it seems watery, check fruit ratios and consider a few extra seconds of blending. A common error here is filling too cautiously and ending up with too little contrast in the layers.
- When the ice pops are frozen solid, quickly run them under hot water to loosen them from the molds. Devour immediately!: Alternating the strawberry and piña colada layers creates the lava effect, and when you drip a small bit of red back in you will see it sink slightly and create veins that look like lava flowing through cream. Finish by topping with the piña colada mix so there is a creamy cap; this helps the popsicle hold the stick upright. If you rush, the layers will blend too much, so pour slowly and let each addition settle for a beat. Avoid swirling vigorously, which eliminates the defined streaks that make the treat special.
- Gently insert the popsicle sticks and put the filled molds in the freezer. Chill for 6 hours or until solid.: When the sticks are placed the molds will start to give off a faint coconut scent as they begin to freeze; set them on a level surface so they freeze straight. The freezing time is crucial for texture, six hours is a reliable baseline though factors like freezer temperature and mold thickness can extend this; I always plan overnight for peace of mind. A typical mistake is trying to unmold too early, which results in broken or slushy popsicles, so resist the urge and allow ample time to become solid.
- When the ice pops are frozen solid, quickly run them under hot water to loosen them from the molds.: The final step rewards patience, as a quick run under warm water loosens the edges without melting the interior, producing a clean release and a satisfying snap. You will notice steam rise from the mold briefly and then the pop should slide free, unveiling the lava pattern in all its glory. Enjoy immediately for the best texture, because refreezing after partial thaw can create icier crystals. Common troubleshooting here is leaving the water too hot which softens the popsicle excessively, so use just warm water for a few seconds at the base.
Notes
- Try different berry bases Swap strawberries for raspberries or a mixed berry blend if you want a deeper red and tangy complexity, adjusting sweetness only if needed.
- Adjust creaminess Use a bit more or less coconut milk to create firmer or silkier popsicles depending on your freezer and preference.
- Sweetness control Taste before adding the optional honey, and add in small increments to avoid oversweetening the natural fruit flavors.
- Layering technique For a marbled look, pour alternating thin streams of each purée and lift the mold gently to encourage veins without full mixing.
- Storage tip Store frozen pops in an airtight container or freezer bag, separated by parchment if stacking to prevent sticking and preserve the lava pattern.