Instant Pot Chicken Taco Chili
Instant Pot Chicken Taco Chili is one of those recipes I turn to when the week has been relentless and I need something that feels like a hug in a bowl. The very first time I made it I was juggling groceries, a ringing phone, and a hungry teenager, but the pressure cooker handled the heavy lifting while I caught my breath. The cozy spice blend and the way the chicken shreds into tender ribbons convinced everyone at the table that takeout was no longer necessary.
Over the years I have tweaked the balance between smoky and bright, learning how the acidity of diced tomatoes with chilies lifts the savory depth of beans and chicken. I love that this version plays well with simple pantry staples and frozen corn, which means it becomes a lifesaver on nights when time is short. Each spoonful has a little crunch from the corn and a gentle warmth from the chili powder, and the fresh cilantro on top gives a final note that makes people ask for seconds.
Recipe Snapshot
30 mins
5 mins
25 mins
Medium
350 kcal
Mexican
Gluten-Free, Low FODMAP
Dinner
Instant Pot, Wooden spoon, Two forks
What We Adore About This Instant Pot Chicken Taco Chili
Hearty One Pot Comfort
I adore how Instant Pot Chicken Taco Chili turns a handful of cans and a few fresh items into a deeply comforting meal. The combination of multiple beans and chicken yields a robust, hearty bowl that satisfies in a way simple soups cannot. I find it becomes a family favorite fast, and you can feel the substance in every spoonful.
Speed without Compromise
I often need dinner quickly, and this recipe proves pressure cooking can deliver complex flavors in a short time. The high pressure braise allows the chicken to absorb the spice blend while keeping the broth thick and rich. I appreciate that you don’t sacrifice depth for convenience.
Pantry Friendly and Flexible
I keep cans of beans, tomato sauce, and a box of taco seasoning on hand, so this dish is a natural pivot when my plan changes. You can rely on versatile staples to build a satisfying meal, which is a relief on busy days. The frozen corn is a small detail that adds sweetness and texture, and it’s often what makes the bowl feel complete.
Balanced Texture and Flavor
I love the way creamy beans, tender shredded chicken, and juicy tomatoes interact. The cumin and chili powder give an earthy backbone while the paprika and garlic powder add subtle warmth. Fresh cilantro sprinkled at the end brightens each bite and keeps the chili from feeling heavy, which is a trick I always use.
Easy to Scale and Serve
I make large batches when guests come, because this fills a pot fast and feeds many. It reheats beautifully and actually tastes better the next day as flavors meld. That makes it ideal for meal prep, potlucks, or weeknight dinners when I want more time with my family and less time cooking.
Shopping List for Instant Pot Chicken Taco Chili
These ingredients form a simple, balanced lineup that supports bold, layered flavor. I think of the beans and chicken as the foundation, the tomatoes and corn as the body, and the spices as the voice that brings the whole dish together. Each component plays a clear role, so the chili is both comforting and lively.
- olive oil spray: Coat the Instant Pot lightly to prevent sticking and ensure even browning when sautéing aromatics; provides a nonstick surface without adding heavy oil. Use a quick spray before heating to maintain a cleaner pot and reduce excess fat in the final chili.
- 1 small onion, chopped: Sauté until translucent to build a savory base and release natural sweetness; provides texture and aromatic depth to the chili. Chop finely to distribute flavor evenly and allow rapid cooking under pressure.
- 115.5 oz can black beans, not drained: Add with juices to supply hearty texture, fiber, and a creamy mouthfeel; contributes protein and a mild earthy flavor that complements spices. Use the can liquid to help generate cooking liquid for the Instant Pot and prevent burning.
- 115.5 oz can kidney beans, not drained: Add with juices to increase bulk, protein, and a robust bean presence; brings a complementary texture to the black beans for a balanced chili. Include the can liquid to boost seasoning distribution and maintain moisture during pressure cooking.
- 18 oz can tomato sauce: Stir in to create a smooth, tomatoey base that binds ingredients and adds acidity; intensifies the chili's richness without chunks. Choose the 18-ounce size to achieve the proper sauce-to-solids ratio for Instant Pot cooking.
- 10 oz package frozen corn kernels: Fold in frozen to contribute bursts of sweetness, color, and a crisp-tender texture after pressure release; helps balance savory and spicy flavors. Add directly from frozen to simplify prep and retain kernel integrity.
- 210 oz can diced tomatoes w/chilies, (Rotel): Pour in with juices to introduce zesty tomato pieces and jalapeño heat for complexity; Rotel lends bright acidity and a mild kick that livens the chili. Use the full can to ensure even distribution of heat and flavor across the pot.
- 24 oz boneless skinless chicken breasts, from 3 breasts: Place whole breasts in the pot to provide lean protein and substantial body; they will shred easily after pressure cooking and absorb surrounding seasonings. Use boneless, skinless pieces for quick cooking and minimal cleanup.
- 4 ounce can chopped green chili peppers: Stir in to deliver concentrated green chile flavor and mild heat; chopped peppers add tanginess and Southwestern character. Drain lightly or add with liquid depending on desired spice intensity.
- 1/4 cup chopped fresh cilantro: Sprinkle over at the end to add a fresh herbal finish, brightness, and subtle citrus notes; cilantro lifts the overall flavor profile. Chop just before serving to preserve color and fragrance.
- 1 packet reduced sodium taco seasoning or homemade, see below: Season to impart balanced taco-style flavors with reduced sodium for health-conscious seasoning; packet or homemade blends provide a convenient mix of spices. Adjust amount to taste, remembering pressure cooking can intensify spice.
- 1 1/2 tablespoons cumin: Measure and add to contribute warm, earthy, and slightly citrusy notes that deepen the chili's complexity; cumin is essential for authentic taco–chili flavor. Toast briefly in the pot when sautéing aromatics to release oils and aroma.
- 1 1/2 tablespoons chili powder: Sprinkle in to provide a smoky, mildly pungent heat that defines traditional chili seasoning; chili powder layers heat and color. Combine with cumin for a rounded, robust taco–chili spice base.
- 1/4 teaspoon garlic powder: Dust lightly to add concentrated garlic flavor and savory depth without the texture of fresh garlic; useful when a subtle, even garlic presence is preferred. Incorporate early so it hydrates and melds with other spices.
- 1/4 teaspoon onion powder: Dust lightly to supplement onion flavor when extra layering is needed, enhancing savory background notes; pairs well with fresh onion for continuity. Use sparingly to avoid overpowering freshly chopped aromatics.
- 1/4 teaspoon dried oregano: Sprinkle to deliver herbal, slightly bitter Mediterranean notes that complement tomato-based dishes; dried oregano adds a classic chili herbaceousness. Add during cooking to allow flavors to infuse the broth.
- 1/2 teaspoon paprika: Dust in to contribute mild smokiness and color, enhancing visual appeal and rounded flavor; paprika supports the chili’s depth without significant heat. Choose sweet or smoked paprika depending on desired smokiness.
- 1 teaspoon kosher salt: Season to bring out and balance flavors while enhancing savory components; kosher salt helps proteins and vegetables release moisture and intensify taste. Adjust to preference, keeping in mind other salty ingredients like canned beans.
- 1/2 teaspoon black pepper: Season to add sharp, pungent heat and a background bite that lifts the overall profile; freshly ground black pepper brightens and balances richer flavors. Add before serving or during cooking for integrated warmth.
Preparation Steps for Instant Pot Chicken Taco Chili
I like to walk through these steps like a rhythm, moving from saut e9 to pressure cook with clear pauses to check aroma and texture. Each stage builds flavor, so pay attention to sensory cues and resist the urge to rush. Below are the directions rewritten into detailed, personal steps to guide you confidently.
- Press saute and spray the insert with oil, add the onion and stir, cooking until soft and golden, about 4 to 5 minutes.: The moment the insert heats, you should hear a gentle sizzle when the onion hits the surface, and a sweet, caramelizing scent will fill the kitchen, signaling Maillard reactions are taking place. As the onion softens, its color will shift from opaque white to translucent, then to pale gold at the edges; that golden fringe is your cue to move on. This step develops foundational flavor, because properly caramelized onion contributes sweetness and complexity that underpins the whole chili. Stir occasionally to ensure even browning, and scrape the bottom to dissolve any flavorful browned bits. If you rush or use too high heat, the onion can char and impart bitterness, so keep a moderate heat and patience. If the pan seems to dry out, a tiny splash of water prevents sticking without diluting the pan fond.
- Press cancel to prevent getting a burn notice, then deglaze the pot with 1/4 cup water.: Right after saut e9ing, you may smell concentrated, toasty notes from the fond; that is flavor gold. Add about 1/4 cup water to the hot insert and use a wooden spoon to gently scrape any browned bits from the bottom until they dissolve into the liquid, which should take a few seconds and produce a rich, glossy sheen. Deglazing prevents the Instant Pot from misinterpreting stuck-on bits as a burn, and it reintegrates those flavors into the base. The small amount of water evaporates quickly, leaving a concentrated aroma. A frequent mistake is skipping deglazing, which can trigger a burn notice and upset the cooking schedule, so always take this short but crucial step.
- Add the chicken and season both sides with half of the taco seasoning.: When placing the raw chicken breasts into the insert, you will notice the meat sinks into the fragrant liquid and begins to accept seasoning. Sprinkle half of the packet of taco seasoning evenly across both sides so the spice rub adheres and begins to infuse the surface. The initial contact with heat will make the spices bloom, releasing aromatic oils that scent the steam as the pot comes to pressure. Properly seasoned surface helps the meat develop depth while the interior stays tender. A common mistake is piling all seasoning at once, which can lead to overly salty pockets; dividing the seasoning ensures balanced flavor throughout.
- Add the beans, corn, green chilies, then finish with the diced tomatoes and tomato sauce.: Layer the cans of beans, the frozen corn , chopped green chilies, and the diced tomatoes with chilies, topping with tomato sauce so the insert fills evenly. As you add each can, you will hear a soft, wet thump and see the colors mingle, creating a visually appealing mosaic of beans, dark kernels, and red tomato. These ingredients contribute texture contrast and body to the broth, the beans thickening it while the tomatoes supply acidity. Stir gently around the chicken so the liquids settle without disrupting the seasoned surface. Be mindful not to over-stir which can break bean skins and make the liquid excessively cloudy or pasty.
- Add 1/2 cup water plus the remaining taco seasonings and gently stir without moving the chicken.: Pour the additional water and sprinkle the remaining taco seasoning, then give the pot a gentle stir around the edges to incorporate spices into the liquid, leaving the chicken more or less in place. You should see the spices dissolve and tint the broth with a warm hue, and a fragrant steam will rise when the lid is sealed. This technique keeps the seasoned surface on the chicken somewhat intact, letting it lock in flavor before shredding. Avoid vigorous stirring which can break down the beans and cost you texture; a few careful folds are all you need to distribute spices evenly.
- Cover and cook high pressure 25 minutes. Natural release, then remove the chicken and shred with two forks. Return the chicken to the pot and mix to combine.: As the lid locks and the cooker builds pressure, you may notice a steady, low hum as steam accumulates; that is the pot sealing and work beginning. The 25 minutes at high pressure coax collagen out of the chicken fibers while melding the beans and tomatoes into a cohesive, thick broth. You will smell the spice blend intensifying through the steam valve, promising a rich finish. One thing to avoid is interrupting the pressure cycle, which can prevent the chicken from becoming tender; trust the time and keep the venting closed until the natural release phase.
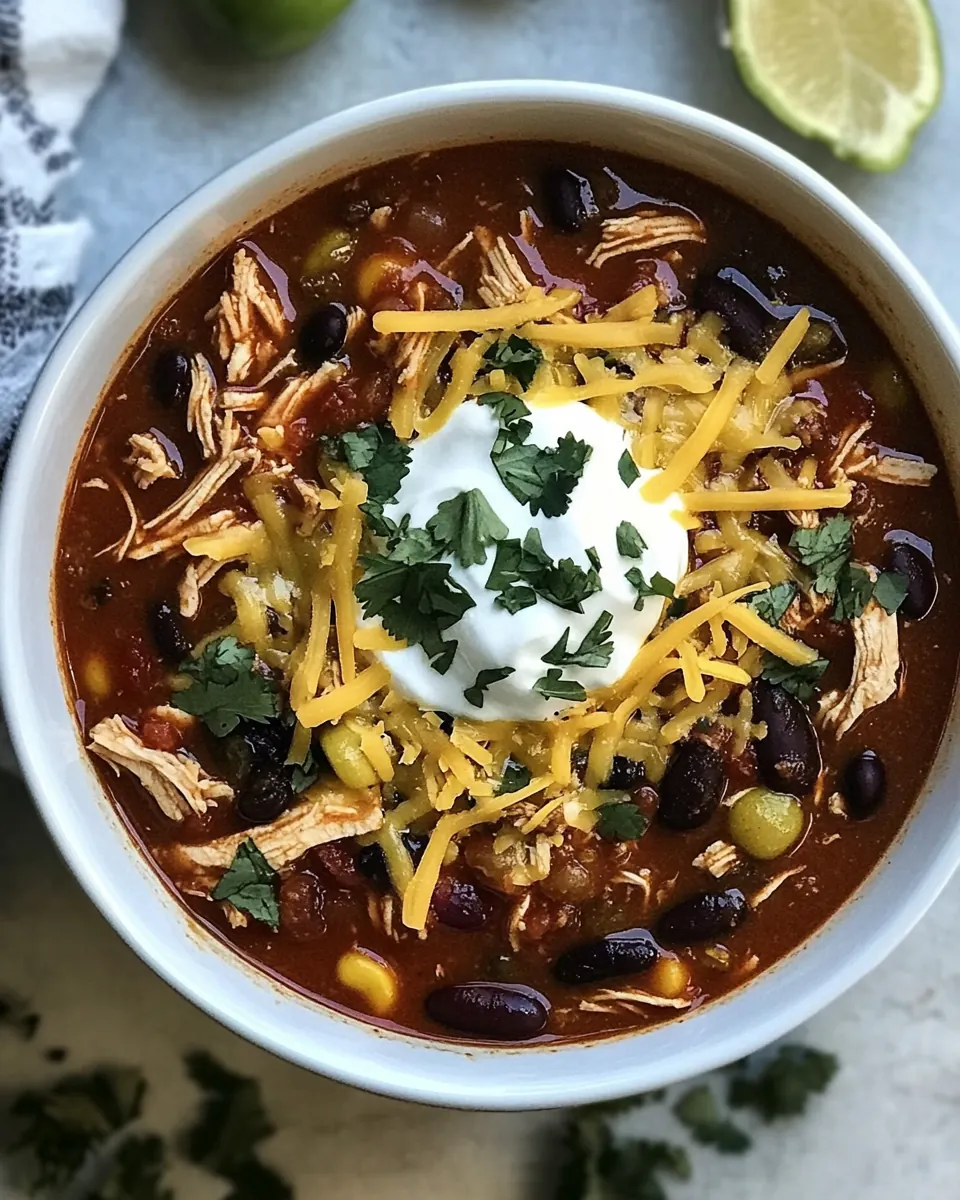
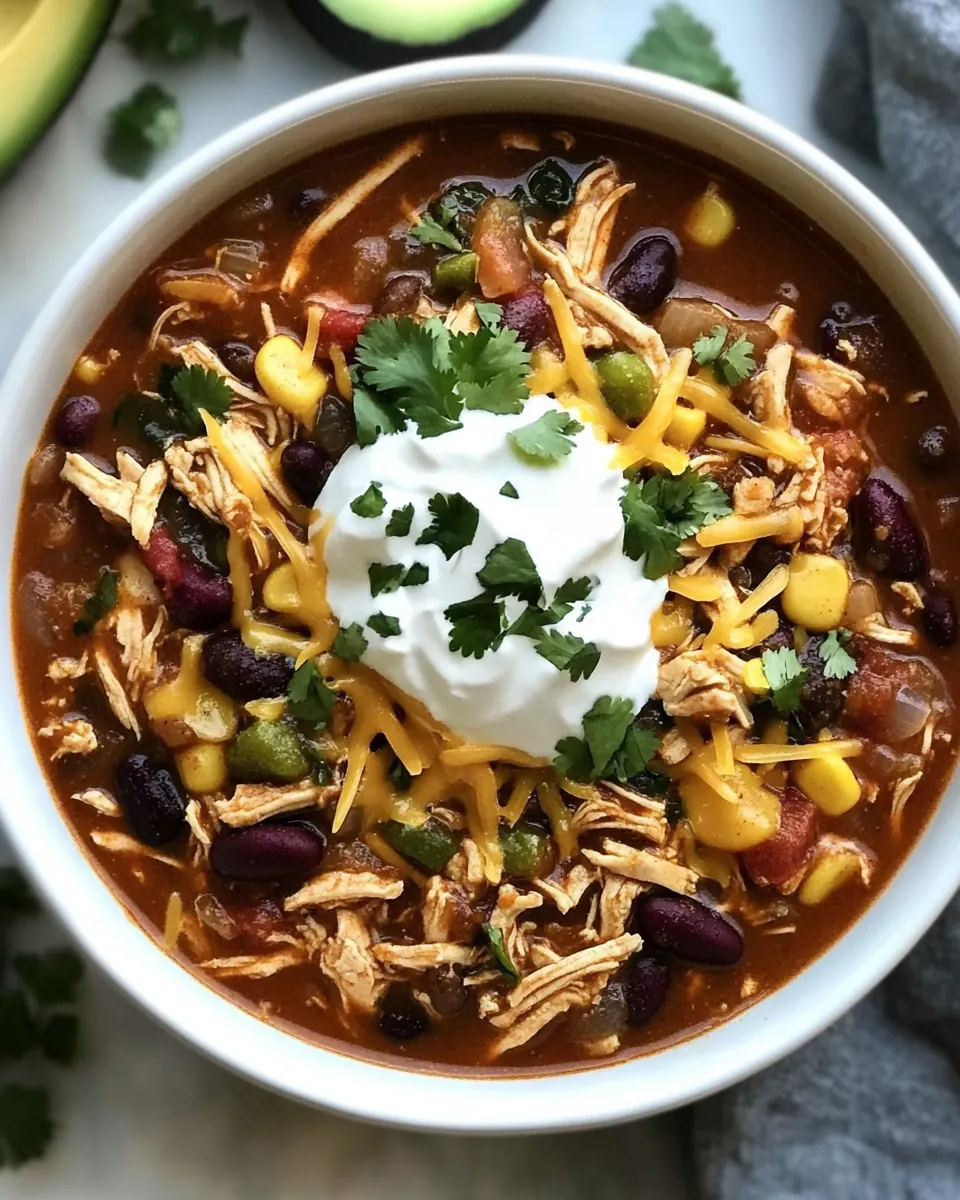
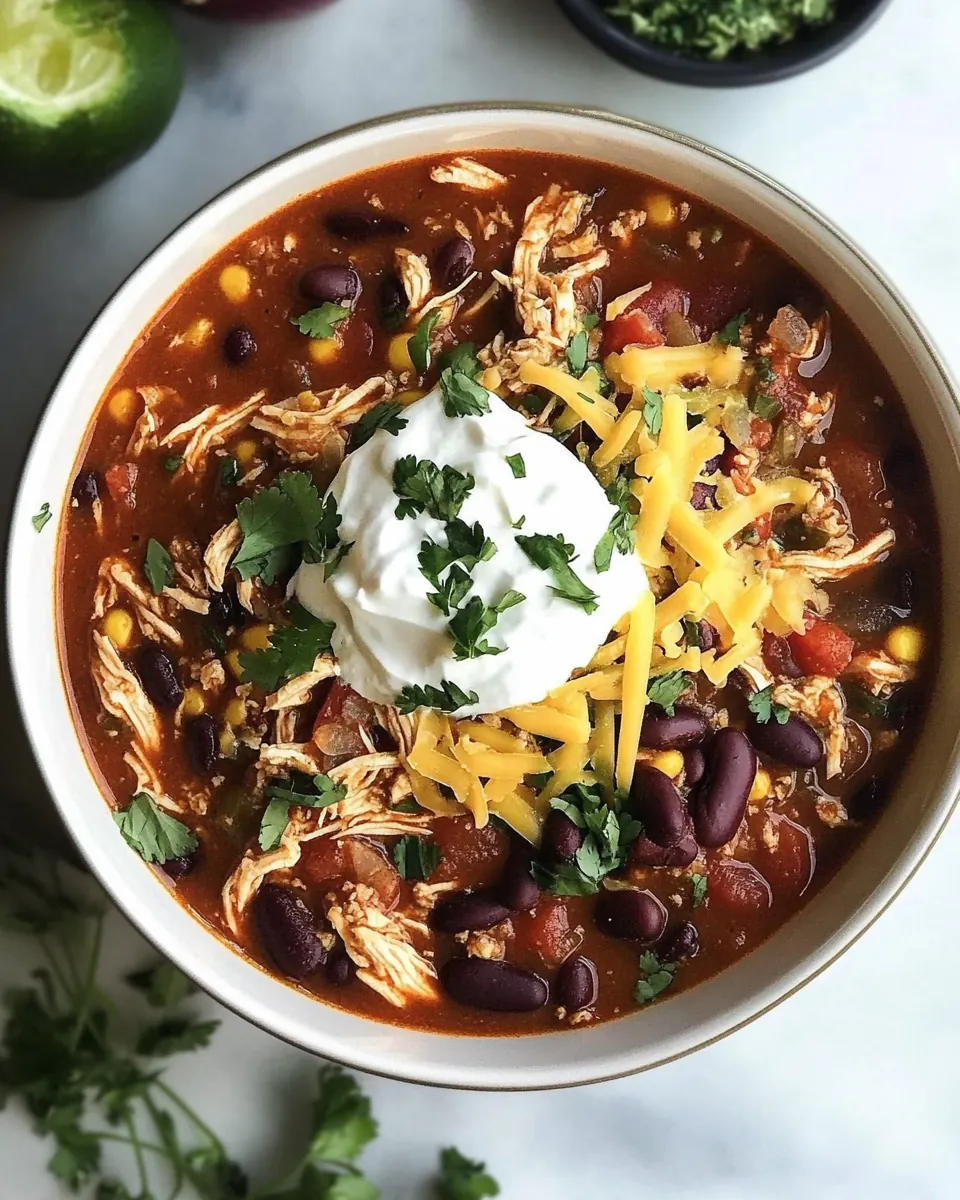
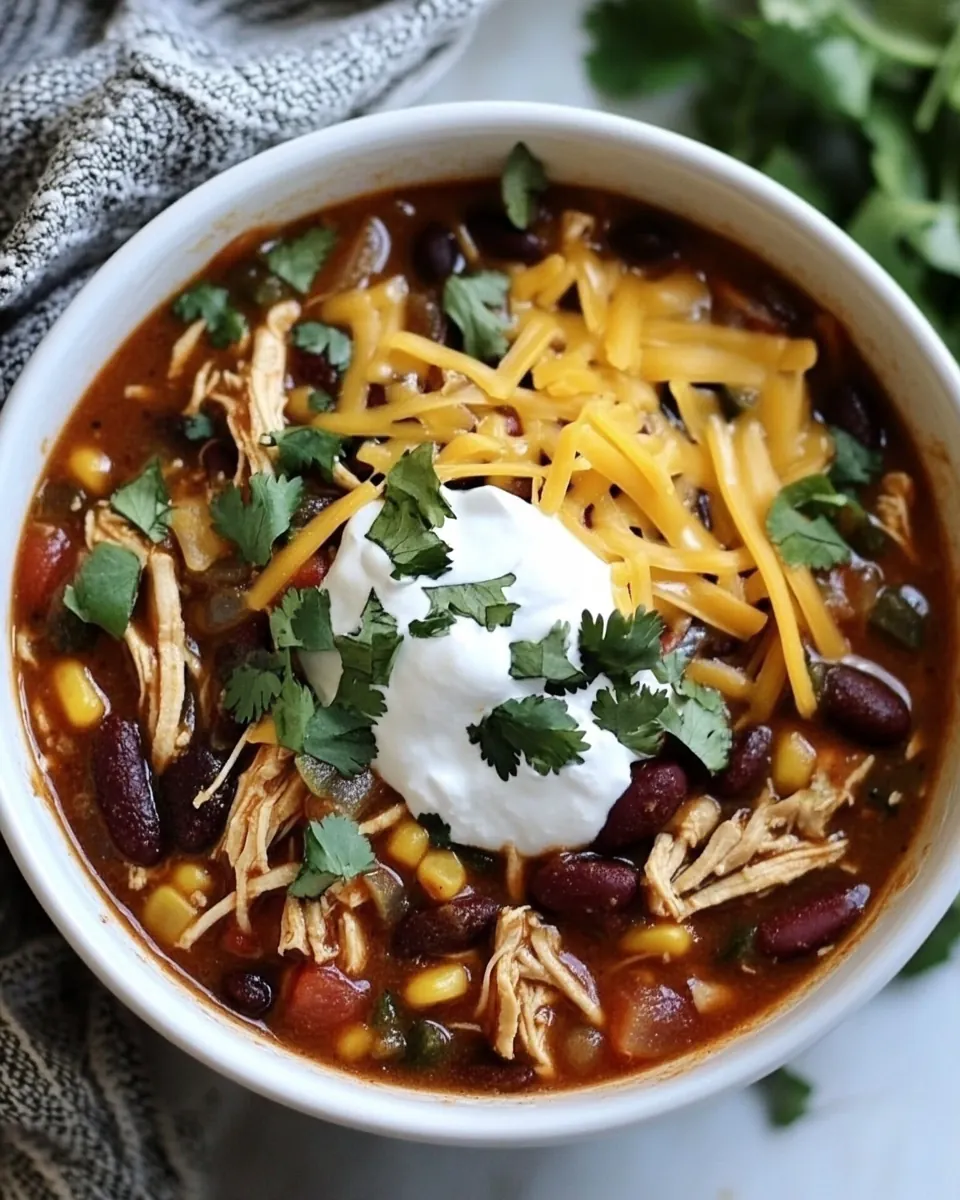
- Top with fresh cilantro and serve. Makes about 11 cups.: After the cook cycle ends, allow the pressure to release naturally so the internal temperature can equilibrate, which keeps the chicken juicy. When it is safe to open, the aroma will be deep and rounded, with the chili powder and cumin prominent. Transfer the breasts to a cutting board and use two forks to shred; the meat should fall apart easily and feel silky, not stringy. Shredding while the meat is warm helps it absorb the broth when returned. A common slip-up is shredding too early when the meat is still very hot, which can cause steam burns, so let it cool a minute before handling.
- Return the chicken to the pot and mix to combine: Once shredded, fold the chicken back into the chili, letting it soak up the seasoned liquid as you stir. You should see the strands take on color and integrate with the beans and tomatoes, creating a uniform texture. Stirring at this stage balances the flavors so every spoonful has both meat and legumes. Avoid over-mixing which can break down the beans; a few gentle turns will suffice to incorporate the chicken .
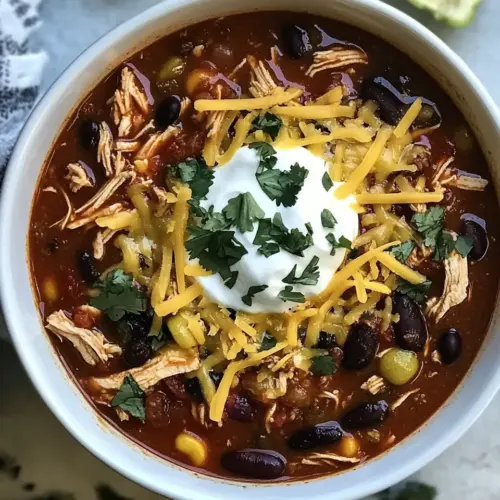
- Top with fresh cilantro and serve: Finish each bowl with a scattering of freshly chopped cilantro to add a bright herbal lift that contrasts the chili's warmth. The bright green against the deep red stew is visually appealing, and the cilantro aroma provides an immediate fresh hit when the bowl reaches the nose. Serve hot, and expect compliments. A frequent oversight is adding the cilantro too early which diminishes its vibrancy, so reserve it as a final flourish.
Ways to Adapt This Recipe
This recipe is forgiving and easy to adapt for different tastes and pantry situations. Below are practical, tested ideas to tweak heat level, texture, and presentation while staying true to the core flavors of the dish.
- Adjust the Heat Add more or less chili powder and paprika to dial in the spice to your preference, tasting the broth before serving so you control the warmth.
- Swap the Protein If you want to vary texture, use boneless thighs instead of breasts; thighs stay more succulent under pressure and offer a deeper mouthfeel.
- Make it Milder Reduce the amount of diced tomatoes with chilies or drain them slightly to temper the heat while keeping the tomato presence.
- Boost Freshness Add extra fresh cilantro at the table and a squeeze of lime if you have it, which brightens each bowl just before eating.
- Stretch the Batch Serve over rice or with warm tortillas to turn bowls into full meals for more people, letting the chili act as a hearty topping.
- Reheating Gently rewarm on the stove over low heat with a splash of water if the chili has thickened in the fridge, stirring occasionally until steaming.
What to Pair With Instant Pot Chicken Taco Chili
This chili pairs beautifully with simple sides and can adapt to many occasions, from casual weeknights to larger gatherings. Think about textures and temperature contrasts to round out the meal, and choose accompaniments that complement the bold, spiced profile.
- Warm Cornbread The slightly sweet, crumbly texture of cornbread offsets the chili‘s spiciness and soaks up the broth nicely, making it ideal for family dinners.
- Steamed Rice A bed of plain rice mellows the bold flavors and stretches the dish for extra servings, great when you are feeding a crowd or meal prepping.
- Fresh Salad A crisp green salad with a light vinaigrette provides a cooling counterpoint to the warm, savory chili, perfect for balancing the plate.
- Tortilla Chips Serve with crunchy tortilla chips for scooping and a satisfying contrast, useful for informal gatherings and game night snacking.
- Light Pickles Quick pickled onions or jalape f1os add a sharp acidic pop that cuts through richness, refreshing the palate between bites.
- Occasions This recipe works for weeknight dinners, casual potlucks, or feeding groups during fall and cooler months when hearty bowls are welcome.
- Storage Tips Refrigerate leftover chili in an airtight container for up to four days, or freeze portions for up to three months, thawing gently before reheating.
- Seasonal Pairings In autumn, serve alongside roasted seasonal vegetables to echo the warm spice notes and make the meal feel cozy and complete.
FAQ
Conclusion
This Instant Pot Chicken Taco Chili stands out for its effortless layering of bold flavors, tender shredded chicken, and satisfying beans that come together in a single, comforting pot. It’s a reliable weeknight hero and a crowd pleaser that reheats beautifully, making it ideal for meal prep and casual entertaining. Give it a try on a busy evening and watch how quickly it becomes a staple in your rotation, offering warmth, texture, and balanced spice with very little hands on time.
Instant Pot Chicken Taco Chili
Equipment
- Instant Pot
- Wooden Spoon
- Two forks
Ingredients
- olive oil spray Coat the Instant Pot lightly to prevent sticking and ensure even browning when sautéing aromatics; provides a nonstick surface without adding heavy oil. Use a quick spray before heating to maintain a cleaner pot and reduce excess fat in the final chili.
- 1 small onion, chopped Sauté until translucent to build a savory base and release natural sweetness; provides texture and aromatic depth to the chili. Chop finely to distribute flavor evenly and allow rapid cooking under pressure.
- 115.5 oz can black beans, not drained Add with juices to supply hearty texture, fiber, and a creamy mouthfeel; contributes protein and a mild earthy flavor that complements spices. Use the can liquid to help generate cooking liquid for the Instant Pot and prevent burning.
- 115.5 oz can kidney beans, not drained Add with juices to increase bulk, protein, and a robust bean presence; brings a complementary texture to the black beans for a balanced chili. Include the can liquid to boost seasoning distribution and maintain moisture during pressure cooking.
- 18 -oz can tomato sauce Stir in to create a smooth, tomatoey base that binds ingredients and adds acidity; intensifies the chili's richness without chunks. Choose the 18-ounce size to achieve the proper sauce-to-solids ratio for Instant Pot cooking.
- 10 oz package frozen corn kernels Fold in frozen to contribute bursts of sweetness, color, and a crisp-tender texture after pressure release; helps balance savory and spicy flavors. Add directly from frozen to simplify prep and retain kernel integrity.
- 210 oz can diced tomatoes w/chilies, (Rotel) Pour in with juices to introduce zesty tomato pieces and jalapeño heat for complexity; Rotel lends bright acidity and a mild kick that livens the chili. Use the full can to ensure even distribution of heat and flavor across the pot.
- 24 oz boneless skinless chicken breasts, from 3 breasts Place whole breasts in the pot to provide lean protein and substantial body; they will shred easily after pressure cooking and absorb surrounding seasonings. Use boneless, skinless pieces for quick cooking and minimal cleanup.
- 4 ounce can chopped green chili peppers Stir in to deliver concentrated green chile flavor and mild heat; chopped peppers add tanginess and Southwestern character. Drain lightly or add with liquid depending on desired spice intensity.
- 1/4 cup chopped fresh cilantro Sprinkle over at the end to add a fresh herbal finish, brightness, and subtle citrus notes; cilantro lifts the overall flavor profile. Chop just before serving to preserve color and fragrance.
- 1 packet reduced sodium taco seasoning or homemade, see below Season to impart balanced taco-style flavors with reduced sodium for health-conscious seasoning; packet or homemade blends provide a convenient mix of spices. Adjust amount to taste, remembering pressure cooking can intensify spice.
- 1 1/2 tablespoons cumin Measure and add to contribute warm, earthy, and slightly citrusy notes that deepen the chili's complexity; cumin is essential for authentic taco-chili flavor. Toast briefly in the pot when sautéing aromatics to release oils and aroma.
- 1 1/2 tablespoons chili powder Sprinkle in to provide a smoky, mildly pungent heat that defines traditional chili seasoning; chili powder layers heat and color. Combine with cumin for a rounded, robust taco-chili spice base.
- 1/4 teaspoon garlic powder Dust lightly to add concentrated garlic flavor and savory depth without the texture of fresh garlic; useful when a subtle, even garlic presence is preferred. Incorporate early so it hydrates and melds with other spices.
- 1/4 teaspoon onion powder Dust lightly to supplement onion flavor when extra layering is needed, enhancing savory background notes; pairs well with fresh onion for continuity. Use sparingly to avoid overpowering freshly chopped aromatics.
- 1/4 teaspoon dried oregano Sprinkle to deliver herbal, slightly bitter Mediterranean notes that complement tomato-based dishes; dried oregano adds a classic chili herbaceousness. Add during cooking to allow flavors to infuse the broth.
- 1/2 teaspoon paprika Dust in to contribute mild smokiness and color, enhancing visual appeal and rounded flavor; paprika supports the chili’s depth without significant heat. Choose sweet or smoked paprika depending on desired smokiness.
- 1 teaspoon kosher salt Season to bring out and balance flavors while enhancing savory components; kosher salt helps proteins and vegetables release moisture and intensify taste. Adjust to preference, keeping in mind other salty ingredients like canned beans.
- 1/2 teaspoon black pepper Season to add sharp, pungent heat and a background bite that lifts the overall profile; freshly ground black pepper brightens and balances richer flavors. Add before serving or during cooking for integrated warmth.
Instructions
- Press saute and spray the insert with oil, add the onion and stir, cooking until soft and golden, about 4 to 5 minutes.: The moment the insert heats, you should hear a gentle sizzle when the onion hits the surface, and a sweet, caramelizing scent will fill the kitchen, signaling Maillard reactions are taking place. As the onion softens, its color will shift from opaque white to translucent, then to pale gold at the edges; that golden fringe is your cue to move on. This step develops foundational flavor, because properly caramelized onion contributes sweetness and complexity that underpins the whole chili. Stir occasionally to ensure even browning, and scrape the bottom to dissolve any flavorful browned bits. If you rush or use too high heat, the onion can char and impart bitterness, so keep a moderate heat and patience. If the pan seems to dry out, a tiny splash of water prevents sticking without diluting the pan fond.
- Press cancel to prevent getting a burn notice, then deglaze the pot with 1/4 cup water.: Right after saut e9ing, you may smell concentrated, toasty notes from the fond; that is flavor gold. Add about 1/4 cup water to the hot insert and use a wooden spoon to gently scrape any browned bits from the bottom until they dissolve into the liquid, which should take a few seconds and produce a rich, glossy sheen. Deglazing prevents the Instant Pot from misinterpreting stuck-on bits as a burn, and it reintegrates those flavors into the base. The small amount of water evaporates quickly, leaving a concentrated aroma. A frequent mistake is skipping deglazing, which can trigger a burn notice and upset the cooking schedule, so always take this short but crucial step.
- Add the chicken and season both sides with half of the taco seasoning.: When placing the raw chicken breasts into the insert, you will notice the meat sinks into the fragrant liquid and begins to accept seasoning. Sprinkle half of the packet of taco seasoning evenly across both sides so the spice rub adheres and begins to infuse the surface. The initial contact with heat will make the spices bloom, releasing aromatic oils that scent the steam as the pot comes to pressure. Properly seasoned surface helps the meat develop depth while the interior stays tender. A common mistake is piling all seasoning at once, which can lead to overly salty pockets; dividing the seasoning ensures balanced flavor throughout.
- Add the beans, corn, green chilies, then finish with the diced tomatoes and tomato sauce.: Layer the cans of beans, the frozen corn , chopped green chilies, and the diced tomatoes with chilies, topping with tomato sauce so the insert fills evenly. As you add each can, you will hear a soft, wet thump and see the colors mingle, creating a visually appealing mosaic of beans, dark kernels, and red tomato. These ingredients contribute texture contrast and body to the broth, the beans thickening it while the tomatoes supply acidity. Stir gently around the chicken so the liquids settle without disrupting the seasoned surface. Be mindful not to over-stir which can break bean skins and make the liquid excessively cloudy or pasty.
- Add 1/2 cup water plus the remaining taco seasonings and gently stir without moving the chicken.: Pour the additional water and sprinkle the remaining taco seasoning, then give the pot a gentle stir around the edges to incorporate spices into the liquid, leaving the chicken more or less in place. You should see the spices dissolve and tint the broth with a warm hue, and a fragrant steam will rise when the lid is sealed. This technique keeps the seasoned surface on the chicken somewhat intact, letting it lock in flavor before shredding. Avoid vigorous stirring which can break down the beans and cost you texture; a few careful folds are all you need to distribute spices evenly.
- Cover and cook high pressure 25 minutes. Natural release, then remove the chicken and shred with two forks. Return the chicken to the pot and mix to combine.: As the lid locks and the cooker builds pressure, you may notice a steady, low hum as steam accumulates; that is the pot sealing and work beginning. The 25 minutes at high pressure coax collagen out of the chicken fibers while melding the beans and tomatoes into a cohesive, thick broth. You will smell the spice blend intensifying through the steam valve, promising a rich finish. One thing to avoid is interrupting the pressure cycle, which can prevent the chicken from becoming tender; trust the time and keep the venting closed until the natural release phase.
- Top with fresh cilantro and serve. Makes about 11 cups.: After the cook cycle ends, allow the pressure to release naturally so the internal temperature can equilibrate, which keeps the chicken juicy. When it is safe to open, the aroma will be deep and rounded, with the chili powder and cumin prominent. Transfer the breasts to a cutting board and use two forks to shred; the meat should fall apart easily and feel silky, not stringy. Shredding while the meat is warm helps it absorb the broth when returned. A common slip-up is shredding too early when the meat is still very hot, which can cause steam burns, so let it cool a minute before handling.
- Return the chicken to the pot and mix to combine: Once shredded, fold the chicken back into the chili, letting it soak up the seasoned liquid as you stir. You should see the strands take on color and integrate with the beans and tomatoes, creating a uniform texture. Stirring at this stage balances the flavors so every spoonful has both meat and legumes. Avoid over-mixing which can break down the beans; a few gentle turns will suffice to incorporate the chicken .
- Top with fresh cilantro and serve: Finish each bowl with a scattering of freshly chopped cilantro to add a bright herbal lift that contrasts the chili's warmth. The bright green against the deep red stew is visually appealing, and the cilantro aroma provides an immediate fresh hit when the bowl reaches the nose. Serve hot, and expect compliments. A frequent oversight is adding the cilantro too early which diminishes its vibrancy, so reserve it as a final flourish.
Notes
- Adjust the Heat Add more or less chili powder and paprika to dial in the spice to your preference, tasting the broth before serving so you control the warmth.
- Swap the Protein If you want to vary texture, use boneless thighs instead of breasts; thighs stay more succulent under pressure and offer a deeper mouthfeel.
- Make it Milder Reduce the amount of diced tomatoes with chilies or drain them slightly to temper the heat while keeping the tomato presence.
- Boost Freshness Add extra fresh cilantro at the table and a squeeze of lime if you have it, which brightens each bowl just before eating.
- Stretch the Batch Serve over rice or with warm tortillas to turn bowls into full meals for more people, letting the chili act as a hearty topping.
- Reheating Gently rewarm on the stove over low heat with a splash of water if the chili has thickened in the fridge, stirring occasionally until steaming.