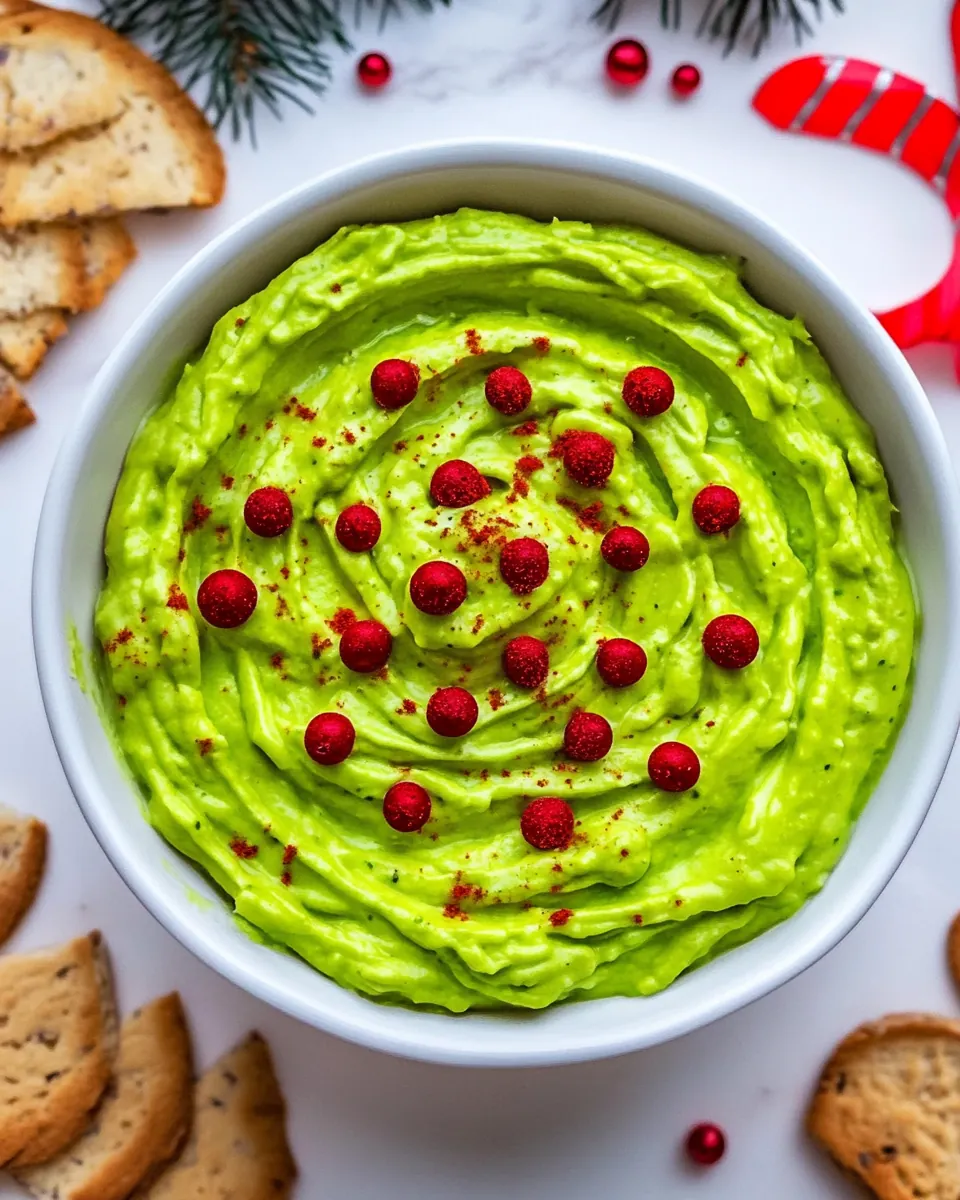
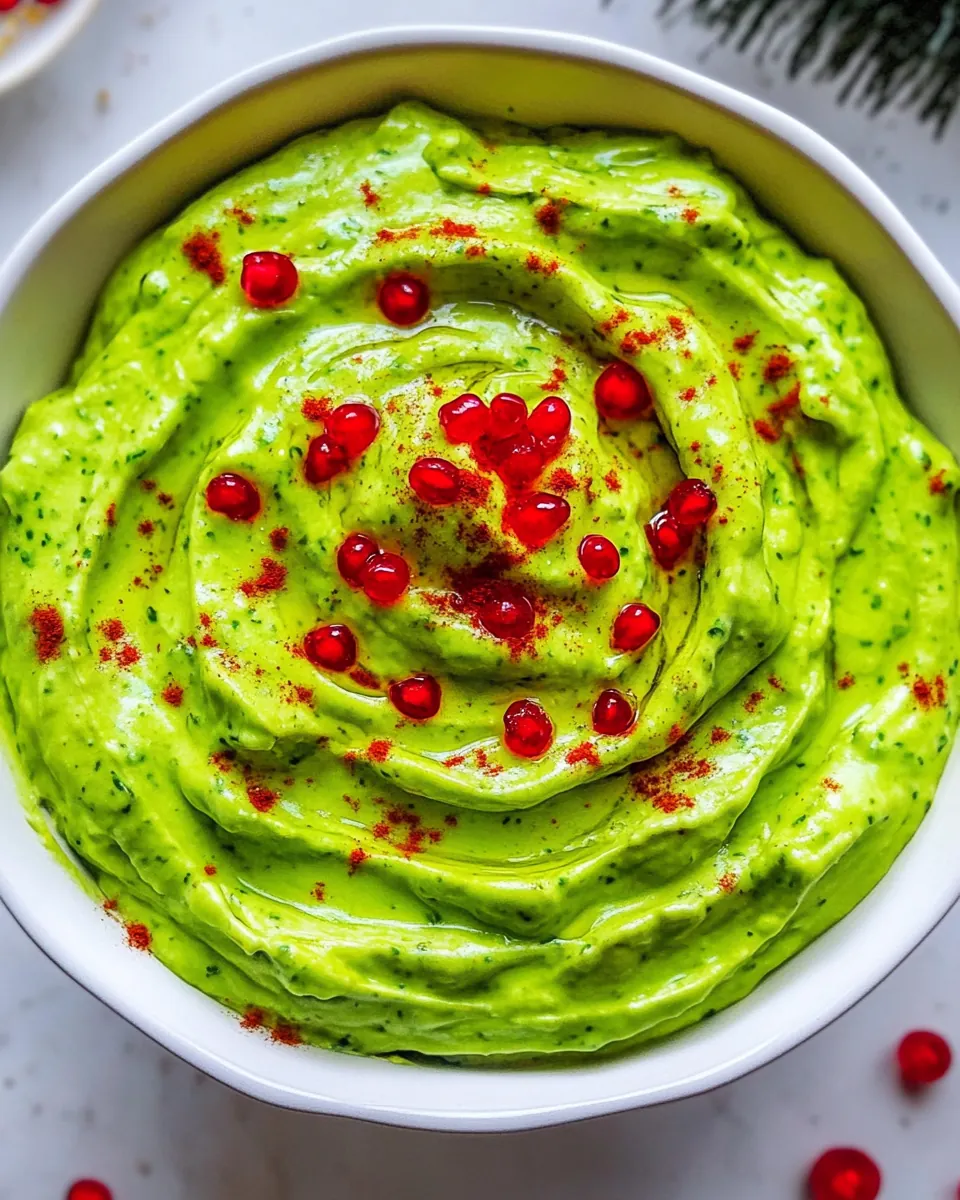
Grinch Dip
Grinch Dip started as something fun I threw together late one December when I wanted a festive, silly snack that would make guests smile before dessert. I remember opening the pantry, seeing a lonely box of white cake mix, and thinking about how a bright green dip studded with red sprinkles would be the perfect playful centerpiece for a holiday cookie platter. That first bowl vanished faster than I expected, and from then on I began tweaking textures and colors until it felt just right.
Over the years I have brought Grinch Dip to neighborhood parties and small family gatherings, and each time I watch people dip cookies and laugh at the color before taking a bite. There is something comforting about a recipe that looks like party mischief but tastes like familiar sweetness, and I like that it asks for minimal effort while rewarding you with a crowd pleasing reaction. When I make it now I often think about the first time I served it to a skeptical friend who then asked for the recipe twice in one evening.
Recipe Snapshot
6 mins
5 mins
1 mins
Easy
150 kcal
American
Gluten-Free, AIP
Desserts
Oven, Baking sheet, Parchment paper, Large bowl, Hand mixer, Spatula
The Magic of This Grinch Dip
I love how fun it looks
The first reason I adore Grinch Dip is that it is unapologetically festive. That vivid green grabs attention, and when you top it with bright red heart sprinkles it becomes a conversation starter, every single time. I find that visual appeal gets people to taste before they even know what it is, which is a delightful little trick when you want to add whimsy to a cookie tray.
It is incredibly simple to pull together
We are talking pantry friendly components that most of us already have or can grab quickly. I appreciate recipes that respect busy schedules, and this one comes together in minutes with only a few bowls and a hand mixer. Because of that, I often make it the morning of a party and still have plenty of time for last minute prep.
The texture is addictively creamy
The combination of container whipped topping and cake mix creates a dip that is fluffy yet substantial enough to cling to cookies. I like the balance between lightness and body, it lets the dip coat each bite without sliding off, and the mouthfeel is pleasingly smooth. When I serve it, people comment on how it feels like a dessert spread and a frosting at once.
It is easy to customize
You can nudge the flavor subtly by using pudding or yogurt, and the color can be dialed from pale mint to neon Grinch green. I enjoy experimenting with those small variations depending on the occasion, and each tweak changes the personality of the dip without complicating the process. That flexibility means the recipe works for casual cookie nights and for holiday dessert tables alike.
Perfect for sharing and dipping
I particularly love how communal Grinch Dip makes a snack spread feel. Place it in the center with an assortment of cookies and people will naturally gather, trade recommendations, and sample a little of everything. I have found it encourages relaxed mingling, which is exactly what I want when hosting.
Ingredient List for Grinch Dip
These ingredients are playful and pantry friendly, and they work together to build a dip that is bright, fluffy, and sweet. The key players are the white cake mix, which provides structure and slightly cakey flavor, and the whipped topping, which brings cloud like lightness. The vanilla pudding or yogurt smooths the texture and adds creaminess, while the food coloring and sprinkles deliver the signature holiday look.
- 1 (15.25-ounce) box white cake mix: Provides structure and sweetness as the base dry ingredient; contains flour and sugar that help absorb moisture and give the dip a cake-miken texture when mixed with wet components. Enhances flavor and contributes to a slightly cakey mouthfeel that balances the creamy elements. Helps thicken the mixture so the dip holds shape for scooping or spreading.
- 1 (8-ounce) container whipped topping thawed: Adds light, airy creaminess and volume to create a fluffy, dessert-like consistency; whipped topping lends a smooth, cool texture that contrasts with denser components. Helps incorporate air so the dip feels lighter on the palate and stays scoopable. Contributes subtle sweetness without overpowering other flavors.
- 3/4 cup vanilla pudding or yogurt: Provides creamy body and vanilla flavor while adding moisture and a smooth mouthfeel; can be used as instant pudding or yogurt depending on preferred tang and texture. Helps bind dry ingredients and stabilize the dip so it holds together well. Delivers vanilla notes that complement the cake mix and whipped topping.
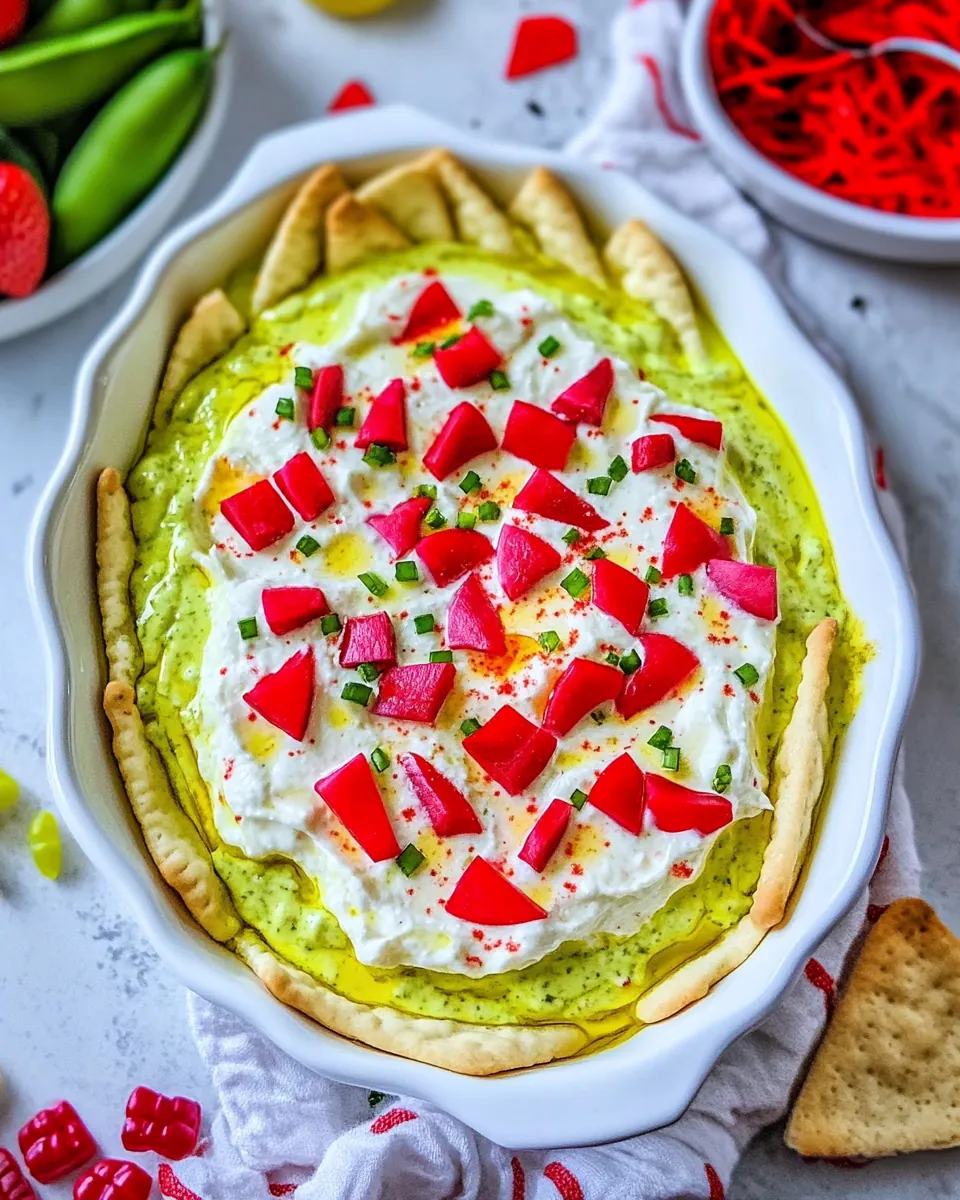
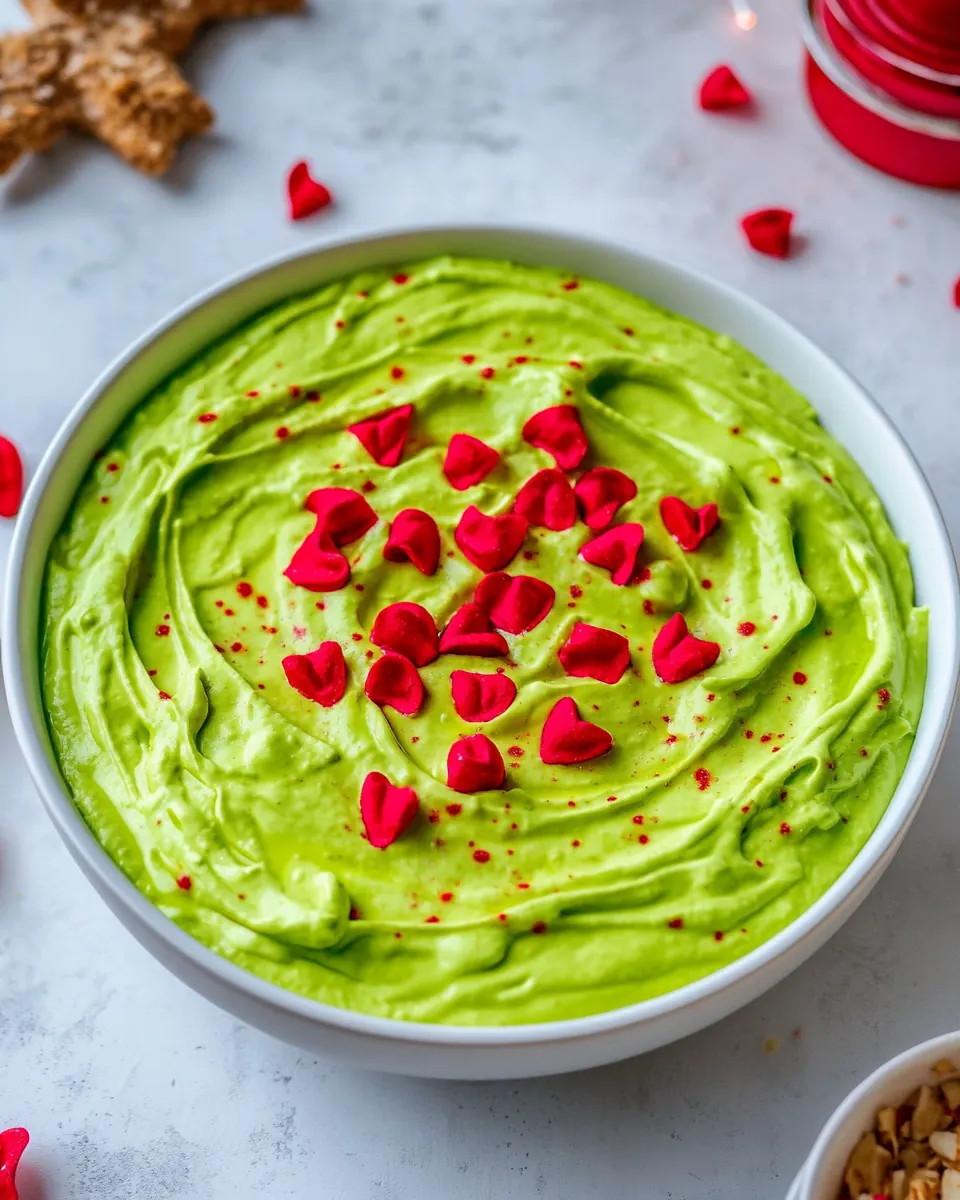
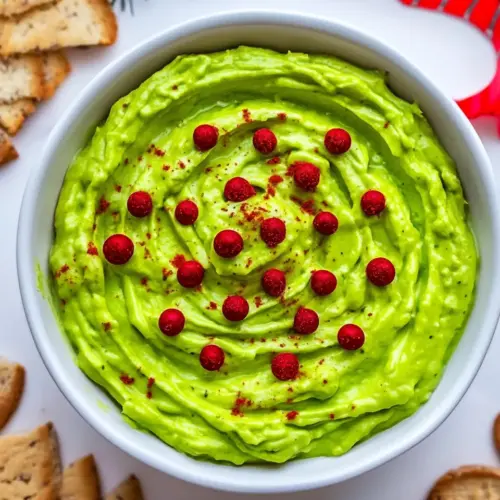
- green food coloring: Colors the mixture vibrantly green to achieve the Grinch-themed appearance; a few drops can transform the dip into a festive, eye-catching shade. Allows customization of intensity to suit presentation and pairs visually with red sprinkles. Typically flavor-neutral when used sparingly, so it mainly affects appearance.
- red heart sprinkles: Adds contrasting color and playful decoration with small red heart shapes that mimic the Grinch theme; sprinkles provide a pop of color and a tiny bit of crunch. Enhances visual appeal and festive presentation for parties or holiday gatherings. Can be scattered on top just before serving to maintain shape and brightness.
Putting Together Grinch Dip
I like to keep the instruction intro short and encouraging, because this recipe is forgiving and joyful. Below I walk through each step with sensory details and troubleshooting tips so you know what to expect at every stage.
- Heat treat 1 (15.25-ounce) box white cake mix to make it safe to eat raw by spreading it out evenly on a parchment-lined baking sheet. Bake at 350 degrees Fahrenheit for 5 minutes, stirring halfway through to prevent burning. Let it cool completely.: The dry cake mix will start to warm and release a gentle baked, toasty scent as it heats, and you should hear no sound except the quiet of the oven hum. This step matters because it neutralizes any bacteria in the flour, making the mix safe to consume uncooked. A common mistake is crowding the pan which leads to uneven heating, so spread the mix in an even, single layer. Keep a timer handy so you do not overbake, and use a metal spatula to break up any small clumps once it comes out of the oven.
- In a large bowl, add the cooled cake mix, 1 (8-ounce) container whipped topping thawed, 3/4 cup vanilla pudding or yogurt and a few drops of bright green food coloring. Whip with a hand mixer until fluffy and no lumps of cake mix remain. Add more food coloring until the dip is a nice grinchy green.: As the mix bakes you will notice the aroma shift from raw to lightly toasted, which is the cue that the heat treatment is working. Stirring halfway through exposes all portions to similar heat and prevents the edges from browning more than the center. The why is safety and flavor balance, because a quick toast enhances nuttiness without turning the mix into cake. Avoid leaving it in longer than instructed, as the mix can brown and alter the intended neutral vanilla base.
- Transfer to a serving bowl and top with red heart sprinkles.: Once toasted, the mix should be cool to the touch before combining with chilled ingredients, otherwise the whipped topping can melt and the dip will become watery. Cooling also helps any steam escape, preserving a dry, crumbly texture that blends into the dip. Rushing this step is a frequent error, so set the pan on a rack and allow at least 10 to 15 minutes, or until you feel no warmth when you hover a hand above the surface.
- Serve with your favorite assortment of cookies for dipping.: When you first combine these ingredients you will notice the contrast between the dry crumbs and the silky whipped topping. The pudding or yogurt adds moisture and a creamy note, which helps transform the crumbs into a cohesive dip. Adding color in small increments is important because gel dyes can be intense; a little goes a long way. A typical pitfall is adding too much liquid at once, which can make the mixture loose, so measure carefully and adjust slowly.
- Whip with a hand mixer until fluffy and no lumps of cake mix remain: As you blend, the bowl will fill with a soft, billowy texture and you may hear the steady hum of the mixer. The mixture should lighten in color and gain volume, with no visible dry flecks. This mechanical action is crucial for aeration, giving the dip that cloud like mouthfeel. If you under whip, the dip may be denser and less scoopable; if you over whip, you risk breaking down the structure so stop once fully combined and fluffy.
- Add more food coloring until the dip is a nice grinchy green: Small, controlled additions of coloring let you hit the exact shade you want, and the color deepens as you fold it in. I prefer adding dye a few drops at a time and stirring, because this prevents streaks and avoids oversaturation. Over coloring can affect the perceived taste and can stain serving bowls, so use gloves or a spoon to stir. If the color is uneven, a few gentle folds will help distribute it evenly without deflating the dip.
- Transfer to a serving bowl and top with red heart sprinkles: The visual reveal is satisfying as the glossy green mass meets the bright red confetti, and the sprinkles add a tiny crunch and contrast. Sprinkle them right before guests arrive so they remain crisp and colorful. Avoid mixing them in too early, because moisture will dull their hue and soften their texture. Position the bowl in the center of your platter for immediate impact.
- Serve with your favorite assortment of cookies for dipping: The dip should cling to cookies and offer a creamy coating with each bite, creating a playful interplay of textures. Offer a variety of cookie shapes and sizes so guests can choose a sturdy vehicle or a delicate one for a lighter bite. One mistake is using a cookie that is too fragile which can crumble into the dip, so provide sturdier options for ease of dipping. Keep napkins nearby and expect a few joyful, messy moments.
Helpful Notes about Grinch Dip
This section collects my most useful practical tips for making Grinch Dip shine. Read these before you start and you will avoid the small mistakes that can alter texture or appearance. Each tip highlights one essential idea and how to execute it well.
- Use a concentrated gel food coloring to achieve a vivid green with just a couple drops, which preserves texture and avoids watering down the dip.
- Thaw whipped topping fully in the refrigerator rather than at room temperature to maintain a stable, fluffy structure when folding with the cake mix.
- Cool the toasted cake mix thoroughly on a wire rack to let residual heat escape, preventing the whipped topping from melting when combined.
- Measure pudding or yogurt carefully to balance creaminess without loosening the dip, and choose pudding for richness or yogurt for a tangier profile.
- Top with sprinkles just before serving so they stay crisp and vibrant, and use a shallow spoon to distribute them evenly across the surface.
What to Serve Alongside Grinch Dip
When I plan a serving spread around Grinch Dip, I like to create a mix of textures and seasonal touches so each bite feels special. Pairing simple cookies with a few contrasting shapes and sizes makes the dip the star while keeping things balanced.
- Assorted sugar cookies, cut in fun shapes and sturdy enough to scoop, are classic companions that echo the vanilla notes in the dip.
- Shortbread fingers provide a buttery, crumbly contrast that pairs exceptionally well with the creamy dip texture.
- Ginger snaps add spicy brightness that cuts through sweetness and gives each bite a little sparkle of warmth suitable for winter and holiday gatherings.
- Chocolate cookies offer a rich counterpoint; the dark cocoa flavor plays nicely against the sweet, fluffy dip and makes for an indulgent pairing.
- Seasonal fruit slices, like firm apple or pear wedges, can add a fresh, crisp contrast for guests who prefer a lighter bite, and they help balance the overall sweetness on the platter.
- Serving tips: Place the bowl in the center of a large platter, surround it with cookies in concentric rings, and add a few small bowls of extra sprinkles or small garnishes. Keep extra napkins and small plates nearby so guests can mingle and sample comfortably.
- Occasions: This dip works wonderfully for holiday cookie exchanges, family gatherings, school parties, or as part of a festive brunch spread during winter and Christmas celebrations.
- Storage: Store leftovers in an airtight container in the refrigerator for up to three days. Give the dip a quick stir before serving, and note that the color may settle slightly over time.
- Seasonal pairing: For winter events and Christmas parties, serve alongside warm spiced beverages and a platter of mixed cookies for a cohesive holiday table.
FAQ
Conclusion
What makes this recipe special is its playful presentation and effortless, crowd pleasing texture that brings a festive moment to any cookie platter. I hope you give Grinch Dip a try because it is quick to prepare and reliably popular at holiday gatherings, adding color and cheer with minimal fuss. Serve it with a variety of cookies, enjoy the smiles it inspires, and keep an extra bowl on hand because guests will keep coming back for more.
Grinch Dip
Equipment
- Oven
- Baking Sheet
- Parchment Paper
- Large Bowl
- Hand Mixer
- Spatula
Ingredients
- 1 (15.25-ounce) box white cake mix Provides structure and sweetness as the base dry ingredient; contains flour and sugar that help absorb moisture and give the dip a cake-miken texture when mixed with wet components. Enhances flavor and contributes to a slightly cakey mouthfeel that balances the creamy elements. Helps thicken the mixture so the dip holds shape for scooping or spreading.
- 1 (8-ounce) container whipped topping thawed Adds light, airy creaminess and volume to create a fluffy, dessert-like consistency; whipped topping lends a smooth, cool texture that contrasts with denser components. Helps incorporate air so the dip feels lighter on the palate and stays scoopable. Contributes subtle sweetness without overpowering other flavors.
- 3/4 cup vanilla pudding or yogurt Provides creamy body and vanilla flavor while adding moisture and a smooth mouthfeel; can be used as instant pudding or yogurt depending on preferred tang and texture. Helps bind dry ingredients and stabilize the dip so it holds together well. Delivers vanilla notes that complement the cake mix and whipped topping.
- green food coloring Colors the mixture vibrantly green to achieve the Grinch-themed appearance; a few drops can transform the dip into a festive, eye-catching shade. Allows customization of intensity to suit presentation and pairs visually with red sprinkles. Typically flavor-neutral when used sparingly, so it mainly affects appearance.
- red heart sprinkles Adds contrasting color and playful decoration with small red heart shapes that mimic the Grinch theme; sprinkles provide a pop of color and a tiny bit of crunch. Enhances visual appeal and festive presentation for parties or holiday gatherings. Can be scattered on top just before serving to maintain shape and brightness.
Instructions
- Heat treat 1 (15.25-ounce) box white cake mix to make it safe to eat raw by spreading it out evenly on a parchment-lined baking sheet. Bake at 350 degrees Fahrenheit for 5 minutes, stirring halfway through to prevent burning. Let it cool completely.: The dry cake mix will start to warm and release a gentle baked, toasty scent as it heats, and you should hear no sound except the quiet of the oven hum. This step matters because it neutralizes any bacteria in the flour, making the mix safe to consume uncooked. A common mistake is crowding the pan which leads to uneven heating, so spread the mix in an even, single layer. Keep a timer handy so you do not overbake, and use a metal spatula to break up any small clumps once it comes out of the oven.
- In a large bowl, add the cooled cake mix, 1 (8-ounce) container whipped topping thawed, 3/4 cup vanilla pudding or yogurt and a few drops of bright green food coloring. Whip with a hand mixer until fluffy and no lumps of cake mix remain. Add more food coloring until the dip is a nice grinchy green.: As the mix bakes you will notice the aroma shift from raw to lightly toasted, which is the cue that the heat treatment is working. Stirring halfway through exposes all portions to similar heat and prevents the edges from browning more than the center. The why is safety and flavor balance, because a quick toast enhances nuttiness without turning the mix into cake. Avoid leaving it in longer than instructed, as the mix can brown and alter the intended neutral vanilla base.
- Transfer to a serving bowl and top with red heart sprinkles.: Once toasted, the mix should be cool to the touch before combining with chilled ingredients, otherwise the whipped topping can melt and the dip will become watery. Cooling also helps any steam escape, preserving a dry, crumbly texture that blends into the dip. Rushing this step is a frequent error, so set the pan on a rack and allow at least 10 to 15 minutes, or until you feel no warmth when you hover a hand above the surface.
- Serve with your favorite assortment of cookies for dipping.: When you first combine these ingredients you will notice the contrast between the dry crumbs and the silky whipped topping. The pudding or yogurt adds moisture and a creamy note, which helps transform the crumbs into a cohesive dip. Adding color in small increments is important because gel dyes can be intense; a little goes a long way. A typical pitfall is adding too much liquid at once, which can make the mixture loose, so measure carefully and adjust slowly.
- Whip with a hand mixer until fluffy and no lumps of cake mix remain: As you blend, the bowl will fill with a soft, billowy texture and you may hear the steady hum of the mixer. The mixture should lighten in color and gain volume, with no visible dry flecks. This mechanical action is crucial for aeration, giving the dip that cloud like mouthfeel. If you under whip, the dip may be denser and less scoopable; if you over whip, you risk breaking down the structure so stop once fully combined and fluffy.
- Add more food coloring until the dip is a nice grinchy green: Small, controlled additions of coloring let you hit the exact shade you want, and the color deepens as you fold it in. I prefer adding dye a few drops at a time and stirring, because this prevents streaks and avoids oversaturation. Over coloring can affect the perceived taste and can stain serving bowls, so use gloves or a spoon to stir. If the color is uneven, a few gentle folds will help distribute it evenly without deflating the dip.
- Transfer to a serving bowl and top with red heart sprinkles: The visual reveal is satisfying as the glossy green mass meets the bright red confetti, and the sprinkles add a tiny crunch and contrast. Sprinkle them right before guests arrive so they remain crisp and colorful. Avoid mixing them in too early, because moisture will dull their hue and soften their texture. Position the bowl in the center of your platter for immediate impact.
- Serve with your favorite assortment of cookies for dipping: The dip should cling to cookies and offer a creamy coating with each bite, creating a playful interplay of textures. Offer a variety of cookie shapes and sizes so guests can choose a sturdy vehicle or a delicate one for a lighter bite. One mistake is using a cookie that is too fragile which can crumble into the dip, so provide sturdier options for ease of dipping. Keep napkins nearby and expect a few joyful, messy moments.
Notes
- Use a concentrated gel food coloring to achieve a vivid green with just a couple drops, which preserves texture and avoids watering down the dip.
- Thaw whipped topping fully in the refrigerator rather than at room temperature to maintain a stable, fluffy structure when folding with the cake mix.
- Cool the toasted cake mix thoroughly on a wire rack to let residual heat escape, preventing the whipped topping from melting when combined.
- Measure pudding or yogurt carefully to balance creaminess without loosening the dip, and choose pudding for richness or yogurt for a tangier profile.
- Top with sprinkles just before serving so they stay crisp and vibrant, and use a shallow spoon to distribute them evenly across the surface.