Gluten Free Strawberry Crisp
Gluten Free Strawberry Crisp is the kind of dessert I reach for when the first local berries arrive at the market, and the kitchen smells like warm sugar and lemon. The first sentence of a recipe often anchors a memory for me, and this one takes me back to a sunny afternoon when I was teaching a neighbor how to make a simple, gluten free dessert for a potluck. I remember how the juices bubbled at the edges and the topping turned a perfect golden brown, and we both agreed it tasted like summer in a bowl.
I’ve made this Gluten Free Strawberry Crisp for busy weeknights, for weekend gatherings, and for quiet Sunday breakfasts with yogurt on the side. Each time it comes out slightly different depending on the berries I use and how rustic I let the topping be, and that casual variability is part of why I love it. My approach is forgiving yet intentional, focusing on texture and brightness so the fruit shines and the crisp stays satisfyingly crunchy.
Recipe Snapshot
1 hr 5 mins
10 mins
55 mins
Medium
240 kcal
American
Gluten-Free, Vegan
Desserts
9×9 inch baking dish, Large mixing bowl, Oven
The Beauty of This Gluten Free Strawberry Crisp
Bright, Seasonal Flavor
I love how this recipe puts strawberries front and center, preserving their natural sweetness with just a touch of maple syrup and lemon. When the fruit softens and bubbles, the aroma fills the kitchen, and you know the dessert will taste fresh and lively. The balance of sweet and tart is simple, and it highlights the berry rather than masking it.
Gluten Free, Yet Comforting
Making a dessert that is both naturally comforting and gluten free is a small victory. I find that using oat flour and rolled oats creates a cozy, crumbly texture people actually crave. It feels indulgent without relying on traditional wheat, and that opens this crisp to friends and family with dietary needs.
Easy to Adapt
I appreciate recipes that let you swap based on what you have, and this one is very forgiving. Use frozen berries if fresh are not available, swap sweeteners, or adjust the sugar level to your taste. I often tweak the topping consistency depending on whether I want a chunkier crumble or a finer, sandy crust.
Textural Contrast
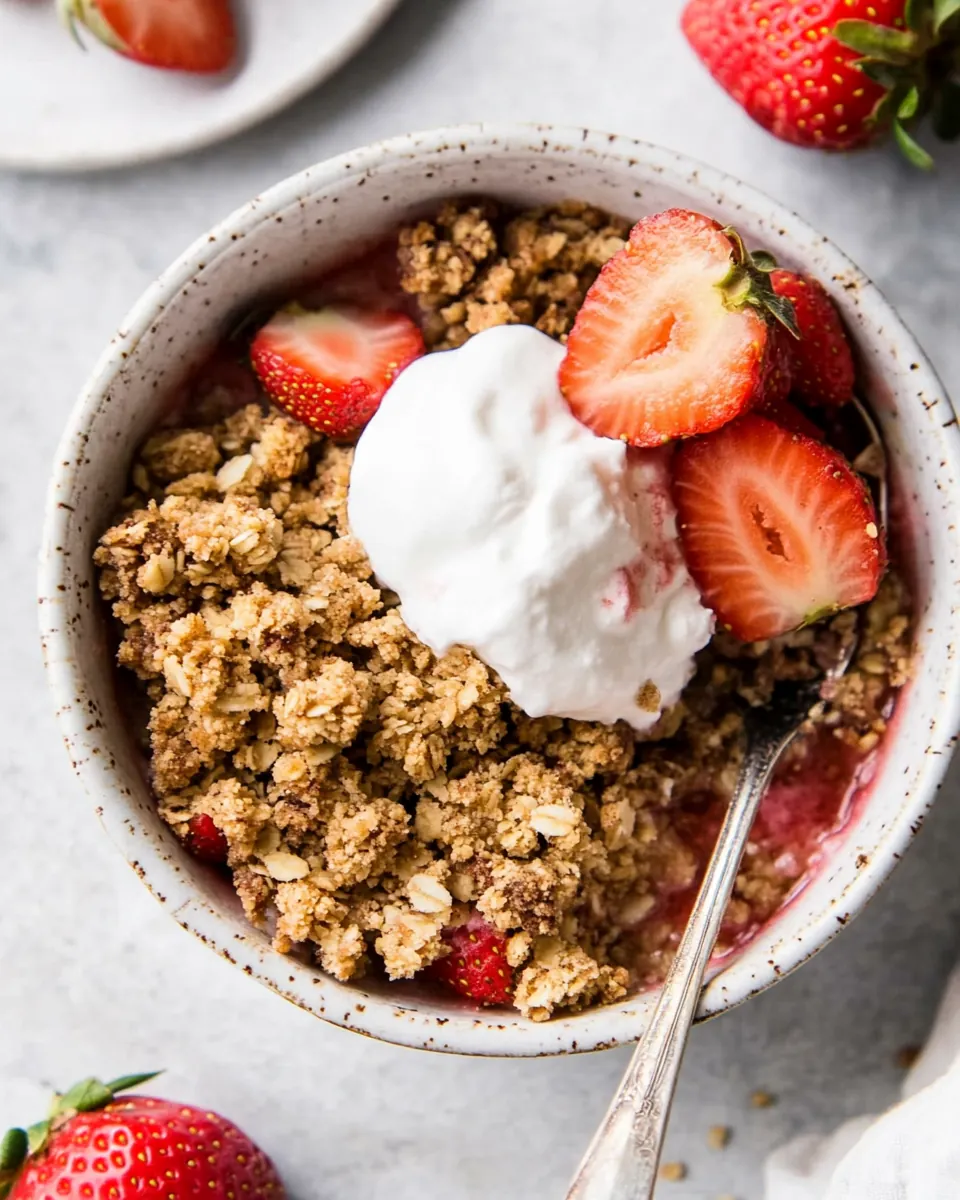
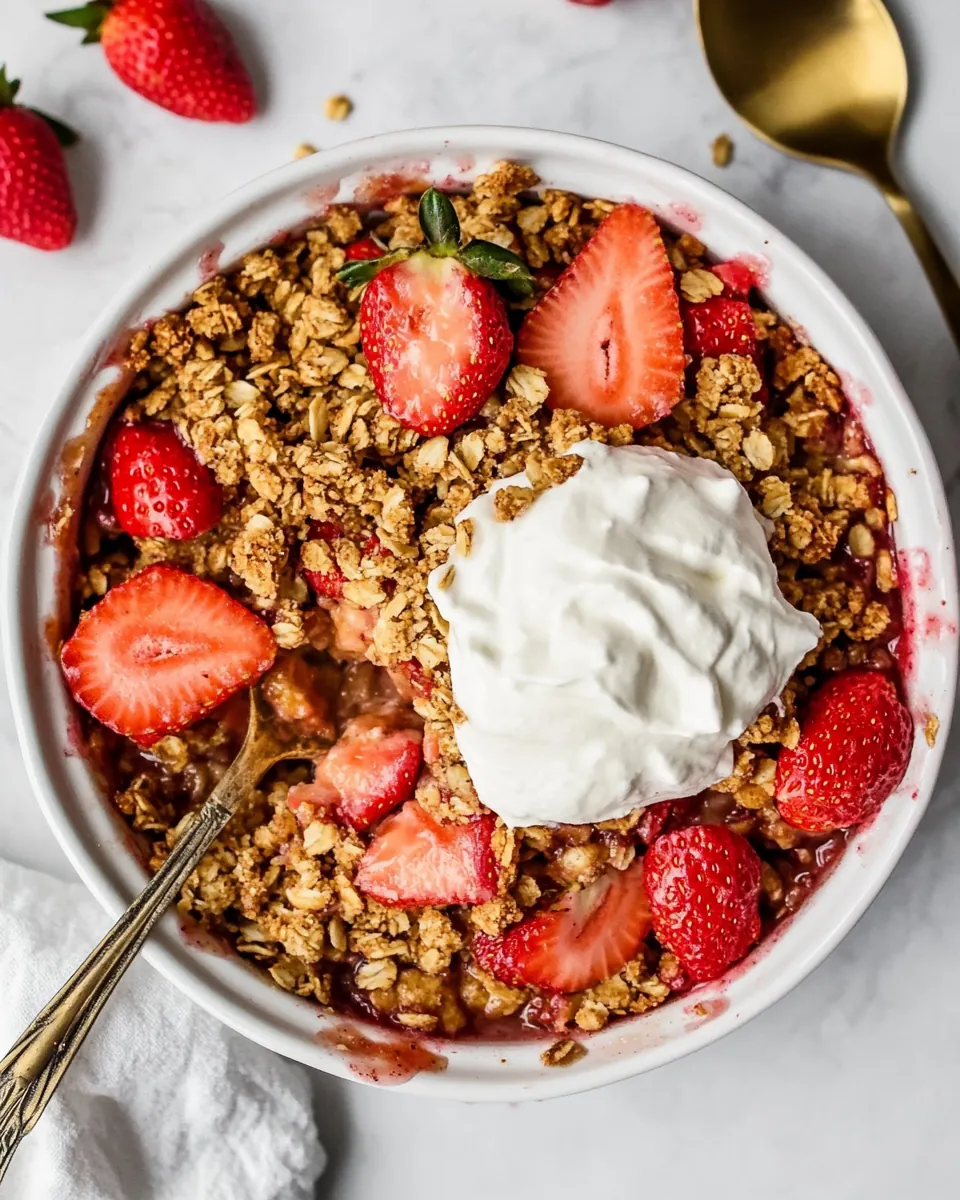
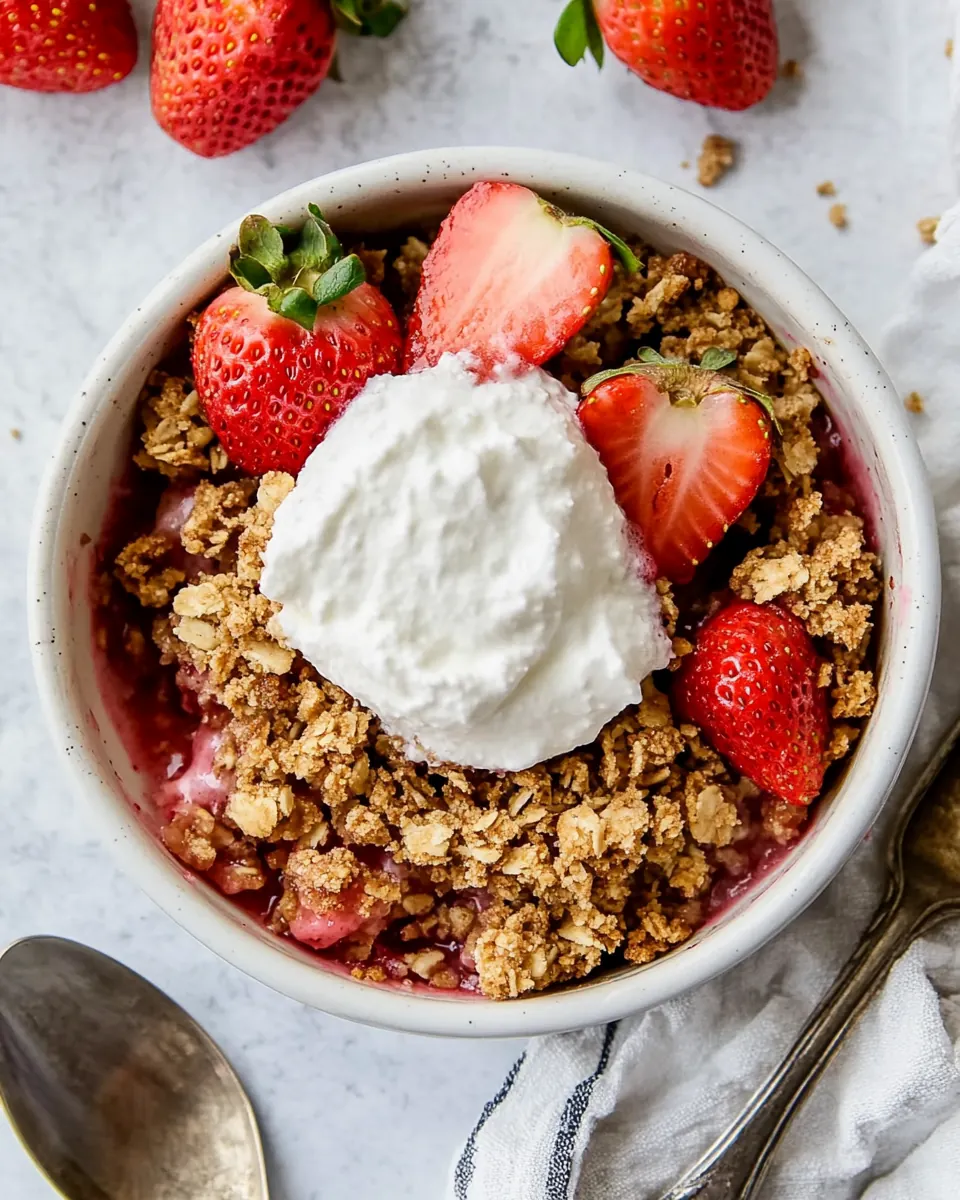
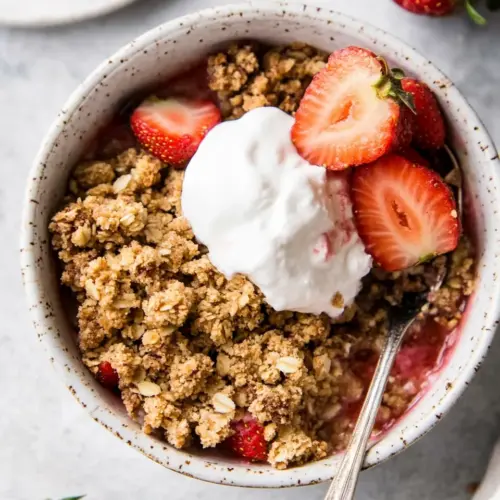
The contrast between bubbling, jammy strawberries and a crunchy buttery topping is irresistible. When you bite in, you get a warm burst of fruit followed by a toasted, slightly chewy oat topping. That play between soft and crisp keeps every spoonful interesting, and it’s why I reach for this dessert when I want something comforting but not heavy.
Perfect for Sharing
This Gluten Free Strawberry Crisp scales well, and it transports easily for potlucks or family dinners. The recipe feeds a small crowd without drama, and it tastes great reheated or at room temperature. I always feel pleased bringing it along because it pleases a crowd and stays true to fresh flavors.
Everything You Need for Gluten Free Strawberry Crisp
The ingredients here are intentionally simple, focusing on two teams: the juicy fruit filling and the crunchy oat based topping. The filling relies on a little binder and brightening elements to coax the best texture from the strawberries, while the topping uses oat flour, rolled oats, and a touch of fat for that golden, buttery finish. Together, these components create a balanced dessert that is fruity, slightly tangy, and satisfyingly crisp.
- 4 cups fresh strawberries see notes for frozen or other berries: Provide juicy sweetness and body to the filling, contributing fresh strawberry flavor and natural moisture; adjust quantity if using frozen or mixed berries, and gently macerate to release juices for best texture.
- 4 tablespoons maple syrup or honey: Add sweetness and a touch of caramel-like depth while helping to balance the berries' tartness; use maple syrup for a vegan option or honey for a richer floral note and stir into the fruit mixture evenly.
- 2 tablespoons arrowroot flour: Act as a gluten–free thickening agent to stabilize the fruit juices and prevent a runny filling; dissolve into the berry syrup so it activates and creates a glossy, slightly thickened consistency.
- 1 teaspoon lemon juice: Brighten and lift the fruit flavors with acidity, cutting through sweetness and enhancing overall brightness; use freshly squeezed lemon juice for the cleanest, most vibrant citrus note.
- 1 teaspoon vanilla extract: Contribute warm, rounded flavor and aromatic complexity to the filling, enhancing the strawberry profile; add for subtle depth and mix in to distribute flavor evenly.
- 2 cups oat flour: Provide the base for the crisp topping with a tender, slightly chewy texture while keeping the dish gluten–free; choose finely ground oat flour for structure and a mellow, toasty oat flavor.
- 1 cup rolled oats gluten-free if needed: Introduce texture and chewiness to the topping while reinforcing oat flavor; opt for certified gluten–free rolled oats if needed to maintain a gluten–free dish.
- cup coconut sugar or maple sugar: Add sweet, caramel-like flavor to the topping while helping it brown and crisp; choose coconut or maple sugar for a more complex, less refined sweetness and adjust quantity to taste.
- 1 teaspoon ground cinnamon: Impart warm, aromatic spice that complements berries and adds depth to the topping; use ground cinnamon sparingly to enhance flavor without overpowering the fruit.
- Pinch of sea salt: Enhance and balance sweetness with a subtle mineral edge, rounding flavors in both filling and topping; a small pinch is enough to lift the overall dish without making it salty.
- 1/2 cup unsalted butter melted: Bind the topping together and create a rich, crisp texture as it melts and toasts; melted unsalted butter promotes browning and yields a buttery mouthfeel without adding extra salt.
- 4 tablespoons maple syrup or honey: Provide additional sweetness and a glossy finish to the topping while reinforcing the sweet notes in the filling; use maple syrup or honey depending on dietary preference for consistent sweetness.
- 1 teaspoon vanilla extract: Add aromatic warmth and depth to the topping, enhancing the baked flavors with a smooth vanilla note; stir in to distribute the scent and mellow the overall profile.
- Zest of 1 lemon: Contribute bright, citrusy aroma and a zesty lift to both filling and topping; lemon zest adds concentrated citrus oils that elevate freshness without extra acidity.
Cooking Method for Gluten Free Strawberry Crisp

I like to keep the baking process relaxed but attentive so the filling thickens and the topping crisps evenly. Read each step fully before you start and have your ingredients prepped and measured, because the transitions are quick once the oven is ready.
- Preheat the oven to 350ºF.: Warmth in the kitchen is immediate, and you should feel a faint dry heat once the oven reaches 350ºF . A properly preheated oven ensures even baking and a golden topping instead of a soggy one. If you skip preheating, the filling may release too much juice before the topping sets, resulting in a runny center. The smell of heated air is subtle but expect a consistent, dry heat when the oven is ready.
- Make the filling: In a large bowl, combine the berries, maple syrup (or honey), arrowroot, lemon juice, and vanilla. Stir gently until evenly coated.: In a large bowl, combine the berries, maple syrup or honey, arrowroot, lemon juice, and vanilla. Stir gently until evenly coated. : The moment you stir the strawberries with the sweetener and lemon juice , you will notice juices begin to bloom from the fruit, creating a glossy sheen. The arrowroot flour will sit suspended, ready to thicken as heat is applied, producing a silky, clean filling rather than a cloudy slurry. Use gentle strokes so the berries retain some shape; rough stirring can pulverize them and create an overly jammy texture. Avoid adding too much thickener, which makes the filling gummy instead of pleasantly saucy.
- Assemble: Pour the fruit mixture (and any juices) into a 9×9-inch or similarly sized baking dish.: Pour the fruit mixture and any juices into a 9×9 inch or similarly sized baking dish. : As you pour, watch the juices coat the bottom of the dish, forming a shallow pool that will bubble up during baking. Spreading the fruit evenly ensures uniform bubbling and consistent baking, so nudge large berries into a single layer. If you overpack the dish, the filling may take longer to bubble; if you underfill it, the topping to fruit ratio can become unbalanced. Ideally the fruit fills the dish so each spoonful gets both fruit and topping.
- Make the topping: In a separate bowl, mix together the oat flour, rolled oats, coconut sugar, cinnamon, and sea salt. Add the melted butter, maple syrup, vanilla, and lemon zest. Stir until the mixture forms a crumbly topping.: In a separate bowl, mix together the oat flour, rolled oats, coconut sugar, cinnamon, and sea salt. Add the melted butter, maple syrup, vanilla, and lemon zest. Stir until the mixture forms a crumbly topping. : When the melted butter meets the dry ingredients, the aroma of toasted oats and warm cinnamon emerges, and the texture should become pebbly and damp rather than pasty. The contrast between the coarse oats and the tender oat flour creates the ideal crumb structure. If the topping seems too dry, add a touch more maple syrup ; if too wet, add a few more tablespoons of oat flour . A common error is overmixing which compacts the topping, preventing it from crisping evenly.
- Bake: Sprinkle the topping evenly over the fruit. Bake for about 55 minutes, until the fruit is bubbling and the topping is golden brown. If the topping browns too quickly, tent the dish with foil for the last 10–15 minutes.: Sprinkle the topping evenly over the fruit. Bake for about 55 minutes, until the fruit is bubbling and the topping is golden brown. If the topping browns too quickly, tent the dish with foil for the last 10 to 15 minutes. : As the crisp bakes, you will hear a faint bubbling and see steam rise from the filling; the top should transition from pale to a warm golden brown, with edges caramelizing slightly. The sound of gentle bubbling and a few small bursts at the edge signal that the filling has thickened and the arrowroot has activated. If you skip tenting when the topping is darkening too soon, it can burn, so keep an eye through the oven window. Also avoid opening the oven repeatedly, which lowers temperature and can lengthen bake time.
- Cool slightly before serving. Enjoy as is, or top with coconut whipped cream or ice cream, if desired.: Cooling is crucial because the filling sets as it loses heat, changing from runny to spoonable. The aroma will be rich with warm fruit and toasted oats, and the topping will crisp more as it cools. Serve warm for the best contrast between hot filling and cool topping or allow to rest and serve at room temperature for an easier transport. A rushed serving can result in a runny spoonful, so let it rest for a few minutes to finish setting.
Tips for Success
A few thoughtful pointers will elevate this simple dessert into a reliably great one. Below are pragmatic tips that focus on timing, texture, and flavor balance to help you get consistent results every time.
- Choose ripe fruit to maximize natural sweetness and reduce added sugar without sacrificing flavor.
- Measure the arrowroot accurately, because too much will make the filling gummy and too little will leave it runny.
- Watch the topping in the last 10 minutes and tent with foil if it begins to darken too quickly to prevent burning.
- Use certified oats if serving someone who needs a strict gluten free diet, since cross contamination can occur.
- Let it rest for at least 10 to 15 minutes after baking so the filling thickens and slices hold together.
Serving Suggestions
This dessert is versatile and works well for casual family dinners, picnic style gatherings, or a simple weekend treat. Serve it warm for the best textural contrast, and consider small extras that complement the fruit without masking it.
- Warm with coconut whipped cream, which adds a light, creamy contrast and keeps the dish dairy free friendly if needed.
- Pair with yogurt for a brunch option, letting the tartness of plain yogurt balance the sweetness of the berries.
- Bring to a potluck in a covered baking dish; it transports well and can be reheated briefly to refresh the topping.
- Store leftovers in an airtight container in the refrigerator for up to 3 days, and reheat gently to restore the crisp texture.
- Serve for spring celebrations, when fresh berries are at peak flavor, making it a natural seasonal dessert for gatherings.
FAQ
Conclusion
This recipe stands out for its bright berry flavor and a satisfyingly crunchy oat topping that stays true to gluten free ingredients. It’s an approachable dessert that highlights seasonal strawberries and comes together with pantry friendly items. Give it a try this spring when berries are at their peak, and you’ll find it’s one of those recipes that feels special without requiring fuss. Share it with friends or savor a warm bowl at home, and enjoy the simple pleasure of fruit, spice, and buttery oat crunch.
Gluten Free Strawberry Crisp
Equipment
- 9×9 inch Baking Dish
- Large Mixing Bowl
- Oven
Ingredients
- 4 cups fresh strawberries see notes for frozen or other berries Provide juicy sweetness and body to the filling, contributing fresh strawberry flavor and natural moisture; adjust quantity if using frozen or mixed berries, and gently macerate to release juices for best texture.
- 4 tablespoons maple syrup or honey Add sweetness and a touch of caramel-like depth while helping to balance the berries' tartness; use maple syrup for a vegan option or honey for a richer floral note and stir into the fruit mixture evenly.
- 2 tablespoons arrowroot flour Act as a gluten-free thickening agent to stabilize the fruit juices and prevent a runny filling; dissolve into the berry syrup so it activates and creates a glossy, slightly thickened consistency.
- 1 teaspoon lemon juice Brighten and lift the fruit flavors with acidity, cutting through sweetness and enhancing overall brightness; use freshly squeezed lemon juice for the cleanest, most vibrant citrus note.
- 1 teaspoon vanilla extract Contribute warm, rounded flavor and aromatic complexity to the filling, enhancing the strawberry profile; add for subtle depth and mix in to distribute flavor evenly.
- 2 cups oat flour Provide the base for the crisp topping with a tender, slightly chewy texture while keeping the dish gluten-free; choose finely ground oat flour for structure and a mellow, toasty oat flavor.
- 1 cup rolled oats gluten-free if needed Introduce texture and chewiness to the topping while reinforcing oat flavor; opt for certified gluten-free rolled oats if needed to maintain a gluten-free dish.
- cup coconut sugar or maple sugar Add sweet, caramel-like flavor to the topping while helping it brown and crisp; choose coconut or maple sugar for a more complex, less refined sweetness and adjust quantity to taste.
- 1 teaspoon ground cinnamon Impart warm, aromatic spice that complements berries and adds depth to the topping; use ground cinnamon sparingly to enhance flavor without overpowering the fruit.
- Pinch of sea salt Enhance and balance sweetness with a subtle mineral edge, rounding flavors in both filling and topping; a small pinch is enough to lift the overall dish without making it salty.
- 1/2 cup unsalted butter melted Bind the topping together and create a rich, crisp texture as it melts and toasts; melted unsalted butter promotes browning and yields a buttery mouthfeel without adding extra salt.
- 4 tablespoons maple syrup or honey Provide additional sweetness and a glossy finish to the topping while reinforcing the sweet notes in the filling; use maple syrup or honey depending on dietary preference for consistent sweetness.
- 1 teaspoon vanilla extract Add aromatic warmth and depth to the topping, enhancing the baked flavors with a smooth vanilla note; stir in to distribute the scent and mellow the overall profile.
- Zest of 1 lemon Contribute bright, citrusy aroma and a zesty lift to both filling and topping; lemon zest adds concentrated citrus oils that elevate freshness without extra acidity.
Instructions
- Preheat the oven to 350ºF.: Warmth in the kitchen is immediate, and you should feel a faint dry heat once the oven reaches 350ºF . A properly preheated oven ensures even baking and a golden topping instead of a soggy one. If you skip preheating, the filling may release too much juice before the topping sets, resulting in a runny center. The smell of heated air is subtle but expect a consistent, dry heat when the oven is ready.
- Make the filling: In a large bowl, combine the berries, maple syrup (or honey), arrowroot, lemon juice, and vanilla. Stir gently until evenly coated.: In a large bowl, combine the berries, maple syrup or honey, arrowroot, lemon juice, and vanilla. Stir gently until evenly coated. : The moment you stir the strawberries with the sweetener and lemon juice , you will notice juices begin to bloom from the fruit, creating a glossy sheen. The arrowroot flour will sit suspended, ready to thicken as heat is applied, producing a silky, clean filling rather than a cloudy slurry. Use gentle strokes so the berries retain some shape; rough stirring can pulverize them and create an overly jammy texture. Avoid adding too much thickener, which makes the filling gummy instead of pleasantly saucy.
- Assemble: Pour the fruit mixture (and any juices) into a 9×9-inch or similarly sized baking dish.: Pour the fruit mixture and any juices into a 9×9 inch or similarly sized baking dish. : As you pour, watch the juices coat the bottom of the dish, forming a shallow pool that will bubble up during baking. Spreading the fruit evenly ensures uniform bubbling and consistent baking, so nudge large berries into a single layer. If you overpack the dish, the filling may take longer to bubble; if you underfill it, the topping to fruit ratio can become unbalanced. Ideally the fruit fills the dish so each spoonful gets both fruit and topping.
- Make the topping: In a separate bowl, mix together the oat flour, rolled oats, coconut sugar, cinnamon, and sea salt. Add the melted butter, maple syrup, vanilla, and lemon zest. Stir until the mixture forms a crumbly topping.: In a separate bowl, mix together the oat flour, rolled oats, coconut sugar, cinnamon, and sea salt. Add the melted butter, maple syrup, vanilla, and lemon zest. Stir until the mixture forms a crumbly topping. : When the melted butter meets the dry ingredients, the aroma of toasted oats and warm cinnamon emerges, and the texture should become pebbly and damp rather than pasty. The contrast between the coarse oats and the tender oat flour creates the ideal crumb structure. If the topping seems too dry, add a touch more maple syrup ; if too wet, add a few more tablespoons of oat flour . A common error is overmixing which compacts the topping, preventing it from crisping evenly.
- Bake: Sprinkle the topping evenly over the fruit. Bake for about 55 minutes, until the fruit is bubbling and the topping is golden brown. If the topping browns too quickly, tent the dish with foil for the last 10–15 minutes.: Sprinkle the topping evenly over the fruit. Bake for about 55 minutes, until the fruit is bubbling and the topping is golden brown. If the topping browns too quickly, tent the dish with foil for the last 10 to 15 minutes. : As the crisp bakes, you will hear a faint bubbling and see steam rise from the filling; the top should transition from pale to a warm golden brown, with edges caramelizing slightly. The sound of gentle bubbling and a few small bursts at the edge signal that the filling has thickened and the arrowroot has activated. If you skip tenting when the topping is darkening too soon, it can burn, so keep an eye through the oven window. Also avoid opening the oven repeatedly, which lowers temperature and can lengthen bake time.
- Cool slightly before serving. Enjoy as is, or top with coconut whipped cream or ice cream, if desired.: Cooling is crucial because the filling sets as it loses heat, changing from runny to spoonable. The aroma will be rich with warm fruit and toasted oats, and the topping will crisp more as it cools. Serve warm for the best contrast between hot filling and cool topping or allow to rest and serve at room temperature for an easier transport. A rushed serving can result in a runny spoonful, so let it rest for a few minutes to finish setting.
Notes
- Choose ripe fruit to maximize natural sweetness and reduce added sugar without sacrificing flavor.
- Measure the arrowroot accurately, because too much will make the filling gummy and too little will leave it runny.
- Watch the topping in the last 10 minutes and tent with foil if it begins to darken too quickly to prevent burning.
- Use certified oats if serving someone who needs a strict gluten free diet, since cross contamination can occur.
- Let it rest for at least 10 to 15 minutes after baking so the filling thickens and slices hold together.