Eye Of Round Roast
Eye Of Round Roast has been one of those centerpieces I reach for when I want something simple, meat forward, and reliably impressive on the table. I remember the first time I cooked one for a family dinner, nervously watching the thermometer, and feeling oddly proud when the slices came out lean, tender, and perfectly pink in the middle. That evening taught me how a few careful steps bring out the best in a cut that can be unforgiving if rushed.
Over the years I learned to treat the Eye Of Round Roast with respect, letting it warm to room temperature, rubbing it thoroughly with olive oil, and using bold but balanced seasoning so each slice sings. I like to tell guests that this roast is modest, it does not need fuss, and yet it rewards patience. Between resting times and low and high heat moments, it becomes a flavorful slice that keeps everyone talking.
Recipe Snapshot
50 mins
5 mins
45 mins
Medium
250 kcal
American
Keto, Paleo
Dinner
Roasting pan, Rack, Meat thermometer, Mixing bowl
Why This Eye Of Round Roast Stands Out
Lean and Flavorful
I love this roast because the cut is very lean, which means the flavor of the beef itself shines through. With just a little olive oil and a handful of seasonings, the natural beef aroma becomes the star, so I rarely overcomplicate it. It is a great option when you want a meaty centerpiece without heavy sauces overshadowing the main ingredient.
Easy to Prepare, Big on Impact
From my experience, Eye Of Round Roast is straightforward to prepare, yet it delivers a restaurant style result. The sequence of high heat sear then lower oven roasting yields a beautifully browned exterior and an evenly cooked interior. I’ve found that even novice cooks can pull this off with a reliable thermometer and a little attention.
Economical but Elegant
One reason I keep this recipe in my rotation is the affordability of the cut. It stretches far and slices thin, so a modest purchase feeds many mouths while still feeling special. I enjoy recommending it for gatherings when you want to impress without breaking the bank, and I often pair it with simple sides to let the roast shine.
Versatile Serving Options
The roast adapts easily to different meals. I slice it thin for sandwiches, serve it warm for a holiday dinner, or turn leftovers into quick salads. This versatility means you can cook once and enjoy multiple meals, which I always appreciate on busy weeks. It’s forgiving in terms of pairings, working with roasted vegetables, mashed potatoes, or crisp salads.
Predictable Doneness with a Thermometer
I cannot stress enough how a good thermometer changes everything. I rely on it to hit medium rare consistently, which keeps the Eye Of Round Roast tender instead of dry. That predictability means less stress at the oven, and more confidence when carving at the table.
Recipe Ingredients for Eye Of Round Roast
These ingredients are intentionally few and focused for clarity and depth of flavor. The cut of meat is the hero, so the other components support rather than mask its character. Together, olive oil helps the spice blend adhere and promotes browning, while salt and black pepper define the savory profile. The Italian seasoning adds aromatic herbs to round out the roast.
- 4 pounds eye of round roast 1 whole roast: Season generously to enhance and tenderize the roast by drawing surface moisture and improving crust formation during roasting; also helps balance overall flavor and preserves meat.
- 4 tablespoons olive oil: Coat evenly to promote even browning and prevent sticking while roasting; additionally contributes a subtle fruity richness and helps herbs and spices adhere to the roast.
- 1 1/2 tablespoons salt: Season liberally to bring out natural beef flavors and aid in moisture retention; also creates a savory foundation that complements pepper and herbs during cooking.
- 1 tablespoon black pepper: Season coarsely to introduce a sharp, pungent heat that contrasts the rich beef; also helps form a flavorful crust and enhances perceived savoriness.
- 1 tablespoon Italian seasoning: Season aromatically to impart a blend of herbs that complements beef, adding complexity and Mediterranean notes; also helps create an even, fragrant crust when roasted.
Making Eye Of Round Roast

These directions are designed to guide you through a confident roast from start to finish. I like to speak like a friend at the stove, pointing out what to listen and look for so you trust the process. Keep a thermometer handy, and give the roast the rest it needs before carving.
- Preheat the oven to 480°F (250°C). Bring the meat to room temperature.: The kitchen fills with a warm, dry heat as the oven climbs, and you may notice a faint metallic smell from the heating element, which will dissipate quickly. Letting the roast sit at room temperature evens out internal temperatures, which prevents the outside from overcooking while the center comes up to target doneness. The why here is simple, thermal equilibrium helps a consistent roast color and texture. A common mistake is skipping the room temperature step which often causes a chilled center and uneven slices.
- In a small bowl, combine the salt, black pepper, and Italian seasoning. Mix well.: As you stir, the pepper releases aromatic oils and the dry herbs create a fragrant, dusty bouquet that foreshadows the roast's flavor. Mixing ensures an even distribution of seasoning so every slice tastes balanced. This step matters because an uneven rub will produce pockets of over seasoned or bland meat. Watch for clumps, and break them apart; a frequent error is not mixing thoroughly which leads to inconsistent seasoning.
- Rub the olive oil all over the roast to help the seasoning stick. Then, evenly coat the roast with the herb mixture. Make sure to press the seasoning into the meat, covering all sides.: Feel the slick surface of the olive oil as you massage it into the meat, it becomes slightly tacky and ready to hold the spice blend. The oil promotes browning by encouraging Maillard reactions during the initial high heat, which builds a savory crust and aroma. If you skip this, the rub may not adhere and you will lose the crisp, flavorful exterior. Avoid using too much oil, which can cause flare ups or an oily crust.
- Place the seasoned roast on a rack in a roasting pan, fat side up. Insert a meat thermometer into the thickest part of the roast, making sure it's not touching any bone.: When you press the mixture into the roast, you can hear soft friction and feel the texture change as the granules sink slightly into the surface. This pressed coating creates a concentrated flavor layer that crisps in the oven. The pressing helps the seasonings stay put during the initial high heat blast. A common slip is patting lightly rather than pressing, which allows the rub to fall off during handling.
- Place the roasting pan in the preheated oven and cook for 20 minutes then lower the temperature to 350°F (180°C). Roast for 10 minutes per pound, or around 35-40 minutes. Continue cooking the roast until the internal temperature reaches 130°F (medium-rare). Carryover cooking will get it to around 135°F.: As you place it, the roast settles into the rack and you can see how the fat reflects light, promising a glossy crust. The rack allows air to circulate and prevents the bottom from stewing in rendered juices, giving a more even crust all around. Proper elevation is why the roast browns evenly, and why juices collect beneath for a clean roast pan. Avoid laying the roast directly on the pan, which can lead to soggy undersides.
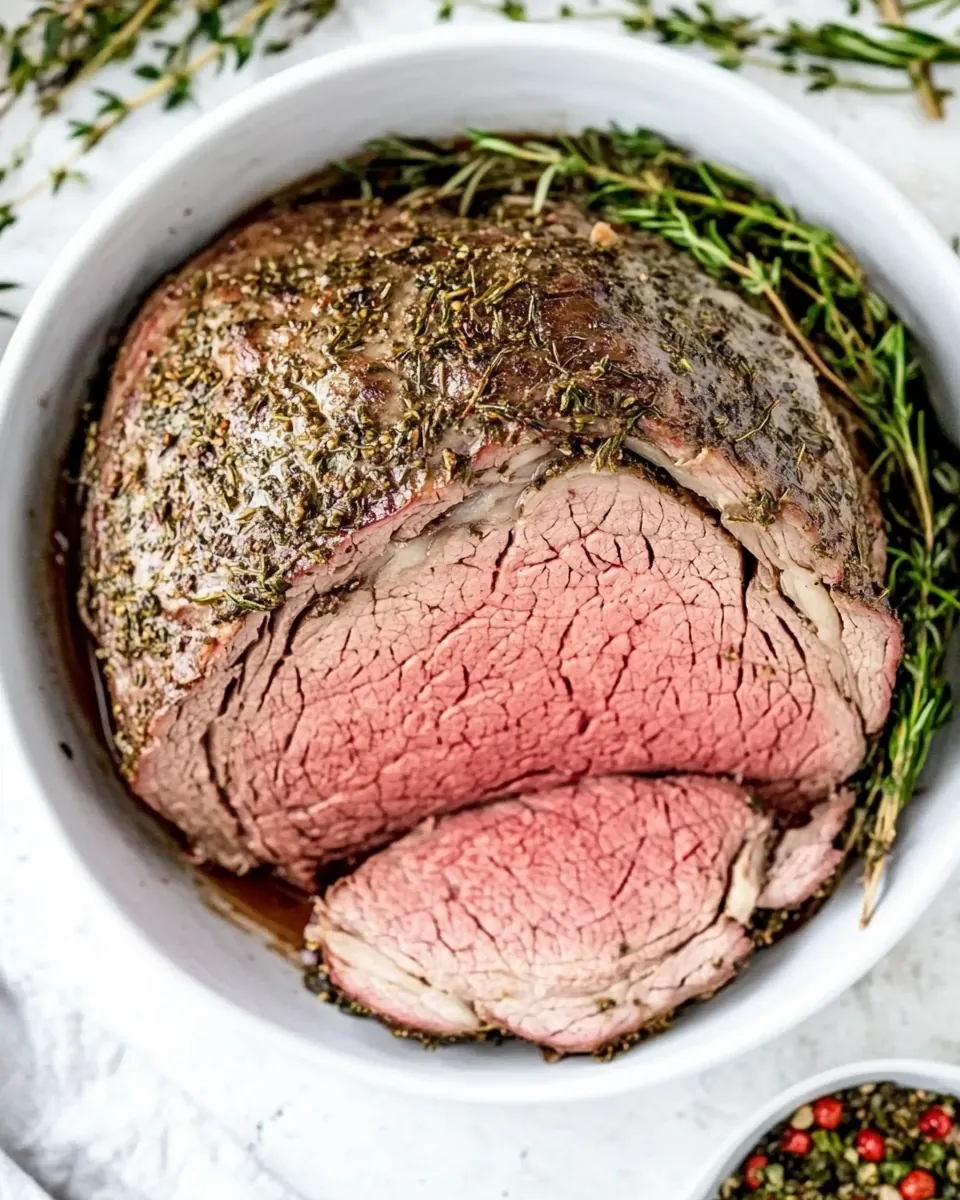
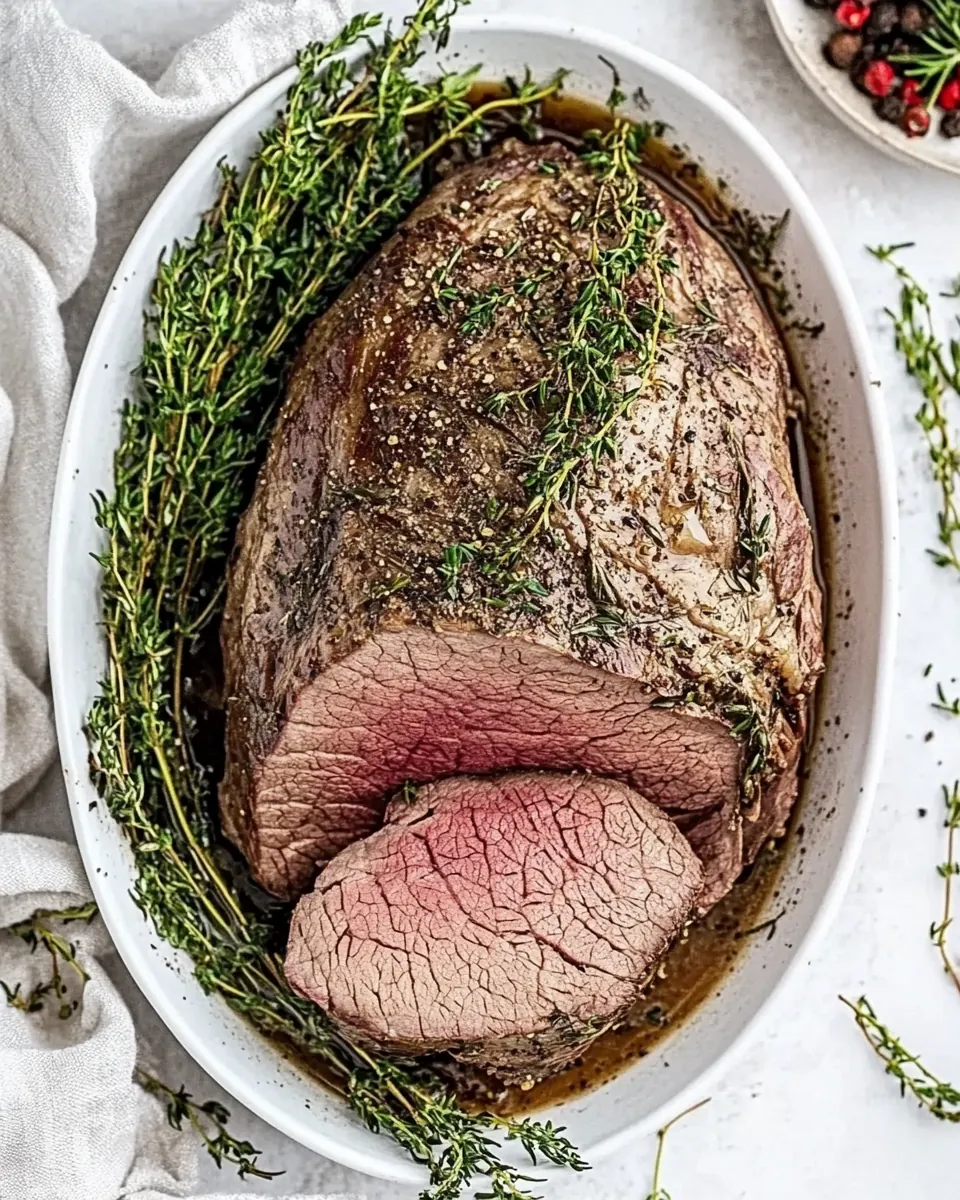
- Once the roast reaches the desired doneness, remove it from the oven and tent it loosely with foil. Let it rest for 15 minutes. After resting, slice the meat against the grain into thin slices and serve.: The thermometer is your honest guide, its metal probe warm to the touch when inserted, and it anchors the roast’s internal narrative of heat. It prevents guesswork, because visual cues alone can be deceptive with lean cuts. Making sure it does not touch bone avoids falsely high readings. A common error is placing the probe near the surface, which underestimates the time needed for the center to reach target temperature.
- Place the roasting pan in the preheated oven and cook for 20 minutes then lower the temperature to 350°F (180°C).: That initial high heat sizzles the exterior, creating a fragrant, caramelized crust that smells almost nutty. After 20 minutes, lowering to 350°F continues cooking more gently, coaxing the center up without overbrowning. This two stage approach is crucial for texture contrast, producing a flavorful crust and a tender interior. Rushing this by skipping the high heat stage can result in less caramelization and a flatter flavor profile.
- Roast for 10 minutes per pound, or around 35 to 40 minutes.: As the roast proceeds, you will notice juices bead at the surface and the aroma deepen, evolving from raw meat to roasted, savory notes. Timing per pound gives a reliable guideline, but the thermometer remains the final authority. This pacing allows collagen to warm and relax without drying the lean meat. Overestimating time is a common misstep, as you can overshoot the internal temperature and lose tenderness.
- Continue cooking the roast until the internal temperature reaches 130°F (medium-rare).: When the probe reads around 130°F, the meat feels springy yet resilient; pulling it at this point accounts for carryover cooking, which will raise the temperature a few degrees while resting. This target yields tender, slightly pink slices with moisture intact. Relying solely on appearance here risks overcooking, especially with this lean cut.
- Carryover cooking will get it to around 135°F.: After removing from the oven, the roast’s internal heat continues to migrate inward and upward a little, completing the cook. I like to think of this as the final gentle polish that brings the roast to perfect doneness without additional oven time. A mistake to avoid is slicing immediately, which lets juices run and leaves the meat dry on the plate.
- Once the roast reaches the desired doneness, remove it from the oven and tent it loosely with foil.: The tented foil traps residual heat and allows the muscle fibers to relax while juices redistribute, and you may hear a faint hiss as warm steam rises. Resting is essential, because it prevents interior juices from pouring out during slicing. Resist the urge to slice too soon, a frequent error that leads to dryer, less flavorful servings.
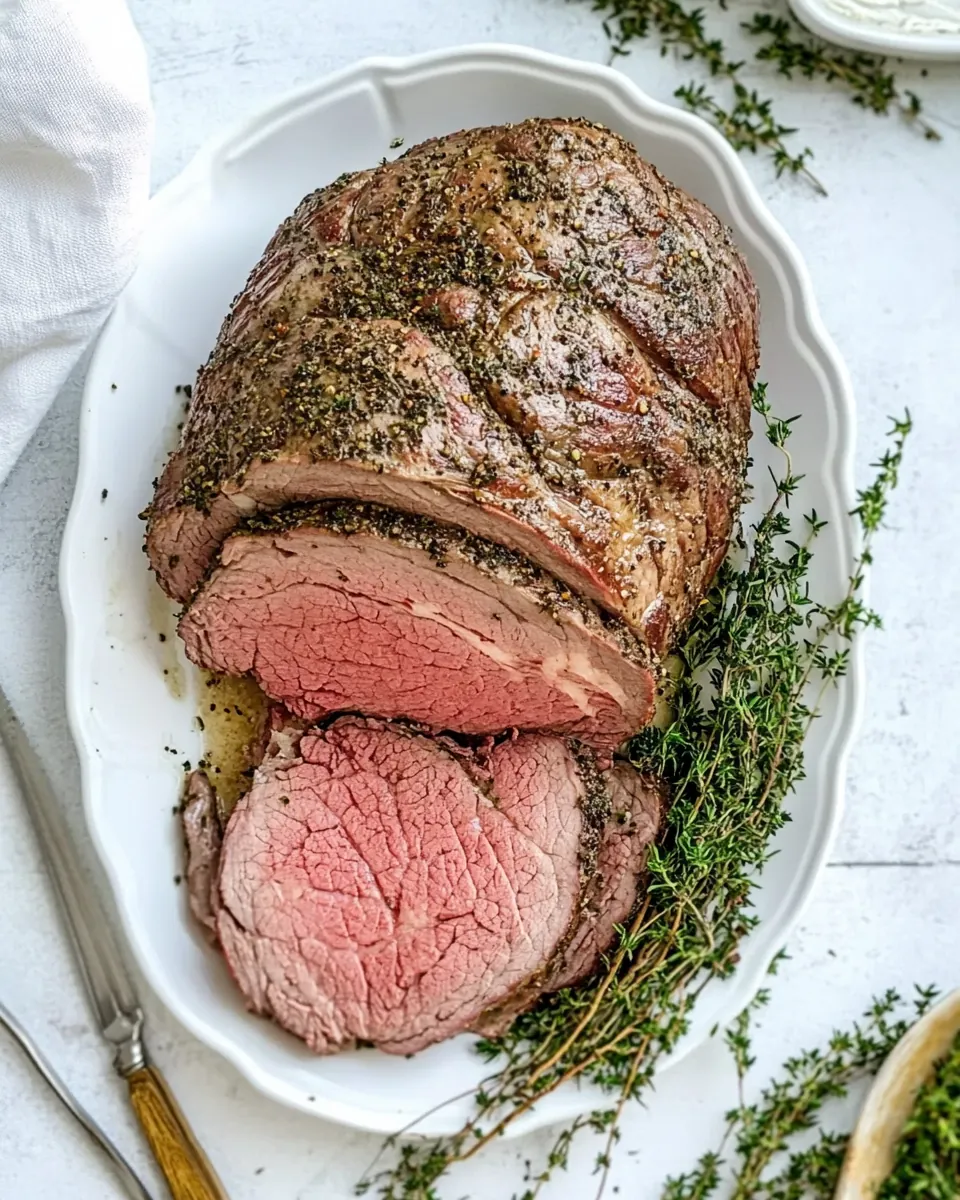
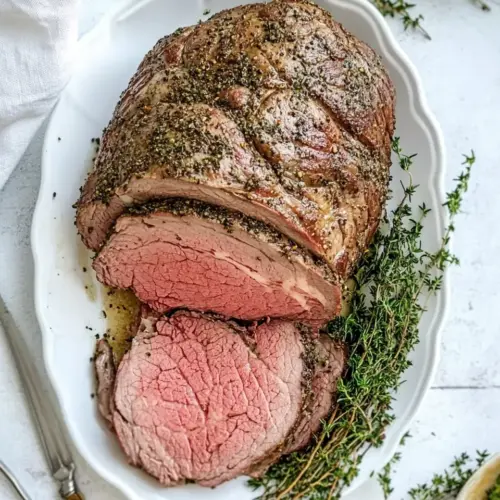
- Let it rest for 15 minutes. After resting, slice the meat against the grain into thin slices and serve.: As you slice, the knife should glide through with minimal resistance, revealing even, pink ribbons of meat. Cutting against the grain shortens muscle fibers, producing tender bites that are easy to chew. Serving immediately on a warm platter keeps the texture inviting. One common oversight is cutting with a dull knife, which crushes the meat and makes slices ragged instead of clean.
Tips and Variations
I like to offer straightforward tips that make a big difference when preparing Eye Of Round Roast. These notes expand the recipe, covering doneness preferences, storage, and simple variations that enhance texture and flavor. Read each tip and choose what fits your meal plan and schedule.
- Doneness guidance: Aim for an internal temperature of 130°F for medium rare, knowing that carryover cooking will raise it to about 135°F, which keeps the roast tender and juicy. If you prefer a firmer texture, you can cook to 145°F for medium, but expect less pink in the center.
- Resting rule: Always rest the roast for 15 minutes tented in foil after cooking, this step allows juices to redistribute and prevents them from running out when sliced, which preserves both moisture and presentation.
- Slicing technique: Use a sharp carving knife and slice thinly against the grain, this shortens muscle fibers and produces slices that feel tender in the mouth, making a lean cut like this far more enjoyable.
- Serving ideas: Serve thin slices with simple pan juices or a light jus, and pair with roasted vegetables or mashed potatoes to complement the beef without overpowering it.
- Storage and leftovers: Cool quickly, then store in an airtight container in the fridge for up to five days, or freeze slices for up to six months, which preserves texture and flavor for future meals.
Serving Options for Eye Of Round Roast
This roast fits many occasions from family dinners to more formal gatherings. Below are thoughtful serving suggestions and pairing ideas to help you present the roast beautifully, with storage and seasonal notes included in the list format requested.
- Classic dinner plate: Serve thin slices of the roast with roasted root vegetables and a simple gravy or jus, creating a balanced meal where the lean beef remains central.
- Holiday or special occasion: Present the roast whole on a warmed platter carved at the table, accompanied by elegant sides like buttered green beans and creamy mashed potatoes to elevate the experience.
- Casual sandwiches: Use leftover slices for thinly sliced roast beef sandwiches with a smear of mustard or horseradish, perfect for casual lunches or picnics, and a great way to stretch the roast across multiple meals.
- Make ahead and store: Refrigerate sliced roast in airtight containers for up to five days, or freeze slices wrapped tightly for up to six months; thaw overnight in the fridge before reheating gently to avoid drying.
- Seasonal pairings: In winter, pair the roast with root vegetables and hearty grains, while in spring, serve with light, crisp salads and lemony sides to brighten the plate.
- Serving temperature: Serve the roast warm but not piping hot after resting, which allows flavors to be more pronounced and the texture to be pleasantly tender for guests.
FAQ
Conclusion
What makes this recipe special is how it transforms a modest, lean cut into a centerpiece with minimal fuss and maximum flavor. The combination of an initial high heat to build a savory crust, followed by a lower roasting temperature and careful resting, produces consistently tender, thinly sliced beef. Give it a try next time you want an economical yet elegant main course, and let the thermometer be your guide. You might be surprised at how often this roast becomes my go to when I want to feed a group without complicated prep.
Eye Of Round Roast
Equipment
- Roasting Pan
- Rack
- Meat Thermometer
- Mixing Bowl
Ingredients
- 4 pounds eye of round roast 1 whole roast Season generously to enhance and tenderize the roast by drawing surface moisture and improving crust formation during roasting; also helps balance overall flavor and preserves meat.
- 4 tablespoons olive oil Coat evenly to promote even browning and prevent sticking while roasting; additionally contributes a subtle fruity richness and helps herbs and spices adhere to the roast.
- 1 1/2 tablespoons salt Season liberally to bring out natural beef flavors and aid in moisture retention; also creates a savory foundation that complements pepper and herbs during cooking.
- 1 tablespoon black pepper Season coarsely to introduce a sharp, pungent heat that contrasts the rich beef; also helps form a flavorful crust and enhances perceived savoriness.
- 1 tablespoon Italian seasoning Season aromatically to impart a blend of herbs that complements beef, adding complexity and Mediterranean notes; also helps create an even, fragrant crust when roasted.
Instructions
- Preheat the oven to 480°F (250°C). Bring the meat to room temperature.: The kitchen fills with a warm, dry heat as the oven climbs, and you may notice a faint metallic smell from the heating element, which will dissipate quickly. Letting the roast sit at room temperature evens out internal temperatures, which prevents the outside from overcooking while the center comes up to target doneness. The why here is simple, thermal equilibrium helps a consistent roast color and texture. A common mistake is skipping the room temperature step which often causes a chilled center and uneven slices.
- In a small bowl, combine the salt, black pepper, and Italian seasoning. Mix well.: As you stir, the pepper releases aromatic oils and the dry herbs create a fragrant, dusty bouquet that foreshadows the roast's flavor. Mixing ensures an even distribution of seasoning so every slice tastes balanced. This step matters because an uneven rub will produce pockets of over seasoned or bland meat. Watch for clumps, and break them apart; a frequent error is not mixing thoroughly which leads to inconsistent seasoning.
- Rub the olive oil all over the roast to help the seasoning stick. Then, evenly coat the roast with the herb mixture. Make sure to press the seasoning into the meat, covering all sides.: Feel the slick surface of the olive oil as you massage it into the meat, it becomes slightly tacky and ready to hold the spice blend. The oil promotes browning by encouraging Maillard reactions during the initial high heat, which builds a savory crust and aroma. If you skip this, the rub may not adhere and you will lose the crisp, flavorful exterior. Avoid using too much oil, which can cause flare ups or an oily crust.
- Place the seasoned roast on a rack in a roasting pan, fat side up. Insert a meat thermometer into the thickest part of the roast, making sure it's not touching any bone.: When you press the mixture into the roast, you can hear soft friction and feel the texture change as the granules sink slightly into the surface. This pressed coating creates a concentrated flavor layer that crisps in the oven. The pressing helps the seasonings stay put during the initial high heat blast. A common slip is patting lightly rather than pressing, which allows the rub to fall off during handling.
- Place the roasting pan in the preheated oven and cook for 20 minutes then lower the temperature to 350°F (180°C). Roast for 10 minutes per pound, or around 35-40 minutes. Continue cooking the roast until the internal temperature reaches 130°F (medium-rare). Carryover cooking will get it to around 135°F.: As you place it, the roast settles into the rack and you can see how the fat reflects light, promising a glossy crust. The rack allows air to circulate and prevents the bottom from stewing in rendered juices, giving a more even crust all around. Proper elevation is why the roast browns evenly, and why juices collect beneath for a clean roast pan. Avoid laying the roast directly on the pan, which can lead to soggy undersides.
- Once the roast reaches the desired doneness, remove it from the oven and tent it loosely with foil. Let it rest for 15 minutes. After resting, slice the meat against the grain into thin slices and serve.: The thermometer is your honest guide, its metal probe warm to the touch when inserted, and it anchors the roast’s internal narrative of heat. It prevents guesswork, because visual cues alone can be deceptive with lean cuts. Making sure it does not touch bone avoids falsely high readings. A common error is placing the probe near the surface, which underestimates the time needed for the center to reach target temperature.
- Place the roasting pan in the preheated oven and cook for 20 minutes then lower the temperature to 350°F (180°C).: That initial high heat sizzles the exterior, creating a fragrant, caramelized crust that smells almost nutty. After 20 minutes, lowering to 350°F continues cooking more gently, coaxing the center up without overbrowning. This two stage approach is crucial for texture contrast, producing a flavorful crust and a tender interior. Rushing this by skipping the high heat stage can result in less caramelization and a flatter flavor profile.
- Roast for 10 minutes per pound, or around 35 to 40 minutes.: As the roast proceeds, you will notice juices bead at the surface and the aroma deepen, evolving from raw meat to roasted, savory notes. Timing per pound gives a reliable guideline, but the thermometer remains the final authority. This pacing allows collagen to warm and relax without drying the lean meat. Overestimating time is a common misstep, as you can overshoot the internal temperature and lose tenderness.
- Continue cooking the roast until the internal temperature reaches 130°F (medium-rare).: When the probe reads around 130°F, the meat feels springy yet resilient; pulling it at this point accounts for carryover cooking, which will raise the temperature a few degrees while resting. This target yields tender, slightly pink slices with moisture intact. Relying solely on appearance here risks overcooking, especially with this lean cut.
- Carryover cooking will get it to around 135°F.: After removing from the oven, the roast’s internal heat continues to migrate inward and upward a little, completing the cook. I like to think of this as the final gentle polish that brings the roast to perfect doneness without additional oven time. A mistake to avoid is slicing immediately, which lets juices run and leaves the meat dry on the plate.
- Once the roast reaches the desired doneness, remove it from the oven and tent it loosely with foil.: The tented foil traps residual heat and allows the muscle fibers to relax while juices redistribute, and you may hear a faint hiss as warm steam rises. Resting is essential, because it prevents interior juices from pouring out during slicing. Resist the urge to slice too soon, a frequent error that leads to dryer, less flavorful servings.
- Let it rest for 15 minutes. After resting, slice the meat against the grain into thin slices and serve.: As you slice, the knife should glide through with minimal resistance, revealing even, pink ribbons of meat. Cutting against the grain shortens muscle fibers, producing tender bites that are easy to chew. Serving immediately on a warm platter keeps the texture inviting. One common oversight is cutting with a dull knife, which crushes the meat and makes slices ragged instead of clean.
Notes
- Doneness guidance: Aim for an internal temperature of 130°F for medium rare, knowing that carryover cooking will raise it to about 135°F, which keeps the roast tender and juicy. If you prefer a firmer texture, you can cook to 145°F for medium, but expect less pink in the center.
- Resting rule: Always rest the roast for 15 minutes tented in foil after cooking, this step allows juices to redistribute and prevents them from running out when sliced, which preserves both moisture and presentation.
- Slicing technique: Use a sharp carving knife and slice thinly against the grain, this shortens muscle fibers and produces slices that feel tender in the mouth, making a lean cut like this far more enjoyable.
- Serving ideas: Serve thin slices with simple pan juices or a light jus, and pair with roasted vegetables or mashed potatoes to complement the beef without overpowering it.
- Storage and leftovers: Cool quickly, then store in an airtight container in the fridge for up to five days, or freeze slices for up to six months, which preserves texture and flavor for future meals.