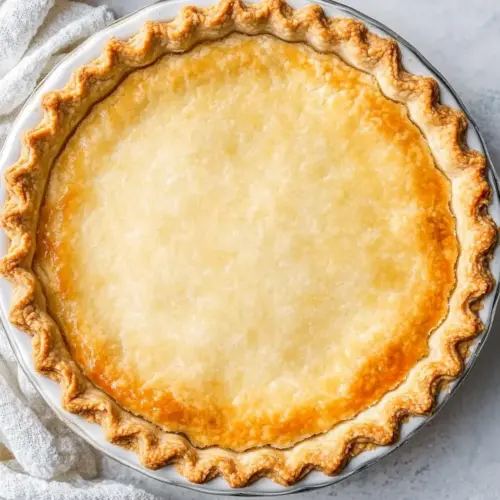
Easy Flaky All Butter Pie Crust
Easy Flaky All Butter Pie Crust is the kind of recipe I reach for when I want a pie that tastes like summer memories and careful technique all at once. The very first time I made this crust I remember the slow, satisfying click of the food processor and the bright scent of cold butter as it broke into pea sized pieces, promising the flaky layers I love. That moment stuck with me, and since then this crust has been my reliable base for fruit pies, tarts, and even savory galettes when guests drop by.
I still think about how tactile the process is, the way the dough responds when you press it into a disk, and how patience pays off when you chill it properly. Over the years I’ve learned small habits that consistently deliver the best texture, like not overworking the dough and keeping everything as cold as possible. These little rituals make the difference between a respectable crust and a truly memorable one.
When I teach friends to make pastry I emphasize rhythm and calm. The recipe for Easy Flaky All Butter Pie Crust feels approachable, but it rewards care. You will notice visual cues, like pea sized butter pieces and a dough that gently holds together when pinched. Those sensory hints are my secret hand signals that I share with anyone who wants to bake with confidence.
Recipe Snapshot
29 mins
10 mins
19 mins
Hard
240 kcal
American
Gluten-Free, Low FODMAP
Desserts
Food processor, Rolling pin, Pie pan, Plastic wrap, Aluminum foil
Why You’ll Love This Easy Flaky All Butter Pie Crust
Flakiness from real butter
I adore that this crust uses unsalted butter as the sole fat, because that butter melts during baking and creates real, layered flakiness. I can always taste the difference between a butter crust and one made with neutral shortening, and I prefer the rich mouthfeel and aroma that butter brings.
Simple, few ingredients
There is comfort in a recipe that demands very little, and the way all purpose flour, salt, and butter work together here is elegantly simple. When I’m short on time yet craving quality, this recipe gives me both minimal shopping and maximal payoff.
Technique driven results
I appreciate that the method is forgiving but technique focused. Pulsing the butter into pea sized pieces and chilling the dough are small steps that change everything. I often remind friends that these actions are not busy work, they are the exact reasons for the crusts that rise and flake just right.
Flexible for sweet and savory
This crust adapts beautifully depending on what I pair it with. Skip the optional sugar for savory pies or keep it for fruit fillings. That flexibility means I can make one dough and invent different meals across the week, which I love when planning menus.
Make ahead convenience
I cannot overstate how useful it is that the dough stores well. I often prepare the disks in advance and refrigerate or freeze them, which saves time on busy days. It’s a small kitchen strategy that elevates home baking without fuss.
What Goes Into Easy Flaky All Butter Pie Crust
This ingredient list reflects a philosophy of restraint and precision. Each component has a clear role: structure from all purpose flour, flavor and flakiness from unsalted butter, balance from salt, a touch of sweetness if desired from sugar, and hydration from ice water. The egg whites are optional for a glossy, set finish when you blind bake. Together these elements create a tender, layered crust that is straightforward yet technically satisfying.
- 2 1/2 cups (12 1/2 ounces) all-purpose flour, divided: Provides structure and bulk to the dough, with all-purpose flour developing gluten when mixed; dividing it allows for layered incorporation of fat and water that yields flakiness.
- 1 teaspoon salt: Balances and enhances overall flavor while controlling dough fermentation; salt also tightens gluten slightly to improve dough handling and texture.
- 1 tablespoon sugar, (omit for savory pies) (optional): Adds a subtle sweetness and flavor depth for sweet pies; optional sugar also promotes browning of the crust and can be omitted for savory fillings.
- 1 cup very cold unsalted butter, cut into tablespoon slices: Creates tender, flaky layers by coating flour with cold butter pieces that steam during baking; keeping butter very cold and in tablespoon slices ensures distinct pockets of fat.
- 5 7 tablespoons very cold ice water: Hydrates the dough to bring the flour together without overdeveloping gluten; adding very cold ice water a tablespoon at a time helps control texture and stickiness.
- 2 tablespoons egg whites, lightly beaten for brushing on the crust: Gives the crust a glossy, golden finish when brushed on before baking; lightly beaten egg whites help browning and create a slight sheen without adding heavy richness.
How to Make Easy Flaky All Butter Pie Crust
This recipe moves from pulsing to chilling to shaping, and it rewards patience. Below I expand each step with sensory cues, reasoning, and troubleshooting so you can bake with confidence. Pay attention to the texture and temperature tips, they are the key to consistent success.
- To the canister of a large food processor, combine 1 1/2 cups flour, salt, sugar and pulse 1 or 2 times to combine.: When you first pulse the dry ingredients the hum of the processor becomes familiar and the mix should look evenly distributed, not clumpy. This step ensures the salt and optional sugar are dispersed through the initial flour, giving even flavor in the finished crust. You will notice a faint dusty scent of flour with hints of the sugar if used. A common mistake is overpulsing here, which can heat the flour slightly; just use short bursts so the blade does not warm the mix.
- Add the sliced butter cubes to the food processor and pulse for approximately 50 seconds, or until a paste forms. Break up and distribute the clumps evenly around the processor canister.: As you pulse, you will hear the sound change from a high pitch to a more muffled chop as the butter breaks down. The butter should not fully melt, instead it will smear into small clumps that look glossy and slightly damp. The aroma of fresh butter becomes noticeable. If the mixture warms or becomes greasy, let it chill briefly before continuing, because warm butter will prevent the desired flakiness in the bake.
- Add in the remaining 1 cup flour and pulse another 3 or 4 more times until the flour is in approximately pea-sized pieces.: After adding the rest of the all purpose flour , the texture should shift to a mix dotted with pea sized bits of butter coated in flour. Visually, these pieces should be roughly uniform. This coating helps create pockets of steam in the oven, which lift the dough into flaky layers. Avoid overprocessing into a uniform paste, as that gives a mealy, dense result rather than flaky layers.
- Add 5 tablespoons of water and pulse to combine.: When you add the initial ice water , the dough will start to come together in ragged clumps. Gently squeeze a small amount between your fingers; it should hold but not be tacky. You will sense the temperature drop as the water chills the dough slightly, which is good. If the dough feels too dry, that is intentional here, because it will finish coming together with optional additional water. A risk is adding too much; stop as soon as it holds.
- Optionally, add the remaining 2 tablespoons water and pulse 2 or 3 times. Do not add this additional water if your dough has already come together and seems sufficiently moist.: This optional addition can make the dough cohesive without overworking, and you may hear fewer dry clacks from the processor as the mix smooths. The surface should no longer crumble when pinched. If the dough becomes sticky, refrain from adding more water and chill it instead, because excess moisture leads to a tough crust during baking.
- Remove the dough and form a ball.: At this point the dough will feel cool to the touch and slightly patchy, holding together when pressed. The aroma is a gentle combination of flour and butter. Forming a ball brings all those elements into a single mass without kneading. A mistake people make is overkneading to force cohesion; that develops gluten and toughens the crust, so handle it gently.
- Divide the dough into two equal portions.: Splitting the dough yields two disks for top and bottom crusts or two single crust pies. You will feel the evenly portioned weight when you press the pieces; using a scale helps but I often trust my eye. If portions are uneven the baking time may vary slightly, so aim for balance if you want uniform pies.
- Roll each portion into a ball and wrap tightly in plastic wrap.: Rolling into a ball and wrapping seals in moisture and prevents freezer burn if you store them. The wrapped dough should feel cool and slightly firm. I like to press out air before sealing. A common error is loose wrapping, which leads to drier dough skins and less pliability when rolling.
- Press down to form a thick disk. Repeat with the second portion of dough.: Flattening the ball into a disk reduces chilling time and makes rolling easier later. The disk should be roughly an inch thick, firm but not rock hard. This shape chills evenly. If you press too thin, the dough may chill into a shape that cracks when rolled out, so keep it comfortably thick.
- Refrigerate for 1 hour, then allow to sit on the counter for 10 minutes before rolling out for the crust.: Chilling is crucial because cold butter yields flaky layers during baking. After an hour in the fridge let the dough rest 10 minutes so it loses a touch of chill and becomes easier to roll, but still cold. Rolling when too cold risks cracking, while rolling when too warm causes the butter to smear. Timing here controls texture.
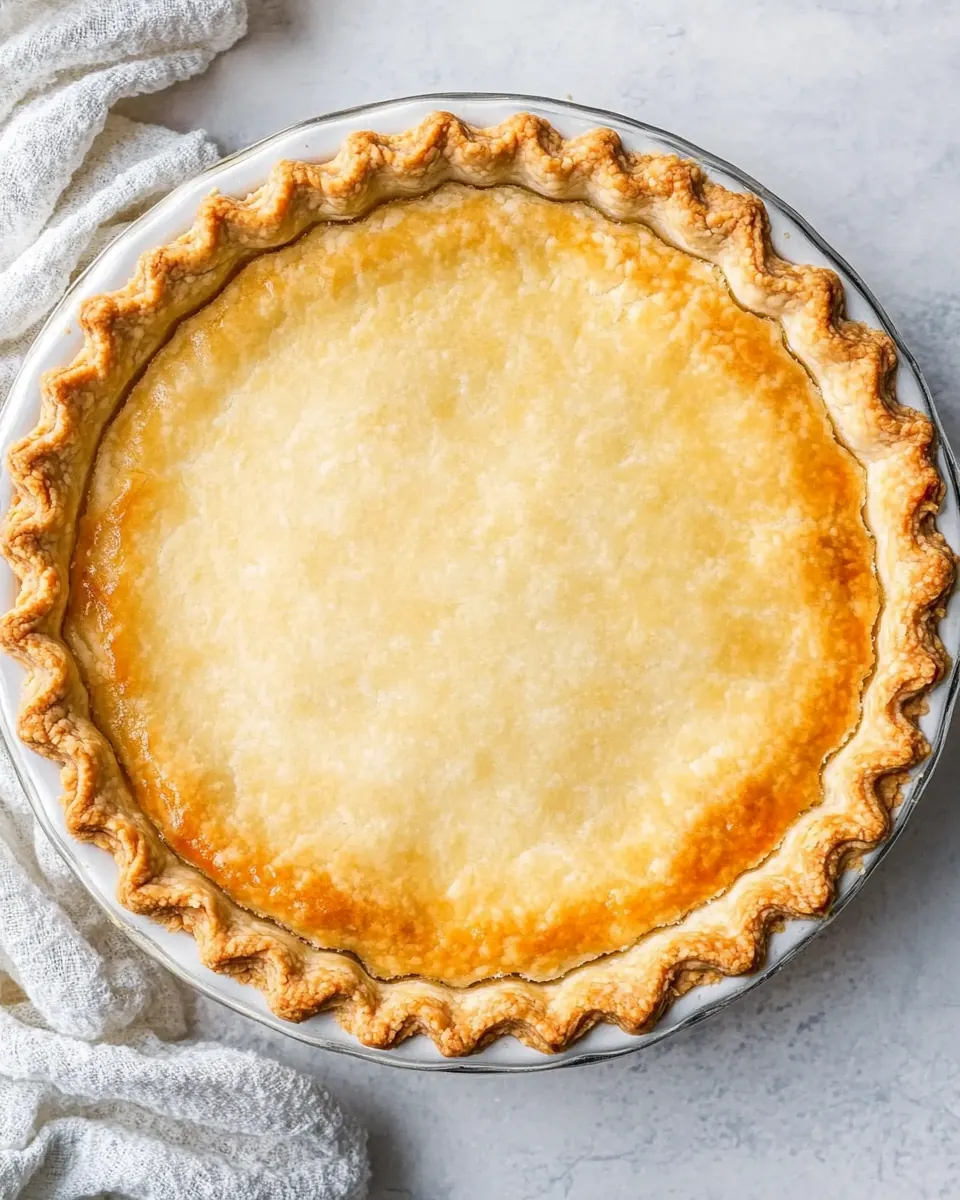
- If you are using a recipe that needs a blind bake (baking the crust first before adding any filling), preheat the oven to 450°F.: The oven should be fully hot before blind baking, which jump starts the steam pockets and sets the structure. You will hear a definitive oven hum and smell a faint toasty heat. Preheating is often skipped, causing a limp crust that does not set properly.
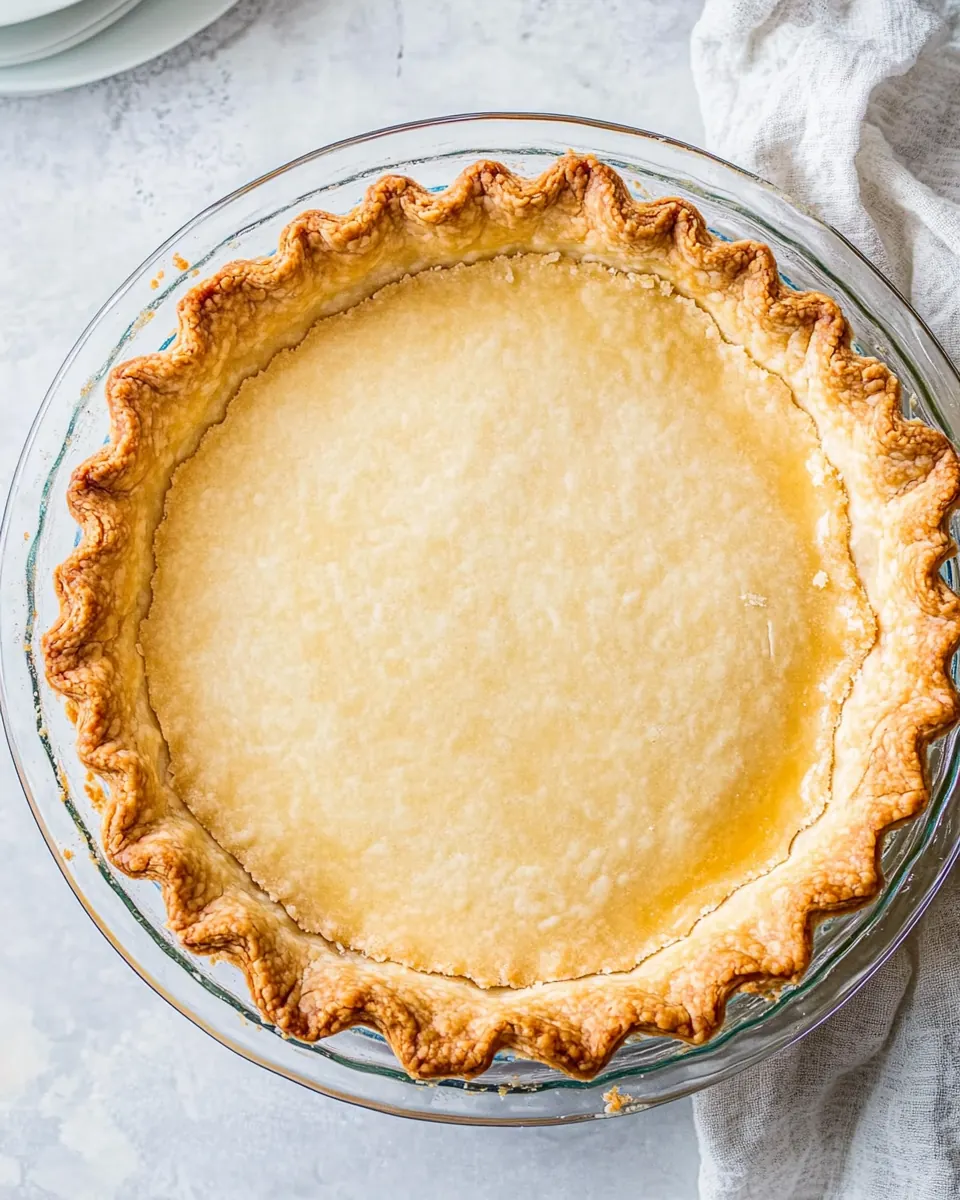
- To bake a single crust, roll the dough out slightly thicker than you normally would.: A slightly thicker single crust holds up better during blind baking without collapsing. As you roll you will see a matte surface with visible butter flecks; this is ideal. Rolling too thin here risks overbrowning and holes.
- Roll the crust up over the rolling pin, then gently unroll over the pie pan.: Using the rolling pin to transfer the dough keeps it intact. The dough should glide with gentle pressure, not drag or tear. If it sticks, dust the surface lightly with flour or chill briefly. Tearing at this stage leads to patching that shows after baking.
- Press it into the base of the pie pan.: Once in the pan smooth the base with fingertips so there are no large air pockets. The dough should sit flush against the pan walls and bottom. Large bubbles form later if you trap air now, so poke gently to settle the dough if needed.
- Trim the crust 1-inch over the edge.: Leaving an inch overhang gives you material to fold under for a thicker edge. You will see a clean rim after trimming. Cutting too close leaves nothing to crimp, and trimming too far wastes dough.
- Fold the extra crust under the edge to make the edges thicker.: Folding creates a sturdy rim that crisps beautifully. The folded edge should feel firm and slightly layered to the touch. If you fold unevenly the edge bakes inconsistently, so take a moment to make it smooth.
- Then using your first finger and thumb on one hand and a first finger on the other, press the dough with one finger into the middle of the other two fingers gently creating a ridge around the crust. This is an easy way to edge the crust but note there are many ways to edge crust.: This classic crimp method gives a pretty finished edge and helps seal the crust. You will notice small, regular ridges that brown attractively. If your fingers are cold the dough forms a tidier ridge; warm hands can make the dough sticky and limp.
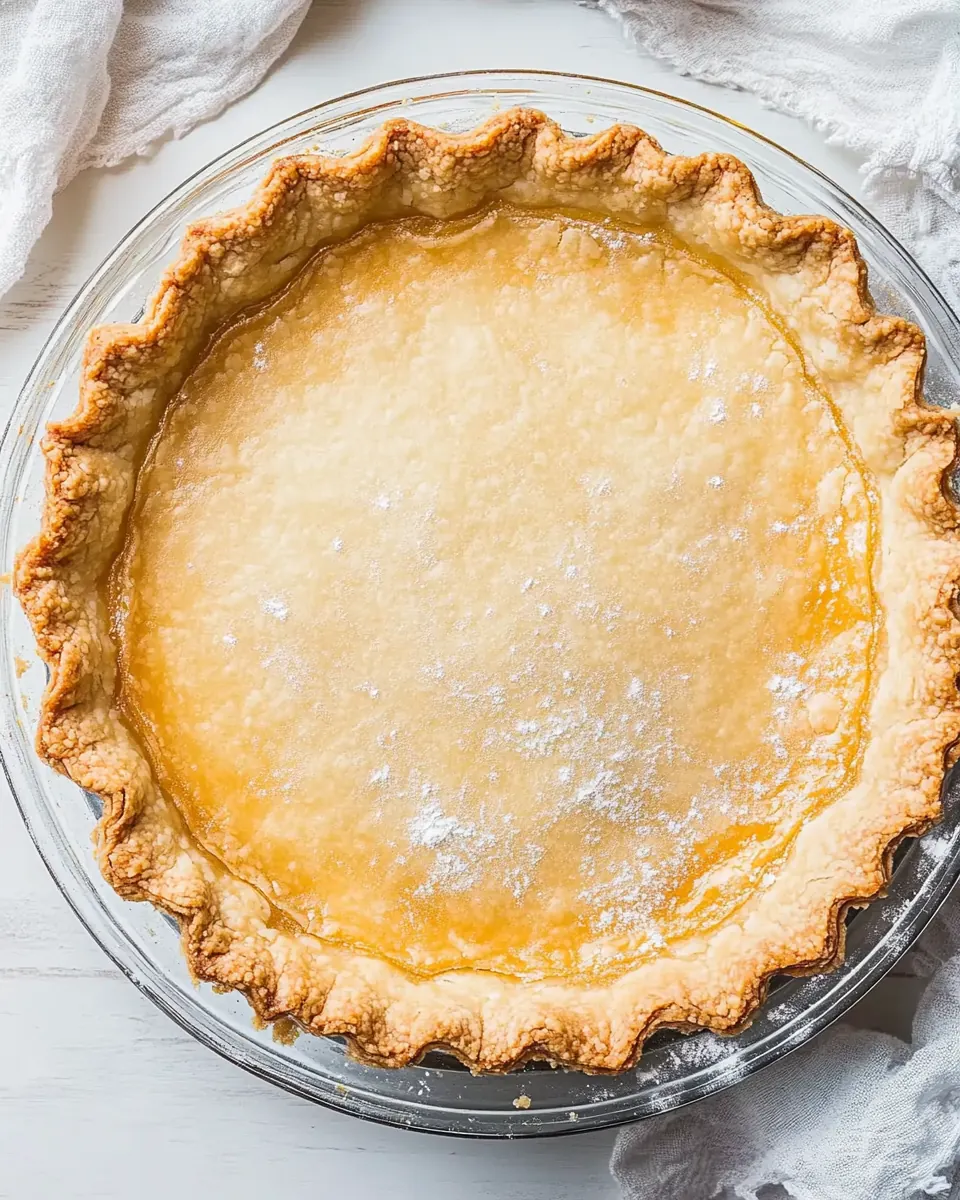
- Optionally, if you have time, return the pie dish with the crust in it to the fridge for approximately 30 minutes to chill once again. This will produce an even flakier, lighter crust because of how the cold butter in the dough will behave in the hot oven.: That extra chill firms the butter and prevents it from melting too quickly, so steam develops in distinct layers. You will feel the chilled pan when moving it. Skipping this step can still yield a nice crust, but the extra chill noticeably improves flake.
- Cover the dough with aluminum foil and fill with dry beans or pie weights if you have them. This will prevent the pie from bubbling up in the middle. Additionally, you can also prick the bottom of the crust with a fork a few times before covering with foil and adding the dry beans.: When you press the foil and weights the crust will stay flat, and you might hear a soft rattle from the beans. Fork pricks allow small vents that reduce pockets under the crust. If you omit weights the crust can puff, creating uneven thickness after baking.
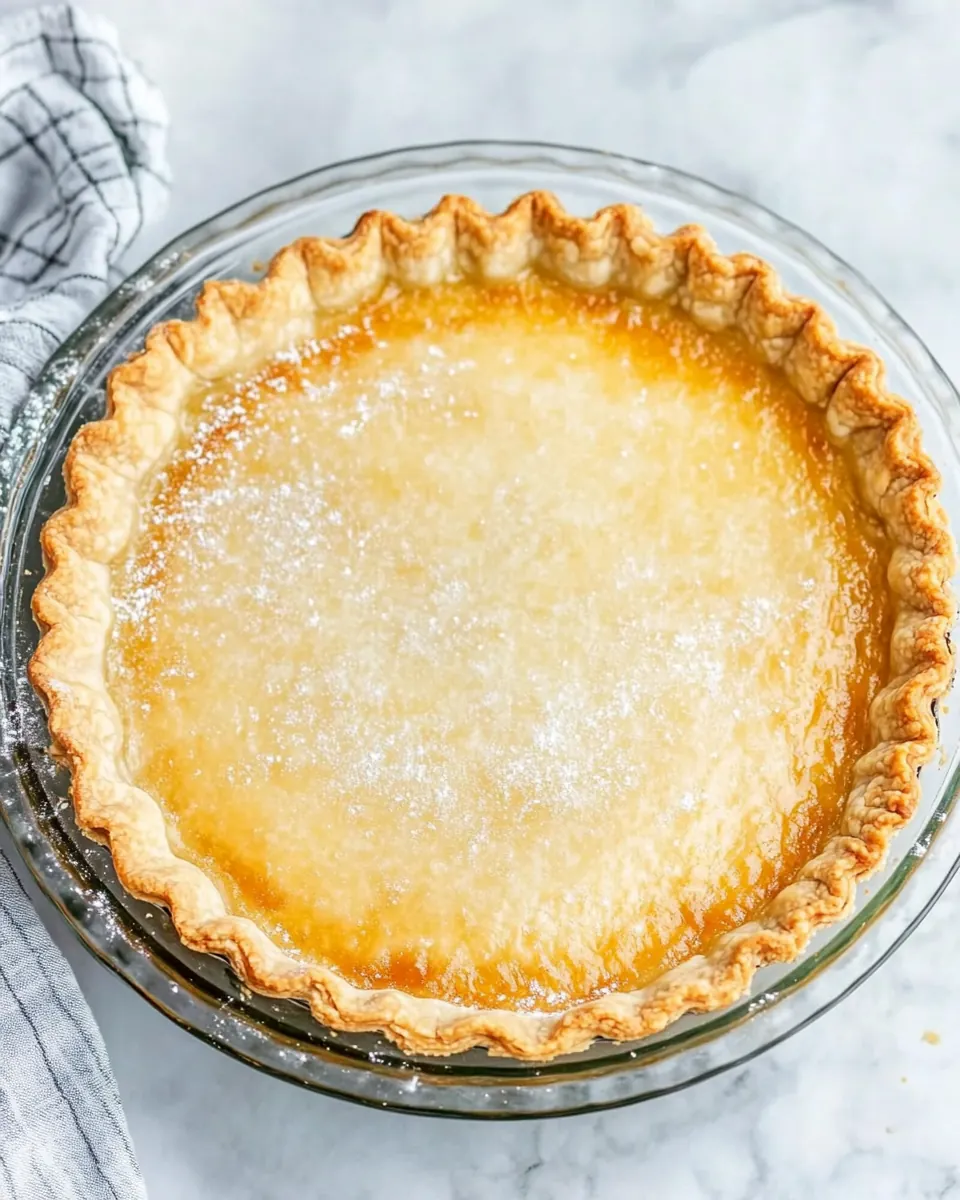
- Bake for 15 minutes, then brush with egg whites.: During the initial bake the edges will begin to set and take on a pale golden tone, and you will smell a faint toasty butter note. Brushing with egg whites after this step seals the surface, preventing sogginess. Be careful not to overbake in this stage, which can make the crust too crisp before fillings are added.
- Return to the oven and bake for an additional 3 to 4 minutes. This helps set the crust.: The final few minutes will give the surface a slight sheen and a firmer texture. You will see gentle deepening of color. Overbaking here causes excessive dryness, so watch closely.
- Fill with your favorite pie filling.: At this point the shell is ready to accept fillings, whether sweet or savory. The base should feel set but not brittle. If the shell seems underdone, give it a minute more in the oven before adding a wet filling to prevent sogginess.
- Roll out the dough to approximately 12-inches in diameter.: For a top crust measure and roll to a roughly 12 inch circle so it covers the pie comfortably. The surface should show small butter specks and be pliable enough to lift. Rolling too small makes assembly tight, while rolling excessively large wastes dough.
- Roll the crust up over the rolling pin, then gently unroll over the pie pan.: Transfer the top crust carefully, aligning it over the filled pie. If the dough tears patch it by pressing a small piece of extra dough to seal, smoothing the seam with a fingertip dampened slightly with water. Tears left unrepaired can leak juices during baking.
- Press it into the base of the pie pan.: Once the top is in place press the edges together to seal the filling, feeling for gaps. A sealed edge prevents leaks and keeps the filling centered. Poorly sealed edges lead to bubbling and messy drips.
- Trim the crust 1-inch over the edge.: Trim a consistent overhang to fold under and crimp as before. Uniform trimming results in even baking and a professional look. Uneven trimming can create weak spots that brown too quickly.
- Fold the extra crust under the edge to make the edges thicker.: Repeat the folding technique to form a sturdy rim that will brown uniformly. The thick edge should feel substantial and layered. If the edge is too thin it may burn before the center is done.
- Then using your first finger and thumb on one hand and a first finger on the other, press the dough with one finger into the middle of the other two fingers gently creating a ridge around the crust. This is an easy way to edge the crust but note there are many ways to edge crust.: Crimp consistently for an even bake and attractive finish. Take your time, as rushed crimping often looks uneven after baking.
- Fill with your favorite pie filling.: With the top sealed, press lightly to distribute the filling, and remove any stray flour dusting. The finished pie should look balanced and ready for a final vent or sheen, depending on the recipe.
- If you’re baking a classic apple or cherry pie for example, or another type of double-crusted pie, proceed with likely blind baking the crust.: Some fruit pies benefit from partial blind baking before filling to reduce sogginess. You will notice a crisper bottom and a reliable structure for juicy fillings. Skipping blind baking with very wet fillings can lead to a soggy underside.
- Add the filling.: Add your prepared filling evenly, and level the top gently so it bakes consistently. You will smell fruit or savory aromatics as the oven heat begins to coax the filling flavors together. Overfilling risks bubbling and spillover in the oven, so leave a touch of headspace.
- Rolling out the second crust to approximately 12-inches in diameter.: Prepare the top crust the same way, aiming for even thickness. The sight of the rolled dough should be uniform and flexible. Inconsistent thickness will cause uneven browning.
- Roll the crust up over the rolling pin, then gently unroll over the top of the pie pan.: Center it carefully and make sure the edges meet symmetrically. A centered top crust settles into place smoothly, while misaligned tops require trimming and patching.
- Trim the crust 1-inch over the edge.: Trim neatly once more to create a clean overhang for folding and crimping. The trimmed edge should be even all the way around to avoid thin spots that burn.
- Then using your first finger and thumb on one hand and a first finger on the other, press the dough with one finger into the middle of the other two fingers gently creating a ridge around the crust. This is an easy way to edge the crust but note there are many ways to edge crust.: Finish the edge with a consistent crimp pattern for a classic look. The pattern should be even and feel secure, sealing the top and bottom together.
- Vent the pie in the center with a paring knife by making a few slits for the hot steam and air to escape. Alternatively, you can research online how to make pretty design cutouts with a paring knife.: Proper vents let steam escape, preventing soggy pockets and messy overflow. You might hear faint sizzling as the filling begins to heat through. Avoid too few vents, which trap steam, or too many, which let juices run out onto the baking sheet.
How to Switch It Up
There are several small tweaks that let you adapt Easy Flaky All Butter Pie Crust for different fillings and preferences. Below are practical, tested options I use to vary texture, flavor, and handling, each expanded into actionable tips you can use in real time.
- Use chilled tools: Keep your food processor bowl and blade cold before starting, storing them in the fridge briefly so the butter stays firm while you pulse.
- Adjust sugar for savory or sweet: Skip the optional sugar when making savory pies like quiche, and include it for fruit pies to help with browning and subtle sweetness.
- Freeze for storage: Wrap individual disks tightly and freeze for up to three months, thawing in the fridge overnight before rolling to preserve texture.
- Blind bake for juicy fillings: Partially blind bake the shell when using very moist fillings to prevent a soggy bottom, using pie weights or dried beans for even support.
- Brush with egg whites: Use the optional egg whites after an initial bake to seal the crust and create a glossy barrier that reduces sogginess from wet fillings.
- Patch tears with spare dough: If the crust tears while transferring, press a small bit of extra dough over the hole and smooth with a fingertip to seal before baking.
Serving Options for Easy Flaky All Butter Pie Crust
This crust is versatile enough for casual family dinners and special gatherings. Below are thoughtful serving suggestions, pairing ideas, and storage tips to help you present pies beautifully and plan ahead.
- Classic fruit pie serving: Fill the baked shell with lightly sugared seasonal fruit and serve warm with a scoop of vanilla ice cream for contrast in temperature and texture.
- Savory pie presentation: Use the crust for quiches or pot pies, serve with a crisp green salad and vinaigrette to balance the rich, flaky pastry.
- Holiday centerpiece: Make multiple pies ahead of a holiday meal and rewarm gently in a 325°F oven to refresh the texture without overbrowning the edges.
- Storage tips: Store baked pies loosely covered at room temperature up to two days, or refrigerate fruit pies to extend freshness, bringing them to room temperature before serving for the best texture.
- Seasonal pairing: In summer highlight berries and stone fruit, while in cooler months choose spiced apples or pear fillings that pair well with a warm spice blend.
FAQ
Conclusion
This recipe stands out because it turns a few simple ingredients into a reliably flaky, buttery crust that performs well for both sweet and savory pies. Give it a try and enjoy how the technique pays off with layered texture and a rich, inviting aroma that fills your kitchen. With small habits like keeping ingredients cold and pulsing instead of overprocessing, you can create a pie crust that looks and tastes like it came from a bakery, and you’ll be glad you practiced the few steps that make all the difference.
Easy Flaky All Butter Pie Crust
Equipment
- Food Processor
- Rolling Pin
- Pie Pan
- Plastic Wrap
- Aluminum Foil
Ingredients
- 2 1/2 cups (12 1/2 ounces) all-purpose flour, divided Provides structure and bulk to the dough, with all-purpose flour developing gluten when mixed; dividing it allows for layered incorporation of fat and water that yields flakiness.
- 1 teaspoon salt Balances and enhances overall flavor while controlling dough fermentation; salt also tightens gluten slightly to improve dough handling and texture.
- 1 tablespoon sugar, optional (omit for savory pies) Adds a subtle sweetness and flavor depth for sweet pies; optional sugar also promotes browning of the crust and can be omitted for savory fillings.
- 1 cup very cold unsalted butter, cut into tablespoon slices Creates tender, flaky layers by coating flour with cold butter pieces that steam during baking; keeping butter very cold and in tablespoon slices ensures distinct pockets of fat.
- 5 -7 tablespoons very cold ice water Hydrates the dough to bring the flour together without overdeveloping gluten; adding very cold ice water a tablespoon at a time helps control texture and stickiness.
- 2 tablespoons egg whites, lightly beaten for brushing on the crust Gives the crust a glossy, golden finish when brushed on before baking; lightly beaten egg whites help browning and create a slight sheen without adding heavy richness.
Instructions
- To the canister of a large food processor, combine 1 1/2 cups flour, salt, sugar and pulse 1 or 2 times to combine.: When you first pulse the dry ingredients the hum of the processor becomes familiar and the mix should look evenly distributed, not clumpy. This step ensures the salt and optional sugar are dispersed through the initial flour, giving even flavor in the finished crust. You will notice a faint dusty scent of flour with hints of the sugar if used. A common mistake is overpulsing here, which can heat the flour slightly; just use short bursts so the blade does not warm the mix.
- Add the sliced butter cubes to the food processor and pulse for approximately 50 seconds, or until a paste forms. Break up and distribute the clumps evenly around the processor canister.: As you pulse, you will hear the sound change from a high pitch to a more muffled chop as the butter breaks down. The butter should not fully melt, instead it will smear into small clumps that look glossy and slightly damp. The aroma of fresh butter becomes noticeable. If the mixture warms or becomes greasy, let it chill briefly before continuing, because warm butter will prevent the desired flakiness in the bake.
- Add in the remaining 1 cup flour and pulse another 3 or 4 more times until the flour is in approximately pea-sized pieces.: After adding the rest of the all purpose flour , the texture should shift to a mix dotted with pea sized bits of butter coated in flour. Visually, these pieces should be roughly uniform. This coating helps create pockets of steam in the oven, which lift the dough into flaky layers. Avoid overprocessing into a uniform paste, as that gives a mealy, dense result rather than flaky layers.
- Add 5 tablespoons of water and pulse to combine.: When you add the initial ice water , the dough will start to come together in ragged clumps. Gently squeeze a small amount between your fingers; it should hold but not be tacky. You will sense the temperature drop as the water chills the dough slightly, which is good. If the dough feels too dry, that is intentional here, because it will finish coming together with optional additional water. A risk is adding too much; stop as soon as it holds.
- Optionally, add the remaining 2 tablespoons water and pulse 2 or 3 times. Do not add this additional water if your dough has already come together and seems sufficiently moist.: This optional addition can make the dough cohesive without overworking, and you may hear fewer dry clacks from the processor as the mix smooths. The surface should no longer crumble when pinched. If the dough becomes sticky, refrain from adding more water and chill it instead, because excess moisture leads to a tough crust during baking.
- Remove the dough and form a ball.: At this point the dough will feel cool to the touch and slightly patchy, holding together when pressed. The aroma is a gentle combination of flour and butter. Forming a ball brings all those elements into a single mass without kneading. A mistake people make is overkneading to force cohesion; that develops gluten and toughens the crust, so handle it gently.
- Divide the dough into two equal portions.: Splitting the dough yields two disks for top and bottom crusts or two single crust pies. You will feel the evenly portioned weight when you press the pieces; using a scale helps but I often trust my eye. If portions are uneven the baking time may vary slightly, so aim for balance if you want uniform pies.
- Roll each portion into a ball and wrap tightly in plastic wrap.: Rolling into a ball and wrapping seals in moisture and prevents freezer burn if you store them. The wrapped dough should feel cool and slightly firm. I like to press out air before sealing. A common error is loose wrapping, which leads to drier dough skins and less pliability when rolling.
- Press down to form a thick disk. Repeat with the second portion of dough.: Flattening the ball into a disk reduces chilling time and makes rolling easier later. The disk should be roughly an inch thick, firm but not rock hard. This shape chills evenly. If you press too thin, the dough may chill into a shape that cracks when rolled out, so keep it comfortably thick.
- Refrigerate for 1 hour, then allow to sit on the counter for 10 minutes before rolling out for the crust.: Chilling is crucial because cold butter yields flaky layers during baking. After an hour in the fridge let the dough rest 10 minutes so it loses a touch of chill and becomes easier to roll, but still cold. Rolling when too cold risks cracking, while rolling when too warm causes the butter to smear. Timing here controls texture.
- If you are using a recipe that needs a blind bake (baking the crust first before adding any filling), preheat the oven to 450°F.: The oven should be fully hot before blind baking, which jump starts the steam pockets and sets the structure. You will hear a definitive oven hum and smell a faint toasty heat. Preheating is often skipped, causing a limp crust that does not set properly.
- To bake a single crust, roll the dough out slightly thicker than you normally would.: A slightly thicker single crust holds up better during blind baking without collapsing. As you roll you will see a matte surface with visible butter flecks; this is ideal. Rolling too thin here risks overbrowning and holes.
- Roll the crust up over the rolling pin, then gently unroll over the pie pan.: Using the rolling pin to transfer the dough keeps it intact. The dough should glide with gentle pressure, not drag or tear. If it sticks, dust the surface lightly with flour or chill briefly. Tearing at this stage leads to patching that shows after baking.
- Press it into the base of the pie pan.: Once in the pan smooth the base with fingertips so there are no large air pockets. The dough should sit flush against the pan walls and bottom. Large bubbles form later if you trap air now, so poke gently to settle the dough if needed.
- Trim the crust 1-inch over the edge.: Leaving an inch overhang gives you material to fold under for a thicker edge. You will see a clean rim after trimming. Cutting too close leaves nothing to crimp, and trimming too far wastes dough.
- Fold the extra crust under the edge to make the edges thicker.: Folding creates a sturdy rim that crisps beautifully. The folded edge should feel firm and slightly layered to the touch. If you fold unevenly the edge bakes inconsistently, so take a moment to make it smooth.
- Then using your first finger and thumb on one hand and a first finger on the other, press the dough with one finger into the middle of the other two fingers gently creating a ridge around the crust. This is an easy way to edge the crust but note there are many ways to edge crust.: This classic crimp method gives a pretty finished edge and helps seal the crust. You will notice small, regular ridges that brown attractively. If your fingers are cold the dough forms a tidier ridge; warm hands can make the dough sticky and limp.
- Optionally, if you have time, return the pie dish with the crust in it to the fridge for approximately 30 minutes to chill once again. This will produce an even flakier, lighter crust because of how the cold butter in the dough will behave in the hot oven.: That extra chill firms the butter and prevents it from melting too quickly, so steam develops in distinct layers. You will feel the chilled pan when moving it. Skipping this step can still yield a nice crust, but the extra chill noticeably improves flake.
- Cover the dough with aluminum foil and fill with dry beans or pie weights if you have them. This will prevent the pie from bubbling up in the middle. Additionally, you can also prick the bottom of the crust with a fork a few times before covering with foil and adding the dry beans.: When you press the foil and weights the crust will stay flat, and you might hear a soft rattle from the beans. Fork pricks allow small vents that reduce pockets under the crust. If you omit weights the crust can puff, creating uneven thickness after baking.
- Bake for 15 minutes, then brush with egg whites.: During the initial bake the edges will begin to set and take on a pale golden tone, and you will smell a faint toasty butter note. Brushing with egg whites after this step seals the surface, preventing sogginess. Be careful not to overbake in this stage, which can make the crust too crisp before fillings are added.
- Return to the oven and bake for an additional 3 to 4 minutes. This helps set the crust.: The final few minutes will give the surface a slight sheen and a firmer texture. You will see gentle deepening of color. Overbaking here causes excessive dryness, so watch closely.
- Fill with your favorite pie filling.: At this point the shell is ready to accept fillings, whether sweet or savory. The base should feel set but not brittle. If the shell seems underdone, give it a minute more in the oven before adding a wet filling to prevent sogginess.
- Roll out the dough to approximately 12-inches in diameter.: For a top crust measure and roll to a roughly 12 inch circle so it covers the pie comfortably. The surface should show small butter specks and be pliable enough to lift. Rolling too small makes assembly tight, while rolling excessively large wastes dough.
- Roll the crust up over the rolling pin, then gently unroll over the pie pan.: Transfer the top crust carefully, aligning it over the filled pie. If the dough tears patch it by pressing a small piece of extra dough to seal, smoothing the seam with a fingertip dampened slightly with water. Tears left unrepaired can leak juices during baking.
- Press it into the base of the pie pan.: Once the top is in place press the edges together to seal the filling, feeling for gaps. A sealed edge prevents leaks and keeps the filling centered. Poorly sealed edges lead to bubbling and messy drips.
- Trim the crust 1-inch over the edge.: Trim a consistent overhang to fold under and crimp as before. Uniform trimming results in even baking and a professional look. Uneven trimming can create weak spots that brown too quickly.
- Fold the extra crust under the edge to make the edges thicker.: Repeat the folding technique to form a sturdy rim that will brown uniformly. The thick edge should feel substantial and layered. If the edge is too thin it may burn before the center is done.
- Then using your first finger and thumb on one hand and a first finger on the other, press the dough with one finger into the middle of the other two fingers gently creating a ridge around the crust. This is an easy way to edge the crust but note there are many ways to edge crust.: Crimp consistently for an even bake and attractive finish. Take your time, as rushed crimping often looks uneven after baking.
- Fill with your favorite pie filling.: With the top sealed, press lightly to distribute the filling, and remove any stray flour dusting. The finished pie should look balanced and ready for a final vent or sheen, depending on the recipe.
- If you’re baking a classic apple or cherry pie for example, or another type of double-crusted pie, proceed with likely blind baking the crust.: Some fruit pies benefit from partial blind baking before filling to reduce sogginess. You will notice a crisper bottom and a reliable structure for juicy fillings. Skipping blind baking with very wet fillings can lead to a soggy underside.
- Add the filling.: Add your prepared filling evenly, and level the top gently so it bakes consistently. You will smell fruit or savory aromatics as the oven heat begins to coax the filling flavors together. Overfilling risks bubbling and spillover in the oven, so leave a touch of headspace.
- Rolling out the second crust to approximately 12-inches in diameter.: Prepare the top crust the same way, aiming for even thickness. The sight of the rolled dough should be uniform and flexible. Inconsistent thickness will cause uneven browning.
- Roll the crust up over the rolling pin, then gently unroll over the top of the pie pan.: Center it carefully and make sure the edges meet symmetrically. A centered top crust settles into place smoothly, while misaligned tops require trimming and patching.
- Trim the crust 1-inch over the edge.: Trim neatly once more to create a clean overhang for folding and crimping. The trimmed edge should be even all the way around to avoid thin spots that burn.
- Then using your first finger and thumb on one hand and a first finger on the other, press the dough with one finger into the middle of the other two fingers gently creating a ridge around the crust. This is an easy way to edge the crust but note there are many ways to edge crust.: Finish the edge with a consistent crimp pattern for a classic look. The pattern should be even and feel secure, sealing the top and bottom together.
- Vent the pie in the center with a paring knife by making a few slits for the hot steam and air to escape. Alternatively, you can research online how to make pretty design cutouts with a paring knife.: Proper vents let steam escape, preventing soggy pockets and messy overflow. You might hear faint sizzling as the filling begins to heat through. Avoid too few vents, which trap steam, or too many, which let juices run out onto the baking sheet.
Notes
- Use chilled tools: Keep your food processor bowl and blade cold before starting, storing them in the fridge briefly so the butter stays firm while you pulse.
- Adjust sugar for savory or sweet: Skip the optional sugar when making savory pies like quiche, and include it for fruit pies to help with browning and subtle sweetness.
- Freeze for storage: Wrap individual disks tightly and freeze for up to three months, thawing in the fridge overnight before rolling to preserve texture.
- Blind bake for juicy fillings: Partially blind bake the shell when using very moist fillings to prevent a soggy bottom, using pie weights or dried beans for even support.
- Brush with egg whites: Use the optional egg whites after an initial bake to seal the crust and create a glossy barrier that reduces sogginess from wet fillings.
- Patch tears with spare dough: If the crust tears while transferring, press a small bit of extra dough over the hole and smooth with a fingertip to seal before baking.