Easy Chicken Pot Pie
Easy Chicken Pot Pie is the sort of food that feels like a warm welcome when you walk through the door, the familiar scent of butter and herbs promising comfort on a chilly evening.
I remember serving this Easy Chicken Pot Pie after a long week, the kitchen alive with the hiss of sautéing onions and the soft bubbling of a thickened filling, and how everyone reached for seconds without a word. Once, I tucked a flaky top crust over a filling made from shredded chicken and simmered vegetables, and the house seemed to exhale as it baked. That day a neighbor stopped by and left with a slice and a smile, which is how I measure a successful dish. Another time I made a double batch, froze one, and later discovered that reheated, it tasted nearly as good as fresh. I often tweak the seasoning in small ways depending on what I have on hand, but this version stayed true to the classic, cozy profile I grew up loving.
What I like about this recipe is how forgiving it is, you can feel confident even if you are not a pro at pastry work, and the textures reward patient cooking. The crust becomes golden and slightly crisp, the filling creamy and savory, and the herbs knit everything together. Family meals, casual dinners with friends, or nights when you simply need a little culinary reassurance, this Easy Chicken Pot Pie answers the call.
Recipe Snapshot
50 mins
20 mins
30 mins
Medium
400 kcal
American
Gluten-Free, Low FODMAP
Dinner
Deep Dish Pie Plate
What We Adore About This Easy Chicken Pot Pie
Comforting, Classic Flavor
One reason I keep coming back to this Easy Chicken Pot Pie is the familiar, layered taste profile. The butter enriched roux, the savory broth, and the roasted notes from the baked crust come together in a way that feels both nostalgic and deeply satisfying. I find it easy to explain to guests why this hits the spot, because the moment you cut into the crust and the warm steam rises, you know you are in for a treat.
Simple, Accessible Ingredients
I like that the ingredient list is straightforward and pantry friendly, with staples most cooks already own. Using shredded chicken from a rotisserie speeds things up, while basic seasonings like salt and ground pepper let the natural flavors shine. For busy weeknights, that accessibility makes this dish a reliable go to.
Great Texture Contrast
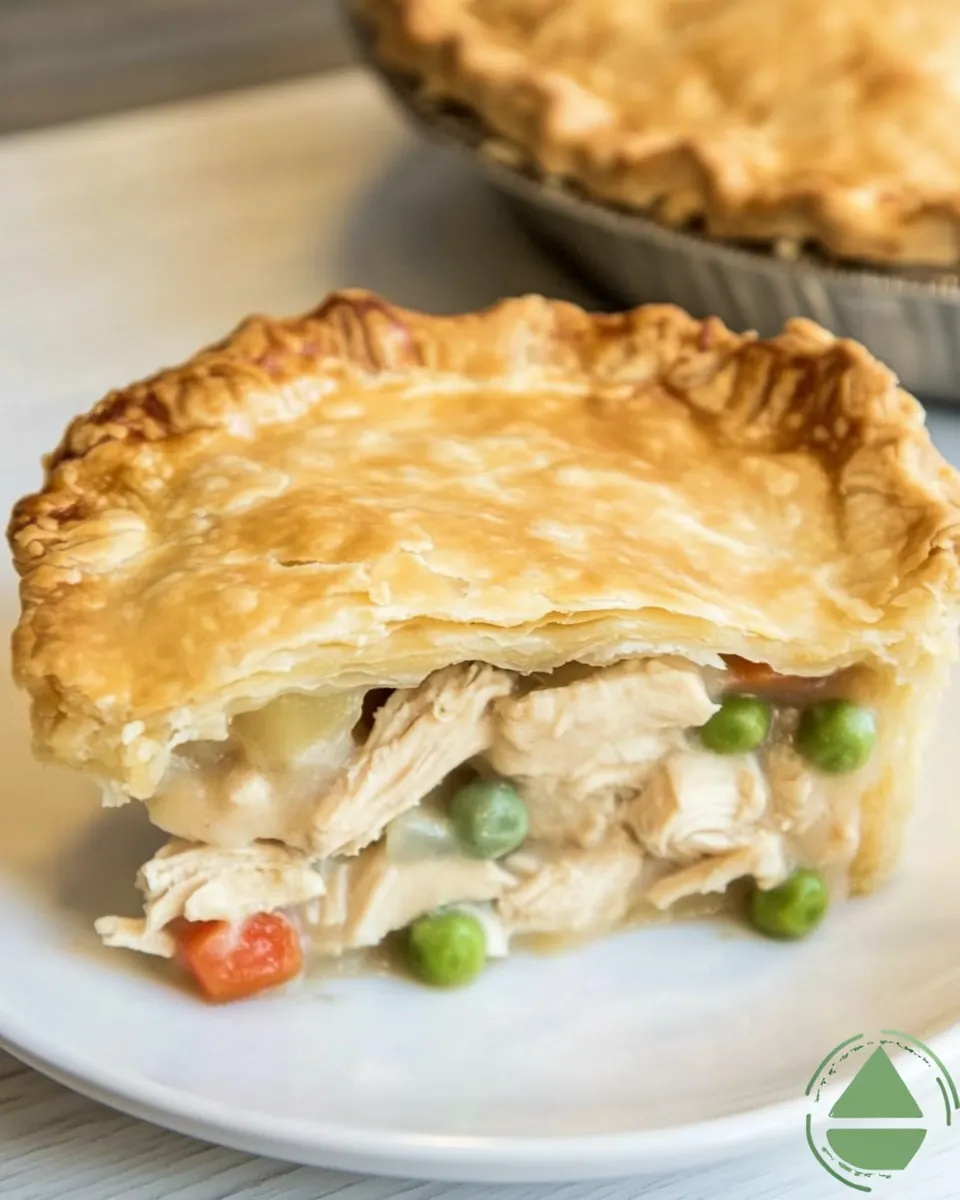
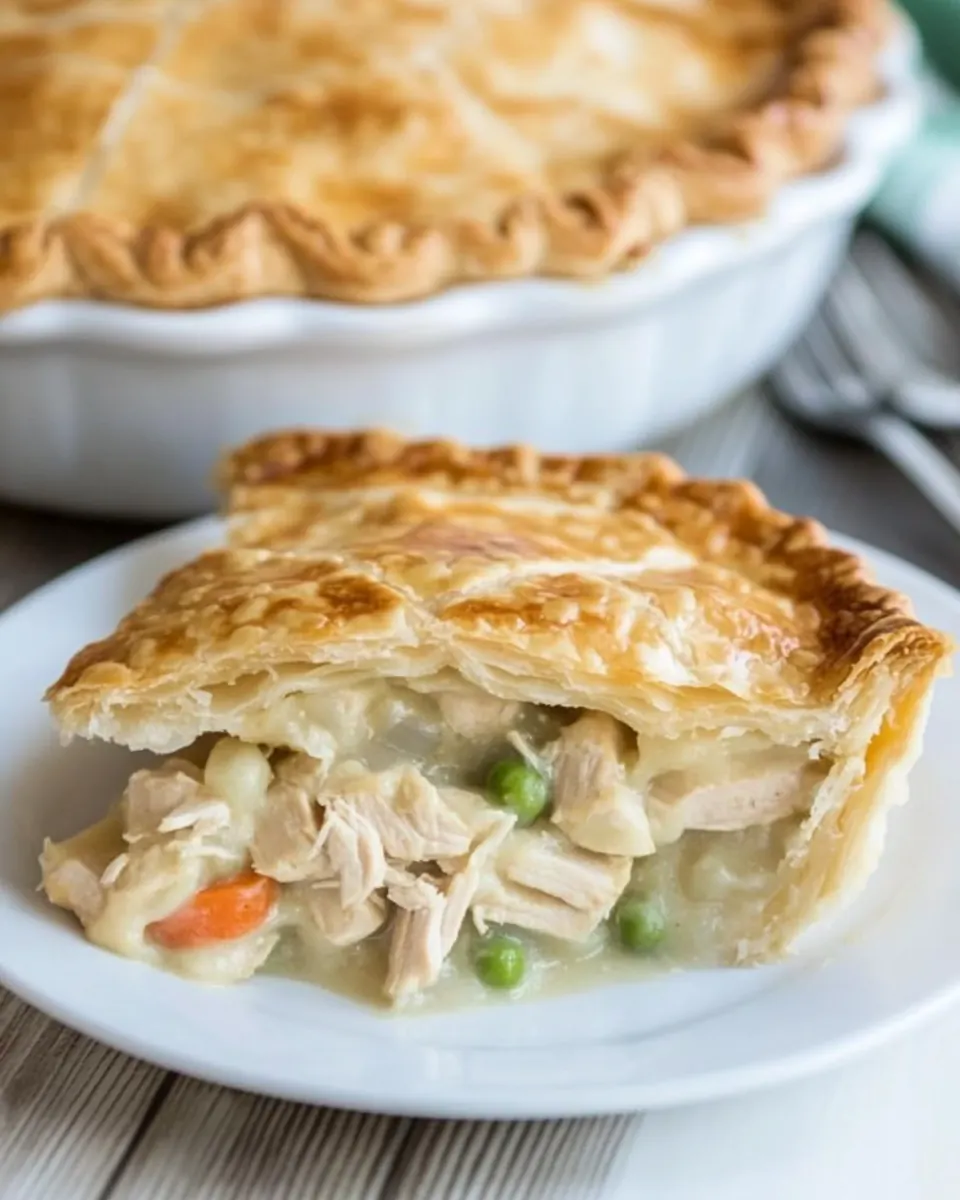
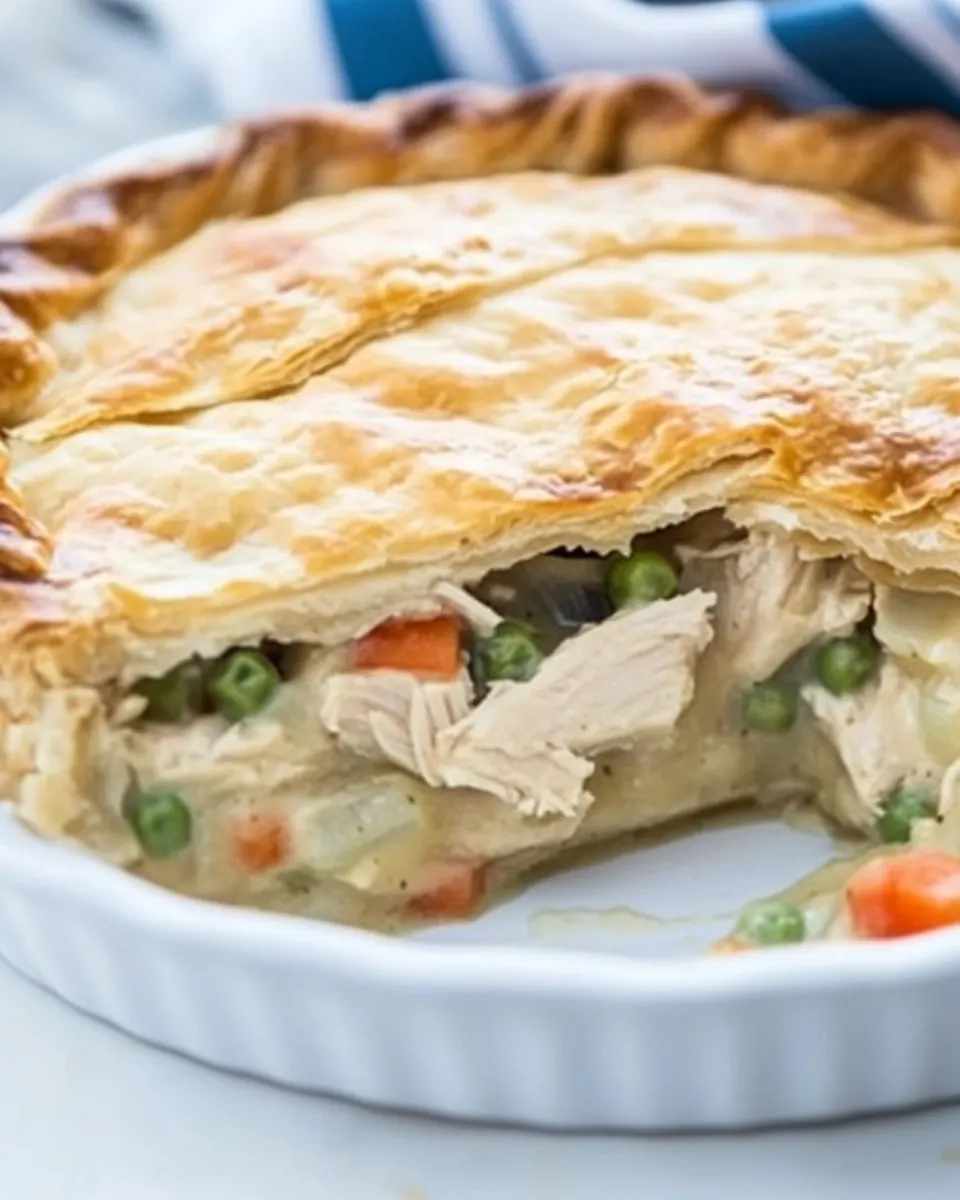
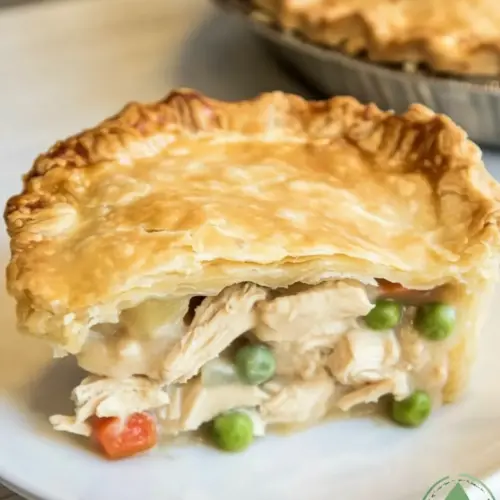
The contrast between the flaky top and the creamy filling is what keeps people coming back for bites. When the crust is golden and slightly crisp, it gives way to tender vegetables and a silky sauce. I pay attention to the thickness of the filling so it is spoonable rather than runny, and that balance is often the difference between good and memorable.
Make Ahead and Freeze Friendly
I value recipes that play well with planning, and this Easy Chicken Pot Pie is forgiving when prepared ahead. You can assemble and refrigerate, or freeze an extra pie for later, which saves time on hectic days. In my experience, freezing works best when you wrap tightly and reheat slowly so the center warms through without burning the crust.
Family Crowd Pleaser
Finally, this recipe is dependable for gatherings because it scales nicely and feels homey yet satisfying. I’ve brought it to potlucks and family dinners, and it tends to disappear fast. It’s the sort of dish that invites conversation and nostalgia, and I’ve seen picky eaters become converts after one warm, buttery bite.
What to Buy for Easy Chicken Pot Pie
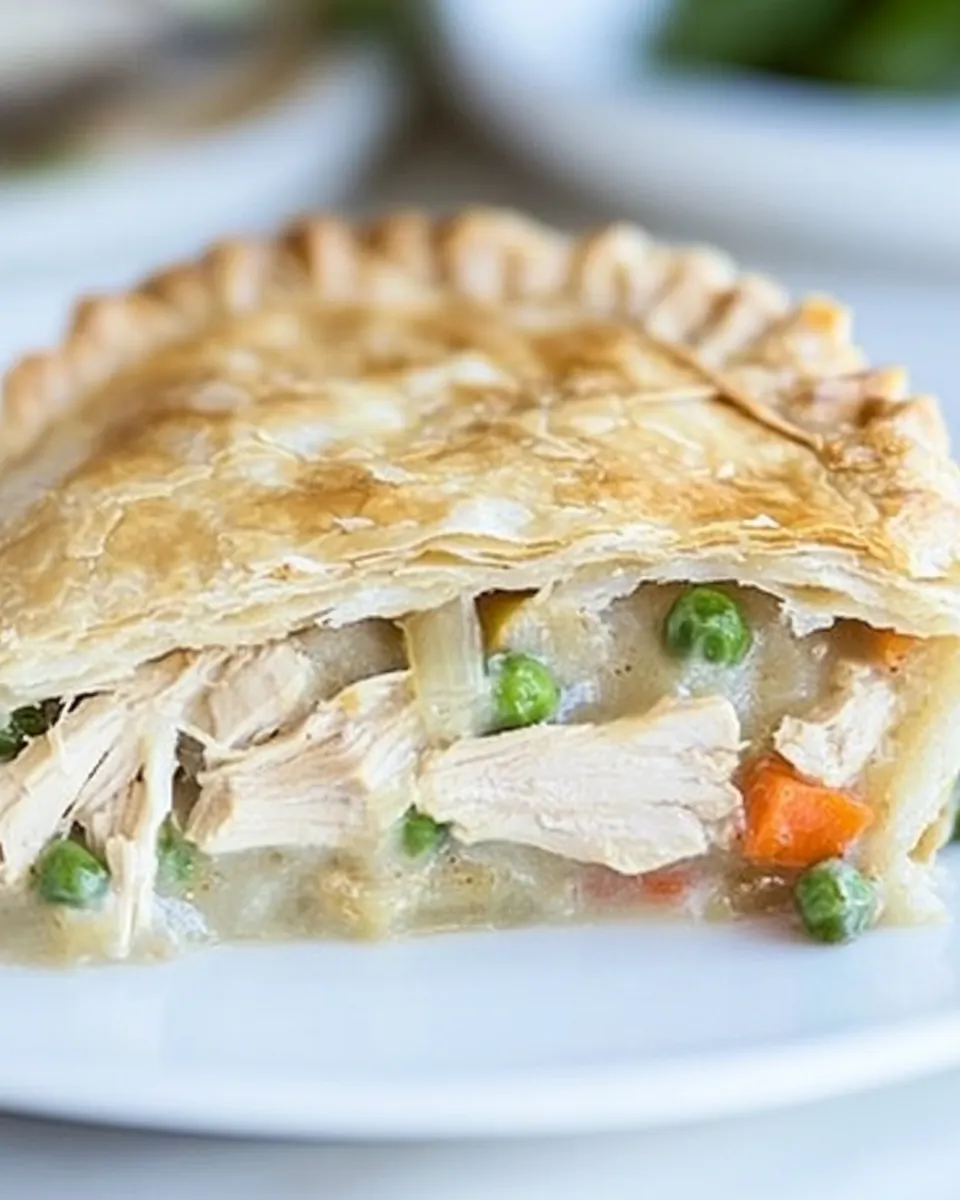
The ingredients for Easy Chicken Pot Pie are intentionally straightforward, aimed at building a rich, savory filling under a crisp, buttery crust. The key players are a sturdy starch for body, aromatic vegetables for depth, a roux to bind the sauce, and shredded chicken to add protein and comfort. Together they create a balanced mouthfeel where creamy richness meets flaky pastry.
- 1 cup peeled and diced potato: Peeled and diced to tender cubes that provide body and mild starchiness to the filling; cook until just fork-tender to avoid turning mushy. Add near the start of sautéing so the potato can absorb flavors from butter and seasonings while cooking through.
- 3/4 cups sliced carrot: Sliced to maintain a slight bite and sweet earthiness that contrasts richer components; simmer until softened but still holding shape. Incorporate early with the potato so carrots release natural sugars and meld with the savory base.
- 1/2 cup butter: Used to enrich the filling by coating vegetables and chicken, adding a silky mouthfeel and carrying fat-soluble flavors; brown gently to develop flavor without burning. Melt before adding aromatics so it emulsifies with the flour to form the roux.
- 2/3 cup diced onion: Diced to contribute aromatic sharpness and a savory backbone; sweat until translucent to release natural sweetness and mellow sulfur notes. Add early so onion flavor infuses the butter and combines with herbs and spices.
- 1 1/4 teaspoons salt: Measured to season the entire filling evenly, enhancing natural flavors and balancing sweetness from vegetables; stir in gradually and taste. Use the specified amount as a baseline, adjusting slightly if using low-sodium broth.
- 1/2 teaspoon ground pepper: Ground to add gentle heat and savory depth without overpowering; distribute evenly to avoid peppery hotspots. Add during cooking so the pepper integrates into the roux and filling for balanced seasoning.
- 1/4 teaspoon dried thyme: Measured to provide subtle herbal, slightly floral notes that complement poultry; add with other dried herbs to allow time for rehydration. Use sparingly to avoid dominating the profile—thyme pairs well with creamy sauces.
- 1/4 teaspoon poultry seasoning: Included to lend warm, slightly savory poultry-specific notes that echo rotisserie chicken flavors; sprinkle into the filling for layered seasoning. Combine with thyme and salt for cohesive herbaceous seasoning throughout the pot pie.
- 1/2 cup all-purpose flour: Added to thicken the sauce by forming a roux with melted butter; whisk until lightly golden to remove raw flour taste. Gradually incorporate liquids after cooking to the desired consistency, ensuring a smooth, velvety filling.
- 1 1/2 cups chicken broth: Poured in to create a flavorful, savory base and to thin the roux into a sauce; choose low-sodium if reducing salt. Simmer gently after adding to concentrate flavor while preventing the dairy from curdling.
- 1 cup milk: Stirred in to provide creaminess and body to the sauce while mellowing sharp flavors; use whole milk for best texture. Heat gently with the broth and flour mixture to achieve a silky consistency without scorching.
- 3 cups shredded chicken from a rotisserie chicken: Shredded to supply tender protein and hearty texture while contributing savory richness from cooked poultry; mix into the sauce so every bite has meat. Use meat from a rotisserie for convenience and seasoned flavor that boosts the filling.
- 1 cup peas: Added to introduce pops of sweetness, color, and a fresh contrast to the creamy filling; stir in near the end if using frozen to avoid overcooking. Ensure peas are heated through so they retain tenderness without becoming mushy.
- 2 refrigerated pie crusts: Used as the flaky crust to encase the filling and provide a buttery, golden exterior; roll or fit into a pie dish according to package instructions. Cover the filled dish and seal edges before baking to achieve a crisp, structured top and bottom.
- 1 egg beaten together with 1 tablespoon water to make an egg wash: Beaten together to create a glossy egg wash that enhances browning and gives the crust an attractive sheen; brush evenly before baking. Use the wash sparingly on exposed pastry to avoid pooling and burning during baking.
Making This Easy Chicken Pot Pie
Working through these steps feels like orchestrating a comforting ritual, where timing matters and small sensory cues tell you when to move on. I like to keep tools and ingredients ready because the filling comes together fast once the roux is set, and the satisfaction of that first golden slice is worth the attention.
- Preheat oven to 425 degrees.: When the oven reaches 425 degrees , you will notice a dry, hot air that crisps pastry quickly, which helps the top crust set and brown without overcooking the filling. Preheating ensures the pie goes into a stable environment so the crust begins to puff and seal, creating flaky layers. A common oversight is not preheating long enough, which leads to a soggy bottom, so wait until the oven signals it is fully up to temperature. The sound of the preheated oven cycling is a subtle cue that it is ready.
- Place potatoes and carrots in a small saucepan, cover with water, and bring to a boil for 5-8 minutes to soften. Drain.: As the water comes to a rolling boil, you will see bubbles rising and the scent of starch and sweet carrot releasing into the steam, signaling the vegetables are loosening. Cook the diced potato and sliced carrot until a fork slides through with slight resistance, then drain thoroughly to avoid diluting the sauce. This partial cook guarantees tender vegetables after baking, and undercooking here leaves hard bites in the finished pie. Rinsing briefly in hot water after draining is unnecessary and can cool them too fast.
- Melt 1/2 cup butter in a large sauté pan. Add onions and sauté for 2 to 3 minutes.: In the pan the butter will shimmer and give off a rich, dairy aroma, then the diced onion added will sizzle, releasing sweet, savory steam as it softens. Cook until the onion becomes translucent and just starting to color for maximum sweetness without bitterness; those gentle brown edges deepen flavor. Turn the heat down if the onions are browning too quickly, since burnt onion imparts a sharp edge that overwhelms the filling. You should hear a gentle, steady sizzle.
- Add salt, pepper, thyme, and poultry seasoning. Sprinkle flour on top and cook for 1 minute, stirring to evenly cook the flour.: Once spices such as salt , ground pepper , dried thyme , and poultry seasoning mingle with the softened onion , sprinkle the all purpose flour evenly and stir quickly; it will absorb fat and begin to smell toasty. Cooking the flour for about a minute removes rawness and builds the roux base that thickens the sauce. Stir constantly to avoid lumps, which are a typical problem if flour is dumped in too fast. A short nutty scent indicates readiness.
- Gradually whisk in chicken broth and then milk. Add potatoes and carrots and let simmer for a few minutes to thicken. Check for seasoning and add more salt and pepper if desired.: As you whisk in the chicken broth slowly, the mixture will loosen into a glossy sauce, and adding the milk after incorporates creaminess, smoothing the texture. The simmer encourages the starch from the potato to meld with the roux, thickening the sauce to a spoon coating consistency. Stir and watch for small bubbles around the edges and a steady steam; that indicates proper simmering. Taste and adjust salt and ground pepper since seasoning can shift as the sauce concentrates. If it becomes too thick, a splash of broth corrects it.
- Stir in chicken and peas. Turn heat off.: When you fold in the shredded chicken and peas , the filling cools slightly, and you will hear small settling sounds as the ingredients integrate into the hot sauce. This step finishes the composition, preventing overcooking of the delicate peas and keeping the chicken tender. Turning the heat off preserves texture and stops the sauce from breaking. A common mistake is continuing to cook here which can make the peas mushy and the chicken dry.
- Fit 1 pie crust into the bottom of a deep dish pie plate. Pour filling into pie shell.: Laying the first refrigerated pie crust into the Deep Dish Pie Plate should feel cool and slightly firm, making it easier to press into corners without tearing. When the filling is spooned in, notice how it settles and how the surface becomes glossy, indicating correct thickness. Work quickly so the crust stays chilled, because a warm crust can shrink away from the dish during baking. If the crust tears, press gently to mend it rather than stretching.
- Place second pie crust on top and trim excess. Press the two pie crusts together to seal and crimp edge using your fingers.: Setting the top crust over the filling, you will feel it drape and conform, and as you trim and press edges, the crusts should bond without gaps. Crimping seals the steam inside so the filling cooks evenly and the top browns attractively. Avoid overhandling which warms the pastry and can make it tough; keep your fingers cool and work briskly. Ensure the seam is sealed to prevent leaking.
- Brush egg wash on top of the pot pie and use a knife to cut 4 slits to let steam escape.: Brushing the egg wash composed of an egg and water creates a glossy, evenly browned surface that catches the eye. The four slits let steam escape in a controlled way, preventing the pie from rupturing and allowing the filling to finish cooking. The sound of brush strokes on the crust and the glossy reflection are small sensory satisfactions. Cutting too many slits or too large openings can dry out the filling.
- Place on a baking sheet and place in oven and bake for 30 minutes.: Sliding the pie onto a baking sheet makes it easy to handle and catches any occasional spills, then as it bakes for about 30 minutes the crust will turn a deep golden brown, and you may hear a faint crackle as butter layers crisp. The aroma of baked pastry and roasted chicken will fill the kitchen, and steam will vent from the slits. A common mistake is removing the pie too early, which leaves the filling overly loose and the crust pale, so wait until the top is deeply colored and the center is bubbly.
Change It Up
If you want to vary the approach, these tips help you adapt the recipe while keeping the core comforting character intact. Small technique shifts or timing adjustments can make it better suited to your schedule or flavor preferences.
- Swap protein idea: Use pre shredded chicken from a rotisserie for speed, it adds roasted notes while saving prep time.
- Make ahead: Assemble the pie up to the crimping stage and refrigerate for up to 24 hours, this helps when you need to spread out the work.
- Freezing: Wrap the fully assembled and uncooked pie tightly for freezing, then bake from frozen, increasing bake time until the center is bubbly.
- Egg wash trick: Brush lightly with the egg and water wash to avoid pooling which can make the crust soggy in spots.
- Thickness check: If the filling seems thin, simmer a little longer off heat to reduce, or stir in a touch more all purpose flour mixed with cold liquid to avoid lumps.
- Vegetable prep: Cut the potato and carrot uniformly so they cook at the same rate, which prevents some pieces from being underdone.
- Browning boost: For an extra golden top, rotate the pie halfway through baking to promote even color across the surface.
What to Pair With Easy Chicken Pot Pie
This pie sits comfortably at the center of a meal, and pairing it thoughtfully brings balance to the table. Light salads, crisp vegetables, and simple sides complement the richness while keeping the experience homey and complete.
- Green salad: A crisp mixed green salad with a light vinegar based dressing cuts through the richness and refreshes the palate.
- Steamed vegetables: Lightly steamed green beans or asparagus provide a bright contrast in texture and color alongside the creamy filling.
- Pickled accents: A small bowl of quick pickles or tangy chutney can add a sharp contrast to the buttery pie.
- Warm bread: For an extra cozy meal serve with slices of crusty bread or rolls to mop up any filling, making it ideal for family dinners.
- Occasions: This Easy Chicken Pot Pie works well for weeknight family dinners, casual weekend gatherings, or whenever you want a comforting main dish for a crowd.
- Storage tips: Refrigerate leftovers in an airtight container for up to three days, or freeze a whole pie wrapped tightly for up to three months.
- Seasonal pairing: In cooler months, serve with warming sides like roasted root vegetables; in transitional seasons, pair with lighter salads to keep the meal balanced.
FAQ
Conclusion
This recipe’s balance of creamy, savory filling and a flaky, golden crust is what makes Easy Chicken Pot Pie feel both comforting and elevated. It’s a dependable recipe I reach for when I want food that nourishes and satisfies without fuss. Try it the next time you crave a warm, homey meal and watch how quickly it brings family and friends to the table. You’ll likely find it becomes a regular in your rotation for chilly nights and casual gatherings.
Easy Chicken Pot Pie
Equipment
- Deep Dish Pie Plate
Ingredients
- 1 cup peeled and diced potato Peeled and diced to tender cubes that provide body and mild starchiness to the filling; cook until just fork-tender to avoid turning mushy. Add near the start of sautéing so the potato can absorb flavors from butter and seasonings while cooking through.
- 3/4 cups sliced carrot Sliced to maintain a slight bite and sweet earthiness that contrasts richer components; simmer until softened but still holding shape. Incorporate early with the potato so carrots release natural sugars and meld with the savory base.
- 1/2 cup butter Used to enrich the filling by coating vegetables and chicken, adding a silky mouthfeel and carrying fat-soluble flavors; brown gently to develop flavor without burning. Melt before adding aromatics so it emulsifies with the flour to form the roux.
- 2/3 cup diced onion Diced to contribute aromatic sharpness and a savory backbone; sweat until translucent to release natural sweetness and mellow sulfur notes. Add early so onion flavor infuses the butter and combines with herbs and spices.
- 1 1/4 teaspoons salt Measured to season the entire filling evenly, enhancing natural flavors and balancing sweetness from vegetables; stir in gradually and taste. Use the specified amount as a baseline, adjusting slightly if using low-sodium broth.
- 1/2 teaspoon ground pepper Ground to add gentle heat and savory depth without overpowering; distribute evenly to avoid peppery hotspots. Add during cooking so the pepper integrates into the roux and filling for balanced seasoning.
- 1/4 teaspoon dried thyme Measured to provide subtle herbal, slightly floral notes that complement poultry; add with other dried herbs to allow time for rehydration. Use sparingly to avoid dominating the profile—thyme pairs well with creamy sauces.
- 1/4 teaspoon poultry seasoning Included to lend warm, slightly savory poultry-specific notes that echo rotisserie chicken flavors; sprinkle into the filling for layered seasoning. Combine with thyme and salt for cohesive herbaceous seasoning throughout the pot pie.
- 1/2 cup all-purpose flour Added to thicken the sauce by forming a roux with melted butter; whisk until lightly golden to remove raw flour taste. Gradually incorporate liquids after cooking to the desired consistency, ensuring a smooth, velvety filling.
- 1 1/2 cups chicken broth Poured in to create a flavorful, savory base and to thin the roux into a sauce; choose low-sodium if reducing salt. Simmer gently after adding to concentrate flavor while preventing the dairy from curdling.
- 1 cup milk Stirred in to provide creaminess and body to the sauce while mellowing sharp flavors; use whole milk for best texture. Heat gently with the broth and flour mixture to achieve a silky consistency without scorching.
- 3 cups shredded chicken from a rotisserie chicken Shredded to supply tender protein and hearty texture while contributing savory richness from cooked poultry; mix into the sauce so every bite has meat. Use meat from a rotisserie for convenience and seasoned flavor that boosts the filling.
- 1 cup peas Added to introduce pops of sweetness, color, and a fresh contrast to the creamy filling; stir in near the end if using frozen to avoid overcooking. Ensure peas are heated through so they retain tenderness without becoming mushy.
- 2 refrigerated pie crusts Used as the flaky crust to encase the filling and provide a buttery, golden exterior; roll or fit into a pie dish according to package instructions. Cover the filled dish and seal edges before baking to achieve a crisp, structured top and bottom.
- 1 egg beaten together with 1 tablespoon water to make an egg wash Beaten together to create a glossy egg wash that enhances browning and gives the crust an attractive sheen; brush evenly before baking. Use the wash sparingly on exposed pastry to avoid pooling and burning during baking.
Instructions
- Preheat oven to 425 degrees.: When the oven reaches 425 degrees , you will notice a dry, hot air that crisps pastry quickly, which helps the top crust set and brown without overcooking the filling. Preheating ensures the pie goes into a stable environment so the crust begins to puff and seal, creating flaky layers. A common oversight is not preheating long enough, which leads to a soggy bottom, so wait until the oven signals it is fully up to temperature. The sound of the preheated oven cycling is a subtle cue that it is ready.
- Place potatoes and carrots in a small saucepan, cover with water, and bring to a boil for 5-8 minutes to soften. Drain.: As the water comes to a rolling boil, you will see bubbles rising and the scent of starch and sweet carrot releasing into the steam, signaling the vegetables are loosening. Cook the diced potato and sliced carrot until a fork slides through with slight resistance, then drain thoroughly to avoid diluting the sauce. This partial cook guarantees tender vegetables after baking, and undercooking here leaves hard bites in the finished pie. Rinsing briefly in hot water after draining is unnecessary and can cool them too fast.
- Melt 1/2 cup butter in a large sauté pan. Add onions and sauté for 2 to 3 minutes.: In the pan the butter will shimmer and give off a rich, dairy aroma, then the diced onion added will sizzle, releasing sweet, savory steam as it softens. Cook until the onion becomes translucent and just starting to color for maximum sweetness without bitterness; those gentle brown edges deepen flavor. Turn the heat down if the onions are browning too quickly, since burnt onion imparts a sharp edge that overwhelms the filling. You should hear a gentle, steady sizzle.
- Add salt, pepper, thyme, and poultry seasoning. Sprinkle flour on top and cook for 1 minute, stirring to evenly cook the flour.: Once spices such as salt , ground pepper , dried thyme , and poultry seasoning mingle with the softened onion , sprinkle the all purpose flour evenly and stir quickly; it will absorb fat and begin to smell toasty. Cooking the flour for about a minute removes rawness and builds the roux base that thickens the sauce. Stir constantly to avoid lumps, which are a typical problem if flour is dumped in too fast. A short nutty scent indicates readiness.
- Gradually whisk in chicken broth and then milk. Add potatoes and carrots and let simmer for a few minutes to thicken. Check for seasoning and add more salt and pepper if desired.: As you whisk in the chicken broth slowly, the mixture will loosen into a glossy sauce, and adding the milk after incorporates creaminess, smoothing the texture. The simmer encourages the starch from the potato to meld with the roux, thickening the sauce to a spoon coating consistency. Stir and watch for small bubbles around the edges and a steady steam; that indicates proper simmering. Taste and adjust salt and ground pepper since seasoning can shift as the sauce concentrates. If it becomes too thick, a splash of broth corrects it.
- Stir in chicken and peas. Turn heat off.: When you fold in the shredded chicken and peas , the filling cools slightly, and you will hear small settling sounds as the ingredients integrate into the hot sauce. This step finishes the composition, preventing overcooking of the delicate peas and keeping the chicken tender. Turning the heat off preserves texture and stops the sauce from breaking. A common mistake is continuing to cook here which can make the peas mushy and the chicken dry.
- Fit 1 pie crust into the bottom of a deep dish pie plate. Pour filling into pie shell.: Laying the first refrigerated pie crust into the Deep Dish Pie Plate should feel cool and slightly firm, making it easier to press into corners without tearing. When the filling is spooned in, notice how it settles and how the surface becomes glossy, indicating correct thickness. Work quickly so the crust stays chilled, because a warm crust can shrink away from the dish during baking. If the crust tears, press gently to mend it rather than stretching.
- Place second pie crust on top and trim excess. Press the two pie crusts together to seal and crimp edge using your fingers.: Setting the top crust over the filling, you will feel it drape and conform, and as you trim and press edges, the crusts should bond without gaps. Crimping seals the steam inside so the filling cooks evenly and the top browns attractively. Avoid overhandling which warms the pastry and can make it tough; keep your fingers cool and work briskly. Ensure the seam is sealed to prevent leaking.
- Brush egg wash on top of the pot pie and use a knife to cut 4 slits to let steam escape.: Brushing the egg wash composed of an egg and water creates a glossy, evenly browned surface that catches the eye. The four slits let steam escape in a controlled way, preventing the pie from rupturing and allowing the filling to finish cooking. The sound of brush strokes on the crust and the glossy reflection are small sensory satisfactions. Cutting too many slits or too large openings can dry out the filling.
- Place on a baking sheet and place in oven and bake for 30 minutes.: Sliding the pie onto a baking sheet makes it easy to handle and catches any occasional spills, then as it bakes for about 30 minutes the crust will turn a deep golden brown, and you may hear a faint crackle as butter layers crisp. The aroma of baked pastry and roasted chicken will fill the kitchen, and steam will vent from the slits. A common mistake is removing the pie too early, which leaves the filling overly loose and the crust pale, so wait until the top is deeply colored and the center is bubbly.
Notes
- Swap protein idea: Use pre shredded chicken from a rotisserie for speed, it adds roasted notes while saving prep time.
- Make ahead: Assemble the pie up to the crimping stage and refrigerate for up to 24 hours, this helps when you need to spread out the work.
- Freezing: Wrap the fully assembled and uncooked pie tightly for freezing, then bake from frozen, increasing bake time until the center is bubbly.
- Egg wash trick: Brush lightly with the egg and water wash to avoid pooling which can make the crust soggy in spots.
- Thickness check: If the filling seems thin, simmer a little longer off heat to reduce, or stir in a touch more all purpose flour mixed with cold liquid to avoid lumps.
- Vegetable prep: Cut the potato and carrot uniformly so they cook at the same rate, which prevents some pieces from being underdone.
- Browning boost: For an extra golden top, rotate the pie halfway through baking to promote even color across the surface.