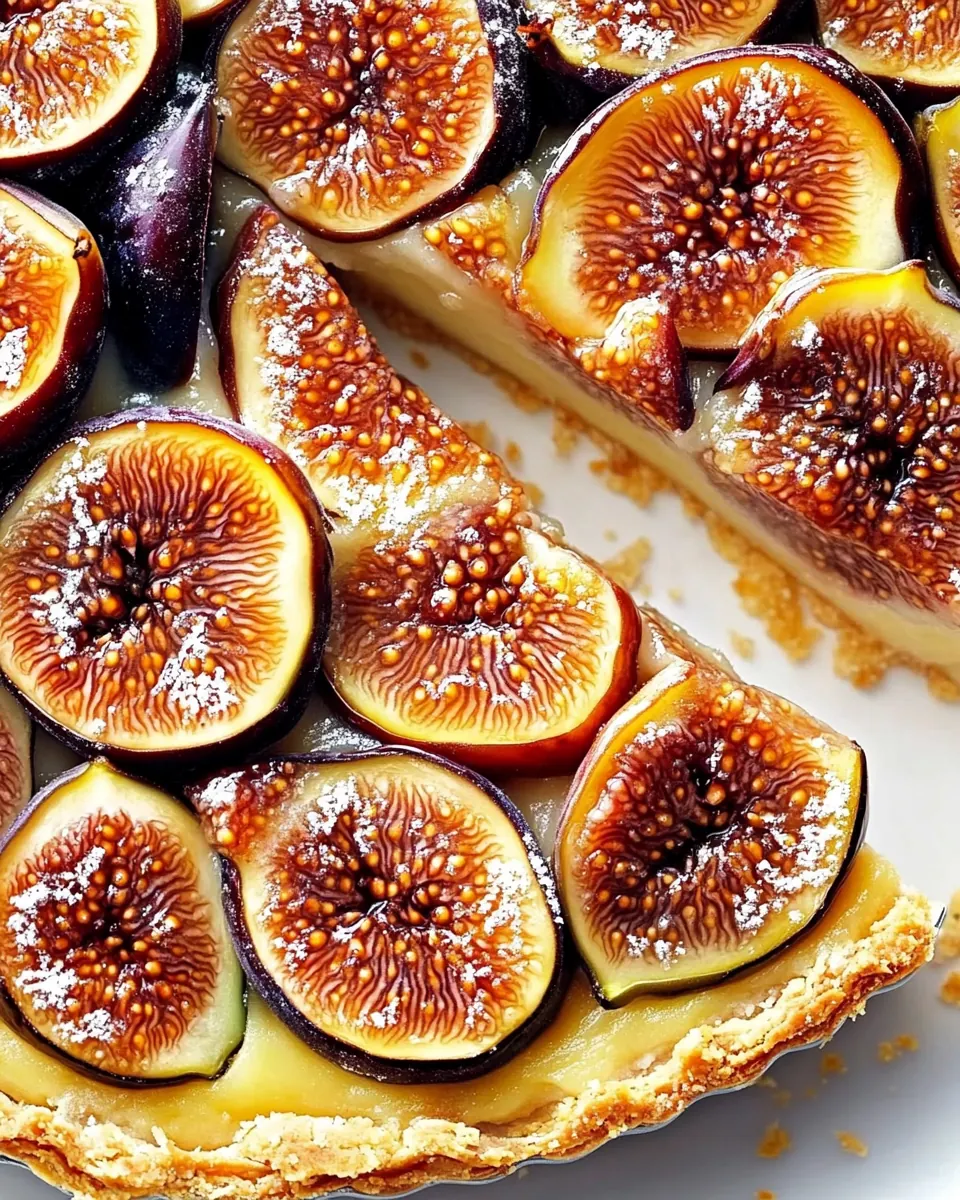
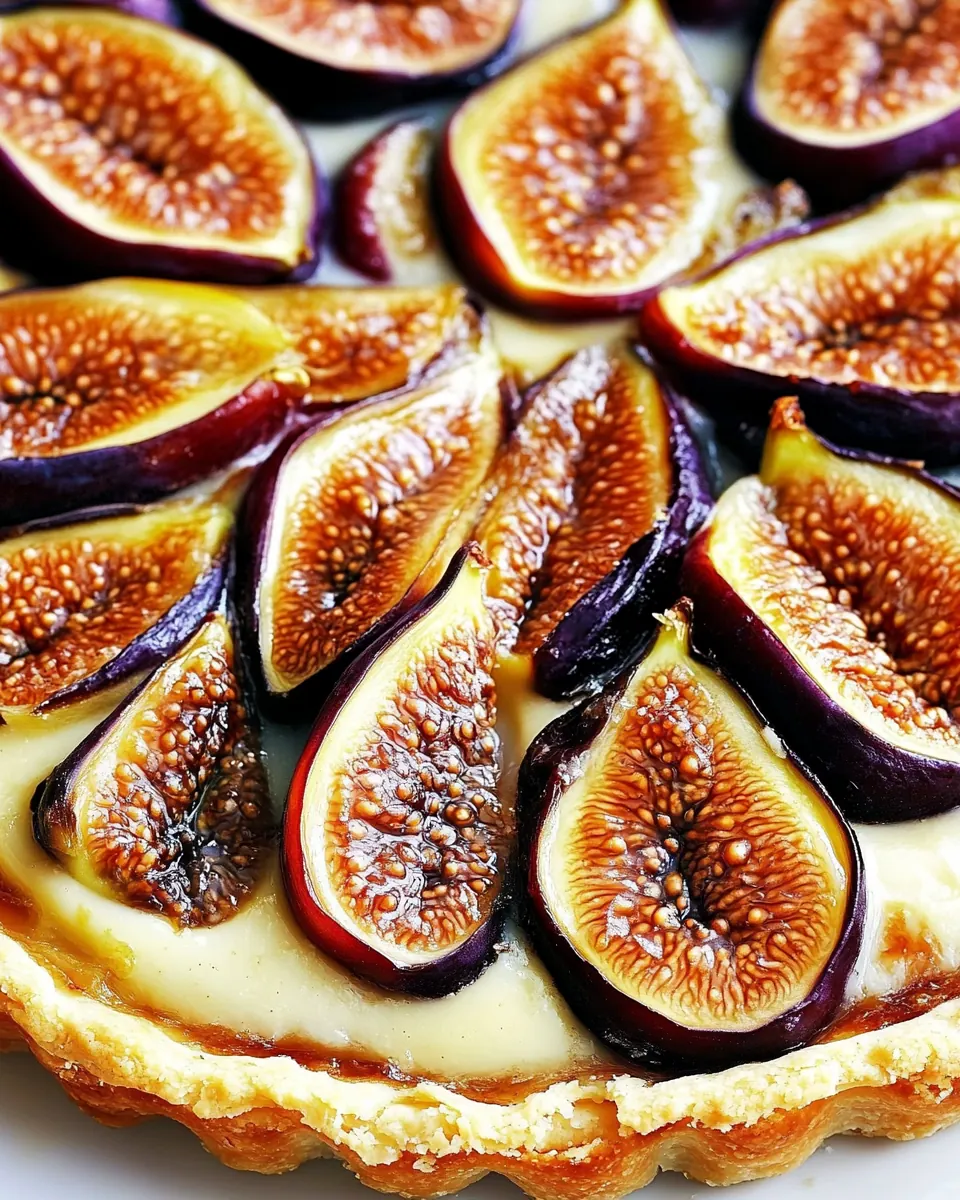
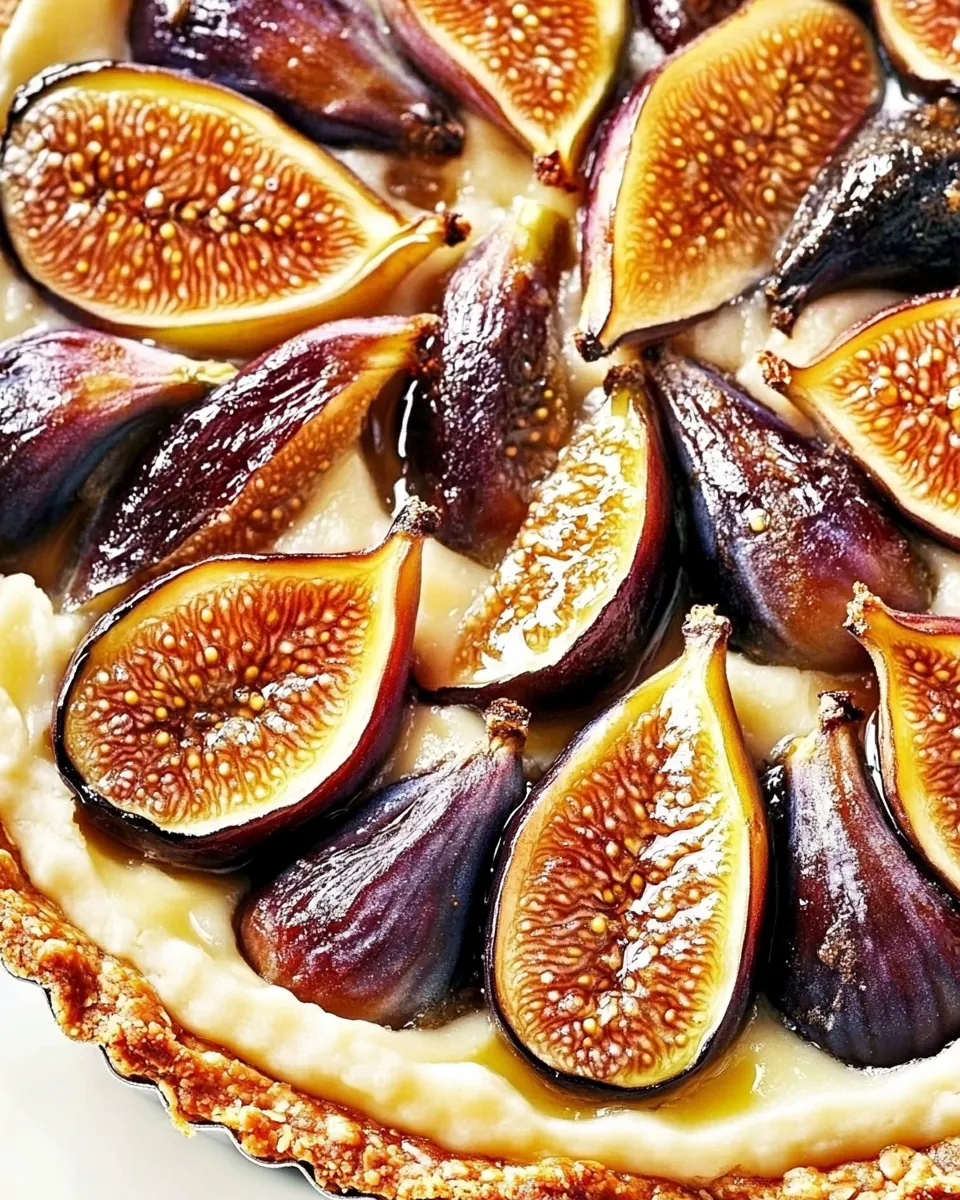
Dalmatian Fresh Fig Tart
Dalmatian Fresh Fig Tart is one of those recipes that feels like a small celebration, the kind I make when figs are at their peak and I want something that looks impressive with very little fuss.
I first tasted a version of this tart on a sunlit afternoon in a little seaside town, where a friend served a slice with strong coffee and an easy smile. I remember the contrast between the crisp, tender pastry and the pillowy, slightly tangy filling, offset by the jewel like figs sitting like tiny crowns. That memory stuck with me, and over a few seasons I adapted the idea until it became a reliable favorite at weekend gatherings. Watching guests pause before taking a bite convinced me to keep this recipe very true to its roots, focusing on texture and the simplest, highest quality components.
When I make Dalmatian Fresh Fig Tart at home, I like to slow down, handling the pastry with a light touch so it stays flaky rather than tough. The filling, with its creamy body and gentle sweetness, lets the figs speak for themselves. Each time I serve it someone asks for the recipe, so I wrote down every nuance to help you reproduce the same bright, rustic result. There is a small ritual to assembling it that makes the process relaxing, and the payoff is a tart that slices cleanly, offers a mix of textures, and tastes like summer condensed into a single dessert.
Recipe Snapshot
58 mins
15 mins
43 mins
Medium
350 kcal
Mediterranean
Gluten-Free, Low FODMAP
Desserts
Mixing bowl, Rolling pin, 26 cm 10 inch loose bottomed flan tin, Baking parchment, Baking beans or rice, Small saucepan
Why This Dalmatian Fresh Fig Tart Is a Winner
Pure and Seasonal Flavor
I love how Dalmatian Fresh Fig Tart highlights the seasonality of figs. These fruits are delicate and fragrant, and the recipe is honest with their flavor, letting their honeyed, slightly earthy notes come forward. I often find that when an ingredient is showcased like this, the whole dessert feels more refined, and the tart requires minimal fuss to shine.
Balanced Creamy Filling
The filling, centered on mascarpone cheese and honey, gives a luxuriously silky mouthfeel without being overly sweet. I appreciate how the dairy adds weight and a gentle tang, which balances the figs and the crisp pastry. This balance makes each bite comforting but not cloying, which keeps people coming back for one more small slice.
Simple Techniques Produce Elegant Results
I enjoy the straightforward pastry method here because it rewards careful handling. Rubbing the butter into the flour until it resembles breadcrumbs, then chilling the dough, yields a texture that is flaky and tender. For home bakers, these modest techniques are accessible yet yield a tart that looks like it belongs in a patisserie.
Visually Charming and Impressive
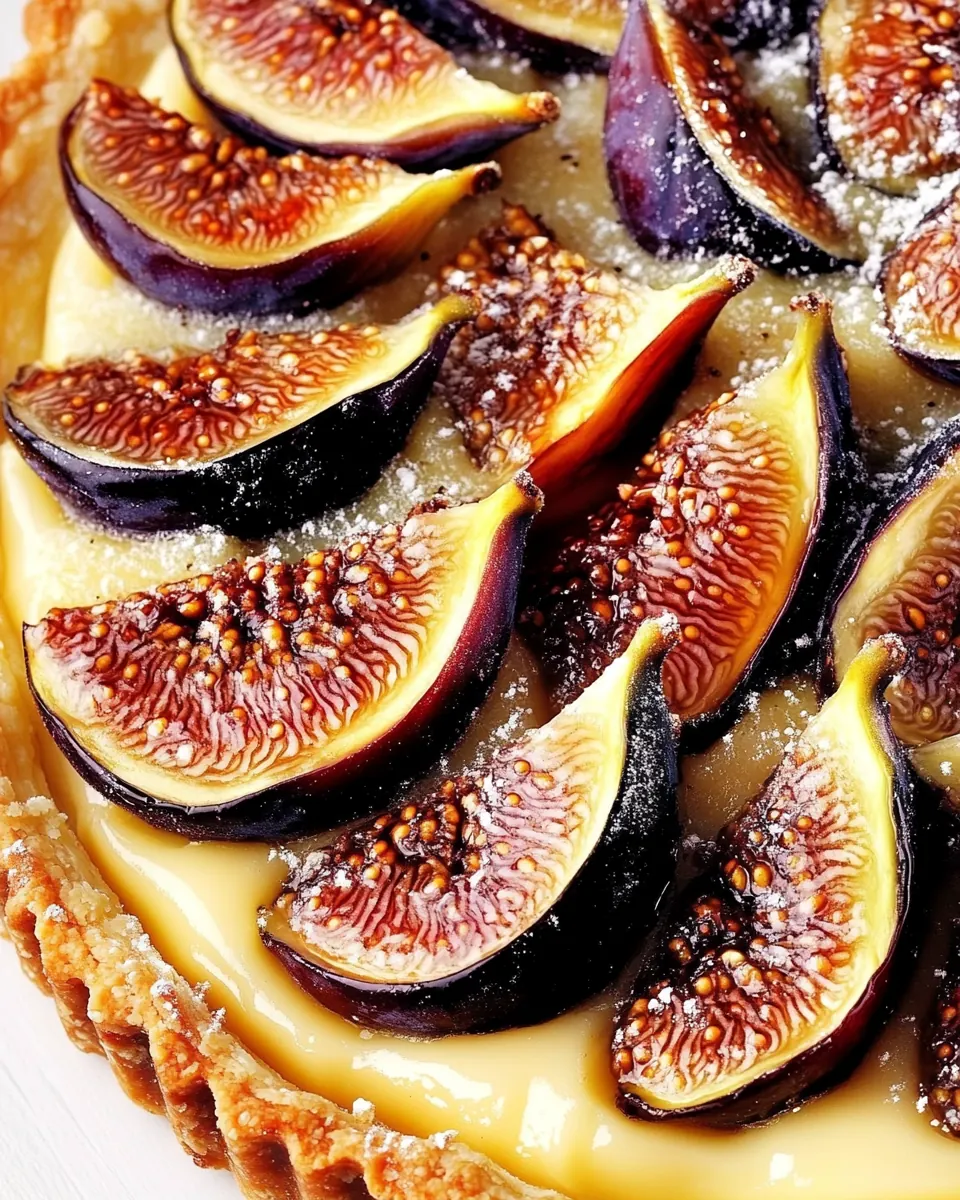
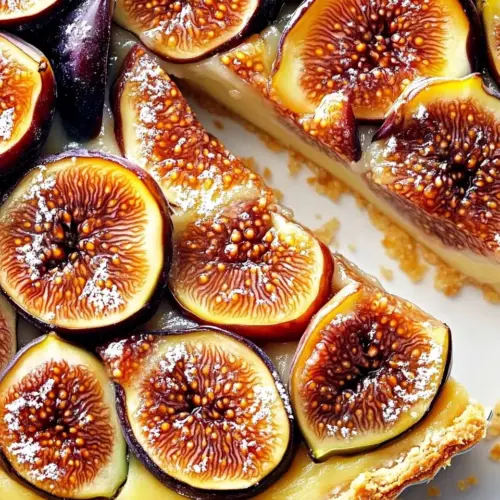
Arranging halved figs cut side up transforms the tart into a centerpiece. I find guests immediately notice the glossy, jewel tone of each fig, and the presentation elevates a casual afternoon tea into something memorable. It is both approachable and photogenic, which I value when I want a dessert that feels special without stress.
Versatile Serving Options
This tart is flexible for many occasions, from a relaxed brunch to a festive dessert. I like that it travels well to picnics and is easy to serve at a small dinner party. The restrained sweetness and creamy filling pair well with strong coffee or a mild herbal tea, giving you choices when you plan the menu.
Ingredient List for Dalmatian Fresh Fig Tart
The ingredients here are purposeful and straightforward, built to support the star of the show, the fig. We rely on a tender pastry made from simple plain flour and butter, a creamy center with mascarpone cheese and double cream, and a touch of honey for shine and sweetness. Each component plays a role: the crust gives structure and crispness, the filling offers creaminess and binding, and the figs deliver seasonal brightness.
- 170 grams plain flour sifted, plus extra for dusting: Provide structure and lightness to the pastry by combining sifted flour with other dry ingredients; helps form gluten when worked briefly to create a tender crumb and supports the filling once baked.
- pinch salt: Season the dough subtly with a small pinch of salt; enhances overall flavor balance and brightens the sweetness of the tart without overpowering other elements.
- 100 grams butter unsalted, cubed: Add richness and flakiness to the pastry when cubed and rubbed into the flour; butter's water content creates steam during baking, producing a delicate crumb and tender texture.
- 50 grams caster sugar: Contribute gentle sweetness and help tenderize the pastry; caster sugar dissolves more readily than granulated, ensuring an even sweetness and slight browning in the crust.
- 1 egg yolk: Bind the pastry ingredients together with a concentrated richness from the yolk; adds color, emulsifying properties, and contributes to a more cohesive dough.
- 50 milliliters double cream: Moisten and enrich the dough with double cream; provides additional fat for a softer texture and helps achieve a pliable consistency for rolling and shaping.
- 500 grams mascarpone cheese: Create a creamy, luxurious filling base when combined with other dairy and sweeteners; mascarpone offers a smooth, tangy richness that complements the figs and honey.
- 6 tablespoons clear honey: Sweeten and glaze the tart with a clear honey, adding floral notes and a glossy finish; warms slightly when brushed to create a shiny, attractive surface and intensify fruit flavor.
- 6 large fresh figs stems trimmed, halved (7 medium or 8 small): Provide fresh, juicy fruit topping with visual contrast and natural sweetness; trimming stems and halving figs exposes the flesh for caramelization and allows even distribution across the tart.
Recipe Directions for Dalmatian Fresh Fig Tart
These directions will walk you through building the pastry, preparing the creamy filling, and baking the tart to the perfect finish. I like to stay organized, having all my measured ingredients ready, because timing matters when working with chilled pastry and delicate figs.
- For the pastry, mix the flour, salt and butter until it resembles breadcrumbs, then stir in the sugar.: The room fills with a gentle scent of butter and flour as you rub the cold cubes into the flour, and you should see a sandy texture dotted with pea sized butter pieces. This visual cue is crucial because those bits of butter melt in the oven to create flaky pockets. Work briskly so the butter does not soften from your hands. If the mixture becomes too warm, chill it for 15 to 30 minutes before continuing. One common mistake is overprocessing until the mixture looks too smooth, which reduces flakiness, so stop as soon as the breadcrumb stage is reached.
- Mix the egg yolk and cream, and add to the flour mixture so that it comes together to form a dough.: When you combine the egg yolk and double cream you will notice a glossy pale liquid that binds the dry ingredients. Pour it in and fold gently until the dough just holds, avoiding vigorous kneading which develops gluten and makes the crust tough. The dough should be slightly tacky but not sticky; if it feels wet, dust with a touch more plain flour . A frequent error is adding too much liquid; proceed gradually and stop when the dough forms.
- On a floured surface, roll out the pastry and use it to line a 26 cm (10-inch), loose bottomed flan tin. (If too difficult to handle, wrap and chill for 30 minutes in the fridge.): The pastry should roll smoothly into an even round, and you will hear a soft whisper of the rolling pin against the lightly floured surface. Lift and turn the dough often to prevent sticking, and aim for an even thickness so it bakes uniformly. Gently ease the dough into the tin, letting it rest into corners rather than stretching it, since stretching can cause shrinkage while baking. If handling feels difficult, wrap and chill the dough for 30 minutes, which firms the butter and relaxes the gluten.
- Trim the edges of the pastry, cover with cling film and rest it in the freezer for 30 minutes.: Chilling in the freezer is decisive for a crisp, flaky crust. The cold firms the butter , which reduces shrinkage and helps the pastry keep its shape during blind baking. You may notice the pastry dulls slightly as it chills, and that is normal. Do not skip this rest or the pastry may slump in the oven. One trap is leaving it in the freezer too long so it becomes rock hard, making it brittle to handle; 30 minutes is the sweet spot for most home freezers.
- Heat the oven to 180°C/gas 4/356° F.: You should feel a mild rush of warmth when the oven reaches temperature, signaling it is ready for blind baking. Preheating ensures the pastry gets an initial blast of heat so the edges set quickly and remain crisp. If your oven runs hot or cold, adjust accordingly and consider using an oven thermometer. A common misstep is not preheating long enough, which leads to inconsistent baking and a soggy base.
- Line the pastry with baking parchment, fill with baking beans or rice and bake blind for 10 minutes.: The parchment and weights keep the base flat and prevent bubbling, with a faint toasty scent developing after several minutes. This stage sets the structure so the filling does not seep into the crust. Use ceramic baking beans or dried rice as a placeholder, and check the edges for color rather than relying solely on time. A frequent error is removing the weights too soon; ensure the pastry looks set and slightly dry before lifting the parchment.
- Remove the paper and beans and cook for a further 3 minutes.: After you lift out the weights, the exposed surface will begin to take on a faint golden hue and the texture will firm. This brief additional cooking dries the base so the filling does not make it soggy. Watch carefully, because this short time can quickly shift from golden to overly brown. If you notice significant browning at the edges, lower the oven temperature slightly to avoid burning.
- Take out of the oven and lower the temperature to 160°C/gas 3/320° F.: The oven cools down to a gentler heat that will cook the filling evenly without overbrowning the pastry. You can feel the change in warmth and hear the oven fan slow, which sets the stage for a gentle bake. This reduced temperature protects the creamy mascarpone cheese from splitting and allows the top to take color slowly. A trap here is leaving the oven at the higher temperature, which risks a dried out filling.
- Soften the mascarpone with the honey in a small saucepan over a low heat.: Warm the mascarpone cheese and honey together slowly, stirring until smooth and glossy; you will smell the floral notes of the honey and see the mixture loosen into a pourable cream. Keep the heat low to avoid curdling, and stir constantly until just smooth. If the mixture splits or becomes watery, remove from heat and whisk gently off the heat until it comes back together. Overheating is the most common mistake here, so patience matters.
- Pour into the pastry case, then lay the figs on top, cut-side up.: The warm, scented filling will sink into the pastry with a quiet sigh, and arranging the halved figs cut side up creates an attractive pattern and allows the fruit to caramelize slightly. Press them gently into the filling so they stay in place while baking. Space them evenly for even baking and visual appeal. Avoid piling too many figs into one area, which can cause uneven cooking and a soggy interior.
- Bake for 30 minutes until just starting to turn golden around the edges.: During this period you will see the filling set and the edges of the pastry develop a warm golden tone, while the figs become tender and slightly glazed. Listen for a soft, settling sound rather than a loud bubbling, which indicates the filling is setting gently. Remove the tart once the center is just set but still a little wobbly, as carryover will finish the set while cooling. A typical error is baking until completely firm, which can dry the filling and dull the delicate texture.
- To serve, allow to cool to room temperature before removing from the tin and cutting.: Cooling lets the filling finish setting and makes clean slicing possible, with the aroma of figs becoming more pronounced as it rests. When you lift the loose bottom and slide the tart onto a board, you will notice a neat edge and a glossy top. Serve at room temperature for the best texture. Cutting too soon often causes the filling to spill, so be patient and allow it to cool fully.
Tips for Success
These practical tips help you get consistent results with Dalmatian Fresh Fig Tart. I include handling, timing, and presentation pointers so you can finish with confidence. Read them before you begin and keep them in mind during each stage of the bake.
- Measure ingredients precisely, especially the plain flour and butter, to maintain the pastry ratio that creates a tender crust.
- Keep everything cold when making the pastry; cold butter yields flakier layers and less shrinkage during baking.
- Use clear honey for a clean glossy finish and to avoid altering the tart color.
- Warm the mascarpone gently and stir constantly to achieve a silky, lump free filling without overheating.
- Arrange figs cut side up for the best caramelization and an attractive presentation.
- Blind bake properly and do not skip the chilling step, both of which ensure a crisp base that supports the creamy filling.
Great Combinations for Dalmatian Fresh Fig Tart
This tart pairs beautifully with simple accompaniments and suits a range of occasions. Below are serving ideas, storage suggestions, and pairing notes to help you present it with confidence, whether for brunch, a casual get together, or a holiday table.
- Afternoon tea companion, serve slices alongside robust coffee or a light herbal tea to balance the creamy filling and sweet figs.
- Weekend brunch, present the tart with a small bowl of extra honey for drizzling and a bowl of fresh fruit to add acidity and color.
- Small dinner party dessert, plate thin slices with a small mint leaf or grated citrus zest for brightness and an elegant touch.
- Storage tip, keep leftovers covered in the fridge for up to two days; bring to room temperature before serving to restore the best texture.
- Seasonal pairing, this tart shines in fall when figs are in season, and it complements light, late afternoon gatherings or festive occasions.
FAQ
Conclusion
This tart is special because it celebrates seasonal figs with a tender pastry and a silky mascarpone and honey filling that complements the fruit without overwhelming it. I encourage you to try it when figs are at their best, and to enjoy the simple pleasure of a dessert that looks elegant but is straightforward to prepare. It is a lovely recipe to make for friends or to treat yourself, and with a little attention to chilling and gentle warming, it reliably delivers a beautiful result.
Dalmatian Fresh Fig Tart
Equipment
- Mixing Bowl
- Rolling Pin
- 26 cm 10 inch loose bottomed flan tin
- Baking parchment
- Baking beans or rice
- Small Saucepan
Ingredients
- 170 grams plain flour sifted, plus extra for dusting Provide structure and lightness to the pastry by combining sifted flour with other dry ingredients; helps form gluten when worked briefly to create a tender crumb and supports the filling once baked.
- pinch salt Season the dough subtly with a small pinch of salt; enhances overall flavor balance and brightens the sweetness of the tart without overpowering other elements.
- 100 grams butter unsalted, cubed Add richness and flakiness to the pastry when cubed and rubbed into the flour; butter's water content creates steam during baking, producing a delicate crumb and tender texture.
- 50 grams caster sugar Contribute gentle sweetness and help tenderize the pastry; caster sugar dissolves more readily than granulated, ensuring an even sweetness and slight browning in the crust.
- 1 egg yolk Bind the pastry ingredients together with a concentrated richness from the yolk; adds color, emulsifying properties, and contributes to a more cohesive dough.
- 50 milliliters double cream Moisten and enrich the dough with double cream; provides additional fat for a softer texture and helps achieve a pliable consistency for rolling and shaping.
- 500 grams mascarpone cheese Create a creamy, luxurious filling base when combined with other dairy and sweeteners; mascarpone offers a smooth, tangy richness that complements the figs and honey.
- 6 tablespoons clear honey Sweeten and glaze the tart with a clear honey, adding floral notes and a glossy finish; warms slightly when brushed to create a shiny, attractive surface and intensify fruit flavor.
- 6 large fresh figs stems trimmed, halved (7 medium or 8 small) Provide fresh, juicy fruit topping with visual contrast and natural sweetness; trimming stems and halving figs exposes the flesh for caramelization and allows even distribution across the tart.
Instructions
- For the pastry, mix the flour, salt and butter until it resembles breadcrumbs, then stir in the sugar.: The room fills with a gentle scent of butter and flour as you rub the cold cubes into the flour, and you should see a sandy texture dotted with pea sized butter pieces. This visual cue is crucial because those bits of butter melt in the oven to create flaky pockets. Work briskly so the butter does not soften from your hands. If the mixture becomes too warm, chill it for 15 to 30 minutes before continuing. One common mistake is overprocessing until the mixture looks too smooth, which reduces flakiness, so stop as soon as the breadcrumb stage is reached.
- Mix the egg yolk and cream, and add to the flour mixture so that it comes together to form a dough.: When you combine the egg yolk and double cream you will notice a glossy pale liquid that binds the dry ingredients. Pour it in and fold gently until the dough just holds, avoiding vigorous kneading which develops gluten and makes the crust tough. The dough should be slightly tacky but not sticky; if it feels wet, dust with a touch more plain flour . A frequent error is adding too much liquid; proceed gradually and stop when the dough forms.
- On a floured surface, roll out the pastry and use it to line a 26 cm (10-inch), loose bottomed flan tin. (If too difficult to handle, wrap and chill for 30 minutes in the fridge.): The pastry should roll smoothly into an even round, and you will hear a soft whisper of the rolling pin against the lightly floured surface. Lift and turn the dough often to prevent sticking, and aim for an even thickness so it bakes uniformly. Gently ease the dough into the tin, letting it rest into corners rather than stretching it, since stretching can cause shrinkage while baking. If handling feels difficult, wrap and chill the dough for 30 minutes, which firms the butter and relaxes the gluten.
- Trim the edges of the pastry, cover with cling film and rest it in the freezer for 30 minutes.: Chilling in the freezer is decisive for a crisp, flaky crust. The cold firms the butter , which reduces shrinkage and helps the pastry keep its shape during blind baking. You may notice the pastry dulls slightly as it chills, and that is normal. Do not skip this rest or the pastry may slump in the oven. One trap is leaving it in the freezer too long so it becomes rock hard, making it brittle to handle; 30 minutes is the sweet spot for most home freezers.
- Heat the oven to 180°C/gas 4/356° F.: You should feel a mild rush of warmth when the oven reaches temperature, signaling it is ready for blind baking. Preheating ensures the pastry gets an initial blast of heat so the edges set quickly and remain crisp. If your oven runs hot or cold, adjust accordingly and consider using an oven thermometer. A common misstep is not preheating long enough, which leads to inconsistent baking and a soggy base.
- Line the pastry with baking parchment, fill with baking beans or rice and bake blind for 10 minutes.: The parchment and weights keep the base flat and prevent bubbling, with a faint toasty scent developing after several minutes. This stage sets the structure so the filling does not seep into the crust. Use ceramic baking beans or dried rice as a placeholder, and check the edges for color rather than relying solely on time. A frequent error is removing the weights too soon; ensure the pastry looks set and slightly dry before lifting the parchment.
- Remove the paper and beans and cook for a further 3 minutes.: After you lift out the weights, the exposed surface will begin to take on a faint golden hue and the texture will firm. This brief additional cooking dries the base so the filling does not make it soggy. Watch carefully, because this short time can quickly shift from golden to overly brown. If you notice significant browning at the edges, lower the oven temperature slightly to avoid burning.
- Take out of the oven and lower the temperature to 160°C/gas 3/320° F.: The oven cools down to a gentler heat that will cook the filling evenly without overbrowning the pastry. You can feel the change in warmth and hear the oven fan slow, which sets the stage for a gentle bake. This reduced temperature protects the creamy mascarpone cheese from splitting and allows the top to take color slowly. A trap here is leaving the oven at the higher temperature, which risks a dried out filling.
- Soften the mascarpone with the honey in a small saucepan over a low heat.: Warm the mascarpone cheese and honey together slowly, stirring until smooth and glossy; you will smell the floral notes of the honey and see the mixture loosen into a pourable cream. Keep the heat low to avoid curdling, and stir constantly until just smooth. If the mixture splits or becomes watery, remove from heat and whisk gently off the heat until it comes back together. Overheating is the most common mistake here, so patience matters.
- Pour into the pastry case, then lay the figs on top, cut-side up.: The warm, scented filling will sink into the pastry with a quiet sigh, and arranging the halved figs cut side up creates an attractive pattern and allows the fruit to caramelize slightly. Press them gently into the filling so they stay in place while baking. Space them evenly for even baking and visual appeal. Avoid piling too many figs into one area, which can cause uneven cooking and a soggy interior.
- Bake for 30 minutes until just starting to turn golden around the edges.: During this period you will see the filling set and the edges of the pastry develop a warm golden tone, while the figs become tender and slightly glazed. Listen for a soft, settling sound rather than a loud bubbling, which indicates the filling is setting gently. Remove the tart once the center is just set but still a little wobbly, as carryover will finish the set while cooling. A typical error is baking until completely firm, which can dry the filling and dull the delicate texture.
- To serve, allow to cool to room temperature before removing from the tin and cutting.: Cooling lets the filling finish setting and makes clean slicing possible, with the aroma of figs becoming more pronounced as it rests. When you lift the loose bottom and slide the tart onto a board, you will notice a neat edge and a glossy top. Serve at room temperature for the best texture. Cutting too soon often causes the filling to spill, so be patient and allow it to cool fully.
Notes
- Measure ingredients precisely, especially the plain flour and butter, to maintain the pastry ratio that creates a tender crust.
- Keep everything cold when making the pastry; cold butter yields flakier layers and less shrinkage during baking.
- Use clear honey for a clean glossy finish and to avoid altering the tart color.
- Warm the mascarpone gently and stir constantly to achieve a silky, lump free filling without overheating.
- Arrange figs cut side up for the best caramelization and an attractive presentation.
- Blind bake properly and do not skip the chilling step, both of which ensure a crisp base that supports the creamy filling.