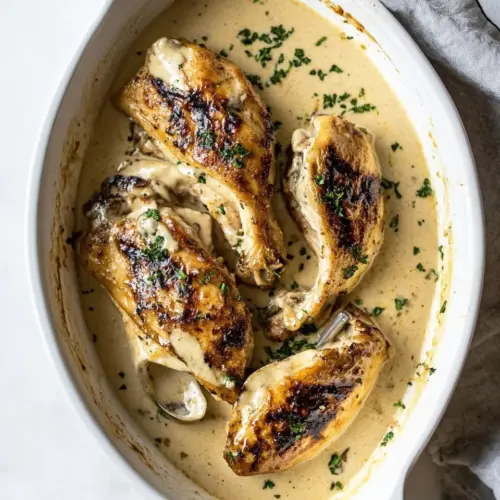
Creamy Garlic Chicken
Creamy Garlic Chicken began as one of those weeknight rescues for me, a skillet supper that felt polished yet unfussy. The first time I made it, I was running late after a long day, and the idea of a creamy, garlicky sauce over tender chicken sounded like a warm, honest dinner I could actually pull off. I chose a head of garlic that smelled sharp and sweet at the market, and the kitchen filled with a toasty aroma as the cloves softened in butter.
From that evening on, Creamy Garlic Chicken became my fallback when I wanted comfort without fuss. I love how the sauce clings to each slice of chicken, and how a squeeze of lemon brightens the rich cream. Guests always ask for seconds, and I admit I rarely refuse myself. Over time I learned small tricks, like the ideal browning color on the chicken and how gently simmering the cream makes the sauce silkier.
Recipe Snapshot
30 mins
10 mins
20 mins
Easy
500 kcal
American
Gluten-Free, Low FODMAP
Dinner
Skillet, Tongs, Measuring cups
Why This Creamy Garlic Chicken Is So Good
1. Silky, indulgent sauce
I adore how the sauce transforms with just a few pantry ingredients. The combination of butter and heavy/whipping cream creates a luxurious mouthfeel that coats the chicken perfectly. I often pause while stirring to breathe in the nutty scent of browned garlic mingling with cream, and that moment tells me the sauce is coming together.
2. Robust garlic flavor without biting heat
Roasting the whole head garlic cloves peeled in the skillet until lightly browned tames sharpness and brings out a mellow, almost sweet profile. I like that the garlic becomes soft enough to spread or bite into, giving bold flavor without overpowering the dish. It feels like comfort food, yet it still has personality.
3. Quick and approachable weeknight cooking
This recipe is one of my go to quick dinners because timing is dependable. With simple steps like dredging the chicken in Flour for dredging and searing, you get satisfying texture and flavor fast. I appreciate recipes that reward a little attention with restaurant style results at home.
4. Flexible and forgiving
I value how forgiving this dish is. If the sauce reduces a bit more, or the chicken needs a minute longer, the final plate still shines. Small swaps within the ingredient list, like choosing a different size of breasts, won’t derail the outcome. That ease makes it a repeat in my rotation.
5. Crowd friendly and elegant
Even though it is straightforward, Creamy Garlic Chicken looks and tastes like you spent more time than you did. I like to serve it when friends drop by, because it feels special without stress. It’s the kind of dish that draws people to the table and invites conversation.
Essential Ingredients for Creamy Garlic Chicken
These ingredients are deliberately simple, each playing a clear role. The chicken provides substance and protein, while the Flour for dredging gives a light crust that helps the sauce cling. Olive oil and butter build flavor and browning, and the aromatic power comes from the whole head garlic cloves peeled. Finally, chicken broth or stock, lemon juice, and heavy/whipping cream form a balanced sauce with tang, savoriness, and silk.
- 2 large boneless skinless chicken breasts: Season generously to enhance overall flavor; use salt and pepper to taste to bring out the chicken’s natural richness and balance the creaminess of the sauce. Apply evenly before dredging to ensure consistent seasoning throughout cooking. Adjust quantities cautiously to avoid overpowering the delicate garlic and cream components.
- Salt & pepper to taste: Coat lightly with flour to create a thin crust that helps seal in juices and promotes even browning when sautéed. Use enough to cover the chicken surface, shaking off excess to prevent gummy texture. The flour also helps thicken the sauce slightly as it mixes with pan drippings.
- Flour for dredging: Heat briefly in oil and butter to provide a hot surface for dredged chicken, aiding in developing a golden sear and caramelized flavor. Maintain proper pan temperature so the flour coating crisps without burning. Use moderate amount so it complements rather than soaks the chicken.
- 1 tablespoon olive oil: Melt to enrich the pan for searing and sauce development; olive oil adds a fruity, slightly peppery note and raises the smoke point when combined with butter. Use it at the start for sautéing chicken and for gently cooking aromatics. Keep heat steady to preserve its flavor and avoid bitterness.
- 2 tablespoons butter divided: Melt and brown to add lusciousness and depth; divide butter so part is used for searing and part for finishing the sauce to achieve a glossy, velvety texture. Monitor browning to prevent burning, which would impart a bitter taste. Stir the reserved portion into the sauce at the end to round flavors and add sheen.
- 1 whole head garlic cloves peeled: Smash or mince after peeling to release intense garlic aroma and flavor that forms the backbone of the dish; whole head provides abundant cloves for a pronounced garlicky profile. Sauté gently to mellow sharpness and prevent bitterness that occurs with high heat. Adjust the amount used to control pungency in the cream sauce.
- 1/2 cup chicken broth or stock: Deglaze the pan and add savory depth; chicken broth or stock lifts browned bits from the pan, blending them into the sauce for richer umami. Use half a cup to balance cream without thinning it excessively, and simmer briefly to concentrate flavor. Choose low-sodium stock if monitoring salt levels.
- 1/2 teaspoon lemon juice: Brighten and balance the richness; a small amount of lemon juice cuts through the creamy sauce and enhances overall freshness. Add cautiously and taste as you go to avoid overt acidity. Incorporate near the end of cooking to preserve its lively citrus notes.
- 1/4 teaspoon garlic powder: Enhance the garlic profile subtly and provide background savory depth; garlic powder reinforces fresh garlic while adding uniform flavor throughout the sauce. Use sparingly to complement rather than compete with minced garlic. Stir in early with liquids so it dissolves and integrates smoothly.
- 1 cup heavy/whipping cream: Enrich and thicken the sauce to yield a silky, luxurious mouthfeel; heavy or whipping cream contributes body and smoothness while mellowing garlic and lemon. Simmer gently to avoid curdling and allow flavors to meld, adjusting heat to achieve desired thickness. Finish with cream last to preserve its creamy texture.
- Parsley chopped () (optional): Garnish sparingly for color and mild herbal brightness; chopped parsley adds a fresh visual contrast and light, peppery notes that lift the dish. Sprinkle just before serving to maintain its vibrant green appearance and fresh flavor. Use optionality to suit guest preferences for herbs.
Step by Step Instructions for Creamy Garlic Chicken
These steps will take you from raw ingredients to a silky finished plate. I like to keep mise en place so the process flows: flour, seasoned chicken, and measured liquids all at the ready. You will notice aromatics and sauce development as the pan transforms through each stage.
- Cut the chicken in half lengthwise so you have 4 smaller cutlets. Generously season them with salt & pepper and coat them in the flour.: The aroma of seasoned chicken meeting hot oil is immediate and mouthwatering, and you should hear a soft sizzle as the meat touches the pan. This initial sear is where flavor begins, because the dry surface of the flour browns into tiny crunchy bits that later flavor the sauce. If you skip seasoning now, the interior will taste bland, so be generous with salt and pepper . A common mistake is overcrowding the pan, which causes steaming instead of browning, so cook in batches if needed.
- Add the olive oil and 1 tbsp of the butter to a skillet over medium-high heat. Once the pan is hot, sauté the chicken for 4-5 minutes/side or until it’s nice and golden. Take the chicken out of the pan and set it aside.: You will see a deep golden color form and hear a steady, energetic sizzle as the crust develops, releasing an inviting toasted aroma. This color signals the Maillard reaction, key for savory depth. Remove the chicken when the edges look caramelized and the center is opaque to prevent drying. A frequent error is flipping too often; let the surface develop before turning for the best crust.
- Reduce the heat to medium (or even med-low if using cast iron), and add the rest of the butter to the pan. Let it melt and then add the garlic cloves. Cook them for 3-4 minutes, stirring often, until they’re lightly browned on the outside.: As the butter melts, it will foam and take on a faintly nutty scent; when you add the whole head garlic cloves peeled , the pan fills with a sweet roasted garlic perfume. Stirring helps the cloves brown evenly without burning. If garlic browns too quickly and turns bitter, lower the heat immediately. Avoid leaving the garlic unattended, because it can go from golden to charred in seconds.
- Add the chicken broth, lemon juice, and garlic powder to the pan. Let it bubble for around 4 minutes or until the liquid is noticeably reduced.: The sizzling will shift to a gentle bubbling as the liquid hits the hot pan, and you will see browned bits loosen from the bottom, releasing concentrated savory flavor into the sauce. Reduction concentrates taste and helps the sauce thicken naturally when cream is added. A common pitfall is adding cream too soon, which keeps the sauce thin, so be patient and reduce properly.
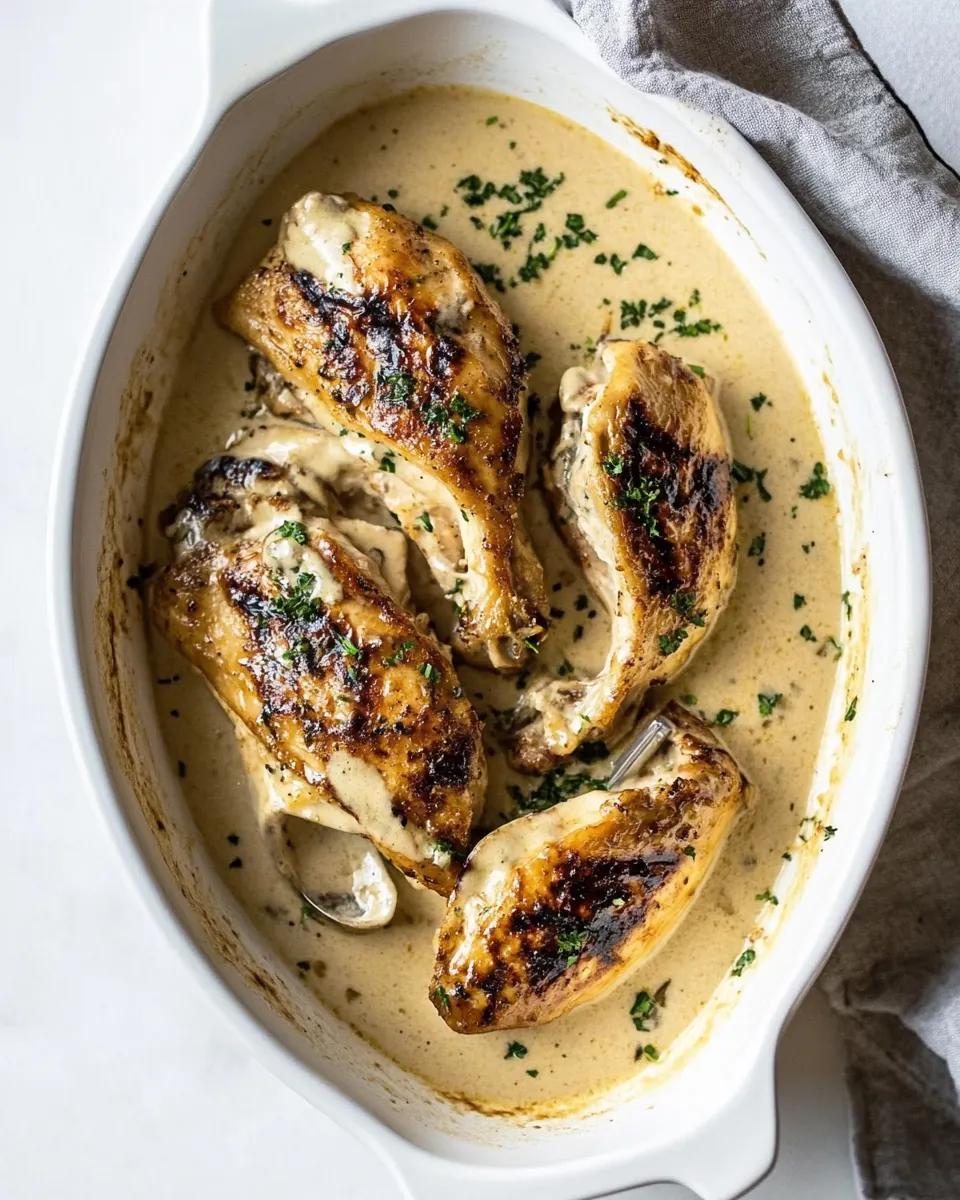
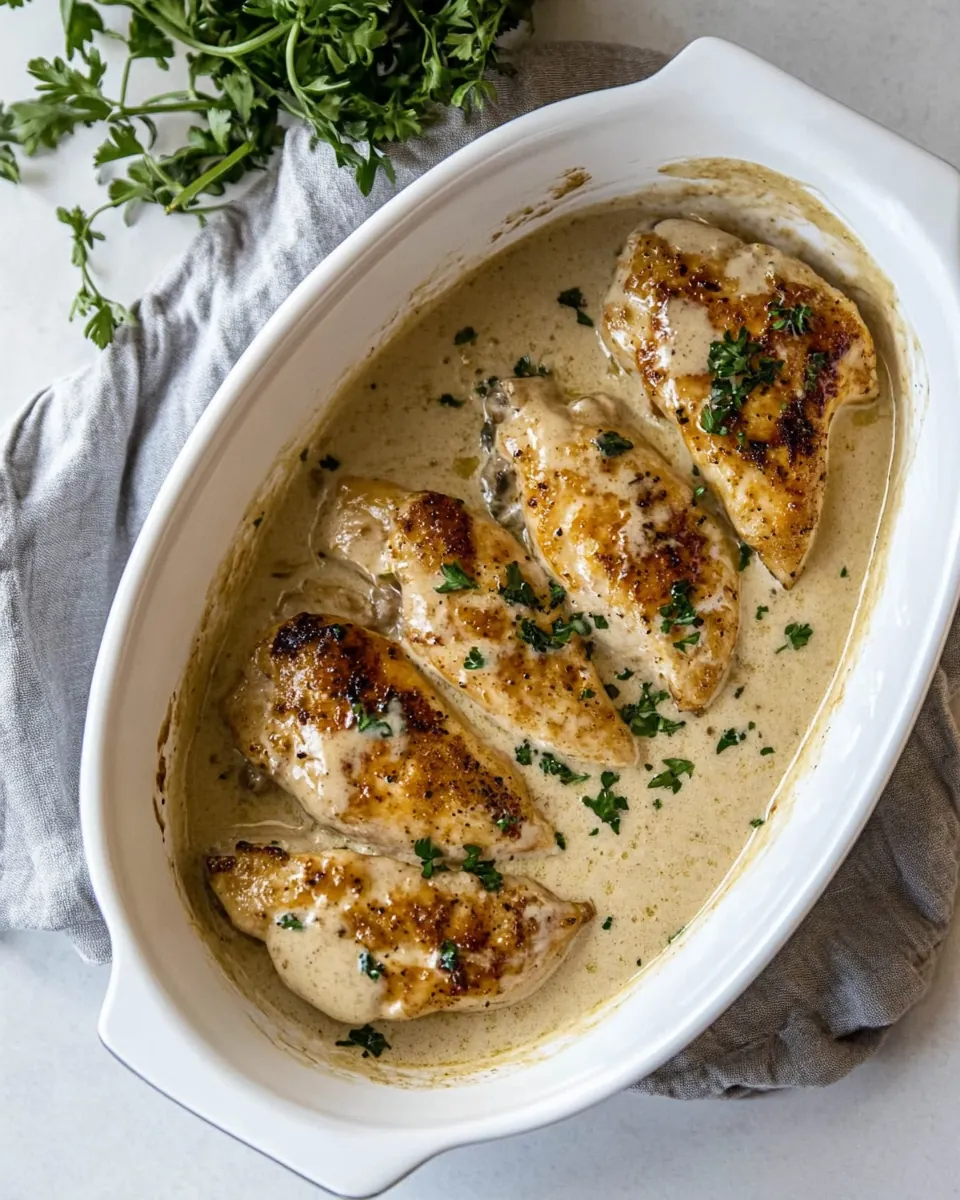
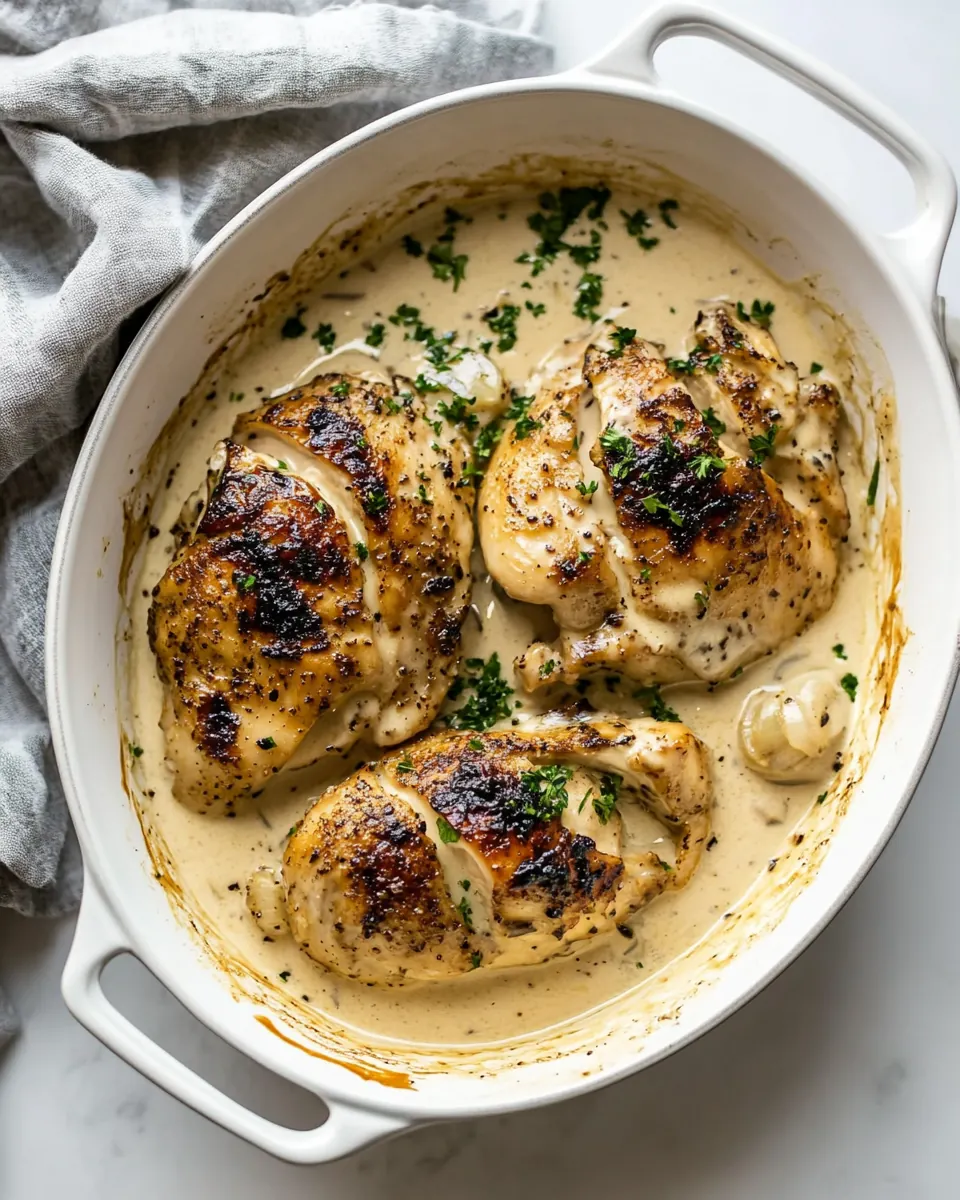
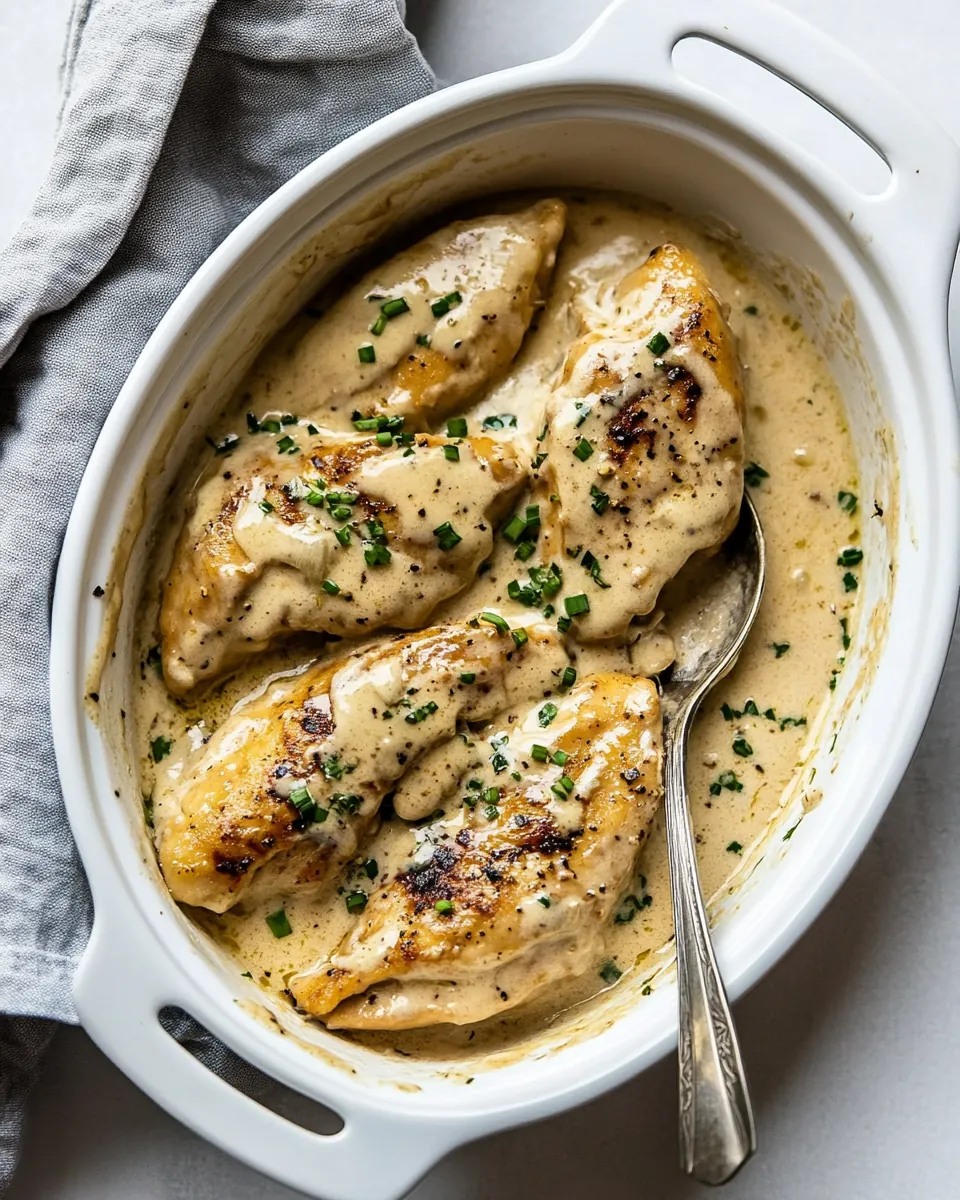
- Stir in the cream and add the chicken back into the pan. Let it cook for another 5 minutes or so, until the sauce is reduced and the chicken is cooked through. Serve with freshly chopped parsley if you wish.: When the heavy/whipping cream joins the pan, the texture will transform into a glossy, velvety sauce, and the scent of garlic and butter will become richer and rounder. Return the chicken to warm through and nestle in the sauce so each piece is coated. Watch for a gentle simmer rather than a boil to avoid breaking the cream. The most common mistake here is overheating, which can cause separation or a curdled texture, so keep the heat low and stir occasionally. Serve with a sprinkle of Parsley chopped (optional) for color and freshness if you like.
Recipe Variations about Creamy Garlic Chicken
I like to tweak small elements depending on mood or what is in the pantry. These variations preserve the heart of the recipe while offering different textures and accents to keep the dish interesting.
- Lemon brightener Add an extra 1/2 teaspoon of fresh lemon juice at the end for a livelier finish that lifts the rich cream.
- Extra garlic If you love garlic, increase the number of cloves slightly but watch cooking time so they do not burn and turn bitter.
- Reduce for thickness Allow the sauce to simmer a bit longer to concentrate flavors and reach a thicker, clingier texture that stays on the chicken.
- Butter technique Use the second tablespoon of butter at the very end for a glossy finish and slightly richer mouthfeel.
- Parsley finish Sprinkle the Parsley chopped (optional) just before serving to retain fresh green color and a herbaceous lift.
Great Combinations for Creamy Garlic Chicken
This dish pairs well with simple sides that complement the creamy sauce and soak up every drop. Below are ideas for meals, occasions, and storage tips that highlight how versatile and crowd friendly this recipe can be.
- Serve over rice A bed of warm rice soaks up the sauce and makes the meal satisfying for family style dinners.
- Buttery mashed potatoes Creamy mashed potatoes are an ideal match, offering a velvety pairing that echoes the texture of the sauce.
- Steamed vegetables Light steamed greens add color and a fresh counterpoint to the richness, perfect for weeknight balance.
- Weeknight dinner This recipe is approachable for busy evenings, it delivers a restaurant feel without excessive fuss.
- Make ahead and store Refrigerate leftovers in an airtight container for up to three days, reheat gently over low heat to preserve sauce integrity.
- Occasion friendly Serve at casual gatherings or family dinners, it looks impressive yet is easy to scale for more people.
FAQ
Conclusion
This recipe shines because it delivers a luscious garlic cream sauce that hugs tender seared chicken, bringing restaurant quality to your weeknight table. Give Creamy Garlic Chicken a try when you want something effortless yet impressive, you may find it becomes a fast favorite. It is forgiving, fast, and satisfying, and I hope it becomes a recipe you reach for often when you want comfort with a little elegance.
Creamy Garlic Chicken
Equipment
- Skillet
- Tongs
- Measuring Cups
Ingredients
- 2 large boneless skinless chicken breasts Season generously to enhance overall flavor; use salt and pepper to taste to bring out the chicken’s natural richness and balance the creaminess of the sauce. Apply evenly before dredging to ensure consistent seasoning throughout cooking. Adjust quantities cautiously to avoid overpowering the delicate garlic and cream components.
- Salt & pepper to taste Coat lightly with flour to create a thin crust that helps seal in juices and promotes even browning when sautéed. Use enough to cover the chicken surface, shaking off excess to prevent gummy texture. The flour also helps thicken the sauce slightly as it mixes with pan drippings.
- Flour for dredging Heat briefly in oil and butter to provide a hot surface for dredged chicken, aiding in developing a golden sear and caramelized flavor. Maintain proper pan temperature so the flour coating crisps without burning. Use moderate amount so it complements rather than soaks the chicken.
- 1 tablespoon olive oil Melt to enrich the pan for searing and sauce development; olive oil adds a fruity, slightly peppery note and raises the smoke point when combined with butter. Use it at the start for sautéing chicken and for gently cooking aromatics. Keep heat steady to preserve its flavor and avoid bitterness.
- 2 tablespoons butter divided Melt and brown to add lusciousness and depth; divide butter so part is used for searing and part for finishing the sauce to achieve a glossy, velvety texture. Monitor browning to prevent burning, which would impart a bitter taste. Stir the reserved portion into the sauce at the end to round flavors and add sheen.
- 1 whole head garlic cloves peeled Smash or mince after peeling to release intense garlic aroma and flavor that forms the backbone of the dish; whole head provides abundant cloves for a pronounced garlicky profile. Sauté gently to mellow sharpness and prevent bitterness that occurs with high heat. Adjust the amount used to control pungency in the cream sauce.
- 1/2 cup chicken broth or stock Deglaze the pan and add savory depth; chicken broth or stock lifts browned bits from the pan, blending them into the sauce for richer umami. Use half a cup to balance cream without thinning it excessively, and simmer briefly to concentrate flavor. Choose low-sodium stock if monitoring salt levels.
- 1/2 teaspoon lemon juice Brighten and balance the richness; a small amount of lemon juice cuts through the creamy sauce and enhances overall freshness. Add cautiously and taste as you go to avoid overt acidity. Incorporate near the end of cooking to preserve its lively citrus notes.
- 1/4 teaspoon garlic powder Enhance the garlic profile subtly and provide background savory depth; garlic powder reinforces fresh garlic while adding uniform flavor throughout the sauce. Use sparingly to complement rather than compete with minced garlic. Stir in early with liquids so it dissolves and integrates smoothly.
- 1 cup heavy/whipping cream Enrich and thicken the sauce to yield a silky, luxurious mouthfeel; heavy or whipping cream contributes body and smoothness while mellowing garlic and lemon. Simmer gently to avoid curdling and allow flavors to meld, adjusting heat to achieve desired thickness. Finish with cream last to preserve its creamy texture.
- Parsley chopped (optional) Garnish sparingly for color and mild herbal brightness; chopped parsley adds a fresh visual contrast and light, peppery notes that lift the dish. Sprinkle just before serving to maintain its vibrant green appearance and fresh flavor. Use optionality to suit guest preferences for herbs.
Instructions
- Cut the chicken in half lengthwise so you have 4 smaller cutlets. Generously season them with salt & pepper and coat them in the flour.: The aroma of seasoned chicken meeting hot oil is immediate and mouthwatering, and you should hear a soft sizzle as the meat touches the pan. This initial sear is where flavor begins, because the dry surface of the flour browns into tiny crunchy bits that later flavor the sauce. If you skip seasoning now, the interior will taste bland, so be generous with salt and pepper . A common mistake is overcrowding the pan, which causes steaming instead of browning, so cook in batches if needed.
- Add the olive oil and 1 tbsp of the butter to a skillet over medium-high heat. Once the pan is hot, sauté the chicken for 4-5 minutes/side or until it’s nice and golden. Take the chicken out of the pan and set it aside.: You will see a deep golden color form and hear a steady, energetic sizzle as the crust develops, releasing an inviting toasted aroma. This color signals the Maillard reaction, key for savory depth. Remove the chicken when the edges look caramelized and the center is opaque to prevent drying. A frequent error is flipping too often; let the surface develop before turning for the best crust.
- Reduce the heat to medium (or even med-low if using cast iron), and add the rest of the butter to the pan. Let it melt and then add the garlic cloves. Cook them for 3-4 minutes, stirring often, until they’re lightly browned on the outside.: As the butter melts, it will foam and take on a faintly nutty scent; when you add the whole head garlic cloves peeled , the pan fills with a sweet roasted garlic perfume. Stirring helps the cloves brown evenly without burning. If garlic browns too quickly and turns bitter, lower the heat immediately. Avoid leaving the garlic unattended, because it can go from golden to charred in seconds.
- Add the chicken broth, lemon juice, and garlic powder to the pan. Let it bubble for around 4 minutes or until the liquid is noticeably reduced.: The sizzling will shift to a gentle bubbling as the liquid hits the hot pan, and you will see browned bits loosen from the bottom, releasing concentrated savory flavor into the sauce. Reduction concentrates taste and helps the sauce thicken naturally when cream is added. A common pitfall is adding cream too soon, which keeps the sauce thin, so be patient and reduce properly.
- Stir in the cream and add the chicken back into the pan. Let it cook for another 5 minutes or so, until the sauce is reduced and the chicken is cooked through. Serve with freshly chopped parsley if you wish.: When the heavy/whipping cream joins the pan, the texture will transform into a glossy, velvety sauce, and the scent of garlic and butter will become richer and rounder. Return the chicken to warm through and nestle in the sauce so each piece is coated. Watch for a gentle simmer rather than a boil to avoid breaking the cream. The most common mistake here is overheating, which can cause separation or a curdled texture, so keep the heat low and stir occasionally. Serve with a sprinkle of Parsley chopped (optional) for color and freshness if you like.
Notes
- Lemon brightener Add an extra 1/2 teaspoon of fresh lemon juice at the end for a livelier finish that lifts the rich cream.
- Extra garlic If you love garlic, increase the number of cloves slightly but watch cooking time so they do not burn and turn bitter.
- Reduce for thickness Allow the sauce to simmer a bit longer to concentrate flavors and reach a thicker, clingier texture that stays on the chicken.
- Butter technique Use the second tablespoon of butter at the very end for a glossy finish and slightly richer mouthfeel.
- Parsley finish Sprinkle the Parsley chopped (optional) just before serving to retain fresh green color and a herbaceous lift.