Classic Bread Stuffing Recipe
Classic Bread Stuffing Recipe has always been the warm, savory anchor on my holiday table, the dish everyone reaches for first. The scent of sautéed onion and celery mingling with butter wafts through the house, and I have a memory of my grandmother nudging me toward the oven as if a secret were hiding inside that bubbling, golden top. I still remember the knot of anticipation when she lifted the foil, revealing that crisp crust, and how small moments around a baking dish turned into long conversations.
Over the years I have tinkered with textures, swapped broths, and learned that the simplest ingredients often deliver the most comforting results. My approach to Classic Bread Stuffing Recipe is about balance. Soft, pillowy bread soaked just enough to stay tender meets pockets of herb perfume, while a final blast in the oven creates crunchy edges that make every bite memorable. I like to think of stuffing as the cozy bridge between the main course and those stories you only tell when there is gravy on your plate.
Recipe Snapshot
60 mins
15 mins
45 mins
Medium
150 kcal
American
Gluten-Free, Paleo
Side Dishes
Baking dish, Large frying pan, Mixing bowl
Why This Classic Bread Stuffing Recipe Works
Heirloom comfort
I love how Classic Bread Stuffing Recipe connects generations. When I make it, I hear my family talking across decades. The simple pairing of bread, butter, and herbs evokes nostalgia, and you can taste the history in every moist forkful.
Texture play
One reason I keep returning to this recipe is the contrast it creates. Tender interior crumbs and a crunchy golden top happen when you get the moisture level right. That interplay of soft and crisp keeps everyone coming back for seconds.
Easy to personalize
I appreciate how forgiving this dish is. You can use different breads to subtly change the character, and the recipe handles swaps well. I often adjust the broth amount to suit the bread density, which makes it perfect for improvising when guests arrive unexpectedly.
Reliable holiday side
When hosting, reliability matters. Classic Bread Stuffing Recipe holds its shape, reheats beautifully, and pairs with many mains. It is the side that ties a spread together, and I count on it every Thanksgiving for that reason.
Flavor without fuss
This stuffing delivers layered flavor using pantry staples. The herbs, butter, and aromatics build up a savory backbone, while the optional seasoning lets you nudge the profile to be more rustic or more refined. I find that small adjustments create big satisfaction.
Everything You Need for Classic Bread Stuffing Recipe
These ingredients work like a small orchestra, each playing a clear role. The dried bread cubes form the structure, absorbing savory liquids while holding pockets of air. The sautéed onion and celery provide aromatic sweetness and crunch. Butter brings silkiness and helps the top brown, while the dried herbs add depth. Broth finishes the job, moisturizing the crumbs and carrying flavor through every bite.
- 8 cups of dry bread cubes (You can choose any bread. White bread is often used, but feel free to try your favorite one): Provide airy structure and absorb flavors; use cubed, dried bread to create the base texture of the stuffing and allow broths and seasonings to moisten evenly. Choose a sturdy bread to avoid becoming mushy, and consider toasting cubes for extra depth and crunch. Works as the primary vehicle for all other flavors and moisture.
- 1 cup of chopped onion: Add aromatic sharpness and sweetness when sautéed; chopped onion enhances savory depth and provides subtle texture contrast throughout the stuffing. Sweat it gently in butter to release sugars and soften its bite without browning too quickly. Balances herbal and buttery components for cohesive flavor.
- 1 cup of chopped celery: Contribute crisp aromatic vegetal notes and a mild savory crunch; chopped celery offers freshness and a slight bitterness that offsets richness. Cook alongside onion in butter to soften while retaining some texture, ensuring even distribution. Complements herbs and adds structural interest to each bite.
- 1/2 cup of unsalted butter: Impart richness and help sauté aromatics; unsalted butter provides a luscious mouthfeel and carries flavors from herbs into the bread. Use unsalted to control seasoning precisely, melting it gently to cook onion and celery without burning. Binds ingredients and promotes golden color in the mixture.
- 1 1/2 teaspoons of dried sage: Provide warm, earthy, and slightly floral notes; dried sage brings classic savory, slightly peppery flavor essential to traditional stuffing profiles. Sprinkle evenly and toast briefly with butter and aromatics to bloom its aroma, being careful not to overpower more delicate herbs. Pairs especially well with poultry and bread components.
- 1 1/2 teaspoons of dried thyme: Bring subtle woodsy and lemony undertones; dried thyme adds layered herbal complexity that complements sage and butter. Crumble between fingers before adding to release oils and even out the flavor throughout the mixture. Enhances savory depth without dominating other aromatics.
- 1 teaspoon of salt: Season and enhance overall flavor balance; salt brightens and amplifies savory ingredients while harmonizing herbs and butter in the stuffing. Add incrementally and taste as broth is added, since liquid components can concentrate or dilute seasoning. Essential for preventing a flat final dish.
- 1/2 teaspoon of ground black pepper: Introduce mild heat and brighten flavors; ground black pepper adds piquancy and complements the salt and herbs. Use freshly ground if possible for more pronounced aroma, and adjust quantity to preference to avoid overpowering delicate tastes. Helps lift the overall profile of the stuffing.
- 1/4 teaspoon of garlic powder (You can skip this if you want): Enhance savory depth with a gentle garlic aroma; garlic powder offers concentrated, mellow garlic flavor without texture of fresh garlic. Add sparingly and distribute evenly to avoid sharpness, or omit if preferring a more traditional herb-forward profile. Provides background umami and warmth.
- 1 1/2 to 2 cups of chicken or vegetable broth: Moisten and bind dry ingredients while adding savory depth; chicken or vegetable broth hydrates the bread cubes and delivers salt and flavor into the stuffing. Add gradually within the 1 1/2 to 2 cup range to achieve desired moistness, and warm it before mixing for best absorption. Choose broth based on dietary preference to control overall taste.
Making This Classic Bread Stuffing Recipe
These directions are straightforward, but the magic is in timing and attention. I walk you through each stage so you can sense when the aromatics are ready, when the texture is correct, and when the top is perfectly bronzed. Take your time, taste as you go, and savor the sensory clues.
- Heat your oven to 350°F (175°C). Grease a baking dish that's 9 x 13 inches.: As heat rises in the oven, an inviting warm air begins to circulate, carrying the faint smell of warming butter if your dish is already prepped. You want the oven steady so the inside cooks evenly and the top crisps without burning. A common mistake is preheating too late, which can leave the center underdone; always allow the oven to reach temperature before sliding the dish in.
- In a large frying pan, melt the butter over medium heat. Add the chopped onions and celery. Cook them until they're soft. This should take about 5 to 7 minutes.: Rubbing the dish with butter or a light coating of oil creates a nonstick surface and promotes even browning at the edges where the bread meets the pan. You should hear a soft spread sound as the fat adheres. If you skip greasing, the edges can cling and tear when serving, so take a moment to prep the pan well.
- Add the dried sage, dried thyme, salt, ground black pepper, and garlic powder (if you're using it). Stir everything together and let it cook for one more minute.: When the butter finishes melting, it will shimmer and give off a slightly nutty aroma as the water content evaporates. This is the best moment to add vegetables because the fat carries flavor. Avoid high heat, which causes the butter to brown too quickly and risk bitterness.
- Put the dry bread cubes in a big bowl. Pour the onion and celery mixture onto the bread. Stir gently until the bread is coated evenly.: Once the onion and celery hit the pan, you should hear a gentle sizzle and smell a green, slightly sweet fragrance. Stir frequently so they soften evenly and do not develop brown bits too soon. If you rush this step with high heat, the vegetables can scorch and impart unwanted bitter notes.
- Slowly pour chicken or vegetable broth over the bread, stirring gently as you do. Keep adding broth until the bread is as moist as you like it. The amount you need might depend on the kind of bread you're using and how moist you want your stuffing.: Softening takes about 5 to 7 minutes, during which the texture transitions from crisp to tender and the flavor becomes sweeter and more cohesive. You will notice the sound change from lively sizzle to a quieter simmer, and the pan will hold more moisture. Overcooking will make them mushy, so stop when they are translucent and pliable.
- Put the stuffing into your greased baking dish. Cover the dish with aluminum foil.: Adding the dried herbs and seasonings briefly to the warmed vegetables releases their oils, amplifying aroma. Give them about one minute to bloom in the hot fat so their flavors open up. A common error is adding herbs too late, which can cause them to remain flat and undeveloped.
- Bake it in the oven for 30 minutes. Then, take off the foil and bake for another 15 to 20 minutes. It's ready when the top is golden brown and crispy.: In this short minute, the mixture should smell fragrant and well balanced, with herb notes rising above the sweet vegetables. Listen for a gentle tightening of the sizzle as moisture reduces. If the pan becomes too dry, add a splash of broth; dryness can create burnt flavor.
- This recipe makes enough bread stuffing to serve as a side dish for 8-10 people. Enjoy your meal!: As you drop the fluffy bread into the bowl, the texture should be airy and slightly coarse. The cubes are designed to soak without collapsing, creating a matrix that will hold broth pockets. Using very fresh bread can lead to a gummy texture, so slightly day old is best.
- Pour the onion and celery mixture onto the bread: When the warm vegetable mixture meets the bread , the heat starts to soften the crumbs and the aromatics distribute through the pieces. The bowl will smell rich and savory. If your bread absorbs unevenly, gently toss to expose all surfaces to the warm mixture.
- Stir gently until the bread is coated evenly: You want a uniform distribution so each forkful has herbs, vegetables, and bread. Use a folding motion rather than aggressive stirring to preserve the bread structure. Overmixing will break the cubes into fine crumbs and create a denser stuffing.
- Slowly pour chicken or vegetable broth over the bread: Pouring slowly lets you control moisture absorption; as broth meets the warm crumbs it softens them and carries seasoning inward. The sound is a light trickle and the mixture becomes glossy. Adding broth too quickly can make the mixture soupy, while adding too little results in dry pockets.
- Stirring gently as you do: Gentle stirring helps distribute the liquid without collapsing the cubes. You should feel the mixture become pliable and slightly springy to the touch. If any dry clumps remain, add broth in small increments until homogenous. A frequent mistake is overwatering, which prevents proper browning in the oven.
- Keep adding broth until the bread is as moist as you like it: The right moisture level is when the crumbs hold together when pressed but still yield easily with a fork. Different breads demand different amounts, so stop and test by squeezing a handful; it should hold shape, yet be tender. If it is too wet, bake covered longer; if too dry, add a little more broth .
- Put the stuffing into your greased baking dish: Transfer the mixture gently so you keep the built air pockets intact. Spread it evenly to encourage uniform browning. The surface should look slightly domed rather than soupy. Compressing too much will create a dense texture and reduce crispy edges.
- Cover the dish with aluminum foil: The foil traps steam and allows the interior to set without overbrowning the top right away. You will notice condensation on the foil which means heat and moisture are working together to finish the center. Forgetting the foil can dry the interior before it is fully warmed through.
- Bake it in the oven for 30 minutes: During this period the center sets and flavors continue to meld, producing a warm, fragrant aroma that fills the kitchen. The dish should feel set when you gently press the top. If the center still seems loose after 30 minutes, keep it covered and bake an additional short period.
- Then, take off the foil and bake for another 15 to 20 minutes: Removing the foil lets the top crisp and develop a golden brown color, creating that desirable crunchy contrast. You should hear a gentle crackle as the surface dries and edges bronzen. If the top browns too quickly, lower the oven temperature slightly and tent with foil to prevent burning.
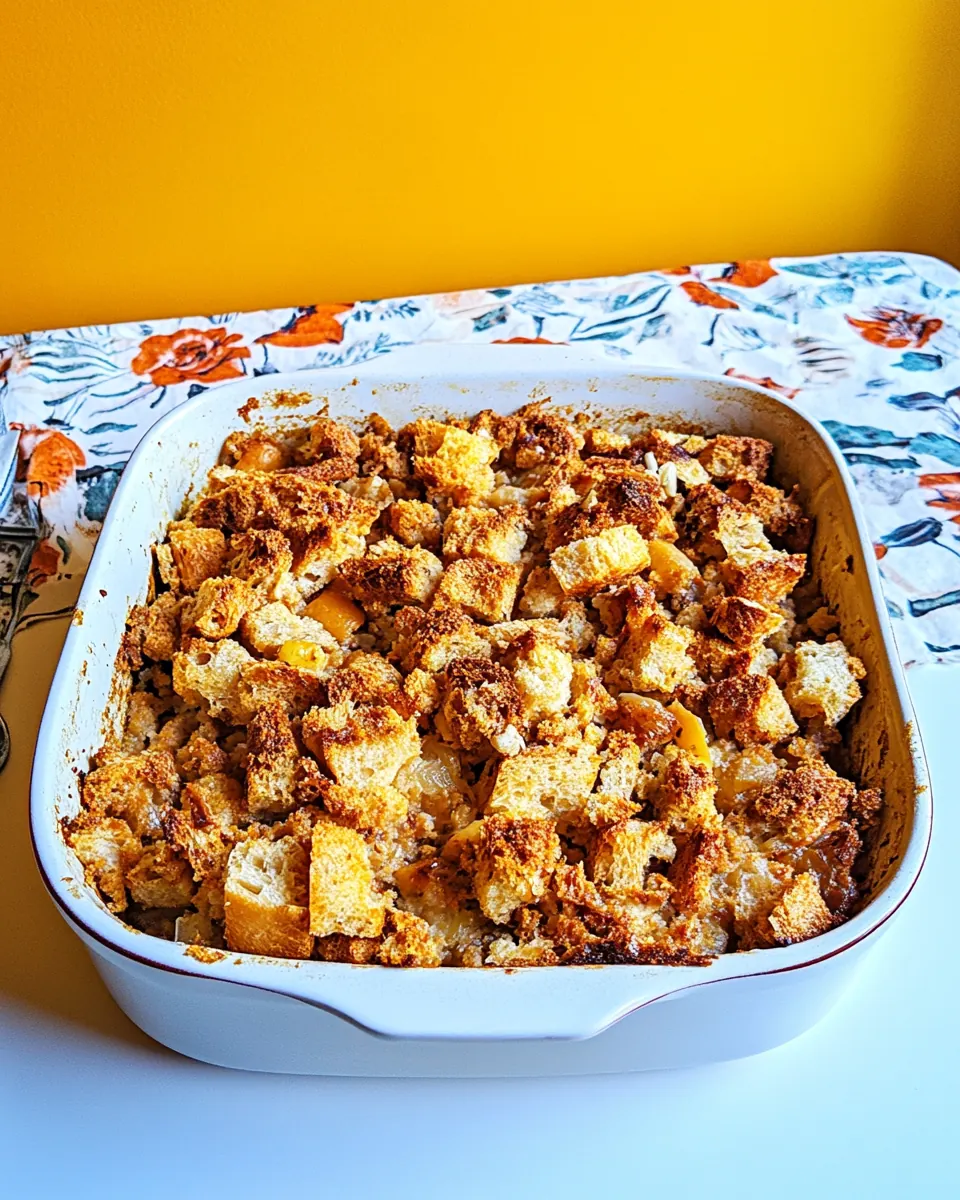
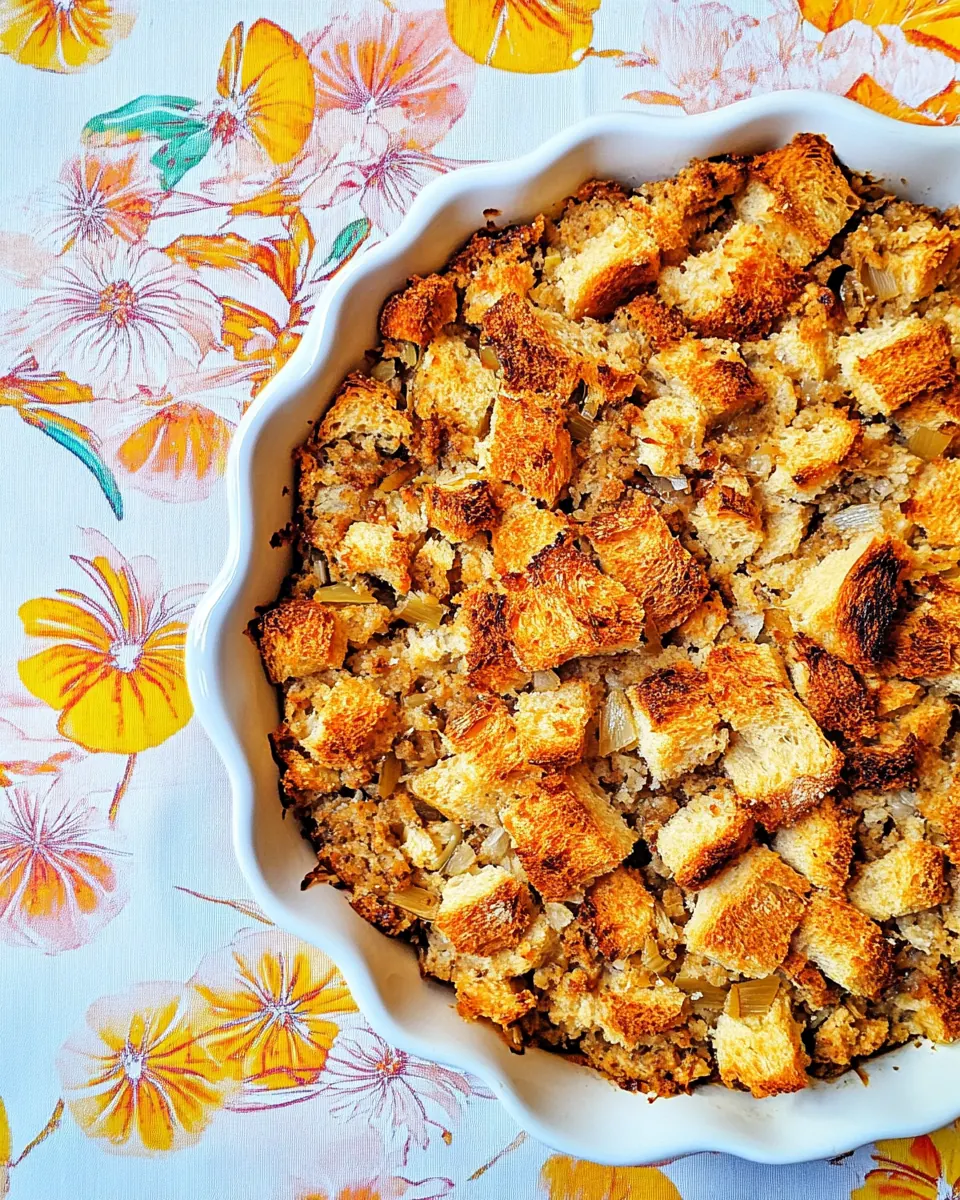
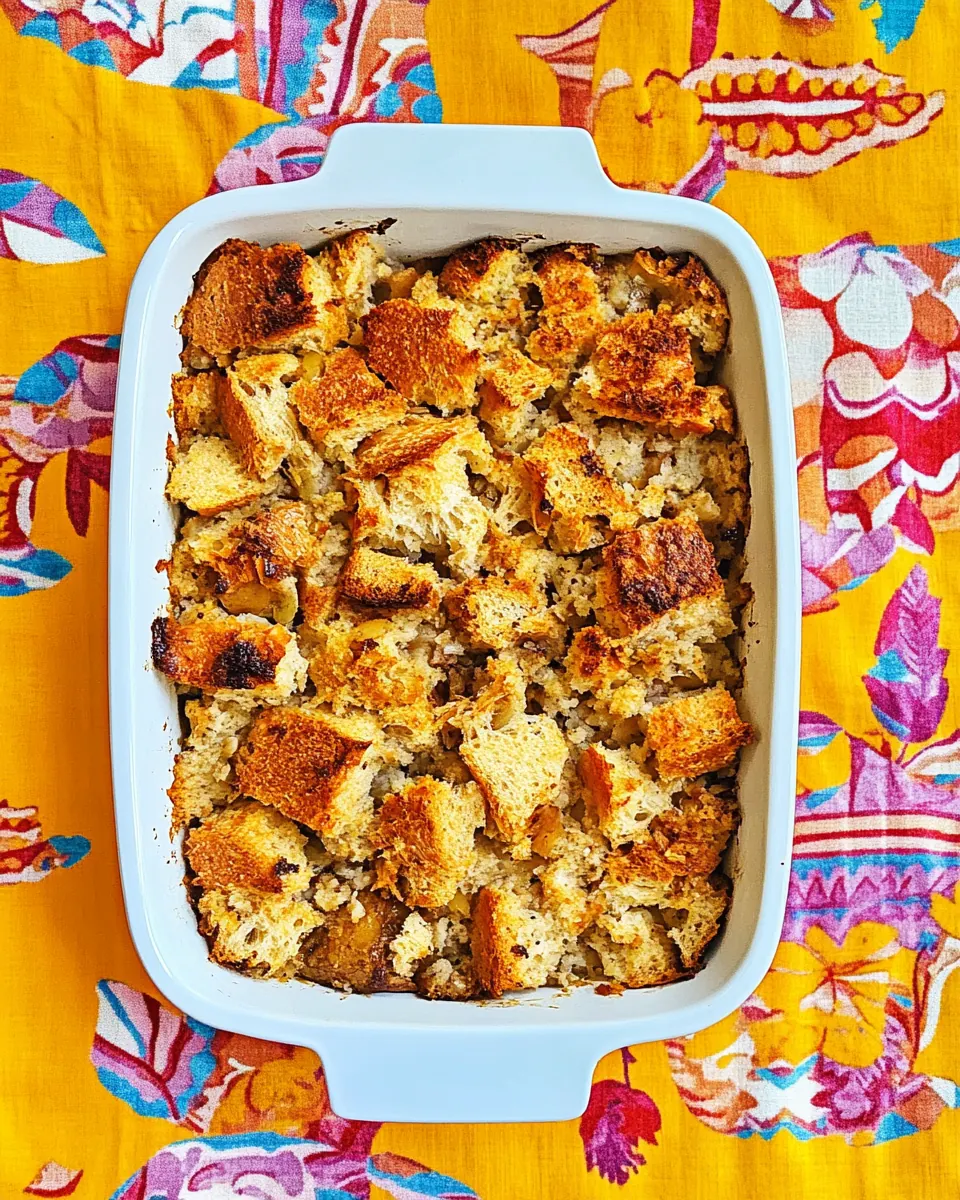
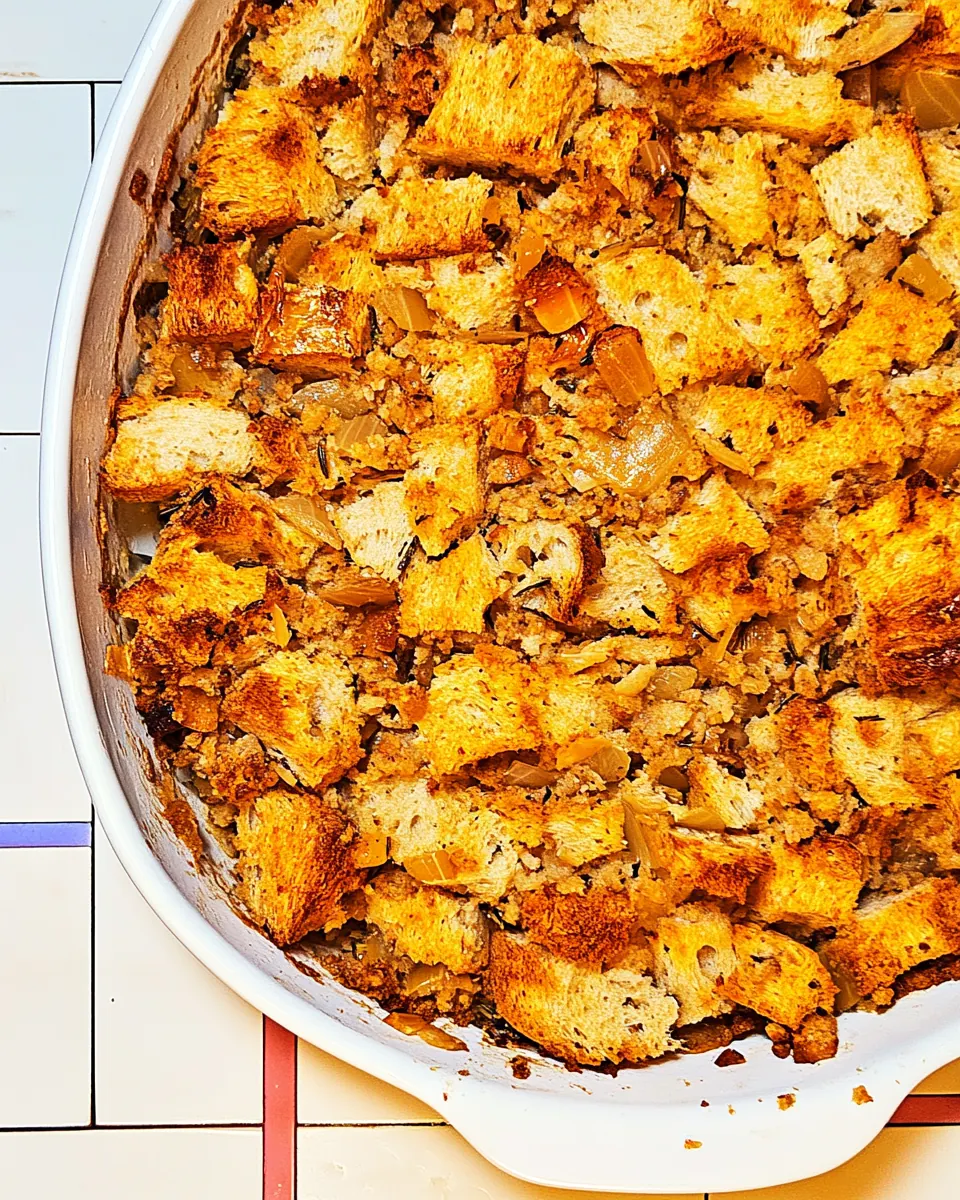
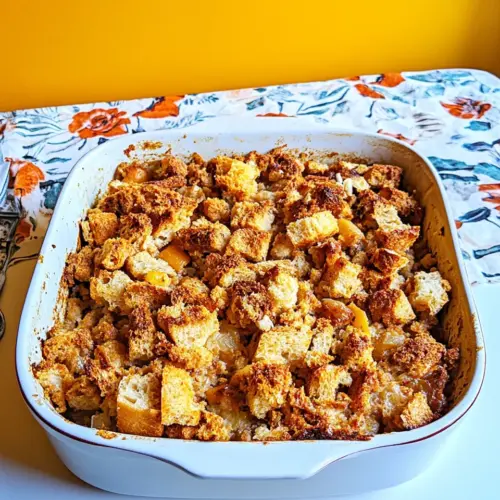
- It’s ready when the top is golden brown and crispy: A perfectly finished stuffing will glisten where the butter has bubbled and show a mosaic of crunchy peaks and tender valleys. The aroma becomes deeply savory, and a fork will reveal a moist interior. Serving too soon may leave the center undercoagulated, while waiting too long risks drying out the crumbs.
- This recipe makes enough bread stuffing to serve as a side dish for 8 to 10 people: When plated, you should see a balance of textures and an even distribution of herbs. Portioning into generous spoonfuls ensures everyone gets a mix of crunchy top and soft filling. If you need fewer servings, the mixture scales down well but watch your baking time, which can shorten in smaller dishes.
- Enjoy your meal: The first bite should combine fluffy interior crumbs, pockets of herb perfume, and a crisp top that sings with butter richness. Take a moment to savor the smell and texture, and share pieces warm from the oven for the best experience. Let leftovers cool before sealing to preserve texture for reheating.
Helpful Hints
This section gathers practical pointers I use every time I make Classic Bread Stuffing Recipe. These are small habits that prevent common issues and elevate the final dish. Read each tip and keep a few in mind while you prep.
- Day old bread is best. Slightly stale bread soaks up broth without collapsing, creating a light yet cohesive texture that fresh bread often cannot achieve.
- Keep herbs measured. Dried sage and thyme are potent; measure accurately to avoid overwhelming the savory profile.
- Test moisture by hand. Squeeze a handful of the mixed bread; it should hold together but fall apart when prodded to ensure correct hydration.
- Use a shallow dish. A wider baking dish encourages more surface area to crisp, giving you more crunchy edge per serving.
- Let it rest briefly. Allow the stuffing to sit five minutes after baking so juices settle and slicing produces cleaner portions.
Serving Options for Classic Bread Stuffing Recipe
Stuffing is versatile, and how you serve it shapes the meal. Below are ideas for occasions, pairings, and practical storage advice so your Classic Bread Stuffing Recipe shines on the table.
- Holiday centerpiece. Serve warm as a traditional Thanksgiving side alongside a roasted main and gravy for a comforting, classic spread.
- Weeknight dinner. Pair with a simple roasted vegetable and a protein for an easy weeknight accompaniment that feels homey without fuss.
- Make ahead. Assemble and refrigerate the night before, then bake on the day for time savings; just bring it to room temperature before baking for even cooking.
- Leftover storage. Cool completely, store in an airtight container, and refrigerate for up to three days; reheat in a 350°F oven until warmed through to restore crispness.
- Seasonal pairings. In fall, serve with roasted root vegetables and cranberry chutney to emphasize autumn flavors; the herbs complement earthy sides beautifully.
- Portioning. For buffet style, spoon into individual ramekins for easy serving and attractive presentation, which also helps retain crisp edges.
FAQ
Conclusion
This Classic Bread Stuffing Recipe stands out because it pairs simple pantry ingredients into a reliably flavorful, texturally interesting side. The contrast of tender interior crumbs with a golden, crispy top makes it both comforting and exciting on the plate. I encourage you to try it as written, then make small adjustments to suit your table; it responds really well to gentle personalization. Serve it warm, enjoy the aromas, and let it be the familiar, welcoming dish that brings the meal together.
Classic Bread Stuffing Recipe
Equipment
- Baking Dish
- Large Frying Pan
- Mixing Bowl
Ingredients
- 8 cups of dry bread cubes (You can choose any bread. White bread is often used, but feel free to try your favorite one) Provide airy structure and absorb flavors; use cubed, dried bread to create the base texture of the stuffing and allow broths and seasonings to moisten evenly. Choose a sturdy bread to avoid becoming mushy, and consider toasting cubes for extra depth and crunch. Works as the primary vehicle for all other flavors and moisture.
- 1 cup of chopped onion Add aromatic sharpness and sweetness when sautéed; chopped onion enhances savory depth and provides subtle texture contrast throughout the stuffing. Sweat it gently in butter to release sugars and soften its bite without browning too quickly. Balances herbal and buttery components for cohesive flavor.
- 1 cup of chopped celery Contribute crisp aromatic vegetal notes and a mild savory crunch; chopped celery offers freshness and a slight bitterness that offsets richness. Cook alongside onion in butter to soften while retaining some texture, ensuring even distribution. Complements herbs and adds structural interest to each bite.
- 1/2 cup of unsalted butter Impart richness and help sauté aromatics; unsalted butter provides a luscious mouthfeel and carries flavors from herbs into the bread. Use unsalted to control seasoning precisely, melting it gently to cook onion and celery without burning. Binds ingredients and promotes golden color in the mixture.
- 1 1/2 teaspoons of dried sage Provide warm, earthy, and slightly floral notes; dried sage brings classic savory, slightly peppery flavor essential to traditional stuffing profiles. Sprinkle evenly and toast briefly with butter and aromatics to bloom its aroma, being careful not to overpower more delicate herbs. Pairs especially well with poultry and bread components.
- 1 1/2 teaspoons of dried thyme Bring subtle woodsy and lemony undertones; dried thyme adds layered herbal complexity that complements sage and butter. Crumble between fingers before adding to release oils and even out the flavor throughout the mixture. Enhances savory depth without dominating other aromatics.
- 1 teaspoon of salt Season and enhance overall flavor balance; salt brightens and amplifies savory ingredients while harmonizing herbs and butter in the stuffing. Add incrementally and taste as broth is added, since liquid components can concentrate or dilute seasoning. Essential for preventing a flat final dish.
- 1/2 teaspoon of ground black pepper Introduce mild heat and brighten flavors; ground black pepper adds piquancy and complements the salt and herbs. Use freshly ground if possible for more pronounced aroma, and adjust quantity to preference to avoid overpowering delicate tastes. Helps lift the overall profile of the stuffing.
- 1/4 teaspoon of garlic powder (You can skip this if you want) Enhance savory depth with a gentle garlic aroma; garlic powder offers concentrated, mellow garlic flavor without texture of fresh garlic. Add sparingly and distribute evenly to avoid sharpness, or omit if preferring a more traditional herb-forward profile. Provides background umami and warmth.
- 1 1/2 to 2 cups of chicken or vegetable broth Moisten and bind dry ingredients while adding savory depth; chicken or vegetable broth hydrates the bread cubes and delivers salt and flavor into the stuffing. Add gradually within the 1 1/2 to 2 cup range to achieve desired moistness, and warm it before mixing for best absorption. Choose broth based on dietary preference to control overall taste.
Instructions
- Heat your oven to 350°F (175°C). Grease a baking dish that's 9 x 13 inches.: As heat rises in the oven, an inviting warm air begins to circulate, carrying the faint smell of warming butter if your dish is already prepped. You want the oven steady so the inside cooks evenly and the top crisps without burning. A common mistake is preheating too late, which can leave the center underdone; always allow the oven to reach temperature before sliding the dish in.
- In a large frying pan, melt the butter over medium heat. Add the chopped onions and celery. Cook them until they're soft. This should take about 5 to 7 minutes.: Rubbing the dish with butter or a light coating of oil creates a nonstick surface and promotes even browning at the edges where the bread meets the pan. You should hear a soft spread sound as the fat adheres. If you skip greasing, the edges can cling and tear when serving, so take a moment to prep the pan well.
- Add the dried sage, dried thyme, salt, ground black pepper, and garlic powder (if you're using it). Stir everything together and let it cook for one more minute.: When the butter finishes melting, it will shimmer and give off a slightly nutty aroma as the water content evaporates. This is the best moment to add vegetables because the fat carries flavor. Avoid high heat, which causes the butter to brown too quickly and risk bitterness.
- Put the dry bread cubes in a big bowl. Pour the onion and celery mixture onto the bread. Stir gently until the bread is coated evenly.: Once the onion and celery hit the pan, you should hear a gentle sizzle and smell a green, slightly sweet fragrance. Stir frequently so they soften evenly and do not develop brown bits too soon. If you rush this step with high heat, the vegetables can scorch and impart unwanted bitter notes.
- Slowly pour chicken or vegetable broth over the bread, stirring gently as you do. Keep adding broth until the bread is as moist as you like it. The amount you need might depend on the kind of bread you're using and how moist you want your stuffing.: Softening takes about 5 to 7 minutes, during which the texture transitions from crisp to tender and the flavor becomes sweeter and more cohesive. You will notice the sound change from lively sizzle to a quieter simmer, and the pan will hold more moisture. Overcooking will make them mushy, so stop when they are translucent and pliable.
- Put the stuffing into your greased baking dish. Cover the dish with aluminum foil.: Adding the dried herbs and seasonings briefly to the warmed vegetables releases their oils, amplifying aroma. Give them about one minute to bloom in the hot fat so their flavors open up. A common error is adding herbs too late, which can cause them to remain flat and undeveloped.
- Bake it in the oven for 30 minutes. Then, take off the foil and bake for another 15 to 20 minutes. It's ready when the top is golden brown and crispy.: In this short minute, the mixture should smell fragrant and well balanced, with herb notes rising above the sweet vegetables. Listen for a gentle tightening of the sizzle as moisture reduces. If the pan becomes too dry, add a splash of broth; dryness can create burnt flavor.
- This recipe makes enough bread stuffing to serve as a side dish for 8-10 people. Enjoy your meal!: As you drop the fluffy bread into the bowl, the texture should be airy and slightly coarse. The cubes are designed to soak without collapsing, creating a matrix that will hold broth pockets. Using very fresh bread can lead to a gummy texture, so slightly day old is best.
- Pour the onion and celery mixture onto the bread: When the warm vegetable mixture meets the bread , the heat starts to soften the crumbs and the aromatics distribute through the pieces. The bowl will smell rich and savory. If your bread absorbs unevenly, gently toss to expose all surfaces to the warm mixture.
- Stir gently until the bread is coated evenly: You want a uniform distribution so each forkful has herbs, vegetables, and bread. Use a folding motion rather than aggressive stirring to preserve the bread structure. Overmixing will break the cubes into fine crumbs and create a denser stuffing.
- Slowly pour chicken or vegetable broth over the bread: Pouring slowly lets you control moisture absorption; as broth meets the warm crumbs it softens them and carries seasoning inward. The sound is a light trickle and the mixture becomes glossy. Adding broth too quickly can make the mixture soupy, while adding too little results in dry pockets.
- Stirring gently as you do: Gentle stirring helps distribute the liquid without collapsing the cubes. You should feel the mixture become pliable and slightly springy to the touch. If any dry clumps remain, add broth in small increments until homogenous. A frequent mistake is overwatering, which prevents proper browning in the oven.
- Keep adding broth until the bread is as moist as you like it: The right moisture level is when the crumbs hold together when pressed but still yield easily with a fork. Different breads demand different amounts, so stop and test by squeezing a handful; it should hold shape, yet be tender. If it is too wet, bake covered longer; if too dry, add a little more broth .
- Put the stuffing into your greased baking dish: Transfer the mixture gently so you keep the built air pockets intact. Spread it evenly to encourage uniform browning. The surface should look slightly domed rather than soupy. Compressing too much will create a dense texture and reduce crispy edges.
- Cover the dish with aluminum foil: The foil traps steam and allows the interior to set without overbrowning the top right away. You will notice condensation on the foil which means heat and moisture are working together to finish the center. Forgetting the foil can dry the interior before it is fully warmed through.
- Bake it in the oven for 30 minutes: During this period the center sets and flavors continue to meld, producing a warm, fragrant aroma that fills the kitchen. The dish should feel set when you gently press the top. If the center still seems loose after 30 minutes, keep it covered and bake an additional short period.
- Then, take off the foil and bake for another 15 to 20 minutes: Removing the foil lets the top crisp and develop a golden brown color, creating that desirable crunchy contrast. You should hear a gentle crackle as the surface dries and edges bronzen. If the top browns too quickly, lower the oven temperature slightly and tent with foil to prevent burning.
- It’s ready when the top is golden brown and crispy: A perfectly finished stuffing will glisten where the butter has bubbled and show a mosaic of crunchy peaks and tender valleys. The aroma becomes deeply savory, and a fork will reveal a moist interior. Serving too soon may leave the center undercoagulated, while waiting too long risks drying out the crumbs.
- This recipe makes enough bread stuffing to serve as a side dish for 8 to 10 people: When plated, you should see a balance of textures and an even distribution of herbs. Portioning into generous spoonfuls ensures everyone gets a mix of crunchy top and soft filling. If you need fewer servings, the mixture scales down well but watch your baking time, which can shorten in smaller dishes.
- Enjoy your meal: The first bite should combine fluffy interior crumbs, pockets of herb perfume, and a crisp top that sings with butter richness. Take a moment to savor the smell and texture, and share pieces warm from the oven for the best experience. Let leftovers cool before sealing to preserve texture for reheating.
Notes
- Day old bread is best. Slightly stale bread soaks up broth without collapsing, creating a light yet cohesive texture that fresh bread often cannot achieve.
- Keep herbs measured. Dried sage and thyme are potent; measure accurately to avoid overwhelming the savory profile.
- Test moisture by hand. Squeeze a handful of the mixed bread; it should hold together but fall apart when prodded to ensure correct hydration.
- Use a shallow dish. A wider baking dish encourages more surface area to crisp, giving you more crunchy edge per serving.
- Let it rest briefly. Allow the stuffing to sit five minutes after baking so juices settle and slicing produces cleaner portions.