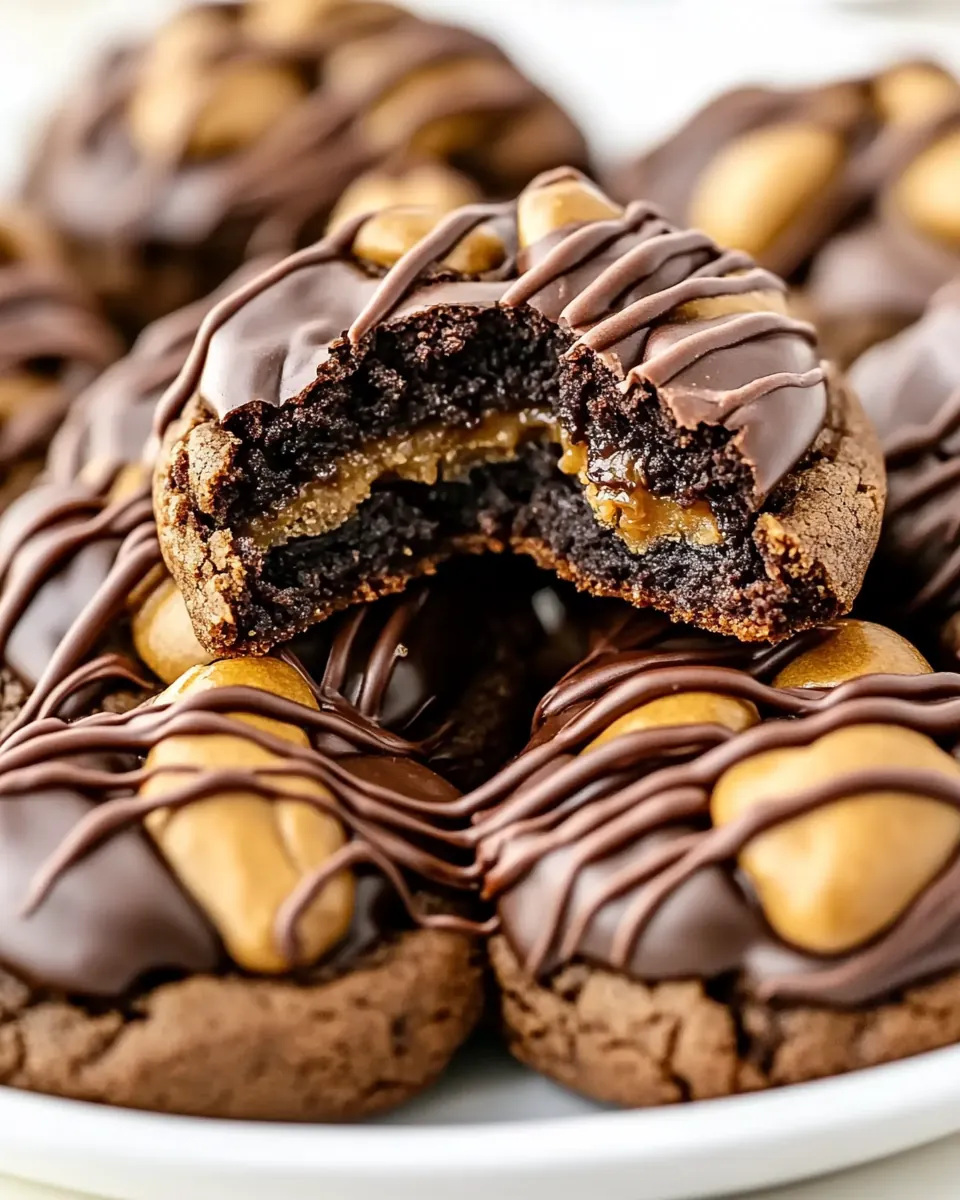
Buckeye Brownie Cookies
Buckeye Brownie Cookies started showing up at our holiday parties long before I learned to make them at home, and the first bite taught me everything I needed to know about the power of contrast in baking.
I remember one chilly afternoon when I decided to translate that classic candy into a cookie, trading molded bites for warm, chewy rounds. The kitchen filled with the comforting aroma of melted butter and chocolate, and I found myself smiling at how the soft, peanut buttery center transformed a fudgy cookie into something almost ritualistic. Each time I press a little reservoir into the warm dough and drop a peanut butter ball inside, the memory of that first messy, glorious batch comes back.
What I love about these cookies is the way they travel from the oven to your hands, still slightly warm, the ganache still glossy on top. Friends always ask for the recipe, and I enjoy telling them about the small tricks that make them stick together and not sag apart. Sharing them has become my cozy, reliable win for bake sales, potlucks, and quiet Sunday afternoons when I want something sweet but familiar.
Recipe Snapshot
32 mins
20 mins
12 mins
Medium
150 kcal
American
Gluten-Free, Low FODMAP
Desserts
handheld mixer, mixing bowls, cookie scoop, parchment paper, microwave safe bowl
What You’ll Enjoy About This Buckeye Brownie Cookies
Chewy yet creamy texture
I adore how Buckeye Brownie Cookies pair a dense, fudgy cookie with a creamy peanut butter core. The interplay of a slightly chewy exterior and a soft center keeps every bite interesting, and I often find myself closing my eyes to focus on the mouthfeel.
Simple components, big results
These cookies rely on approachable pantry staples like brownie mix, cream cheese, and peanut butter. I love that you can get an impressive result without hunting for obscure ingredients. The balance of timesaving convenience and homey flavor makes this recipe a go to when I want a crowd pleaser with minimal fuss.
Decadent, nostalgic flavor
The chocolate and peanut butter pairing hits a nostalgic sweet spot for many of us. When I make these, I always think of childhood treats, and guests often tell me the taste brings them back to holiday gatherings. That nostalgic note is a huge reason I keep this recipe in heavy rotation.
Looks impressive, bakes easily
I appreciate how these cookies appear bakery level but are actually forgiving to bake. Because the centers are pressed in and topped while warm, the assembly feels deliberate, and even imperfect shapes end up looking professional after the glossy chocolate sets. I enjoy sharing this trick with friends who want pretty results fast.
Versatile and portable
These cookies transport well, and I often bring them to potlucks. The firm ganache makes stacking simple, and they hold up during travel. I find they keep their texture for a day or two at room temperature, which is great when I need make ahead options.
What to Gather for Buckeye Brownie Cookies
These ingredients are concise and purposeful, each one playing a clear role. The mix provides structure and chocolate intensity, the cream cheese softens the crumb, and the peanut butter center creates that signature Buckeye experience. The few pantry additions help the ganache and texture come together so the cookies bake up reliably.
- 18.3 ounces chewy fudge brownie mix: Provides a base of fudgy brownie flavor and structure, supplying sweet, chocolatey crumbs and cocoa that form the cookie batter when combined with other wet ingredients. Adds sugar and leavening components from the mix to help set texture and enhance overall chocolaty depth. Contributes convenience by combining multiple dry elements into one measured component.
- 4 ounces cream cheese (softened): Adds rich creaminess and slight tang to lighten the dense brownie batter, helping create a tender, moist interior and improving spread during baking. Softened texture allows it to easily incorporate with other wet ingredients and balances sweetness with a subtle acidic note.
- 5 tablespoons salted sweet cream butter (melted and cooled): Supplies fat and silkiness while adding a subtle buttery flavor that enhances overall richness; melting and cooling helps it blend smoothly without cooking the egg. Adds moisture to the dough and aids in achieving a tender crumb and slightly crisp edges when baked.
- 1 large egg (room temperature): Provides structure and binding to the batter while contributing moisture and richness, helping the dough hold together and set during baking. Room temperature ensures even incorporation for a consistent texture and helps activate any leavening agents present.
- 1 cup creamy peanut butter: Delivers the classic peanut buttery flavor and creamy mouthfeel central to buckeye-style filling, adding fat and structure to the dough. Balances sweetness and contributes to chewiness while providing the signature nutty taste that pairs with chocolate.
- 1 1/4 cups powdered sugar: Adds concentrated sweetness and helps thicken the peanut butter filling, creating a smooth, pipeable or scoopable consistency that firms up when chilled. Contributes to the dense, candy-like texture typical of buckeye centers and stabilizes the mixture.
- 1 cup semi-sweet chocolate chips: Provides melted chocolate for coating or swirling, offering a glossy, rich chocolate finish with a slight snap when set. Semi–sweet chips balance the peanut butter sweetness and form a smooth outer layer when combined with oil and melted.
- 2 teaspoons vegetable oil: Improves melted chocolate gloss and pourability by thinning and stabilizing the coating, producing a shinier, smoother finish that sets well. Small amount of oil prevents chocolate from seizing and helps it adhere evenly to the peanut butter centers.
Step by Step Instructions for Buckeye Brownie Cookies
These directions walk you through each stage with care, from forming peanut butter centers to finishing the glossy chocolate. I like to pace myself so the dough and fillings behave as expected, and I find pausing between key moments helps the cookies come together cleanly.
- Using a small mixing bowl and a handheld mixer on medium speed, beat the peanut butter and powdered sugar until smooth.: The mixture should smell of roasted peanut butter and look satiny, with no visible grains of powdered sugar . You will notice the sound of the mixer change as the texture becomes dense yet pliable, and the mixture will pull away slightly from the bowl sides. This silky texture matters because it ensures the small peanut butter balls hold together and do not crumble when pressed into warm cookies. A common mistake is over beating and making the filling too soft, so stop as soon as the mixture is smooth and holds its shape.
- Scoop out 1/2 tablespoons of the mixture and roll into balls. Set them aside.: The peanut butter balls should be compact and smooth, with a faint sheen from the natural oils. When you roll, your fingers will warm the dough slightly, so try to work quickly to keep them firm. Place them on a small plate and chill briefly if they become too soft, as a firmer ball will better retain its shape once pressed into the warm cookie. Avoid making the balls too large, or they can overwhelm the cookie and cause overfill when the ganache is added.
- Preheat the oven to 350°F. Line 2 baking sheets with parchment paper and set them aside.: You will feel a small thrill as the oven warms and the kitchen air takes on a hint of toasty warmth. Lining sheets with parchment paper prevents sticking and helps the bottoms brown evenly. The even heat is essential for consistent spread and chew, and a common oversight is skipping the parchment, which can cause cookies to stick or bake unevenly.
- Using a medium-sized mixing bowl and a handheld mixer on medium speed, combine the brownie mix, softened cream cheese, butter, and egg. Mix just until well combined. The dough will be very sticky.: As you mix, the aroma of chocolate will deepen and the dough will transform into a tacky, cohesive mass. This sticky texture preserves moisture so the cookies remain fudgy, and gentle mixing prevents overworking gluten from any flour in the mix. Beware of over mixing, which can yield tougher cookies; stop the mixer when streaks disappear and the batter is uniformly glossy.
- Using a 1 tablespoon cookie dough scoop, scoop out the dough and space 1 inch apart.: The dough feels dense and slightly tacky to the touch, and scooping with a measured scoop ensures uniform cookie sizes for even baking. Arrange them with care so each cookie has breathing room to rise slightly and develop a tender edge. A frequent misstep is spacing too close, leading to merged cookies, so maintain the one inch gap for best results.
- Using either your thumb or a 1 teaspoon measuring spoon, depress the centers of the cookie dough balls. Bake for 10 to 12 minutes.: Pressing makes a small well that will cradle the peanut butter ball later, and you should see the cookies puff slightly around the edges as they bake. The oven will produce a gentle crackle of steam, and the tops will look set while the centers remain softer. This technique is critical for forming the Buckeye silhouette, and if you press too deep you may touch the baking sheet and flatten the cookie base.
- Immediately after removing the brownie cookies from the oven, press the peanut butter balls into the depressed center of the cookies. Allow the cookies to rest on the cookie sheets for 10 minutes or until completely cooled. The heat from the cookies and cookie sheet will help encourage the peanut butter balls to adhere to the cookies.: The warm cookie will slightly soften the peanut butter center, producing a melded seam where the two elements meet. You will notice the peanut butter soften but not liquefy, and the warm vapor helps the filling adhere. Letting them rest is essential because moving the cookies too soon can cause the centers to slide off; a common error is rushing the transfer to a rack, which risks distorting the shape.
- Using a small heat-safe bowl, add the chocolate chips and the vegetable oil. Heat on high for 30 seconds. Stir and heat for 15 more seconds. Stir until smooth.: The chocolate will melt into a glossy pool, and the faint sizzle of the brief microwave burst will fade as you stir. The added vegetable oil makes the ganache pourable and snap to a tender finish when set. Stirring until silky is crucial; if the chocolate is not fully smooth, the ganache may look grainy on the cookies. Overheating is a common pitfall, which can scorch the chocolate and create a bitter flavor.
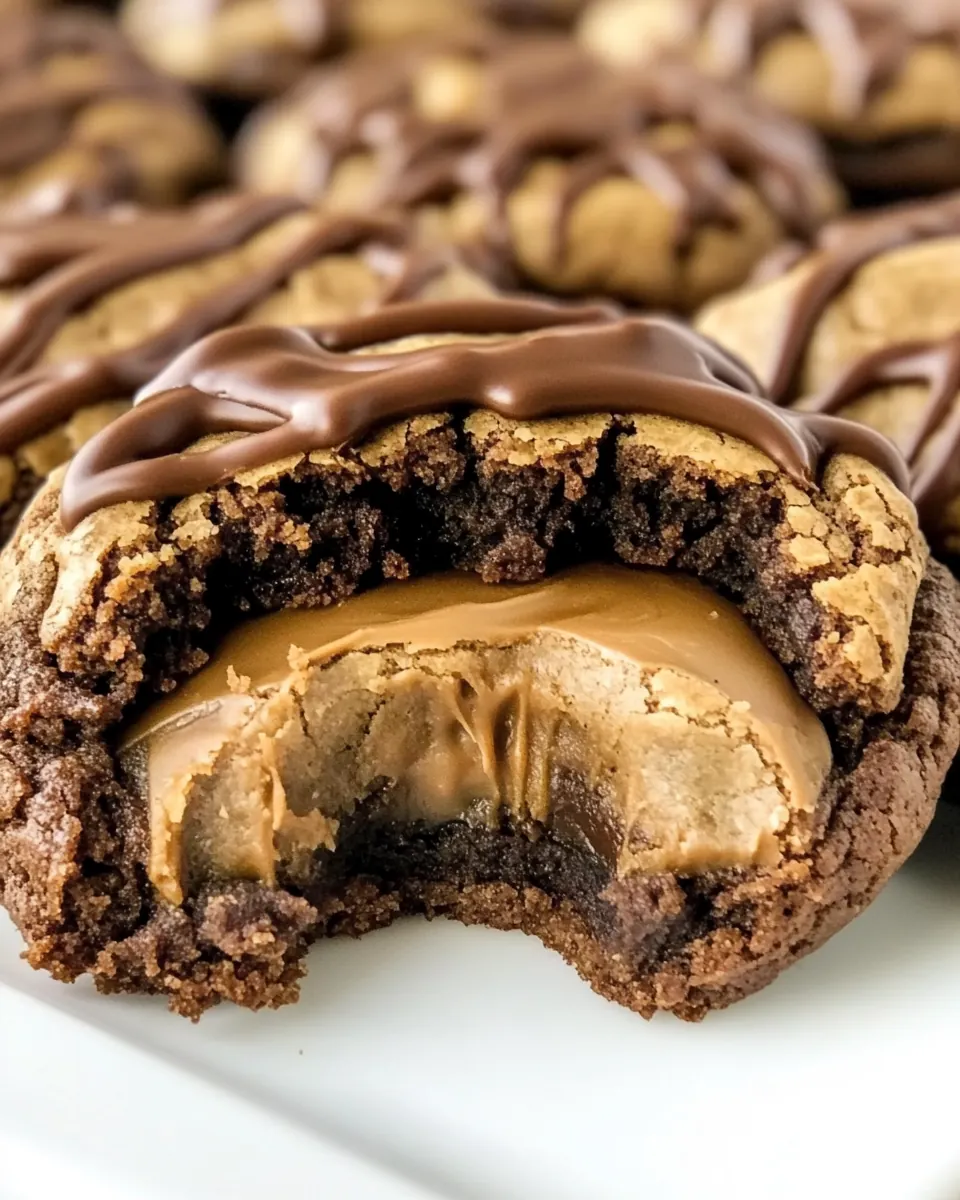
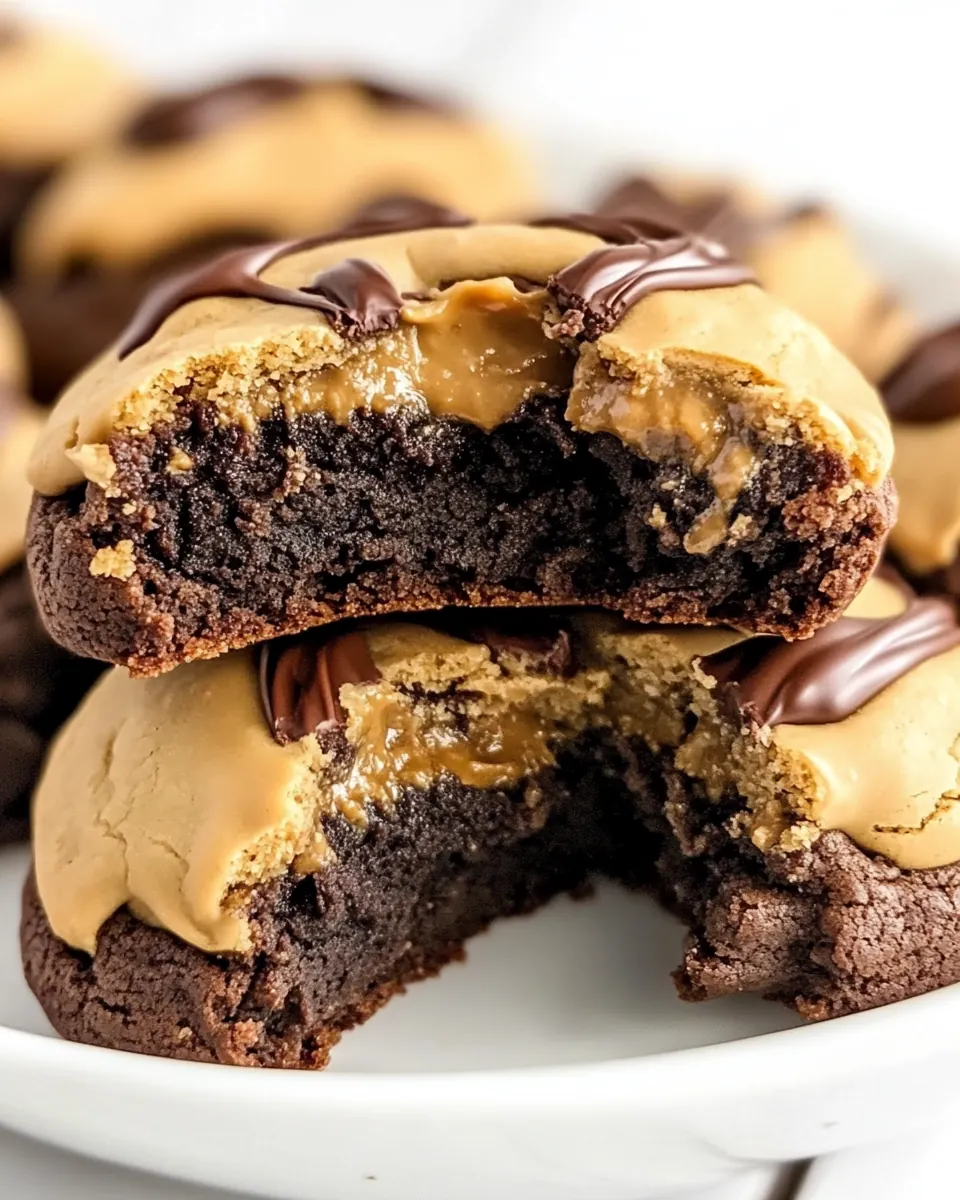
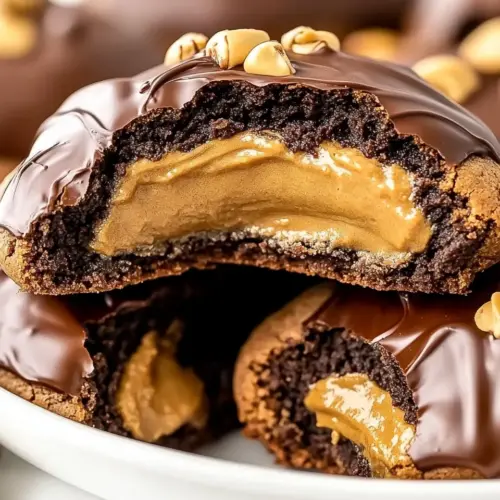
- Spoon 1 teaspoon, per cookie, on top of the peanut butter. Gently spread the ganache over the top of the peanut butter. Allow the ganache to harden before storing or serving.: The first drop of ganache should gloss over the peanut butter , creating a mirror like finish that slowly dulls as it sets. Using the back of the spoon, you can coax the ganache to just the cookie edges for a neat presentation, while the aroma of warm chocolate lingers. Let them sit undisturbed until the chocolate firms, as moving them too early can leave finger prints or smudges. A typical mistake is using too much ganache, which takes ages to set and can mask the cookie to filling ratio.
Variations to Try
If you want to tweak the classic, these ideas let you play with texture and presentation while keeping the core concept intact. Each variation is easy enough to try on the next batch, and I encourage experimenting to find your favorite take.
- Swap the brownie mix, try a fudge forward mix for an ultra rich cookie, it deepens the chocolate intensity and yields a denser chew.
- Use natural peanut butter, expect a thinner filling consistency, chill the balls longer so they hold shape and offer a more pronounced peanut flavor.
- Add a sprinkle of flaky salt, right after spooning the ganache for a contrast that amplifies both chocolate and peanut notes.
- Make mini versions, use a 1/2 tablespoon scoop for smaller cookies that are perfect for parties and allow faster setting of ganache.
- Brush ganache with a glossy finish, by warming a little extra oil and smoothing the top for a bakery polished look.
Perfect Pairings for Buckeye Brownie Cookies
These cookies are versatile for gifting, gatherings, and everyday treats. Think about occasions and pairings that highlight the chocolate and peanut flavors, and consider simple storage notes to keep them fresh.
- Serve at dessert tables, they pair well with a simple platter of mixed cookies and make an eye catching centerpiece at potlucks or holiday spreads.
- Pack for lunchboxes, individually wrap a couple for an after school treat or commute snack, keeping them at room temperature for best texture.
- Bring to bake sales, their familiar flavor combination and tidy appearance sell quickly, and packaging in clear cellophane shows off the glossy tops.
- Occasion ideas, ideal for holiday gatherings, game day treats, or neighborhood exchanges where handheld sweets are preferred.
- Storage tips, keep in an airtight container at room temperature for up to two days, or refrigerate for up to five days if you prefer a firmer ganache.
- Seasonal pairings, these feel right at home on winter dessert trays, but they are equally welcome at summer picnics when packed cool to maintain ganache gloss.
FAQ
Conclusion
Buckeye Brownie Cookies marry fudgy chocolate cookie with a creamy peanut butter heart, delivering a classic, crowd pleasing flavor combination. Give them a try and you will likely find they become a go to for gatherings and gift boxes. The straightforward ingredient list and friendly technique make this an accessible recipe, and the glossy chocolate finish ensures they look as good as they taste. I hope you enjoy making a batch, sharing them with friends, and discovering your own small rituals around assembly and presentation.
Buckeye Brownie Cookies
Equipment
- Handheld Mixer
- Mixing Bowls
- Cookie Scoop
- Parchment Paper
- Microwave-safe Bowl
Ingredients
- 18.3 ounces chewy fudge brownie mix Provides a base of fudgy brownie flavor and structure, supplying sweet, chocolatey crumbs and cocoa that form the cookie batter when combined with other wet ingredients. Adds sugar and leavening components from the mix to help set texture and enhance overall chocolaty depth. Contributes convenience by combining multiple dry elements into one measured component.
- 4 ounces cream cheese (softened) Adds rich creaminess and slight tang to lighten the dense brownie batter, helping create a tender, moist interior and improving spread during baking. Softened texture allows it to easily incorporate with other wet ingredients and balances sweetness with a subtle acidic note.
- 5 tablespoons salted sweet cream butter (melted and cooled) Supplies fat and silkiness while adding a subtle buttery flavor that enhances overall richness; melting and cooling helps it blend smoothly without cooking the egg. Adds moisture to the dough and aids in achieving a tender crumb and slightly crisp edges when baked.
- 1 large egg (room temperature) Provides structure and binding to the batter while contributing moisture and richness, helping the dough hold together and set during baking. Room temperature ensures even incorporation for a consistent texture and helps activate any leavening agents present.
- 1 cup creamy peanut butter Delivers the classic peanut buttery flavor and creamy mouthfeel central to buckeye-style filling, adding fat and structure to the dough. Balances sweetness and contributes to chewiness while providing the signature nutty taste that pairs with chocolate.
- 1 1/4 cups powdered sugar Adds concentrated sweetness and helps thicken the peanut butter filling, creating a smooth, pipeable or scoopable consistency that firms up when chilled. Contributes to the dense, candy-like texture typical of buckeye centers and stabilizes the mixture.
- 1 cup semi-sweet chocolate chips Provides melted chocolate for coating or swirling, offering a glossy, rich chocolate finish with a slight snap when set. Semi-sweet chips balance the peanut butter sweetness and form a smooth outer layer when combined with oil and melted.
- 2 teaspoons vegetable oil Improves melted chocolate gloss and pourability by thinning and stabilizing the coating, producing a shinier, smoother finish that sets well. Small amount of oil prevents chocolate from seizing and helps it adhere evenly to the peanut butter centers.
Instructions
- Using a small mixing bowl and a handheld mixer on medium speed, beat the peanut butter and powdered sugar until smooth.: The mixture should smell of roasted peanut butter and look satiny, with no visible grains of powdered sugar . You will notice the sound of the mixer change as the texture becomes dense yet pliable, and the mixture will pull away slightly from the bowl sides. This silky texture matters because it ensures the small peanut butter balls hold together and do not crumble when pressed into warm cookies. A common mistake is over beating and making the filling too soft, so stop as soon as the mixture is smooth and holds its shape.
- Scoop out 1/2 tablespoons of the mixture and roll into balls. Set them aside.: The peanut butter balls should be compact and smooth, with a faint sheen from the natural oils. When you roll, your fingers will warm the dough slightly, so try to work quickly to keep them firm. Place them on a small plate and chill briefly if they become too soft, as a firmer ball will better retain its shape once pressed into the warm cookie. Avoid making the balls too large, or they can overwhelm the cookie and cause overfill when the ganache is added.
- Preheat the oven to 350°F. Line 2 baking sheets with parchment paper and set them aside.: You will feel a small thrill as the oven warms and the kitchen air takes on a hint of toasty warmth. Lining sheets with parchment paper prevents sticking and helps the bottoms brown evenly. The even heat is essential for consistent spread and chew, and a common oversight is skipping the parchment, which can cause cookies to stick or bake unevenly.
- Using a medium-sized mixing bowl and a handheld mixer on medium speed, combine the brownie mix, softened cream cheese, butter, and egg. Mix just until well combined. The dough will be very sticky.: As you mix, the aroma of chocolate will deepen and the dough will transform into a tacky, cohesive mass. This sticky texture preserves moisture so the cookies remain fudgy, and gentle mixing prevents overworking gluten from any flour in the mix. Beware of over mixing, which can yield tougher cookies; stop the mixer when streaks disappear and the batter is uniformly glossy.
- Using a 1 tablespoon cookie dough scoop, scoop out the dough and space 1 inch apart.: The dough feels dense and slightly tacky to the touch, and scooping with a measured scoop ensures uniform cookie sizes for even baking. Arrange them with care so each cookie has breathing room to rise slightly and develop a tender edge. A frequent misstep is spacing too close, leading to merged cookies, so maintain the one inch gap for best results.
- Using either your thumb or a 1 teaspoon measuring spoon, depress the centers of the cookie dough balls. Bake for 10 to 12 minutes.: Pressing makes a small well that will cradle the peanut butter ball later, and you should see the cookies puff slightly around the edges as they bake. The oven will produce a gentle crackle of steam, and the tops will look set while the centers remain softer. This technique is critical for forming the Buckeye silhouette, and if you press too deep you may touch the baking sheet and flatten the cookie base.
- Immediately after removing the brownie cookies from the oven, press the peanut butter balls into the depressed center of the cookies. Allow the cookies to rest on the cookie sheets for 10 minutes or until completely cooled. The heat from the cookies and cookie sheet will help encourage the peanut butter balls to adhere to the cookies.: The warm cookie will slightly soften the peanut butter center, producing a melded seam where the two elements meet. You will notice the peanut butter soften but not liquefy, and the warm vapor helps the filling adhere. Letting them rest is essential because moving the cookies too soon can cause the centers to slide off; a common error is rushing the transfer to a rack, which risks distorting the shape.
- Using a small heat-safe bowl, add the chocolate chips and the vegetable oil. Heat on high for 30 seconds. Stir and heat for 15 more seconds. Stir until smooth.: The chocolate will melt into a glossy pool, and the faint sizzle of the brief microwave burst will fade as you stir. The added vegetable oil makes the ganache pourable and snap to a tender finish when set. Stirring until silky is crucial; if the chocolate is not fully smooth, the ganache may look grainy on the cookies. Overheating is a common pitfall, which can scorch the chocolate and create a bitter flavor.
- Spoon 1 teaspoon, per cookie, on top of the peanut butter. Gently spread the ganache over the top of the peanut butter. Allow the ganache to harden before storing or serving.: The first drop of ganache should gloss over the peanut butter , creating a mirror like finish that slowly dulls as it sets. Using the back of the spoon, you can coax the ganache to just the cookie edges for a neat presentation, while the aroma of warm chocolate lingers. Let them sit undisturbed until the chocolate firms, as moving them too early can leave finger prints or smudges. A typical mistake is using too much ganache, which takes ages to set and can mask the cookie to filling ratio.
Notes
- Swap the brownie mix, try a fudge forward mix for an ultra rich cookie, it deepens the chocolate intensity and yields a denser chew.
- Use natural peanut butter, expect a thinner filling consistency, chill the balls longer so they hold shape and offer a more pronounced peanut flavor.
- Add a sprinkle of flaky salt, right after spooning the ganache for a contrast that amplifies both chocolate and peanut notes.
- Make mini versions, use a 1/2 tablespoon scoop for smaller cookies that are perfect for parties and allow faster setting of ganache.
- Brush ganache with a glossy finish, by warming a little extra oil and smoothing the top for a bakery polished look.