Black Magic Cake
Black Magic Cake is the kind of dessert that made me fall back in love with baking, one glossy slice at a time. I still remember the first time I tried this recipe, carrying the warm Bundt pan from the oven with oven mitts that had seen better days, and feeling the house shift as the deep cocoa aroma unfurled. The cake looked like a midnight landscape, and I could not wait to slice into that tender crumb and reveal the secret richness hidden inside.
Over the years I have tweaked the balance of cocoa, coffee, and chocolate to coax out an almost smoky depth while keeping the texture feather light. Friends always ask if the coffee makes the cake taste like a mocha, and my answer is always the same, I promise it does not, it simply lifts the chocolate so it sings, quieter and rounder. When I serve Black Magic Cake I like to slow down and watch how people react to that first forkful, the little pause followed by an approving smile.
Recipe Snapshot
50 mins
10 mins
40 mins
Medium
400 kcal
American
Gluten-Free, Low FODMAP
Desserts
Bundt Cake Pan, Mixing Bowls, Hand Mixer
The Magic of This Black Magic Cake
Deep, Complex Chocolate without the Bitter Edge
I love how Black Magic Cake delivers an intense chocolate presence that is never harsh. Because the recipe balances cocoa powder, brewed coffee, and chocolate chips, the flavor profile is layered, giving you a rich, roasty backbone that stays soft on the palate. I find this makes the cake feel grown up, yet approachable.
Velvety Texture That Feels Luxurious
The crumb here is tender and moist, thanks to the generous measure of neutral oil and the interplay between dry and wet ingredients. I appreciate how every bite feels supple, not dense, which means it’s as satisfying on day two as it is straight from the oven. If you value mouthfeel, this one delivers.
Simple Technique, Stunning Results
What excites me is how approachable the method is. Most steps are straightforward mixing and baking, yet they yield a dramatic, bakery quality cake. That sense of achieving something impressive without fuss is a big reason I keep returning to this recipe.
Flexible Finishing Options
I especially like the quick ganache finish that the recipe includes, it takes minutes and dresses the cake in a shiny coat that is both elegant and forgiving. You can switch to a dusting of powdered sugar or a buttercream if you prefer, but the ganache offers a balance of richness and simplicity I often reach for.
Perfect for Gatherings
This cake scales for company effortlessly, feeding a crowd while still feeling special. I often bring it to potlucks because it travels well and slices beautifully. It holds up at room temperature and stores nicely for a couple of days, which makes life easier when I have a busy weekend.
What to Gather for Black Magic Cake
These ingredients are chosen to harmonize texture and flavor. The dry players create structure, while the wet players add moisture and richness. Key players like cocoa powder and brewed coffee build chocolate depth, while the vegetable oil keeps the crumb soft. Together they create a cake that is moist, tender, and deeply chocolaty.
- 2 cups all-purpose flour: Provide structure and bulk to the cake batter, forming the gluten network when mixed with liquids. Contribute to the crumb and texture while balancing moisture from fats and liquids. Serve as the main dry component that combines with leaveners to produce rise.
- 1 tsp salt: Enhance overall flavor and balance sweetness while strengthening gluten slightly. Assist in controlling yeast or chemical leavening reaction sensitivity and improve the cake's savory-sweet profile. Help emphasize chocolate notes by providing subtle contrast to sweet and bitter components.
- 1 tsp baking powder: Leaven the cake by producing gas when exposed to moisture and heat, giving lift and lightness. React with acidic ingredients to create fine crumb and volume, working in concert with baking soda. Stabilize batter pH to ensure consistent texture and rise.
- 2 tsp baking soda: Provide rapid leavening through reaction with acids, contributing to the cake's initial rise and open crumb. Help neutralize acidic components from cocoa and buttermilk or coffee if present, ensuring proper texture. Balance with baking powder to control overall lift and prevent large air pockets.
- 3/4 cup cocoa powder: Deliver concentrated chocolate flavor and contribute to color, depth, and slight bitterness that enhances sweetness. Absorb some fat and liquid, affecting batter thickness and moisture distribution. React with baking soda and other ingredients to enrich cocoa's flavor during baking.
- 2 cups sugar: Sweeten the batter and promote browning through caramelization and Maillard reactions during baking. Influence texture by dissolving into the liquid phase and interacting with fats and proteins to tenderize. Provide bulk and contribute to moisture retention in the finished cake.
- 1 cup vegetable oil or canola oil: Moisturize the cake and tenderize the crumb by coating flour proteins and inhibiting excessive gluten development. Supply fat for richness and mouthfeel while carrying flavor molecules like vanilla. Help produce a moist, fine-textured cake that stays soft after baking.
- 2 large eggs: Bind ingredients and provide structure through coagulation when heated, contributing to lift and stability. Add richness, moisture, and emulsification to distribute fats evenly throughout the batter. Help create a consistent crumb and contribute to overall tenderness.
- 1 tsp vanilla extract: Impart aromatic sweetness and enhance chocolate flavor by adding a warm, rounded note. Work as a flavor enhancer that complements sugar and cocoa without adding moisture. Integrate into wet ingredients to disperse evenly through the batter.
- 1 cup milk: Provide liquid to hydrate dry ingredients and dissolve sugars, aiding in batter formation and texture. Contribute mild dairy richness and proteins that help with structure and tenderness. Help achieve desired batter consistency and moisture balance for baking.
- 1 cup brewed coffee, room temperature: Add deep flavor complexity and enhance the chocolate profile, while providing liquid without adding dairy fat. Introduce subtle bitterness that balances sweetness and intensifies cocoa notes. Contribute to overall moistness and help bloom cocoa for a more intense chocolate taste.
- 3/4 cup semi-sweet chocolate chips: Introduce concentrated pockets of chocolate flavor and texture that melt partially during baking for gooey bites. Add sweetness and richness and create pleasant contrast to the crumb when distributed in the batter. Provide visual appeal and intensified chocolate bursts in the finished cake.
- 1/4 cup heavy cream: Supply richness and fat for a silky, glossy chocolate ganache or drizzle when combined with chocolate chips. Improve mouthfeel and help melt chocolate smoothly for finishing sauces or fillings. Add decadent creaminess that enhances overall chocolate intensity.
Cooking Method for Black Magic Cake
Baking this cake is satisfying because the steps are clear and each stage gives you visual and aromatic cues to guide you. As you move from sifting dry ingredients to mixing wet ones and finally baking, pay attention to texture and tempo. The directions below expand on each original instruction so you can sense when things are going right, and avoid common pitfalls.
- Preheat oven to 350ºF. Grease and flour a 12-cup Bundt cake pan.: From the moment you start you should notice a warm, anticipatory aroma as the oven comes up to temperature, and prepping the pan is about ensuring a clean release and even browning. Lightly grease and dust flour into every crevice so the cake unmolds without tearing, and set the pan on the center rack for steady heat circulation. A common mistake is skimping on greasing, which causes sticking; to avoid this, use a pastry brush or paper towel to work the oil into the pan corners. You want the oven stable at 350ºF before the batter goes in, because a consistent initial heat helps the cake rise evenly. If your oven runs hot or cold, a quick oven thermometer check will save you from an overbaked exterior or an undercooked center.
- Sift together flour, salt, baking powder, baking soda, cocoa powder, and sugar.: As you sift, notice how the cocoa and flour lighten and aerate, producing a fine, uniform mixture that promises a smooth batter. Sifting breaks up lumps, especially in the cocoa powder , and blends the leaveners for even distribution, which prevents pockets of bitter or dense areas. If you skip sifting, you may end up with uneven texture or clumps of dry ingredients; tapping the sifter and stirring gently ensures everything is incorporated. The dry mixture should feel soft and powdery, with no visible streaks, which signals it's ready to meet the liquids.
- In a large bowl, whisk together vegetable oil, eggs, vanilla, milk, and coffee.: When you whisk these wet ingredients you are marrying fats and liquids into a cohesive emulsion that will trap air and help create a fine crumb. The vegetable oil gives silkiness, while the eggs add structure and the coffee deepens flavor. Whisk until slightly frothy, not foamy; overbeating can change the texture and create too many bubbles. A common error is using hot coffee which can scramble the eggs, so ensure the coffee is room temperature. The bowl should look glossy and uniform, signaling the wet base is ready to accept the dry ingredients.
- Add dry ingredients to the bowl, and stir to combine.: At this point the batter will begin to take form, and you should stir gently to preserve the tender crumb. Use a folding motion so you combine until just smooth; overmixing activates gluten in the flour , leading to toughness. Watch for a homogeneous batter with no streaks of flour, but avoid vigorous whisking. The sound will be low and smooth as the batter comes together, and the surface should be glossy and even. A typical pitfall is stirring too long; stop when there are no dry pockets remaining to keep the cake soft.
- Pour batter into the prepared cake pan.: Pouring should feel effortless, and you will see a thick, glossy stream fill the pan, settling into every contour. Tap the pan gently on the counter a few times to release any trapped air bubbles and to level the batter; this helps the cake rise uniformly. If you notice large bubbles on the surface, a couple of gentle taps are all you need. Avoid overfilling the pan; leave room for rise so the cake does not spill over. The batter should sit about two thirds to three quarters full depending on pan shape, which prevents wet centers.
- Bake for 40 to 45 minutes, until a toothpick inserted into the center of the cake comes out clean or with a few crumbs.: As the cake bakes you will smell the chocolate deepen and see the top set with a slight sheen. The edges will pull away slightly from the pan, and the center should spring back to the touch. Use the toothpick test at the lower end of time first, because ovens vary; inserting a toothpick that comes out with a few moist crumbs is preferable to seeing wet batter. A common mistake is opening the oven too often which causes temperature swings, so check near the end only once. Visual cues like a firm top and subtle dome are your best guide alongside the toothpick test.
- Let the cake cool in the pan for 15 minutes. Remove cake from pan and cool completely on a wire rack.: Cooling in the pan allows the crumb to set gently so the cake will release cleanly, and the aroma will mellow into a deeper, more rounded chocolate scent. After about 15 minutes the body will have firmed enough to invert onto a wire rack, where the remaining warmth will evaporate and the bottom will finish drying. If you try to unmold too soon the cake can tear; be patient and use a thin spatula around the edges if needed. Cooling completely prevents the ganache from sliding off when you top the cake.
- Place chocolate chips and heavy cream in a microwave safe bowl. Microwave for 30 seconds. Stir until smooth.: This is the quick ganache step, and you will see the heavy cream soften the chocolate chips so that stirring transforms them into a glossy, silky mixture. The key sensory cue is the sheen and smooth flow, indicating the emulsion has formed correctly. If the chips do not fully melt, small bursts of 10 seconds with stirring in between will finish it; avoid overheating which can separate the ganache. A common misstep is pouring cold cream onto hot chips, which can seize; warming the cream first helps ensure a smooth result.
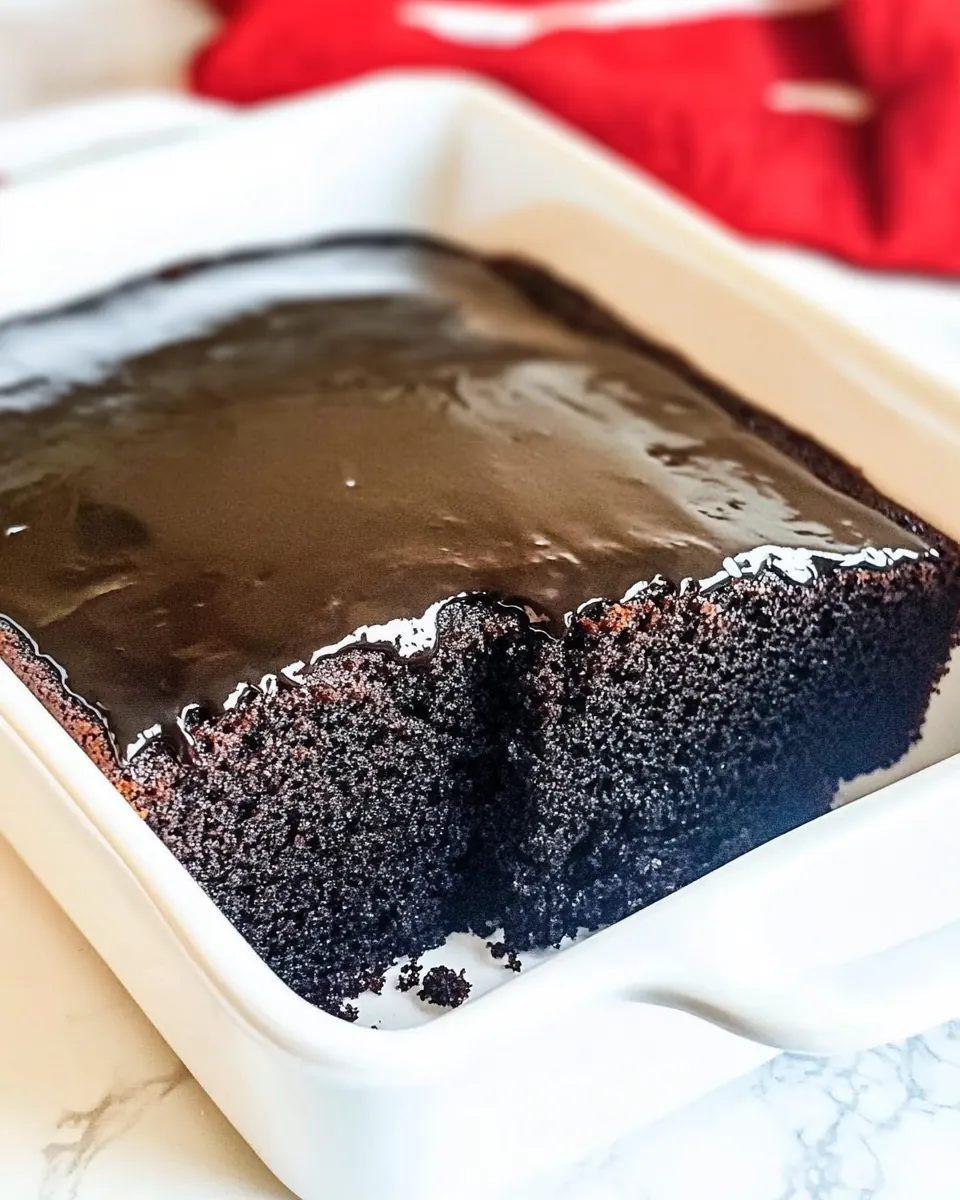
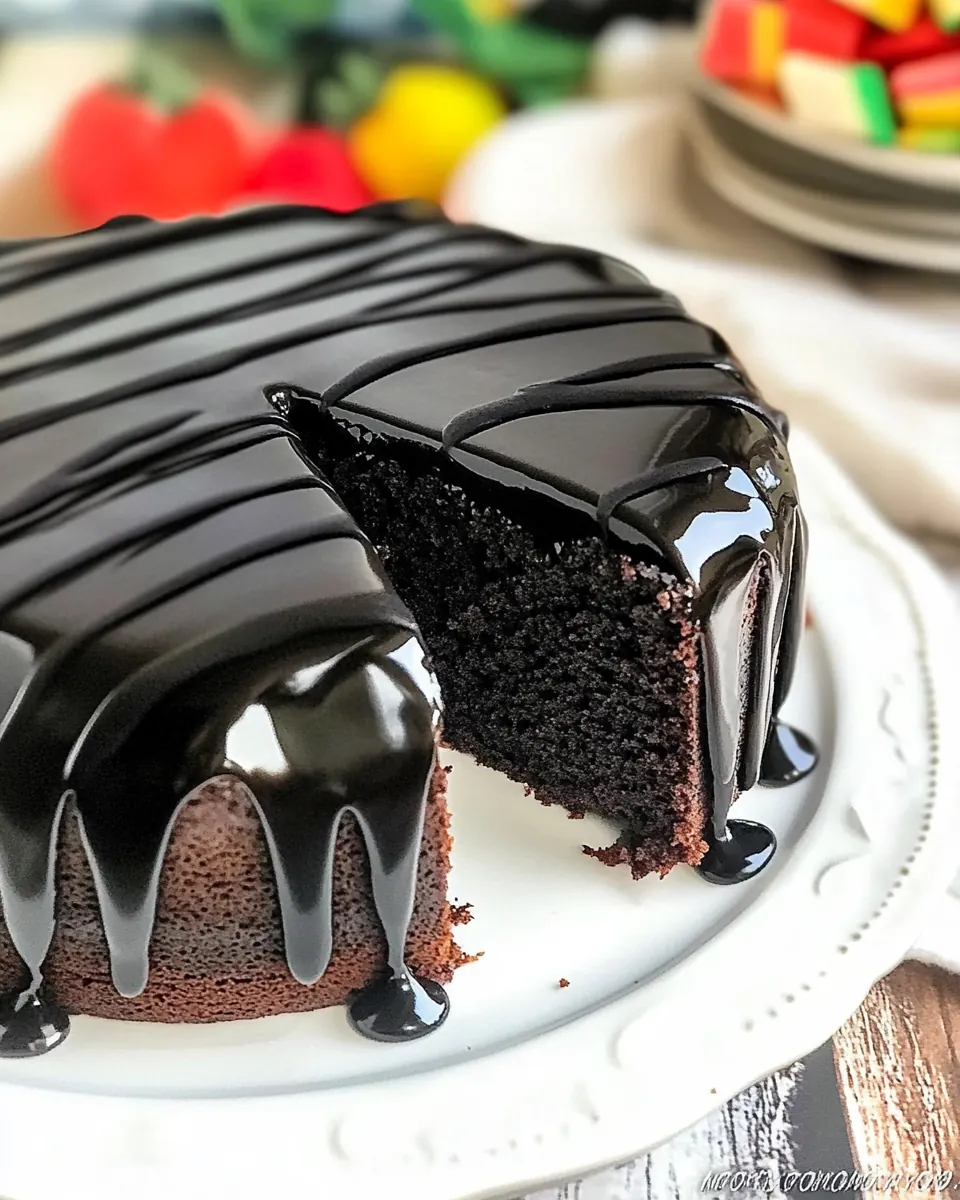
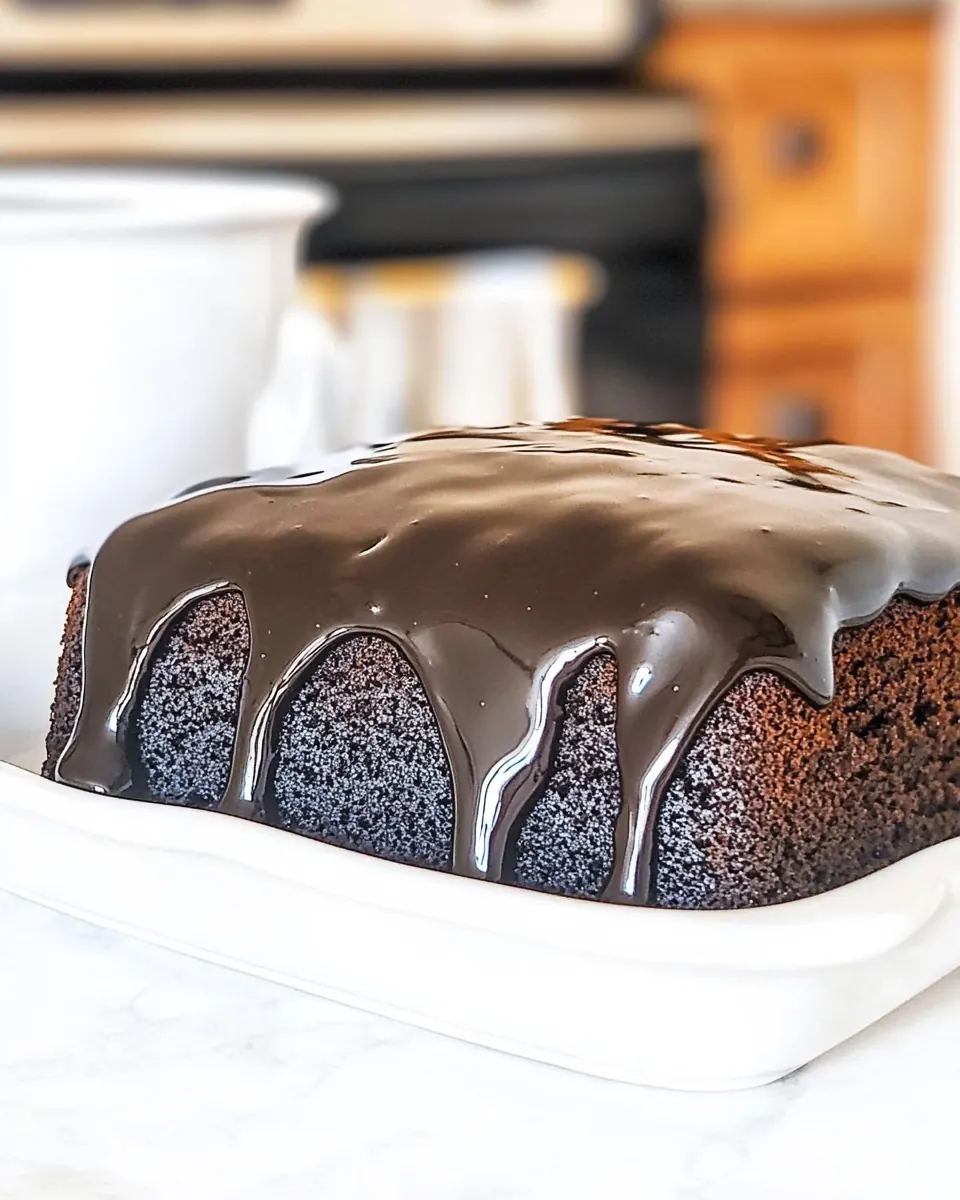
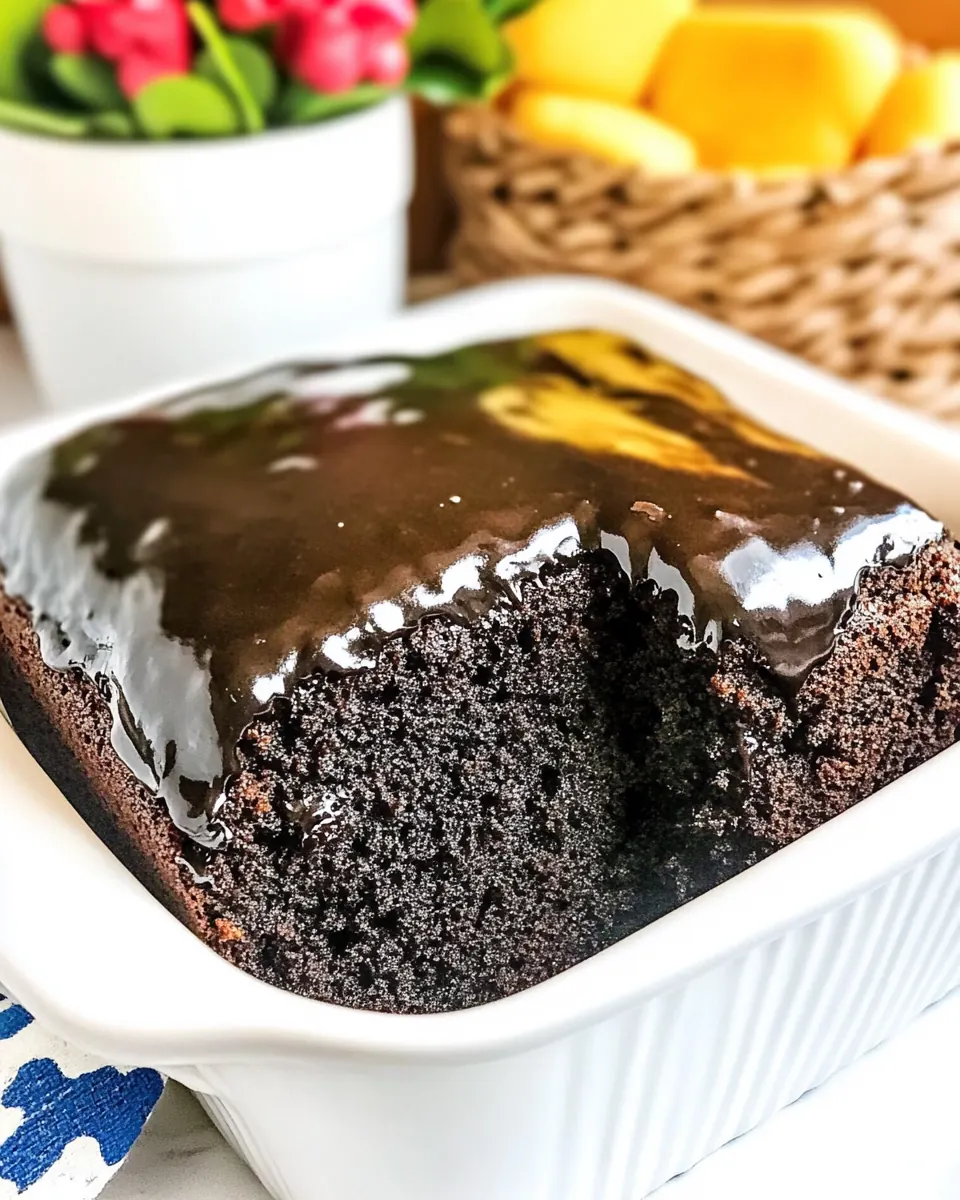
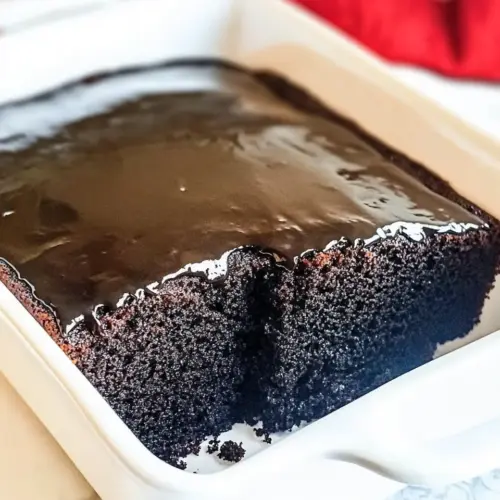
- Spread ganache over cake and serve.: When you spoon the ganache over the cooled cake you will see it cascade in a shiny sheet, clinging to the ridges and pooling slightly at the base. The contrast of the glossy top against the matte crumb is beautiful, and the first slice should reveal a moist interior with pockets of melted chocolate from the chips. Serve at room temperature so the ganache is soft but set; if chilled it will firm up and become less yielding. A final tip is to let the ganache settle for a few minutes before slicing to avoid dragging the knife through puddles, which keeps slices neat and impressive.
Customization Ideas
I like giving people options so they can make this cake their own. Below are practical tweaks and creative swaps that preserve the cake’s soul while letting you personalize flavor, texture, and presentation.
- Boost the chocolate: Stir in an extra quarter cup of semi sweet chocolate chips for more pockets of melted chocolate in each slice, watch for slightly longer bake time.
- Swap the finish: Use a thick dusting of powdered sugar or your favorite buttercream instead of ganache for a less glossy but equally delicious top.
- Pan choices: If you do not own a 12 cup Bundt cake pan, use a 9 by 13 inch pan and check for doneness a bit earlier to avoid overbaking.
- Make ahead: Bake the cake a day in advance and store in an airtight container, the flavors meld overnight and the crumb stays moist.
- Texture tweak: For a denser feel, reduce the milk by two tablespoons, but expect a slightly firmer crumb.
- Chocolate intensity: Choose a darker cocoa powder for a richer, slightly more bitter profile, or go for dutched cocoa if you prefer a mellower taste.
Serve This Black Magic Cake With
This cake is versatile enough for cozy family dinners and special occasions. Think about pairings that either echo the chocolate theme or contrast it with bright, fresh elements. Below are serving ideas, storage tips, and occasion suggestions to help you present the cake beautifully.
- Classic dessert plate: Serve slices at room temperature with a dollop of lightly whipped cream or a scoop of vanilla ice cream to add cool contrast to the warm chocolate notes.
- Coffee hour: Pair slices with brewed coffee or a milky tea for an afternoon treat; the cake’s chocolate depth complements the roasted beverage without feeling heavy.
- Celebration center: Present the cake as a centerpiece for birthdays or gatherings, adding fresh berries for color and a festive touch that brightens the dark cake.
- Storage guidance: Store at room temperature in an airtight container for up to three days, or slice and freeze individual pieces for longer keeping, wrapping them tightly to avoid freezer burn.
- Seasonal pairing: In cooler months highlight the cake with spiced elements like a cinnamon scented whipped cream, while in warmer weather a citrus salad on the side can lighten the experience.
- Occasion fit: Works well for dinner parties, holiday gatherings, or casual potlucks because it travels well and slices neatly for a crowd.
FAQ
Conclusion
This Black Magic Cake stands out because it pairs intense chocolate flavor with a tender, moist crumb and a quick glossy ganache finish. The careful balance of cocoa powder, brewed coffee, and melted chocolate chips gives it depth without bitterness, and the straightforward method yields bakery caliber results at home. I encourage you to give it a try, whether you are baking for a celebration or just craving a serious chocolate fix. Share a slice with someone you love, and enjoy watching how a simple cake can create such warm, memorable moments.
Black Magic Cake
Equipment
- Bundt Cake Pan
- Mixing Bowls
- Hand Mixer
Ingredients
- 2 cups all-purpose flour Provide structure and bulk to the cake batter, forming the gluten network when mixed with liquids. Contribute to the crumb and texture while balancing moisture from fats and liquids. Serve as the main dry component that combines with leaveners to produce rise.
- 1 tsp salt Enhance overall flavor and balance sweetness while strengthening gluten slightly. Assist in controlling yeast or chemical leavening reaction sensitivity and improve the cake's savory-sweet profile. Help emphasize chocolate notes by providing subtle contrast to sweet and bitter components.
- 1 tsp baking powder Leaven the cake by producing gas when exposed to moisture and heat, giving lift and lightness. React with acidic ingredients to create fine crumb and volume, working in concert with baking soda. Stabilize batter pH to ensure consistent texture and rise.
- 2 tsp baking soda Provide rapid leavening through reaction with acids, contributing to the cake's initial rise and open crumb. Help neutralize acidic components from cocoa and buttermilk or coffee if present, ensuring proper texture. Balance with baking powder to control overall lift and prevent large air pockets.
- 3/4 cup cocoa powder Deliver concentrated chocolate flavor and contribute to color, depth, and slight bitterness that enhances sweetness. Absorb some fat and liquid, affecting batter thickness and moisture distribution. React with baking soda and other ingredients to enrich cocoa's flavor during baking.
- 2 cups sugar Sweeten the batter and promote browning through caramelization and Maillard reactions during baking. Influence texture by dissolving into the liquid phase and interacting with fats and proteins to tenderize. Provide bulk and contribute to moisture retention in the finished cake.
- 1 cup vegetable oil or canola oil Moisturize the cake and tenderize the crumb by coating flour proteins and inhibiting excessive gluten development. Supply fat for richness and mouthfeel while carrying flavor molecules like vanilla. Help produce a moist, fine-textured cake that stays soft after baking.
- 2 large eggs Bind ingredients and provide structure through coagulation when heated, contributing to lift and stability. Add richness, moisture, and emulsification to distribute fats evenly throughout the batter. Help create a consistent crumb and contribute to overall tenderness.
- 1 tsp vanilla extract Impart aromatic sweetness and enhance chocolate flavor by adding a warm, rounded note. Work as a flavor enhancer that complements sugar and cocoa without adding moisture. Integrate into wet ingredients to disperse evenly through the batter.
- 1 cup milk Provide liquid to hydrate dry ingredients and dissolve sugars, aiding in batter formation and texture. Contribute mild dairy richness and proteins that help with structure and tenderness. Help achieve desired batter consistency and moisture balance for baking.
- 1 cup brewed coffee, room temperature Add deep flavor complexity and enhance the chocolate profile, while providing liquid without adding dairy fat. Introduce subtle bitterness that balances sweetness and intensifies cocoa notes. Contribute to overall moistness and help bloom cocoa for a more intense chocolate taste.
- 3/4 cup semi-sweet chocolate chips Introduce concentrated pockets of chocolate flavor and texture that melt partially during baking for gooey bites. Add sweetness and richness and create pleasant contrast to the crumb when distributed in the batter. Provide visual appeal and intensified chocolate bursts in the finished cake.
- 1/4 cup heavy cream Supply richness and fat for a silky, glossy chocolate ganache or drizzle when combined with chocolate chips. Improve mouthfeel and help melt chocolate smoothly for finishing sauces or fillings. Add decadent creaminess that enhances overall chocolate intensity.
Instructions
- Preheat oven to 350ºF. Grease and flour a 12-cup Bundt cake pan.: From the moment you start you should notice a warm, anticipatory aroma as the oven comes up to temperature, and prepping the pan is about ensuring a clean release and even browning. Lightly grease and dust flour into every crevice so the cake unmolds without tearing, and set the pan on the center rack for steady heat circulation. A common mistake is skimping on greasing, which causes sticking; to avoid this, use a pastry brush or paper towel to work the oil into the pan corners. You want the oven stable at 350ºF before the batter goes in, because a consistent initial heat helps the cake rise evenly. If your oven runs hot or cold, a quick oven thermometer check will save you from an overbaked exterior or an undercooked center.
- Sift together flour, salt, baking powder, baking soda, cocoa powder, and sugar.: As you sift, notice how the cocoa and flour lighten and aerate, producing a fine, uniform mixture that promises a smooth batter. Sifting breaks up lumps, especially in the cocoa powder , and blends the leaveners for even distribution, which prevents pockets of bitter or dense areas. If you skip sifting, you may end up with uneven texture or clumps of dry ingredients; tapping the sifter and stirring gently ensures everything is incorporated. The dry mixture should feel soft and powdery, with no visible streaks, which signals it's ready to meet the liquids.
- In a large bowl, whisk together vegetable oil, eggs, vanilla, milk, and coffee.: When you whisk these wet ingredients you are marrying fats and liquids into a cohesive emulsion that will trap air and help create a fine crumb. The vegetable oil gives silkiness, while the eggs add structure and the coffee deepens flavor. Whisk until slightly frothy, not foamy; overbeating can change the texture and create too many bubbles. A common error is using hot coffee which can scramble the eggs, so ensure the coffee is room temperature. The bowl should look glossy and uniform, signaling the wet base is ready to accept the dry ingredients.
- Add dry ingredients to the bowl, and stir to combine.: At this point the batter will begin to take form, and you should stir gently to preserve the tender crumb. Use a folding motion so you combine until just smooth; overmixing activates gluten in the flour , leading to toughness. Watch for a homogeneous batter with no streaks of flour, but avoid vigorous whisking. The sound will be low and smooth as the batter comes together, and the surface should be glossy and even. A typical pitfall is stirring too long; stop when there are no dry pockets remaining to keep the cake soft.
- Pour batter into the prepared cake pan.: Pouring should feel effortless, and you will see a thick, glossy stream fill the pan, settling into every contour. Tap the pan gently on the counter a few times to release any trapped air bubbles and to level the batter; this helps the cake rise uniformly. If you notice large bubbles on the surface, a couple of gentle taps are all you need. Avoid overfilling the pan; leave room for rise so the cake does not spill over. The batter should sit about two thirds to three quarters full depending on pan shape, which prevents wet centers.
- Bake for 40 to 45 minutes, until a toothpick inserted into the center of the cake comes out clean or with a few crumbs.: As the cake bakes you will smell the chocolate deepen and see the top set with a slight sheen. The edges will pull away slightly from the pan, and the center should spring back to the touch. Use the toothpick test at the lower end of time first, because ovens vary; inserting a toothpick that comes out with a few moist crumbs is preferable to seeing wet batter. A common mistake is opening the oven too often which causes temperature swings, so check near the end only once. Visual cues like a firm top and subtle dome are your best guide alongside the toothpick test.
- Let the cake cool in the pan for 15 minutes. Remove cake from pan and cool completely on a wire rack.: Cooling in the pan allows the crumb to set gently so the cake will release cleanly, and the aroma will mellow into a deeper, more rounded chocolate scent. After about 15 minutes the body will have firmed enough to invert onto a wire rack, where the remaining warmth will evaporate and the bottom will finish drying. If you try to unmold too soon the cake can tear; be patient and use a thin spatula around the edges if needed. Cooling completely prevents the ganache from sliding off when you top the cake.
- Place chocolate chips and heavy cream in a microwave safe bowl. Microwave for 30 seconds. Stir until smooth.: This is the quick ganache step, and you will see the heavy cream soften the chocolate chips so that stirring transforms them into a glossy, silky mixture. The key sensory cue is the sheen and smooth flow, indicating the emulsion has formed correctly. If the chips do not fully melt, small bursts of 10 seconds with stirring in between will finish it; avoid overheating which can separate the ganache. A common misstep is pouring cold cream onto hot chips, which can seize; warming the cream first helps ensure a smooth result.
- Spread ganache over cake and serve.: When you spoon the ganache over the cooled cake you will see it cascade in a shiny sheet, clinging to the ridges and pooling slightly at the base. The contrast of the glossy top against the matte crumb is beautiful, and the first slice should reveal a moist interior with pockets of melted chocolate from the chips. Serve at room temperature so the ganache is soft but set; if chilled it will firm up and become less yielding. A final tip is to let the ganache settle for a few minutes before slicing to avoid dragging the knife through puddles, which keeps slices neat and impressive.
Notes
- Boost the chocolate: Stir in an extra quarter cup of semi sweet chocolate chips for more pockets of melted chocolate in each slice, watch for slightly longer bake time.
- Swap the finish: Use a thick dusting of powdered sugar or your favorite buttercream instead of ganache for a less glossy but equally delicious top.
- Pan choices: If you do not own a 12 cup Bundt cake pan, use a 9 by 13 inch pan and check for doneness a bit earlier to avoid overbaking.
- Make ahead: Bake the cake a day in advance and store in an airtight container, the flavors meld overnight and the crumb stays moist.
- Texture tweak: For a denser feel, reduce the milk by two tablespoons, but expect a slightly firmer crumb.
- Chocolate intensity: Choose a darker cocoa powder for a richer, slightly more bitter profile, or go for dutched cocoa if you prefer a mellower taste.