Avocado Rose
Avocado Rose is my favorite tiny touch that turns simple breakfast or brunch into something a bit magical. The first time I made an Avocado Rose, I was rushing to plate a small brunch for a friend and decided to try a delicate garnish I had seen online. It took patience, a steady hand, and a slow smile when the slices finally curled into that blossom shape. From that morning on, I loved how a humble avocado could make a plate feel celebrated without any fuss.
I still reach for this technique when I want to impress without stress. Often I slice a few extra thin pieces and practice the fan motion while I sip my coffee. There is a rhythm to it, and once you find it, forming an Avocado Rose feels meditative. I enjoy the tactile moment of feeling the cool, creamy avocado slices and the bright pop of citrus when a drop of lemon or lime hits the flesh. That acid lifts the flavor and keeps the color vivid for longer.
Recipe Snapshot
2 mins
0 mins
2 mins
Medium
150 kcal
American
Vegan, Gluten-Free
Appetizers
Sharp Knife, Cutting Board, Spoon
The Best Thing About This Avocado Rose
Simple elegance that elevates any plate
I adore how an Avocado Rose takes five minutes and adds instant visual appeal. You do not need elaborate tools, just a sharp knife and patience. That single flourish makes avocado toast, salads, or grain bowls feel like a chef plated them, and I love offering that to guests who think I spent much longer than I did.
Freshness and texture in one bite
The avocado provides a creamy counterpoint to crisp toast or crunchy greens. I enjoy the contrast between the soft, buttery mouthfeel and the bright tang from a squeeze of lemon or lime. This little trick amplifies texture without extra ingredients.
Fast and forgiving
You can make an Avocado Rose in minutes, and it tolerates tiny mistakes. If a slice tears, you can tuck it back in or add another slice to mask the break. I often salvage imperfect attempts and still end up with a beautiful result to serve.
Customizable for any occasion
I like using the rose as a garnish for weekend brunch, light lunches, or picnic plates. Add a pinch of salt and a touch of citrus for brightness, and you have a refined finishing touch that works for informal mornings and more celebrated meals alike.
Minimal ingredients, maximum impact
This is one of those tricks where quality matters. A ripe, slightly soft avocado makes the slicing effortless, and a fresh wedge of lemon or lime keeps oxidation in check. I often keep it in my repertoire because it feels like an easy win for presentation and flavor.
What to Buy for Avocado Rose
For an Avocado Rose I focus on simplicity and quality. These ingredients are minimal, but each plays a key role. Choose a ripe avocado that yields slightly to gentle pressure, pick a bright lemon or lime for acidity, and use flaky kosher or sea salt so every sprinkle finishes the flavors. Together they create contrast and keep the rose looking fresh.
- 1 ripe avocado: Mashed gently to form thin slices or curls for shaping into a delicate rose, providing creamy texture and rich, buttery flavor that anchors the presentation. Adds healthy monounsaturated fats and a smooth mouthfeel that balances acidity and salt. Helps bind any fillings and visually elevates the dish when arranged carefully.
- lemon or lime: Squeezed sparingly for bright citrus juice to prevent browning and add a crisp, tangy contrast that lifts the avocado's richness. Supplies acid to balance flavors and enhance overall freshness without overpowering the delicate profile. Used cautiously to control tartness and preserve color.
- kosher or sea salt: Sprinkled lightly to enhance flavor by introducing subtle minerality and heightening the avocado's natural taste without masking it. Serves as a seasoning to balance sweetness and acidity while providing a pleasant finish on the palate. Chosen type influences texture and salinity, so apply to taste.
Instructions for Avocado Rose

These directions are simple, but they reward focus and a light touch. Read through the sequence once, then move confidently. Keep your knife sharp and your movements deliberate for the best results.
- Take a sharp knife and cut the avocado in half.: The first cut should be clean and even; you will hear the subtle sound of the blade slicing through the tender flesh, and the two halves will separate smoothly. I like to rotate the avocado gently as the knife traces the seam to ensure a uniform cut. This matters because an uneven cut can make one half harder to slice thinly later on. One common error is using a dull knife, which mashes rather than slices the avocado , so sharpen beforehand and wipe the blade between actions for a flawless look.
- Tap the pit with the sharpest part of your knife and remove.: When you tap, you should feel a brief, secure click as the blade lodges into the pit, and then with a slight twist the pit comes free. The sound and slight resistance tell you the connection is made. This technique matters because removing the pit cleanly preserves the curvature of the half you will slice. Be careful to keep fingers clear to avoid injury, and if you do not feel confident, use a spoon to scoop the pit instead.
- Place the avocado on a cutting board and gently remove the peel of the avocado.: As you peel, you will notice the cool, glossy flesh reveal itself beneath the skin, and it will feel silky to the touch. Removing the skin in one piece helps keep the slices intact, and I often use the edge of the board to hold the half steady while pulling away the peel. If the peel resists, slide a spoon between skin and flesh to lift it cleanly. Avoid squeezing too hard, which can bruise the flesh and make it harder to slice thinly.
- Starting at either end of the avocado, slice the avocado across into the thinest slices possible.: Thinness is crucial here, because the slices need to bend and overlap without breaking, and you can hear a faint whisper of the knife as it glides through. I aim for almost translucent slices so they fan smoothly, and I keep the blade level to maintain consistent thickness. The reason this technique matters is that thicker slices will not curl into a tight rose, they will flop. A frequent mistake is sawing back and forth, which tears slices; instead, use long, steady strokes.
- Gently fan out the avocado into a long line with the slices overlapping each other.: When you fan the slices, you should see a gradient of green from pale near the center to deeper tones toward the edge, creating visual depth. I lay the overlapping slices on the board and nudge them into a single continuous line, which makes curling simpler. The overlap holds the form as you roll. Avoid forcing slices too flat, which can break them; keep a slight lift between layers so they nestle neatly.
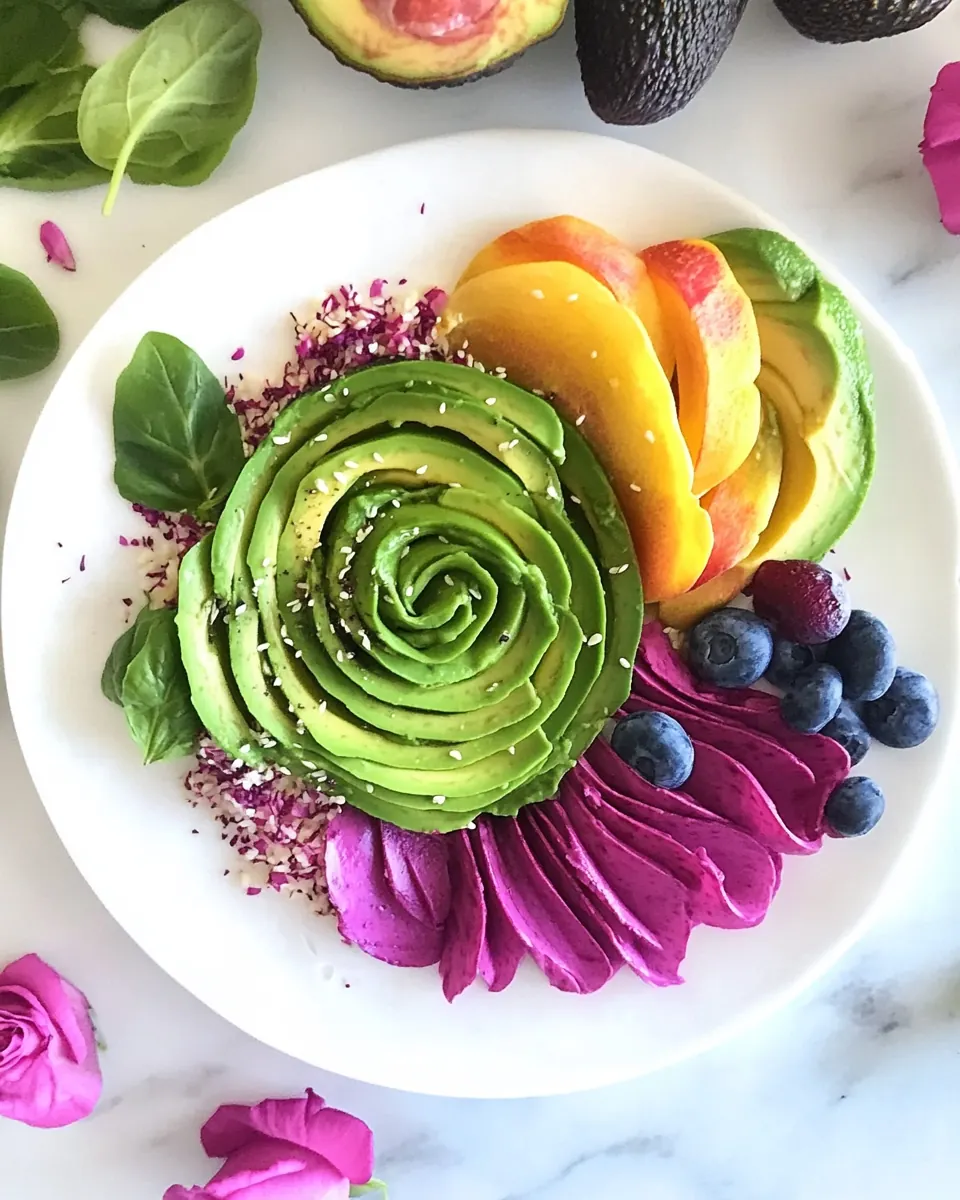
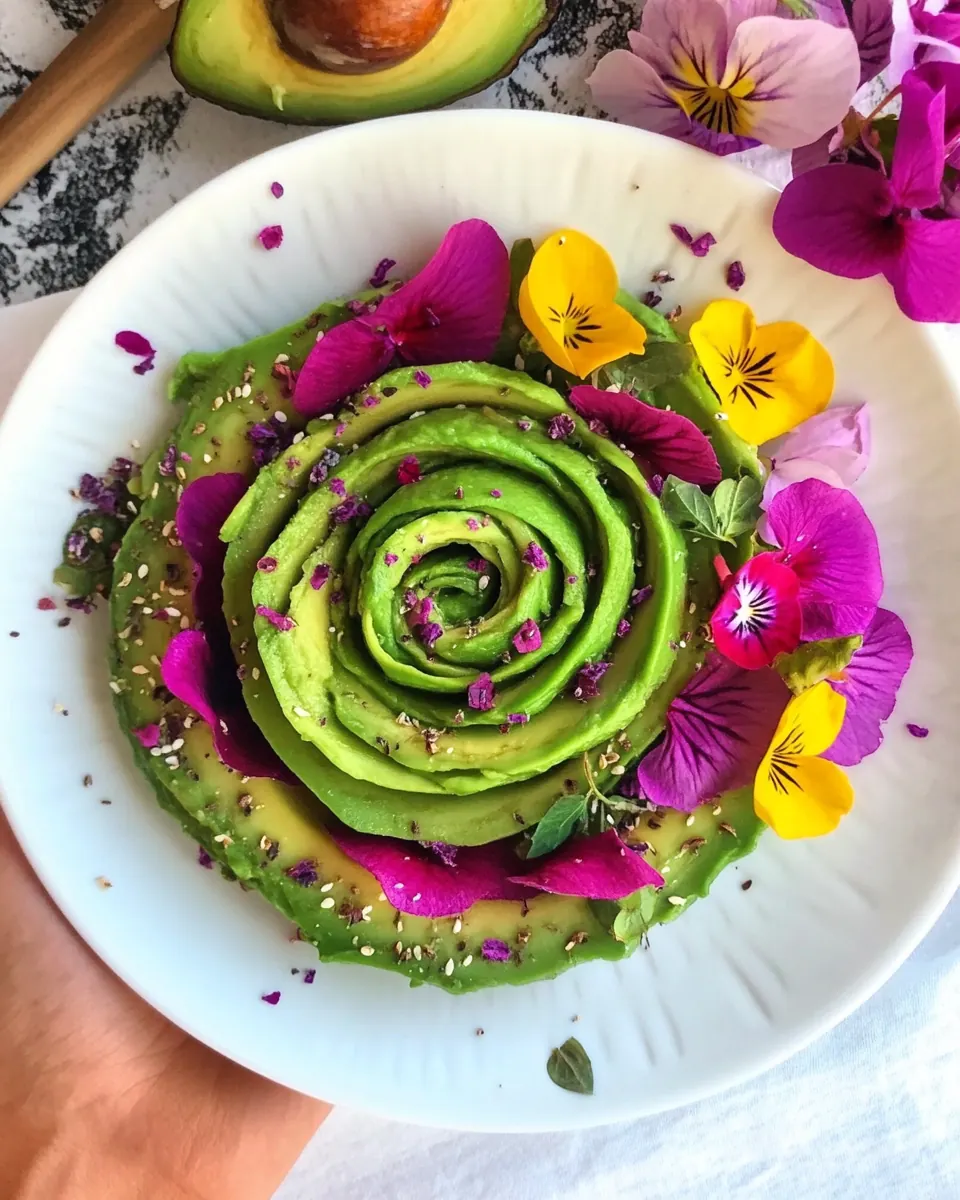
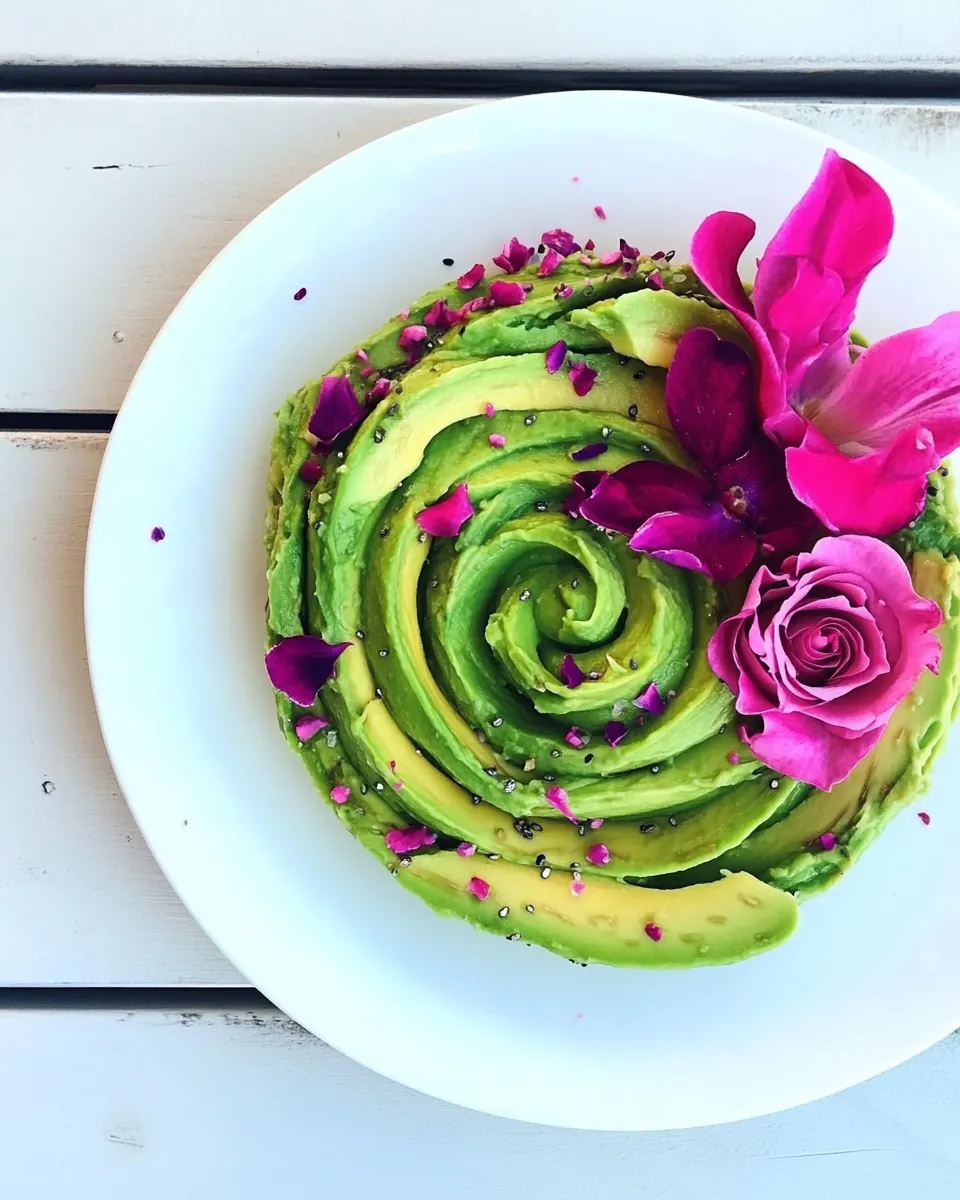
- Starting from one end, slowly curl the slices towards the center. Continue curling until you form a rose.: As you curl, the rose begins to take shape and it is satisfying to feel the slices hold together, forming concentric rings. Work slowly so each layer sits evenly atop the previous one, and use your fingers to guide rather than press. This technique produces a tight, elegant center and a natural blossom edge. A common issue is rushing, which leads to uneven coils or gaps, so breathe and let the slices settle as you go.
- Squeeze a touch of lemon over the rose and sprinkle with salt.: The final bright note of lemon or lime and a light dusting of kosher or sea salt adds lift and contrast, and you will notice a fresh citrus aroma that cuts the richness. Apply the acid gently so the rose keeps its structure, and scatter the salt sparingly for little bursts of flavor. This finishing step preserves color and balances mouthfeel, but overdoing the citrus can make the surface slick and cause separation, so use judiciously.
Ways to Customize
There are small ways to make an Avocado Rose your own while keeping the core technique intact. Below are suggestions focused on finishing touches, textures, and serving styles to suit different meals.
- Play with citrus intensity. Adjust the amount of lemon or lime you use, starting with a light squeeze and tasting as you go, so the bright acid lifts the avocado without overpowering it.
- Season with restraint. Use a light hand with kosher or sea salt so each flake gives a small pop of flavor against the creamy avocado, rather than masking the fruit’s natural richness.
- Plate it intentionally. Place the rose on a slightly textured surface like toasted bread or a bed of greens to create contrast and make the shape read clearly on the plate.
- Practice thin slicing. Spend extra time developing a smooth, steady slicing motion so your slices are uniform, which makes curling into a rose much easier and more consistent.
- Make roses ahead sparingly. You can prepare roses shortly before serving, but they are best within a short window; plan timing so they look freshest at the table.
Great Combinations for Avocado Rose
An Avocado Rose is versatile and pairs well with simple bases and light accompaniments that let it shine. Below are thoughtful pairings and occasions that highlight the texture and visual appeal of the rose.
- On toast: Place the rose on rustic toasted bread with a thin spread of olive oil or mashed bean spread for a refined brunch focal point that reads well on a plate.
- With salads: Nestle the rose atop mixed greens or baby spinach to add a creamy center and elegant presentation for lunch or light dinner.
- At breakfast: Add the rose to a plate with eggs and roasted tomatoes for a balanced morning meal with color and richness.
- For entertaining: Use multiple roses on a platter with small toasts for a chic appetizer during gatherings or casual brunches.
- Storage tips: If you must store, wrap halves tightly with plastic and refrigerate with a cut side facing lemon juice to slow browning, but aim to form roses just before serving.
- Seasonal pairing: Bright citrus is ideal year round, and lighter spring greens make a lovely bed for the rose in warmer months.
- Occasions: This garnish works beautifully for everyday breakfasts, weekend brunches, and special occasions where a small flourish elevates the meal.
FAQ
Conclusion
The Avocado Rose is a small technique that makes a big visual and textural impact. I love how a ripe avocado, a touch of citrus, and a sprinkle of salt transform simple dishes into something special. Try making one the next time you want to elevate toast, a salad, or a brunch plate, and enjoy the calm focus of shaping this delicate garnish. It is quick to learn, forgiving with practice, and always impressive on the plate.

Avocado Rose
Equipment
- Sharp Knife
- Cutting Board
- Spoon
Ingredients
- 1 ripe avocado Mashed gently to form thin slices or curls for shaping into a delicate rose, providing creamy texture and rich, buttery flavor that anchors the presentation. Adds healthy monounsaturated fats and a smooth mouthfeel that balances acidity and salt. Helps bind any fillings and visually elevates the dish when arranged carefully.
- lemon or lime Squeezed sparingly for bright citrus juice to prevent browning and add a crisp, tangy contrast that lifts the avocado's richness. Supplies acid to balance flavors and enhance overall freshness without overpowering the delicate profile. Used cautiously to control tartness and preserve color.
- kosher or sea salt Sprinkled lightly to enhance flavor by introducing subtle minerality and heightening the avocado's natural taste without masking it. Serves as a seasoning to balance sweetness and acidity while providing a pleasant finish on the palate. Chosen type influences texture and salinity, so apply to taste.
Instructions
- Take a sharp knife and cut the avocado in half.: The first cut should be clean and even; you will hear the subtle sound of the blade slicing through the tender flesh, and the two halves will separate smoothly. I like to rotate the avocado gently as the knife traces the seam to ensure a uniform cut. This matters because an uneven cut can make one half harder to slice thinly later on. One common error is using a dull knife, which mashes rather than slices the avocado , so sharpen beforehand and wipe the blade between actions for a flawless look.
- Tap the pit with the sharpest part of your knife and remove.: When you tap, you should feel a brief, secure click as the blade lodges into the pit, and then with a slight twist the pit comes free. The sound and slight resistance tell you the connection is made. This technique matters because removing the pit cleanly preserves the curvature of the half you will slice. Be careful to keep fingers clear to avoid injury, and if you do not feel confident, use a spoon to scoop the pit instead.
- Place the avocado on a cutting board and gently remove the peel of the avocado.: As you peel, you will notice the cool, glossy flesh reveal itself beneath the skin, and it will feel silky to the touch. Removing the skin in one piece helps keep the slices intact, and I often use the edge of the board to hold the half steady while pulling away the peel. If the peel resists, slide a spoon between skin and flesh to lift it cleanly. Avoid squeezing too hard, which can bruise the flesh and make it harder to slice thinly.
- Starting at either end of the avocado, slice the avocado across into the thinest slices possible.: Thinness is crucial here, because the slices need to bend and overlap without breaking, and you can hear a faint whisper of the knife as it glides through. I aim for almost translucent slices so they fan smoothly, and I keep the blade level to maintain consistent thickness. The reason this technique matters is that thicker slices will not curl into a tight rose, they will flop. A frequent mistake is sawing back and forth, which tears slices; instead, use long, steady strokes.
- Gently fan out the avocado into a long line with the slices overlapping each other.: When you fan the slices, you should see a gradient of green from pale near the center to deeper tones toward the edge, creating visual depth. I lay the overlapping slices on the board and nudge them into a single continuous line, which makes curling simpler. The overlap holds the form as you roll. Avoid forcing slices too flat, which can break them; keep a slight lift between layers so they nestle neatly.
- Starting from one end, slowly curl the slices towards the center. Continue curling until you form a rose.: As you curl, the rose begins to take shape and it is satisfying to feel the slices hold together, forming concentric rings. Work slowly so each layer sits evenly atop the previous one, and use your fingers to guide rather than press. This technique produces a tight, elegant center and a natural blossom edge. A common issue is rushing, which leads to uneven coils or gaps, so breathe and let the slices settle as you go.
- Squeeze a touch of lemon over the rose and sprinkle with salt.: The final bright note of lemon or lime and a light dusting of kosher or sea salt adds lift and contrast, and you will notice a fresh citrus aroma that cuts the richness. Apply the acid gently so the rose keeps its structure, and scatter the salt sparingly for little bursts of flavor. This finishing step preserves color and balances mouthfeel, but overdoing the citrus can make the surface slick and cause separation, so use judiciously.
Notes
- Play with citrus intensity. Adjust the amount of lemon or lime you use, starting with a light squeeze and tasting as you go, so the bright acid lifts the avocado without overpowering it.
- Season with restraint. Use a light hand with kosher or sea salt so each flake gives a small pop of flavor against the creamy avocado, rather than masking the fruit's natural richness.
- Plate it intentionally. Place the rose on a slightly textured surface like toasted bread or a bed of greens to create contrast and make the shape read clearly on the plate.
- Practice thin slicing. Spend extra time developing a smooth, steady slicing motion so your slices are uniform, which makes curling into a rose much easier and more consistent.
- Make roses ahead sparingly. You can prepare roses shortly before serving, but they are best within a short window; plan timing so they look freshest at the table.