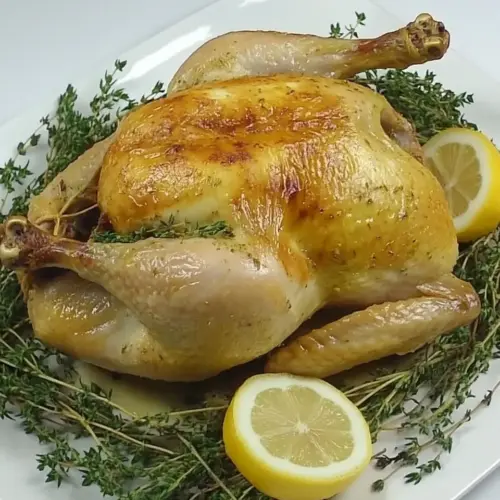
Whole Roast Chicken with Lemon Thyme
Whole Roast Chicken with Lemon Thyme delivers crispy golden skin, juicy meat and bright citrus herb notes. This easy weeknight dinner feels special enough for guests, with fragrant pan juices and simple aromatics like lemon and thyme. The method is forgiving yet yields restaurant quality results, making it the perfect choice to feed a family or enjoy flavorful leftovers.
Equipment
- Roasting tray
- Kitchen twine
- Mixing Bowl
- Kitchen shears
Ingredients
- 1 chicken organic, approx. 1.5-1.9 kg Roast whole and tied for even cooking; provides the primary protein and centerpiece, delivering moist meat and crisped skin when properly seasoned and rested after roasting.
- 4 small onion Slice or quarter to nest around the bird; adds sweet aromatic depth and caramelizes in the pan, contributing to the pan juices and stuffing cavity for flavor.
- 1 lemon sliced in 4 Zest and quarter to place inside the cavity and around the bird; contributes bright citrus acidity that cuts richness and imparts subtle fragrance to the meat.
- 1 handful fresh thyme Strip or leave on small sprigs and scatter inside and around the cavity; imparts fresh herbal aroma and savory notes that infuse the chicken during roasting.
- 3 clove garlic Smash or leave whole and tuck into the cavity; releases pungent, savory oils when roasted, enhancing the overall depth of flavor and aromatics.
- 2 bay leaves Tuck whole into the cavity or scatter in the pan; adds a slightly herbal, bay-like fragrance that complements the poultry without overpowering.
- olive oil extra virgin Drizzle or rub over the skin before roasting; helps brown and crisp the skin, carries seasonings, and adds fruity, peppery richness to the final dish.
- smoked paprika Sprinkle sparingly over the skin or mix into the rub; contributes smoky warmth and color to the skin, enhancing both flavor complexity and visual appeal.
- sea salt flakes Season liberally before roasting and sprinkle in pan juices; enhances overall flavor, balances other seasonings, and can help draw moisture to the skin for better browning.
- black pepper freshly ground Grind over the chicken before and after roasting; adds bright, sharp heat and complexity that complements the salt and citrus while accentuating savory notes.
- kitchen twine about 1/2 metre or yard Tie legs and wings together to secure shape; ensures even roasting, keeps stuffing and aromatics in the cavity, and promotes uniform browning for an attractive presentation.
Instructions
- Preheat oven to 200 degrees Celsius (400 Fahrenheit).: You will feel the kitchen warm up as the oven reaches temperature, and that initial high heat is what jumpstarts browning on the skin. The sound of the preheated oven settling is subtle, but the result is immediate when the bird hits the tray, you should hear a faint hiss as the skin begins to sizzle. This first high heat step encourages Maillard reaction, creating that coveted golden brown color. A common mistake is to skip preheating, which slows crisping and can produce a paler skin, so always allow the oven to fully reach temperature before roasting.
- Place 2 of the sliced onions, lemon, thyme, garlic and bay leaves, in a mixing bowl with a good splash of olive oil and a pinch of salt and pepper.: When you toss these aromatics, you will notice the citrus oils release and the garlic and thyme begin to smell brighter; the glistening olive oil helps those flavors cling to the aromatics. This little aromatic mix becomes the fragrant heart of the cavity stuffing, and the salt draws a touch of moisture from the onion which later helps form rich pan juices. Avoid over salting at this stage, which can make the cavity mixture too salty once the juices concentrate.
- Toss the above ingredients together with hands and stuff firmly into the cavity of the chicken.: As you press the mixture into the cavity you will feel the bulk tighten and the lemon and herbs settle in; the steam from the citrus and the roast will aromatize the meat internally. This step helps the bird steam from the inside, keeping the breast juicy and imparting subtle herb and citrus flavors. Be careful not to overstuff, as too much filling can block even airflow around the bird and extend cooking time.
- Truss the chicken.: Trussing brings the legs together and ensures the bird cooks evenly, preventing the legs from splaying and overcooking while the breast finishes. When the twine is snug, the bird looks compact and will roast more uniformly. A common issue is tying too loosely, which negates the benefit, or too tightly, which can restrict airflow under the skin; aim for firm but not constrictive tension.
- Lay the remaining slices of onion in the bottom of a roasting tray.: The bed of onion cushions the chicken and slowly caramelizes, releasing sweet, savory juices that mingle with the bird drippings. Visually you will see the onion soften and pick up color as the roast proceeds. If the tray is overcrowded, the onions will steam rather than brown, so leave enough space for heat circulation.
- Lightly rub the chicken with a little bit of olive oil.: Rubbing the skin with olive oil gives it a sheen and promotes even browning. The skin will feel silky to the touch and the oil helps the salt and paprika stick. Skip the oil and the skin may remain pale and dry, so a light, even coating is important for crisp, golden results.
- Season the chicken liberally with sea salt, paprika and pepper.: As you season, you will notice the surface take on warm color from the paprika and the salt will begin to dissolve into the skin. This seasoning layer is responsible for much of the final flavor, so be confident but measured in your application. The most common mistake is undersalting, which leaves the meat bland; however oversalting early can over concentrate flavors, so distribute the salt evenly.
- Place the chicken on the onion slices, (back and wings facing down).: Positioning the bird this way exposes the breast to more ambient heat and allows the wing tips to tuck without burning. You will see steam escaping from the cavity as the bird settles, and the onion below will start to brown sooner than the meat. Ensure the bird sits flat; if it tilts, the roasting will be uneven and one side may overcook.
- Roast in oven for 15 minutes.: In this first roast period the skin will begin to blister and set, and that initial sizzling is a sign the exterior is sealing in juices. The aroma of caramelizing surface proteins and warming herbs should be noticeable. The danger here is opening the oven door often, which drops temperature and delays browning, so resist the urge to check until the initial time has passed.
- Reduce heat to 180 degrees Celsius (350 Fahrenheit) and roast a further 1 hr.: Lowering the oven temperature allows the interior to cook through without charring the exterior. During this longer phase you will notice the juices collecting in the pan and the onion deepening in color. Cooking at too high a sustained temperature risks dried breast meat, while too low will extend time and reduce the crispness of the skin.
- About half way through the cooking process baste the bird with a little olive oil.: Basting adds moisture to the surface and reinvigorates browning, giving you glossy skin and richer pan juices. You will see the skin darken and the oil meld with drippings. Overbasting or using cold liquid can cool the bird and interrupt cooking, so use warm oil or drippings and baste quickly.
- Remove the chicken from the oven and pierce the bird in the thickest part of the leg, near the joint. Juices should run clear, indicating it is cooked.: When you pierce the leg, clear juices indicate doneness, while any pink suggests more time is needed. The leg should feel tender, and the juices will run translucent. A common pitfall is relying only on color of the skin; always check the leg juices or use a thermometer for certainty.
- Gather everyone up and sit down to a family dinner.: The aroma will act as a signal, and the sizzling, browned skin with steaming juices is a sight that draws people in. Serving straight from the tray creates a convivial moment around the table. Avoid waiting too long to carve, as the meat continues to rest and will reabsorb juices; allow a short rest before cutting for the best texture.
- You’ll need about 1/2 metre (1/2 yard) long piece of cooking twine.: Having the correct length ready makes trussing fast and tidy. When you handle the twine you will appreciate how it secures the legs and neatens presentation. Using twine that is too short forces awkward knots, while excess can burn in the oven, so cut a practical length.
- Lay it on its back with its tail away from you.: Positioning the bird this way gives you mechanical advantage when trussing; the legs fall naturally toward you for easier tying. Visually the bird looks balanced, and that translates into even roasting. A common error is trying to truss from an awkward angle, which can lead to loose knots.
- Place twine under the bird’s tail and centre it.: Centering ensures symmetrical tension on both legs so the bird roasts uniformly. You will feel the twine snug under the cavity. If the twine slips, reposition it so the knot will hold during roasting.
- Pull both ends of the twine up and cross them over one another.: Crossing creates the tension that will draw the legs together. You will notice the legs respond and move inward as you pull. Failing to cross properly may leave one leg higher, causing uneven cooking.
- Wrap each piece of twine around the end of the drumstick.: Wrapping secures the drumsticks and keeps them compact during cooking, yielding more even results. Ensure the twine sits at the ankle joint rather than the thigh for a clean hold. Wrapping too loosely or too close to the skin can create pressure points or slipping.
- Pull the twine tight and the legs will come together.: Tightening produces a neat, compact shape that helps the thighs and breasts finish at similar times. When the legs come together the bird presents well and cooks evenly. Avoid over tightening which can deform the leg joints and impede circulation of heat.
- Cross the twine over one another again and make a knot.: The final knot locks the truss in place; the bird should remain secure for the entire roast. A secure knot prevents the legs from separating during cooking. A sloppy knot can come undone, so double knot if needed for confidence.
- Cut off the excess string.: Removing extra string prevents it from charring in the oven and keeps the presentation tidy. Use kitchen shears to snip close to the knot. Leaving long tails risks burning and an unpleasant smoky note.
- Tuck the wings under by forcing the tip of the 3 rd digit to sit behind the 1 st digit and shoulder.: Tucking protects the wing tips from burning and creates a compact shape for even cooking. When the wings are secure they will not flare out and overbrown. If tucked improperly, wing tips can char, so ensure the tips are fully under the bird before roasting.
Notes
- Bring the bird to room temperature: Allowing the chicken to sit 30 minutes before roasting reduces cooking time variance and promotes even doneness, especially for larger birds.
- Adjust salt to taste: If you are watching sodium, reduce the surface salt and rely on the cavity aromatics to flavor the meat; remember you can always season at the table.
- Use a thermometer for accuracy: An instant read thermometer removes uncertainty, ensuring the thigh reaches a safe temperature while preserving juicy breast meat.
- Customize the herb mix: If you have extra thyme, tuck sprigs under the skin for more intense herb flavor, taking care to avoid bunching which can hinder browning.
- Make pan juices into sauce: After roasting, deglaze the tray with a splash of warm stock and strain to create a simple, savory sauce from the fond and soft onion.