White Chocolate Peppermint Pretzel Rice Krispie Treats
White Chocolate Peppermint Pretzel Rice Krispie Treats are crispy, chewy, and bright with peppermint, combining crunchy pretzels and melting white chocolate for a festive, easy dessert. These quick no bake squares deliver sweet pockets of white chocolate, crunchy candy cane shards, and a salty finish, perfect for holiday platters or gifting. Make a batch when you want something impressive yet simple to prepare.
Equipment
- Large Pot
- 9x9 or 9x13 baking pan
- Spatula
- Small Bowl
- Microwave
Ingredients
- 6 tablespoons unsalted butter Melted to bind the marshmallows and cereal together, providing richness and a smooth mouthfeel; browns slightly if heated too long, contributing a subtle nutty flavor when fully incorporated.
- 16 ounce bag mini marshmallows plus 2 cups, divided Added in two stages to create structure and extra gooey pockets; the bag provides the bulk for the bars while the additional measured cups are folded in later for chewiness and binding.
- 1/4 teaspoon peppermint extract Added sparingly to give a bright peppermint note that lifts the sweetness; balanced carefully so the extract enhances flavor without overpowering the other components.
- 1/2 teaspoons ea salt, plus more for sprinkling Measured to season the mixture and balance sweetness; a small amount in the batter and extra for finishing provides contrast and highlights the salty-sweet profile.
- 8 cups crispy rice cereal Tossed in to provide the classic crispy texture and lightness; absorbs some of the butter-marshmallow matrix to form sturdy, yet tender bars that hold their shape.
- 2 cups chopped pretzels Stirred through for crunch and savory contrast, complementing the sweet components with a salty, crunchy bite; chopped size distributes texture evenly throughout each bar.
- 3/4 cup white chocolate chips Melted with a little of the reserved oil to create a smooth drizzle or coating, adding creamy sweetness and a silky finish that contrasts the salty pretzels and crisp cereal.
- 2 candy canes, smashed Crushed and sprinkled to provide bright peppermint shards and festive color; the hard candy also offers a crunchy contrast and concentrated mint flavor in bites.
- 1/2 cup white chocolate chips Melted separately with oil to make a smooth topping or drizzle that sets glossy; adds extra white chocolate flavor and helps pieces stick for a finished look.
- 1/4 teaspoon oil Added in small amount to thin melted chocolate for smoothness and sheen; helps the white chocolate become pourable and set with a delicate gloss.
- 1/4 cup chopped pretzels Used as a smaller quantity of crunch for garnish and texture variation; scattered pieces add visual interest and reinforce the pretzel flavor in each bite.
- 1 candy cane, crushed Crushed for a final peppermint accent that adds crunch and concentrated mint flavor; used sparingly to avoid undissolved hard bits while contributing festive texture.
- Flaky sea salt, for sprinkling on top Sprinkled on top to finish and emphasize the sweet-salty contrast; flaky texture and bright briny notes elevate the overall flavor and provide a professional look.
Instructions
- For super thick Rice Krispie Treats, grease a 9×9-inch baking pan with nonstick cooking spray. For regular Rice Krispie Treats, grease a 9×13-inch baking pan with nonstick cooking spray. You can also line the pan with parchment paper to make it easier for them to come out of the pan. Set pan aside.: As you prepare the warm marshmallow mixture, you will notice a sweet, buttery scent filling the kitchen, signaling it is time to move quickly. Greasing the pan or lining it with parchment ensures the treats release cleanly and keeps edges intact, which matters for neat squares. Lightly spray or rub a bit of unsalted butter onto the pan so the mixture does not stick. One common error is waiting until after the mixture cools to prepare the pan, which makes pressing into the pan messy and harder to level. Keep your spatula or hands lightly greased to prevent tearing the treats as you press them in.
- In a large pot, melt the butter over medium high heat. Add the 16 oz bag of marshmallows and stir until the marshmallows are completely melted.: You will hear a gentle bubbling as the unsalted butter warms and the marshmallows begin to soften, releasing a warm, sugary aroma. Stir consistently with a heatproof spatula so the marshmallows melt evenly without scorching, and reduce the heat slightly if you see browning at the edges. The glossy, velvety texture is the cue that it is ready; stop stirring only when the mixture is smooth and homogeneous. A typical mistake is allowing the mixture to simmer too long, which can make the marshmallow tough once cooled, so maintain steady medium high heat and attention.
- Remove the pan from the heat and stir in the peppermint extract and the sea salt. Add the cereal and pretzels; gently stir until well coated with the marshmallows.: After removing from heat you will smell the peppermint bloom when you add peppermint extract , which lends a lifted, cool top note. Sprinkle the measured salt in to balance the sweetness. Add the crispy rice cereal and chopped pretzels in batches, folding gently so the fragile cereal does not crush, but every piece is coated. The goal is an even distribution so each bite has crunch and chew. Overmixing at this stage can crush the cereal and yield dense treats, so fold with patient, gentle strokes.
- Stir in the remaining 2 cups of mini marshmallows, white chocolate chips, and crushed candy cane pieces.: As you fold in the reserved mini marshmallows , they will create soft pockets within the mixture that stay pillowy after cooling, which gives textural contrast. Adding the first portion of white chocolate chips now allows them to warm slightly and meld into little creamy pockets. The crushed candy cane adds flecks of color and a peppermint crunch that punctuates each bite. Watch for overly large clumps of mix; if they form, gently tease them apart so the distribution remains uniform. A common oversight is adding the chips too early to very hot marshmallow which can over melt them and lose their texture, so let the mixture cool just briefly off the heat first.
- Transfer mixture to the prepared pan. Lightly press the mixture into the pan, using a greased spatula. You can also lightly grease your hands and press the mixture into the pan.: As you move the warm mixture into the pan you will feel it firm slightly but remain pliable; pressing evenly ensures consistent thickness and neat squares when sliced. Use a piece of parchment or a greased spatula to press without compressing excessively, which keeps the interior airy rather than dense. The patting should be firm but gentle, just enough to smooth the top. A typical pitfall is pressing too hard which creates rock hard bars; to avoid that, press evenly and stop when the surface is even and compacted but still springy to the touch.
- For the topping, place white chocolate chips and oil in a small bowl. Heat in microwave in 30 second intervals, stirring in between, until melted and smooth.: Melting the reserved white chocolate chips with a touch of oil produces a glossy drizzle that contrasts visually and texturally with the matte surface of the treats. Heat in short bursts and stir to prevent seizing; you will smell the sweet, creamy aroma and see a silky sheen when it is ready. If the chocolate seems grainy, a small splash more oil can smooth it, but avoid overheating. Many cooks overheat in one go and the chocolate burns, so patience and stirring are crucial here.
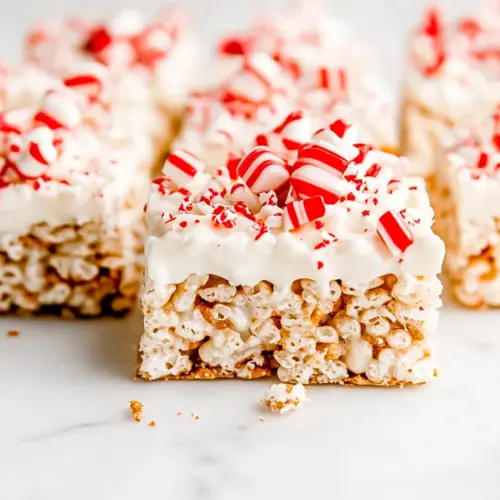
- Drizzle the white chocolate over the Rice Krispie Treats. Top with chopped pretzels, crushed candy cane, and flaky sea salt.: As you drizzle, the warm chocolate will thread across the surface and pool slightly into crevices, creating pretty ribbons and concentrated sweet bites. Scatter the extra chopped pretzels and crushed candy cane immediately so they adhere to the chocolate while it is still tacky, then finish with a light sprinkle of flaky sea salt for bursts of savory contrast. Watch that you do not overload the top or the squares can be hard to slice cleanly; a light, even distribution works best.
- Let the Rice Krispie Treats sit until chocolate is hard, about 1 hour. Cut into squares and serve.: Allowing the pan to rest gives the chocolate time to set and the bars to firm up without becoming brittle. You will notice the treats losing their tacky feel and taking on a slight give when ready; this is the right texture for clean slices. Use a sharp knife and press straight down rather than sawing to keep edges neat. Cutting too soon is a frequent mistake, resulting in messy edges and chocolate smears, so patience yields prettier results.
- Cover pan with plastic wrap or put the treats in an airtight container and store on the counter for up to 3 days.: Stored at room temperature in an airtight container, the treats retain chew and crunch for several days, though they are best fresh. If you live in a humid climate, consider a tightly sealed container to prevent softening. Freezing is also possible, but thawing can soften the candy cane bits slightly. A common storage error is stacking the squares without parchment between layers, which makes them stick together, so separate layers if you need to stack.
Notes
- Measure precisely, especially the crispy rice cereal and marshmallows. Too much cereal makes the bars dry, and too few makes them overly sticky.
- Use room temperature butter so it melts evenly and incorporates smoothly into the melted marshmallows without cooling the pot too quickly.
- Work quickly when mixing and pressing the mixture into the pan, since the marshmallow sets as it cools and becomes harder to shape.
- Keep a small bowl of lightly oiled water nearby to dip your spatula or knife in when smoothing or cutting, which prevents sticking and yields cleaner edges.
- Toast the chopped pretzels briefly if you like, about 2 minutes at low heat, to intensify their flavor but watch closely so they do not burn.