White Chocolate Lemon Bars
White Chocolate Lemon Bars are a creamy, bright bar with a tender buttery crust and a silky lemon custard topping. These easy to slice squares combine fresh Meyer lemon juice and zest with pockets of white chocolate chips for a balanced sweet and tangy bite, perfect for spring gatherings or an easy weeknight dessert, and compelling enough to make again and again.
Equipment
- 9 x 13 inch baking dish
- Food Processor
- Mixing Bowl
- Whisk
Ingredients
- 2 1/4 cups cake flour, or 2 cups all-purpose flour + 1/4 cup cornstarch Provides a tender, delicate crumb to the crust; use as specified for structure and a light texture. Substitute with the all-purpose plus cornstarch option if cake flour is unavailable to mimic lower-protein flour behavior. Measure accurately and sift if lumpy to ensure even incorporation and a uniform base for the bars.
- 1/2 cup granulated sugar Adds sweetness and helps balance the tartness of the lemon filling while contributing to slight caramelization in the crust. Dissolve well into the dough for consistent sweetness distribution and to aid in achieving a crisp edge. Adjusting quantity will noticeably change the final sweetness and texture.
- 1 teaspoon salt Enhances overall flavor complexity and balances sweetness by bringing out citrus notes and reducing flatness. Dissolve evenly into the dry ingredients to ensure consistent seasoning throughout the crust or filling. Use the stated amount to avoid overly salty results that could overwhelm delicate white chocolate and lemon flavors.
- 1 teaspoon vanilla extract Imparts a warm, sweet aromatic note that deepens the dessert's flavor profile and complements both white chocolate and lemon. Stir into the wet mixture to distribute its flavor uniformly without overpowering the citrus brightness. Use pure extract for best results and avoid artificial-tasting substitutes when possible.
- 12 tablespoons melted butter Provides rich fat for a tender, flaky crust and contributes to moistness and flavor depth in the bars. Melted form allows for easy mixing into dry ingredients to form a cohesive dough or base layer. Use unsalted butter if possible and adjust salt elsewhere if using salted butter.
- 1/2 cup white chocolate chips Contributes creamy, sweet cocoa butter flavor and adds body and richness to the filling when melted or folded in. Melt or chop as directed so it integrates smoothly without graininess and complements the lemon rather than overpowering it. High-quality white chocolate yields a cleaner, more pronounced vanilla-cream note.
- 4 large eggs Creates structure and stability in the filling as eggs set during baking, providing lift and a custard-like texture. Beat and incorporate at the specified temperature to ensure even coagulation and smooth consistency. Overbeating or undercooking can affect texture, so follow timing and temperature guidance.
- 1 2/3 cups granulated sugar Sweetens and balances the tartness of fresh lemon juice, contributing to the filling's syrupy consistency and mouthfeel. Dissolve into the wet ingredients thoroughly to prevent graininess and help the eggs and milk form a smooth custard. Quantity adjustments will significantly influence sweetness and set.
- 1/4 cup all-purpose flour Adds a slight thickening and helps stabilize the lemon filling, contributing to a silky texture and preventing curdiness. Mix into the other dry ingredients before combining with liquids to avoid lumps and ensure even distribution. Using too much will overly firm the filling, while too little may yield a runny center.
- 2 tablespoons Meyer lemon zest Provides concentrated citrus oils and intense flavor that brightens the filling with aromatic complexity and fresh lemon character. Zest finely and measure packed as directed so flavorful oils are released without adding bitterness from white pith. Fresh zest is preferred over dried for the most vibrant result.
- 2/3 cup fresh-squeezed Meyer lemon juice Delivers the primary tart and acidic component of the filling, creating the characteristic lemon flavor and helping the custard to set through acid-protein interaction. Strain to remove seeds and measure freshly squeezed juice for optimal flavor clarity and brightness. Bottled juice will lack the nuanced, fresh acidity of Meyer lemons.
- 1/3 cup whole milk Lightens and enriches the filling with fat and body, helping to create a smooth, tender custard that bakes to a creamy consistency. Warm slightly before combining to prevent curdling and ensure seamless integration with eggs and sugar. Whole milk provides enough fat for richness without making the filling heavy.
Instructions
- Preheat the oven to 350 degrees F. Line a 9 X 13-inch baking dish with foil or parchment paper.: The kitchen should smell neutral with a faint warmth as the oven comes up to temperature, which ensures even baking later. Proper preheating produces predictable browning on the crust and consistent set in the filling, so don’t skip it. A common mistake is underestimating preheat time, which can lead to an underbaked center; wait until the oven indicator shows it has fully reached 350 degrees F. Lining the pan with foil or parchment creates a clean release and makes lifting the bars simple after cooling, plus it keeps the edges from sticking and becoming overly crisp.
- For the Crust: Pour cake flour, sugar, and salt in a food processor (or stand mixer). Pulse in the vanilla extract and melted butter until the mixture is soft and crumbly. Dump the mixture into the prepared baking dish. Press the crumbs into an even layer. Then sprinkle the white chocolate chips over the crust and press them into the dough. Bake the crust for 20 minutes.: Pour cake flour, sugar, and salt in a food processor (or stand mixer) : When you pulse these dry ingredients together, you’ll notice the sugar distributing evenly and the flour taking on a slightly aerated look. This step ensures the salt and sugar are uniform so the crust bakes evenly. If you skip thorough mixing, you might end up with pockets of sugar or uneven seasoning. Use short pulses to avoid overworking the flour; overprocessing can heat the mixture and affect the texture.
- Meanwhile, zest the lemons, making sure not to zest too deeply. You only want the yellow flesh, not the white bitter skin below. Place the eggs, sugar, flour, lemon zest, lemon juice, and milk in a bowl. Whisk well to combine. Then pour the filling over the baked crust.: As the butter integrates, the mixture transforms into coarse crumbs that hold when pinched between your fingers. You should hear a gentle change in the processor’s sound as the crumbs form, and the aroma will become noticeably buttery and fragrant. The reason for cooling the melted butter slightly beforehand is to prevent it from melting any added chocolates prematurely, though here it mainly helps create the right crumb. Avoid adding too much butter, or the crust will be greasy and won’t hold a clean edge when sliced.
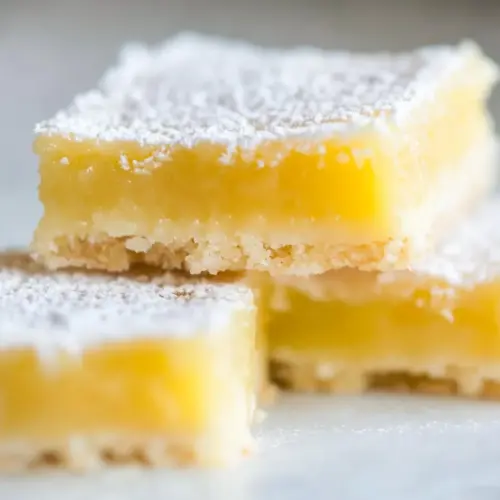
- Bake for another 20-25 minutes, until the filling is set in the center. Cool to room temperature. Then lift the entire sheet of bars out of the pan by the edges of the foil and cut into pieces. You can sprinkle the tops with powdered sugar if you like!: Spread the crumbs evenly across the bottom, and press with firm, even pressure until you have a smooth, compact base. I like to press with the bottom of a measuring cup to achieve uniform thickness, and you should hear a slight compressing sound as the crumbs compact. If the crust is uneven, the filling can pool in thinner spots and bake differently, so take your time here. Pressing too hard can make the crust overly dense, so aim for firm but not compacted into a paste.
- Press the crumbs into an even layer: The visual cue is a seamless surface with no loose crumbs; it should look like a single sheet of dough. This evenness ensures the bars cut neatly and bake uniformly. A patchy crust can lead to burnt edges where it is thin, or an undercooked base where it is thick. If you notice gaps, add a few extra crumbs and press again until you have a continuous layer.
- Then sprinkle the white chocolate chips over the crust and press them into the dough: The chips should nestle slightly into the dough so they melt into pockets rather than sitting on top. As the pan goes into the oven, you may see a few chips begin to soften at the surface; this is fine, and after baking they will have mellowed into creamy melds. If you place too many chips too close together, the crust might not set properly where they cluster, so distribute them evenly for consistent texture.
- Bake the crust for 20 minutes: You will smell a toasty, buttery aroma as the crust sets and the edges take on a light golden tone. Proper baking here ensures a sturdy base that will support the filling without becoming soggy. Underbaking will cause a limp crust that struggles to hold the bars, while overbaking can make it dry and hard. Check visual cues rather than strictly timing, the edges should be lightly golden and the center slightly set when you remove it from the oven.
- Meanwhile, zest the lemons, making sure not to zest too deeply: The kitchen will fill with bright citrus oils as you zest, a fragrant sign that real citrus flavor is being introduced. Focus only on scraping the yellow surface, because the white pith beneath is bitter and will muddy the flavor if included. A common error is pressing too hard with the zester, which yields unpleasant bitterness, so use gentle strokes to collect fragrant zest strips.
- You only want the yellow flesh, not the white bitter skin below: As you transfer the zest, you can rub it between your fingers to release more aroma, which is a great way to check potency. The zest carries essential oils that contribute immediate citrus perfume and lift in each bite. Avoid substituting dried zest or powdered lemon, because they lack the fresh oil burst that makes this filling lively and fragrant.
- Place the eggs, sugar, flour, lemon zest, lemon juice, and milk in a bowl: When you combine these, the mixture will look glossy and slightly thick, a promising sign that the filling will set with a custardy texture. Using fresh squeezed lemon juice yields a bright, clean acid note that balances the sweetness. If you don’t mix thoroughly, pockets of flour can remain, creating grainy spots, so whisk until the batter looks homogeneous.
- Whisk well to combine: As you whisk, you’ll see the mixture lighten slightly and the sugar begin to dissolve into the liquid. The sound is a steady, smooth whisking rather than clinking, and the aroma becomes a blend of citrus and sweet egg. Make sure the sugar is integrated; a gritty texture indicates incomplete mixing. Overwhisking may trap too much air and cause the filling to puff and crack, so aim for a smooth, even batter.
- Then pour the filling over the baked crust: Pour evenly so the filling distributes across the pan, watching it spread and settle into a uniform layer. The contrast between the pale yellow filling and golden crust is satisfying visually, and once poured you should tilt the pan gently if needed to level the surface. Pouring too fast can disturb the crust and create uneven areas, so pour steadily and allow it to settle on its own.
- Bake for another 20 to 25 minutes, until the filling is set in the center: During this bake, the filling should lose shine and become slightly firm to the touch in the middle, with the edges a touch more set. You might see a gentle wobble in the very center; that is fine, it will continue to firm as the bars cool. Overbaking will give you a rubbery texture and cracks, while underbaking leaves the center runny, so use visual cues and a gentle jiggle to judge doneness.
- Cool to room temperature: Cooling allows the custard to finish setting and prevents a runny center when you slice. The room will carry a mellow citrus note mingled with sweet white chocolate, and patience here rewards you with neat squares. Cutting too soon often creates messy pieces, so wait until the bars are fully cooled or even chilled briefly for cleaner cuts.
- Then lift the entire sheet of bars out of the pan by the edges of the foil and cut into pieces: Use the foil or parchment edges to lift the whole slab out, and slice with a sharp knife for precise edges. Wiping the knife between cuts helps maintain clean lines, and a chilled slab yields the sharpest squares. Rushing to cut while warm usually causes crumbling and uneven slices, so allow proper cooling time for the best presentation.
- You can sprinkle the tops with powdered sugar if you like: A light dusting adds visual charm and a subtle sweetness at the first bite. It also softens the look of the bars and highlights their edges. If you plan to dust, wait until just before serving to avoid the sugar dissolving into the surface during storage.
Notes
- Measure flour properly by spooning it into the measuring cup and leveling with a knife, to avoid a dry, crumbly crust from packed flour.
- Room temperature eggs whisk more evenly into the filling, producing a smoother custard and reducing the chance of graininess.
- Fresh lemon juice matters, as bottled juice lacks the bright volatile oils that lift the flavor and add that fresh citrus zip.
- Mint or powdered sugar garnish adds visual appeal, but add them just before serving to keep the look fresh.
- Storage tip store loosely covered at room temperature for up to three days, or refrigerate for up to ten days for longer keeping.