White Chocolate Cranberry Sugar Cookies
White Chocolate Cranberry Sugar Cookies are tender, slightly chewy cookies studded with tart dried cranberries and finished with creamy white chocolate drizzle. This easy, festive treat combines bright fruit notes with sweet, velvety chocolate for an irresistible holiday cookie that is simple to make and perfect for gifting or cookie swaps.
Equipment
- Mixing Bowl
- Whisk
- Mixer
- Measuring Cups
- Baking Sheet
- Parchment Paper
- Microwave-safe Bowl
- Cooling rack
- Scoop
Ingredients
- 1 and 3/4 cup all-purpose flour Provide structure and bulk to the cookies, forming the dough’s base by combining with fats and liquids. Sift or whisk before measuring to ensure even texture and prevent lumps. Contributes to tenderness when correctly measured and not overworked.
- 1/2 teaspoon baking powder Help the cookies rise gently by releasing carbon dioxide when heated, creating a light crumb. Use precise measurement for balanced leavening without metallic taste. Combine with baking soda for proper lift and texture.
- 1 teaspoon baking soda Act as a chemical leavener that reacts with acidic components to produce carbon dioxide and spread control. Ensure even distribution through dry ingredients to avoid uneven pockets of lift. Balances texture and browning in the finished cookie.
- 1/8 teaspoon salt Enhance overall flavor and balance sweetness while strengthening gluten slightly when present in small amounts. Control salt level carefully to avoid overpowering delicate flavors. Dissolve into dry ingredients for uniform seasoning.
- 1/2 cup (1 stick) unsalted butter, softened to room temperature Provide fat that tenderizes the crumb, adds richness, and aids in spreading during baking. Soften to room temperature for easier creaming with sugar and optimal aeration. Contributes flavor and mouthfeel to the cookies.
- 1 cup granulated sugar Introduce sweetness and assist in creaming with butter to create a light, aerated dough. Dissolve and caramelize slightly during baking to add flavor depth and color. Measure accurately for consistent sweetness and texture.
- 1 teaspoon vanilla Impart aromatic flavor that rounds out sweet components and enhances other ingredients. Add to creamed butter and sugar to evenly distribute flavor throughout the dough. Choose pure vanilla for best results.
- 1 large egg Bind the dough together while providing moisture, structure, and some leavening through trapped air when beaten. Crack into a small bowl before adding to ensure quality and uniform mixing. Adjust mixing just until incorporated to avoid toughness.
- 1 cup white chocolate chips, melted Contribute creamy, sweet, and smooth white chocolate flavor; when melted, helps integrate chocolate uniformly into the dough. Melt gently to avoid scorching and temper slightly with oil if needed for gloss. Adds sweetness and rich mouthfeel to each bite.
- 1/2 teaspoon vegetable or coconut oil Thin the melted white chocolate and improve shine and pourability for easier mixing into the dough. Use a neutral oil in very small quantity to avoid altering flavor. Stir thoroughly to achieve a smooth, silky chocolate consistency.
- 3/4 cup dried cranberries Provide chewy texture and tart-sweet flavor contrast that complements white chocolate. Soak briefly if very dry to plump slightly, then drain to avoid excess moisture in the dough. Fold in at the end to distribute evenly without crushing.
Instructions
- In a large mixing bowl, whisk together flour, baking powder, baking soda and salt.: The dry mix should look even and pale, with no streaks of leavening. You will notice a faint powdery aroma of the all purpose flour and a light dusty texture on your fingertips if you rub a bit between them. Sifting or whisking aerates the mix, which promotes even rising and prevents clumping. This step matters because if the leavening agents are not evenly distributed, some cookies will puff and others will stay flat, creating inconsistent batches. A common mistake is to skip thorough whisking, which can leave small pockets of baking soda that cause tiny bitter spots. If you spot clumps, press them through a fine mesh or break them up with the whisk until the mixture is uniform and powdery.
- In another mixing bowl, cream butter for 30 seconds. Gradually add the sugar and beat until light and fluffy.: When you cream the softened butter , it should look lighter in color and develop a slightly fluffy texture. You will hear the mixer lighten its load as the butter aerates, and the aroma becomes more buttery and rich. Proper creaming traps tiny air pockets which help the cookie rise and create a tender crumb. Overcreaming can make the butter too soft and greasy, causing excessive spread. If your butter looks greasy or has separated, chill the bowl briefly, then continue. Undercreamed butter will result in dense cookies, so aim for a smooth, airy consistency.
- Add vanilla and egg and mix in well.: As you add granulated sugar , the mixture will transform, gaining body and a slightly grainy sheen before the sugar dissolves. Beat until the texture is visibly lighter and the bowl shows faint streaks where the paddle has been. This creates structure and sweetness and helps the cookies achieve a delicate crumb. If you rush and dump sugar in all at once, it may not integrate well and will leave grainy pockets, producing a coarser texture. Scrape the bowl sides to ensure even mixing, and stop when the mixture has a pale, airy look.
- Add the dry ingredients to the wet ingredients and mix just until incorporated.: When the vanilla and the large egg go in, the mixture will briefly look glossy and more cohesive. The egg binds fats and dry ingredients, adding moisture and richness. Mix until just combined and smooth, then pause to smell the fragrant vanilla lifting the blend, and observe the batter become slightly looser. A typical misstep is overmixing at this stage, which can toughen the dough once flour is added. If you see separation or curdling, mix gently until it comes back together, and ensure the egg is room temperature for best integration.
- Cover the bowl with the dough and chill for 2 hours in the fridge.: At this stage, you will notice the mixture thicken and the bowl will look doughlike, with streaks of flour disappearing as you fold. The key sensory cue is that the dough should cling together without being sticky or overly stiff. This gentle mixing preserves tender texture, because overmixing develops gluten and can make cookies chewy. A common mistake is to power through the mixer, which leaves you with tough cookies. Use a spatula or low speed, and stop when you only see small bits of dry flour remaining, then finish folding by hand if needed.
- Preheat oven to 375 degrees.: After chilling, the dough firms and the flavors meld, which makes scoopable mounds and controls spread during baking. You will notice the texture change from soft to slightly firm, and the aroma will deepen as the butter cools. This rest also hydrates the flour for a better mouthfeel. Skipping chill time can lead to overly flat cookies, particularly if your kitchen is warm. If you are short on time, a 30 to 60 minute chill helps, but two hours is ideal for a reliably shaped cookie.
- Line a baking sheet with parchment paper or silicone baking mat.: The oven should be fully heated so the cookies start setting at the right moment. When the oven reaches temperature, it will feel noticeably warm and airy when you open the door briefly, and a quick glance at an oven thermometer helps confirm accuracy. Baking at the correct temperature ensures even browning and proper rise. A common error is inserting cold dough into an oven that is still heating, resulting in uneven spread. Allow the oven to preheat fully before baking to achieve consistent results.
- Using a 1 and 1/2 tablespoon scoop, drop mounds of dough onto the prepared sheet.: The surface should look smooth and clean, which helps cookies release easily and promotes even bottom browning. You will notice reduced sticking and easier cleanup when using parchment or a silicone mat. This step matters because direct contact with a hot metal pan can cause faster browning and uneven spread. Avoid greasing the sheet when you are using parchment, since excess fat on the pan can alter how the cookies bake and may cause them to flatten too much.
- Bake for 10 to 11 minutes. The cookies will puff up but deflate slightly during cooling.: Scooping consistent portions gives you uniform baking times and matching cookie sizes, so the tray bakes evenly. You should hear a soft thud as the scoop releases dough, and the mounds should hold their shape without collapsing. If the dough sticks to the scoop, lightly wet or dip the scoop in a bit of water, but do not add extra liquid to the dough. A typical mistake is making uneven scoops, which leads to some cookies underbaked while others are overdone. Leave space between mounds for gentle spreading.
- Cool cookies completely before decorating.: The cookies will puff and develop pale golden edges, then settle gently as they cool. You should see the tops set and the edges take on a faint color while the centers remain slightly soft. This sensory cue tells you they are done, as they will firm up off the heat. If you bake too long, they can become dry and lose their tender center, so remove them when edges are light golden. Rotate the pan halfway through if your oven has hot spots to ensure even coloring.
- Melt chocolate and oil in a heat-proof dish, in a microwave. Stir until smooth.: Cooling allows the cookies to set so the toppings do not sink or melt into the surface. The exterior will firm and the aroma will relax into a mellow sweet note, making the cookies easier to handle. Decorating too soon leads to smeared chocolate and lost texture contrast. Patience here results in cleaner presentation and preserved chewiness in the center.
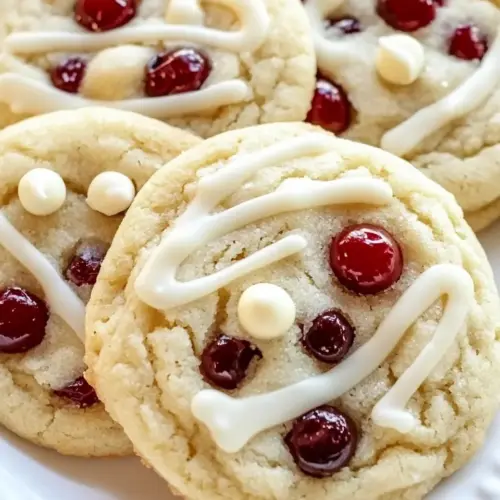
- Spread each cookie with two teaspoons of melted chocolate. Sprinkle with dried cranberries.: Melt gently using short bursts and stirring between intervals until the white chocolate chips and the small amount of oil are silky and smooth. You will see a glossy shine and a warm sweet aroma when the chocolate is properly melted. The oil thins the chocolate for easy spreading and drizzling. Overheating can cause graininess or separation, so heat in 15 second bursts and stir well. If the chocolate seizes, a tiny splash of warm cream or oil can help re emulsify it.
- Set on a cooling rack to dry. Repeat with the rest of the cookies.: The melted chocolate should glide smoothly and create a glossy surface that sets with a satiny finish. When you spread, the chocolate will be warm and will slightly soften the cookie surface, creating a seamless bond. This step enhances visual appeal and delivers a creamy bite of white chocolate in every mouthful. If the chocolate cools and thickens too much, warm it briefly and stir, but avoid overheating or it may lose its sheen.
- Drizzle the remaining chocolate over each cookie. Let dry.: The tart red pieces create a striking contrast against the warm white chocolate, and their chewiness adds texture. Press them lightly so they adhere to the melted chocolate, and you will notice a pleasing color pop that makes the cookies look festive. Adding them while the chocolate is still tacky prevents them from sliding off as it sets. Too heavy a pile can weigh down the chocolate, so use moderate amounts for balance.
- Store in an air-tight container for up to 5 days.: Placing cookies on a rack allows air to circulate so the chocolate sets evenly and the bottoms stay crisp. You will hear a faint settling sound as the chocolate firms, and the gloss will dull slightly as it becomes matte. If you stack cookies before the chocolate is fully dry, the topping can smudge and stick. Wait until the surface is fully set to the touch before stacking or packing.
- Repeat with the rest of the cookies: Working in batches keeps the melted chocolate at an ideal consistency for spreading, and lets you maintain uniform decoration. You will notice that the chocolate becomes cooler with time, so reheating briefly between batches ensures a smooth finish. A common trap is trying to decorate too many at once, which causes the chocolate to thicken and results in uneven coverage. Keep a consistent workflow and refresh the chocolate as needed.
- Drizzle the remaining chocolate over each cookie: Use a spoon or a small piping bag to create a fine ribbon of chocolate that adds texture and elegance. The drizzle should create thin, glossy lines that set to a firm but tender finish. This final flourish elevates the appearance and adds another layer of creamy flavor. If your drizzle is too thick, thin the chocolate slightly with the tiniest amount of oil, stirring until fluid but not runny.
- Let dry: Allow the decorated cookies to rest until the chocolate is fully set, which may take a short while at room temperature or faster in a cool spot. You will notice the surface lose its wet shine and become firm to the touch, signaling readiness for storage or gifting. Storing too early can result in smudged toppings, so patience ensures an attractive final product.
- Store in an air tight container for up to 5 days: Proper storage preserves texture and flavor, keeping the cookies chewy and the toppings intact. Layer with parchment if stacking to prevent sticking, and keep them at room temperature for the best bite. Avoid refrigerating as that can dry them out and dull the texture. A common storage mistake is using a loosely covered container, which lets air in and causes the cookies to stale faster.
Notes
- Make them softer by reducing the bake time by one minute and chilling the dough less, which keeps the centers tender and slightly underbaked for a chewier bite that stays moist for days.
- For a crisper cookie bake until the edges are a touch darker and let them cool fully on the sheet for a few minutes before transferring to a rack, which encourages a crisp exterior while the center still retains slight chew.
- Decorative drizzle use a piping bag or a zip top bag with a small snip to create finer chocolate lines, giving a more professional finish and allowing you to control thickness and pattern effortlessly.
- Storage tip layer with parchment between cookies in an airtight container to prevent sticking and preserve the appearance of the chocolate decorations when transporting or gifting.
- Batch prep freeze scooped dough on a tray, then transfer to a sealed bag; bake directly from frozen with an extra minute or two of baking time for fresh cookies on demand.