White Balsamic Custard Tart with Blueberries
White Balsamic Custard Tart with Blueberries is a creamy, elegant dessert with a crisp buttery crust and a bright, slightly tangy custard topped with fresh berries. The white balsamic reduction adds a subtle lifted acidity that balances the sweetness, creating an easy yet impressive finish for summer gatherings or relaxed weekend desserts. Make it ahead for stress free entertaining and gorgeous presentation.
Equipment
- Food Processor
- 9 inch Tart Pan with Removable Bottom
- Heavy Medium Saucepan
- Whisk
- Fine mesh sieve
Ingredients
- 1 1/4 C. flour 3 T. sugar 1/4 t. salt 1 stick chilled unsalted butter - cut into 1/2-inch cubes 1 large egg yolk 1 T. whipping cream Provides structure and a tender, flaky pastry when combined: whisk flour, sugar, and salt, then cut in chilled butter until coarse crumbs form; bind with egg yolk and whipping cream to create a rich tart dough that bakes to a delicate crust.
- 1/2 C. whipping cream 2 T. cornstarch 2 large eggs 4 large egg yolks 1 t. vanilla extract 1/2 C. white balsamic vinegar 3/4 C. water 3/4 C. sugar 1/2 stick unsalted butter Creates a smooth, silky custard with balanced sweet and tangy notes: whisk whipping cream, cornstarch, whole eggs, egg yolks, and vanilla, then gently cook with white balsamic, water, sugar, and butter until thickened to pour into the baked shell for a glossy filling.
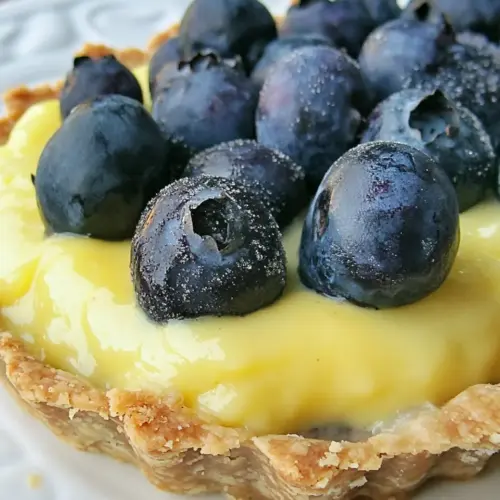
- Blueberries or any summer berry of your choice Offers bright, fresh flavor and a pop of color to finish: scatter blueberries or preferred summer berries over the cooled custard to add natural sweetness, slight acidity, and visual contrast to the tart.
Instructions
- For crust: Combine flour, sugar, and salt in processor; blend 5 seconds. Add butter and blend, using on/off turns, until coarse meal forms. Add egg yolk and cream. Using on/off turns, blend until moist clumps form. Gather dough into ball. Press dough evenly into 9-inch-diameter tart pan with removable bottom. Pierce dough all over with fork. Chill 1 hour.: The first impression should be of a uniformly mixed dry base, with the surface of the flour lightly dusted and the sugar dispersed. When you pulse in the processor, listen for brief, clean pulses rather than a continuous motor hum, which indicates overmixing. The aroma will still be mostly neutral at this point, with just a faint sweetness. This short blend distributes the salt and sugar so every bite of crust tastes balanced. If you overblend, the texture can become mealy and the finished crust may be tough, so err on the side of underworking here. A common mistake is running the processor too long, which warms the butter and changes the dough texture.
- Preheat oven to 375°F. Bake crust until golden, pressing with back of fork if crust bubbles, about 22 minutes. Cool.: As you add the chilled cubes of unsalted butter , you want to see pieces about the size of coarse crumbs or small peas. The visual clue is flecks of butter across the dry mix, which will produce a flaky texture after baking. The sound should be intermittent pulses rather than a constant high pitch. You will not yet smell anything buttery or rich because the butter is cold, but the tactile cue of small butter pieces is critical. If you get a uniform paste, that means the butter melted into the flour, and the crust will be dense rather than flaky. Avoid warm hands and a hot processor bowl to prevent this issue.
- For filling: Stir cream and cornstarch in medium bowl until cornstarch dissolves. Add eggs, egg yolks, and vanilla; whisk to blend.: At this stage the dough begins to come together into moist clumps that hold when pressed. The texture should be slightly tacky but not wet, and you will notice the mixture start to cohere when pinched between fingers. The presence of the egg yolk and whipping cream brings sheen and suppleness. If the dough feels crumbly and will not hold, it is too dry; add a teaspoon of cold cream at a time. Conversely, if it becomes sticky, you have added too much liquid. Mixing just until clumps form is essential to maintain flakiness after baking.
- Boil vinegar in heavy medium saucepan until reduced to 1/4 cup, about 3 minutes. Add 3/4 cup water, sugar, and butter. Stir until butter melts; return to boil. Gradually whisk vinegar mixture into egg mixture; return to pan. Whisk until custard thickens and boils, about 1 minute. Strain into bowl; cool. Spread custard in prepared crust. Cover and chill tart at least 3 hours and up to 1 day.: The dough should feel cool and slightly firm when you gather it into a ball, and pressing it into the tart pan is tactile therapy, smoothing it until it forms an even layer with no thin spots. Use the pad of your hand to press up the sides and across the bottom, aiming for consistent thickness so it bakes evenly. When you pierce the surface with a fork, the tiny holes allow steam to escape and prevent bubbling. Chill for one hour to relax the gluten and firm the butter, which helps keep the crust crisp. A common mistake is skipping the chill, which can cause the crust to shrink or become tough while baking.
- For topping: Cover with berries and then cover loosely and chill until ready to serve. (Can be made up to 6 hours ahead.): Preheat to ensure the oven is hot and stable, which promotes good oven spring for the crust. As the tart bakes you will see the edges turn a warm golden color and the aroma of butter will become more prominent. If bubbles form, gently press them down with the back of a fork to maintain an even surface. Baking about 22 minutes should yield a crisp, evenly browned shell. Once out of the oven, let the crust cool to stop carryover cooking and to protect the custard from melting when added. A common error is opening the oven frequently, which causes temperature fluctuations and uneven browning.
- For filling Stir cream and cornstarch in medium bowl until cornstarch dissolves Add eggs egg yolks and vanilla whisk to blend: When you whisk the whipping cream with cornstarch , ensure the cornstarch is fully dissolved to prevent lumps in the finished custard. Adding the eggs and extra egg yolks creates a rich base; whisk until the mixture is smooth and slightly glossy from the vanilla extract . The mixture should smell mildly sweet and vanilla scented, not eggy. Proper blending here leads to a silky custard that sets consistently. A frequent mistake is adding hot liquid directly to eggs too quickly, which can scramble them; temper gently as directed later.
- Boil vinegar in heavy medium saucepan until reduced to 1/4 cup about 3 minutes Add 3/4 cup water sugar and butter Stir until butter melts return to boil: Reducing the white balsamic vinegar concentrates its flavor while mellowing its sharpness, producing a rounded acidity that complements the custard. You will see the vinegar bubble and steam as water content evaporates, and the aroma will shift from sharp vinegar to a deeper, almost sweet tang. After reduction, adding the water , sugar , and unsalted butter creates a glossy syrup; the butter melting into the syrup gives it a silky mouthfeel. Return to a gentle boil to meld flavors. Avoid a violent boil which can scorch the mixture and create off flavors.
- Gradually whisk vinegar mixture into egg mixture return to pan Whisk until custard thickens and boils about 1 minute Strain into bowl cool: Temper the eggs by adding the hot vinegar syrup gradually while whisking constantly so the eggs warm without curdling. The mixture should become smooth and slightly fragrant, and when returned to the pan and heated, the custard will thicken and then reach a gentle boil that signals set. You will notice the custard coating the back of a spoon and you can draw a line with your finger through it. Straining removes any tiny bits of cooked egg or coagulated solids for a silky final texture. Overcooking at this stage will yield a grainy custard, so watch the temperature and remove promptly once it thickens.
- Spread custard in prepared crust Cover and chill tart at least 3 hours and up to 1 day: When you spread the cooled custard into the baked shell, use a spatula to create a perfectly even surface. The custard should be pourable but thick, and spreading should be smooth without drips. Covering and chilling allows the custard to fully set and the flavors to marry; chilling for at least three hours is important for a stable slice. The texture transforms into a dense yet creamy slice that holds its shape. A mistake is slicing too soon, the custard may still be soft and not hold clean slices.
- For topping Cover with berries then cover loosely and chill until ready to serve: Arrange the blueberries across the custard in a single layer or as you prefer for presentation. Their coolness contrasts with the custard and their juices add a bright note with each bite. Cover loosely to protect the tart while avoiding moisture buildup that could make the crust soggy. Chill until serving; berries will stay fresh for several hours when refrigerated. Do not add berries too far in advance if they are very ripe, as they may release juice and soften the surface.
- Can be made up to 6 hours ahead: This line is a helpful finishing note that means you can assemble and refrigerate the topped tart a few hours before serving without loss of quality. The tart retains its texture and flavor for several hours, making it ideal for events. Keep it chilled and protected from strong odors. A common mistake is leaving it out at room temperature too long, which can affect texture and freshness, especially with berry toppings.
Notes
- Keep everything cold for the crust When you cut the unsalted butter into the flour, the goal is to maintain visible pieces of butter. Cold butter creates steam pockets as it melts in the oven, which gives the crust a flaky structure. Use a chilled bowl and work quickly to prevent warming. If the dough feels too warm, pop it in the fridge for 15 minutes before pressing into the pan.
- Use a heavy bottom saucepan for reduction Reducing the white balsamic vinegar on a heavy pan helps distribute heat evenly and avoid hotspots that scorch the vinegar. Stirring occasionally and monitoring the reduction by volume helps you hit the 1/4 cup mark precisely. Scorched vinegar will impart a bitter note, so err on the side of a gentle simmer.
- Tempering is non negotiable When combining a hot syrup with eggs, pour a small stream into the eggs while whisking vigorously to slowly raise their temperature. This prevents curdling and keeps the custard smooth. Once tempered, adding the mixture back to the pan and cooking gently until it just thickens will yield the best texture.
- Strain the custard for silkiness Passing the cooked custard through a fine mesh sieve captures any tiny coagulated bits and ensures a perfectly smooth surface in the tart. This extra step takes minutes and elevates the final texture dramatically.
- Chill fully for clean slices Refrigerate the filled tart for at least three hours to let the custard firm. This makes slicing much easier and prevents a runny presentation. If you need to slice sooner, running a warm knife blade between cuts can help, but waiting is the superior option.
- Top with berries just before serving if very ripe Fresh blueberries look best and retain texture when added close to serving time. If your berries are particularly juicy, add them shortly before guests arrive to avoid sogginess on the custard surface.