Weeknight Taco Stuffed Avocados
Weeknight Taco Stuffed Avocados are creamy, crunchy, and ridiculously easy, combining seasoned ground beef with ripe avocados, melty cheddar cheese, and fresh tomatoes. This easy weeknight dinner offers smoky spices, bright lime, and crisp tortilla chips for texture, making it an instant family favorite. Make it for a fast summer meal that feels celebratory and satisfying every time.
Equipment
- Skillet
- Wooden Spoon
- Shaker cup
Ingredients
- 1 pound 85% to 93% lean ground beef Brown thoroughly and crumble to form the savory protein base, seasoning as it cooks and draining excess fat for a lean filling that holds spice well.
- 1 teaspoon ground cumin Add warm, earthy flavor and a subtle citrus-like undertone when sprinkled into the beef; grind evenly to distribute aroma and deepen the taco profile.
- 1 teaspoon smoked paprika Introduce smoky, slightly sweet notes that complement the cumin and enhance the grilled-taco character when mixed with the cooked meat.
- 1/2 teaspoon garlic powder Provide a mellow garlic essence without added moisture; sprinkle into the beef during cooking to build savory depth and roundness.
- 1/2 teaspoon chili powder Bring mild heat and traditional taco warmth; incorporate into the seasoning blend to create a balanced, Mexican-inspired spice profile.
- 1/2 teaspoon salt Enhance overall flavors and heighten taste perception when measured carefully to avoid over-salting; balances the spices and meat.
- 1/2 teaspoon freshly cracked pepper Contribute bright, sharp contrast that lifts the richness of the beef; freshly cracked pepper adds a penetrating spice and aroma.
- 4 avocados Halve and pit to form creamy edible vessels that contrast the spiced meat; scoop slightly to create space for stuffing and add buttery texture.
- 1 lime Juice and zest to provide fresh acidity that brightens the rich filling; squeeze over avocados to prevent browning and add tangy lift.
- shredded lettuce, for topping Add crisp, mild freshness as a cool topping that provides textural contrast and lightens the overall richness of the stuffed avocados.
- 1 cup shredded cheddar cheese Melt or sprinkle for a gooey, salty finish that adds sharp dairy richness and helps bind the filling for a satisfying bite.
- 1 cup chopped tomatoes Fold in or spoon on top for juicy bursts and fresh, acidic notes that cut through the creamy avocado and savory meat.
- fresh cilantro, for topping Scatter chopped leaves to contribute herbal brightness and a fragrant finish that complements the other Mexican-inspired flavors.
- lime wedges, for serving Serve alongside to offer extra brightness and acidity; wedges let each diner adjust tanginess to taste and refresh the palate.
- tortilla chips, for topping Crumble or serve whole to add crunch and a salty contrast; chips provide additional texture and scoopability for enjoying the stuffed avocados.
Instructions
- Heat a skillet over medium heat. With ground beef, I rarely add any oil to the skillet because it tends to be fattier. If needed, you can add 1 teaspoon of olive oil (of your oil of preference). Once the skillet is hot, add the ground beef and break it apart with a wooden spoon.: When the pan hits temperature you will notice a faint shimmer on the surface if it is seasoned or a dry heat if it is stainless, that signals readiness. The right heat is important because it helps the ground beef brown quickly rather than stew in its juices, producing a deeper flavor through the Maillard reaction. You may hear a soft sizzle the moment the meat touches the pan, and that is a good sign. A common mistake is using too low heat, which results in pale, steamed meat instead of flavorful browned bits. If the pan smokes, reduce the heat a touch and allow it to cool slightly before adding meat.
- Cook, stirring and breaking apart the beef often, until it begins to brown. Add in the cumin, paprika, garlic powder, chili powder, salt and pepper. Stir well to disperse all the seasonings. Cook until the beef is just browned.: The rendered fat will begin to appear as the ground beef warms, pooling slightly and carrying those umami notes. Let the meat sit briefly after first added so it can develop a sear, then break it apart to expose fresh surface for browning. The smell will change from raw to richly meaty and slightly caramelized as it browns. Avoid overcrowding the pan, because too much meat lowers the temperature and prevents proper browning. If you notice the beef releasing a lot of liquid without browning, increase the heat a touch and stir occasionally to evaporate excess moisture.
- I love the seasoned beef like this – it is not very saucy. For a saucy beef, I use a slurry to make my homemade ground beef saucy. Fill a shaker cup with 1/2 cup cold water or beef/vegetable stock. Add 1 1/2 tablespoons all-purpose flour, masa or whole wheat flour to the liquid and cover it. Shake for at least 30 seconds. With the skillet on low heat, slowly stream in the slurry while stirring with a wooden spoon. Stir often and cook over low for about 10 minutes.: As you break the meat apart you will see it shift color from pink to tan to brown, and little crisped bits should start forming. Those crisped edges carry intense flavor and are worth coaxing along by moving the meat gently rather than constantly stirring. If you keep the spoon moving too much you miss those caramelized notes. If you encounter very large clumps, press them down and let them sear briefly before continuing to break them up.
- Right before serving, slice the avocados open. I like to use the lime and spritz them all over with fresh lime juice to help slow the browning process. Sprinkle all over with salt and pepper.: The sound will be an active sizzle, and the aroma will turn deeply savory with hints of toasted notes. At this point add the ground cumin , smoked paprika , garlic powder , chili powder , salt and freshly cracked pepper so the spices can bloom in the hot fat. Stir well to disperse the seasonings into the meat so each morsel is flavorful. A mistake to avoid is adding spices too late, which keeps the aromas from fully developing; equally avoid burning the spices by adding them to an excessively hot pan.
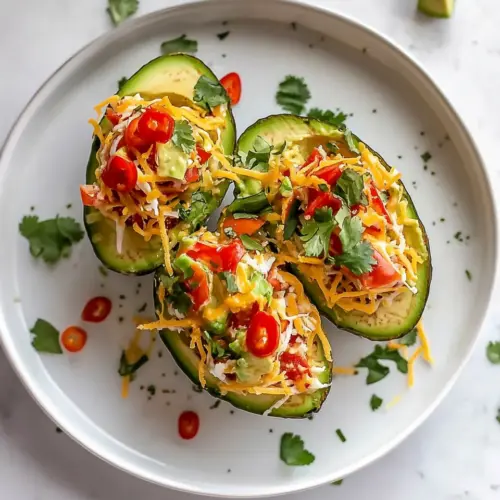
- Place the avocados and fill them with the ground beef mixture. Top with shredded cheese, lettuce, tomatoes, cilantro and another spritz of lime. Top with crushed tortilla chips. Serve immediately!: As you mix, notice the way the meat darkens and the pan picks up browned bits that will flavor the whole dish. The spices will release their oils, making the mix smell more complex, and a gentle steam may rise as moisture evaporates. If the mixture seems dry, add a splash of stock or water to help lift those browned bits from the pan, creating an intensely flavored base. Do not add too much liquid at once, or you will dilute the seasoning.
- Note: you can prep the beef and even chop the lettuce and tomatoes ahead of time to serve this. Just wait until right before serving to slice the avocado!: Once the meat reaches an even golden brown, taste a small piece to check seasoning balance. The texture should be tender yet slightly crisped at the edges. This level of browning ensures depth of flavor without dryness. Overcooking can dry the meat, and undercooking leaves it underdeveloped, so aim for steady, even color across the pieces.
- I love the seasoned beef like this, it is not very saucy: For those who prefer a saucier filling you can prepare a slurry to thicken the pan juices into a glossy coating. The slurry will change the texture from loose to clingy, which helps it stay in the avocado halves rather than falling out. A common pitfall when making a slurry is adding it too quickly, which can create lumps, so whisk it in gradually and keep the heat low.
- For a saucy beef, I use a slurry to make my homemade ground beef saucy: The slurry should be combined in a separate shaker cup so it disperses evenly. As you stream it into the skillet while stirring, the liquid will thicken and coat the meat, creating a glossy finish that carries the spices well. You will notice the aroma deepen as the flour cooks and the mixture reduces slightly. If the sauce becomes too thick, loosen it with a little warm stock or water. Avoid adding cold slurry to a very hot pan without stirring, as it can seize and form lumps.
- Fill a shaker cup with 1/2 cup cold water or beef/vegetable stock: Cold liquid helps the flour or masa hydrate evenly. The chilled temperature prevents clumping and allows a smooth mixture to form when shaken. You will hear the sloshing sound as you combine the flour with the liquid, indicating an even emulsion. If the slurry feels gritty after shaking, let it rest a moment and shake again to fully dissolve any pockets of flour.
- Add 1 1/2 tablespoons all-purpose flour, masa or whole wheat flour to the liquid and cover it: The choice of thickener slightly changes the flavor and texture, with masa giving a subtle corn note. When these dry ingredients hydrate, they form the structure that will thicken the meat juices. A well-made slurry should be smooth and pourable. If you notice lumps, pass the mixture through a fine mesh strainer before adding to the pan to ensure a silky sauce.
- Shake for at least 30 seconds: This vigorous shaking integrates the flour and liquid so there are no pockets that will create gluey clumps when heated. The shaking also helps aerate the mix, making it pour more uniformly. A steady shake produces a consistent texture, which is important for a glossy sauce that clings to the ground beef . Do not skip this step, as an uneven slurry leads to uneven thickening and textural surprises.
- With the skillet on low heat, slowly stream in the slurry while stirring with a wooden spoon: The gradual addition allows the liquid to incorporate without shocking the pan, which prevents lumps and ensures even thickening. As you stir, you will observe the liquid transforming into a sheen that coats the meat, and the aroma will evolve into a deeper, more rounded profile. If you pour too quickly, the flour may clump; if the sauce becomes lumpy, remove the pan from heat and whisk briskly to smooth it out.
- Stir often and cook over low for about 10 minutes: Gentle simmering allows the starches to cook through and the flavors to meld. You will see the mixture reduce slightly and thicken to a clingy consistency that will stay put inside the avocado halves. Low, patient cooking avoids a pasty texture and lets the spices integrate fully. A common error is turning the heat too high, which can break down the sauce and make it gluey instead of silky.
- Right before serving, slice the avocados open: Cut the avocados in half lengthwise and remove the pits carefully to preserve the boat shape. The flesh should be creamy and pale green, offering a visual contrast to the rich ground beef . I like to scoop a little more flesh if the cavity needs enlarging, creating more room for the filling. If the avocado is overly soft or brown, it may be past its best, so choose firmness accordingly.
- I like to use the lime and spritz them all over with fresh lime juice to help slow the browning process: The citrus not only slows oxidation but also brightens the overall flavor. A light spritz will leave tiny droplets on the surface that shimmer and add a zesty note. If you skip this, the exposed avocado surface may brown faster, which affects presentation though not safety. Too much lime can overwhelm the delicate avocado flavor, so use judiciously.
- Sprinkle all over with salt and pepper: Seasoning the cut surface enhances the avocado 's natural flavor and ties it to the seasoned ground beef . The grains of salt dissolve into the flesh, amplifying richness, while the pepper adds a sharp finish. Over-salting is easy with small, concentrated surfaces, so start with a light sprinkle and adjust after tasting a sample assembly.
- Place the avocados and fill them with the ground beef mixture: Spoon the warm seasoned ground beef into the avocado cavities so the heat slightly softens the surrounding flesh. The visual contrast of green and browned meat is appealing and indicates readiness. If the filling is too loose, a thicker slurry or slightly more reduction will help it stay contained. Be careful not to overfill, as the seed cavity size varies by fruit.
- Top with shredded cheese, lettuce, tomatoes, cilantro and another spritz of lime: Layering toppings adds flavor complexity and texture. The cheddar cheese will soften against the warm meat, the shredded lettuce offers crunch, and the chopped tomatoes bring juicy acidity. Fresh cilantro adds herbal brightness. Avoid piling on too many wet ingredients which can weigh down the avocado and dilute the concentrated flavors.
- Top with crushed tortilla chips: The final crunch of crushed tortilla chips elevates each bite and plays off the creamy avocado . Wait until the last moment to add them so they remain crisp. If you add them too early, they will soften and lose their impact. Scatter them just before serving for the best texture.
- Serve immediately: This dish is best enjoyed right away to preserve the contrast between warm meat and cool toppings. A last quick squeeze of lime before eating sharpens the flavors and ties everything together. If not served immediately, the avocado may brown and the chips may lose crunch, diminishing the intended experience.
- Note, you can prep the beef and even chop the lettuce and tomatoes ahead of time to serve this: Advance prep saves time on busy nights while keeping the final assembly fresh. Store the components separately and hold off on slicing the avocados until you are ready to eat. A common oversight is pre-slicing the avocados ; this leads to discoloration and a less vibrant presentation.
Notes
- Prep the beef ahead, cook and cool the seasoned ground beef and store it in the refrigerator for up to two days to make assembly a breeze on busy nights.
- Adjust spice intensity, taste the cooked ground beef and add more chili powder or smoked paprika if you like it smokier or hotter, remembering that the cheddar cheese will add saltiness.
- Keep avocados fresh, slice them last and spritz with fresh lime to slow browning and maintain a bright presentation.
- Control sauce thickness, if using a slurry add it gradually and cook gently until it reaches a clingy consistency that will stay in the avocado cavity.
- Serve components family style, set the fillings and toppings out so everyone can build their own avocados, making it interactive and customizable.