Vintage Carrot Cake
Vintage Carrot Cake is a moist, tender layered cake with creamy cream cheese frosting and toasted walnuts. This nostalgic dessert is warmly spiced, easy to slice, and perfect for gatherings or a cozy tea time. The balanced sweetness and silky frosting make it a must-bake for anyone seeking a reliable, crowd pleasing dessert.
Equipment
- Stand mixer
- Box grater
- 9-inch Round Cake Pans
- Parchment Paper
- Wire Rack
- Skillet
Ingredients
- 4 large eggs, room temp Whisk together at room temperature to provide structure and moisture; beaten until pale and slightly thickened they help trap air for lift in the cake batter.
- 1 cup granulated sugar Sweeten and tenderize the crumb while aiding browning during baking; granulated sugar also helps stabilize beaten eggs and controls texture.
- 1 cup vegetable oil or extra light olive oil Moisten the batter and contribute to a tender, rich mouthfeel; neutral-flavored oil keeps the cake soft and extends its shelf life.
- 1 tsp vanilla extract Enhance overall flavor with warm, familiar aroma; a small amount balances sweetness and rounds out the cake's taste profile.
- 2 cups all-purpose flour, *measured correctly Provide the bulk and framework for the cake; properly measured all-purpose flour delivers the right protein for a tender yet sturdy crumb.
- 1 tsp baking soda React with acidic ingredients to produce carbon dioxide for leavening; baking soda supports rise and helps achieve a light texture.
- 1/4 tsp baking powder Contribute a modest additional lift and fine crumb refinement; baking powder complements baking soda for consistent aeration.
- 1 lb carrots, about 3 cups, grated on the large holes of a box grater Add natural sweetness, moisture, and texture when grated; carrots bring both flavor and visual warmth to the cake batter.
- 16 oz cream cheese, softened at room temp Create a smooth, tangy frosting base when softened and beaten; cream cheese adds richness and balances sweetness in the icing.
- 1 stick, 8 Tbsp or 113 grams of butter, softened at room temp Incorporate creamy richness and structure into the frosting; softened butter helps create a spreadable, stable cream cheese frosting.
- 2 cups powdered sugar Sweeten and thicken the frosting to a smooth, pipeable consistency; powdered sugar also helps stabilize and set the icing.
- 1 1/2 cups walnuts, toasted on a skillet and coarsely chopped Introduce crunchy texture and nutty flavor when toasted and chopped; walnuts provide contrast and depth in both batter and garnish.
Instructions
- Prep: Preheat oven to 350˚. Butter two 9" round cake pans and line the bottoms with parchment paper.: Preheat oven to 350˚. Butter two 9" round cake pans and line the bottoms with parchment paper : The kitchen should smell faintly warm as the oven reaches 350˚ , a signal the environment is ready for the batter. Buttering the pans and lining them with parchment paper ensures a clean release, and if you run a knife around the edge after cooling, the layers come out without tearing. If you skip greasing properly, the cake can cling and break when you remove it, so take the extra minute to grease thoroughly and press the parchment flat to avoid bubbling that creates uneven bottoms. Visually, the prepared pans should look evenly coated with a thin sheen of butter, and the parchment should sit flat against the base.
- In a stand mixer, whisk 4 eggs and 1 cup sugar on high speed 3 min until thick and fluffy. With mixer on medium speed, add 1 cup oil in a steady stream. Whisk in 1 tsp vanilla.: As the eggs and sugar whip, you will notice the mixture lighten in color and gain volume, turning into a pale, ribbon forming batter that falls slowly from the whisk. Adding the oil in a thin stream while mixing helps emulsify the batter, preventing separation and creating a smoother mouthfeel. The scent will become gently sweet and rounded once the vanilla is incorporated. A common mistake is rushing the initial whisking, which reduces aeration and yields a denser cake; be patient for the full three minutes to build lift. The texture at this point should be glossy and slightly thickened, not runny.
- Sift 1 tsp baking soda and 1/4 tsp baking powder into 2 cups of flour and whisk the dry ingredients together well. With the mixer on medium low, add the dry ingredients to the wet ingredients in fourths, scraping down the bowl as needed. Once flour is fully incorporated, use a spatula to fold in 3 cups of carrots just until evenly combined.: Sifting the flour and leaveners aerates them, ensuring even distribution so pockets of soda or powder do not create odd bursts of flavor or uneven rise. Add the dry mix gradually, on low speed, to avoid a flour cloud and to preserve the air you built in the eggs. When you fold in the grated carrots , use a spatula to combine gently; you should see orange flecks throughout the batter and feel a slight resistance as the vegetables integrate. The batter should be cohesive but not overworked. Overmixing at this stage activates gluten, which makes the crumb tough, so stop folding once everything looks evenly moistened. You should sense the batter thickening and smelling mildly of sweet baked carrot and vanilla.
- Divide dough in to two round baking pans and bake at 350˚ for 30-35 min or until toothpick comes out clean (mine was perfect at 30 min). Let cake layers cool in their cake pans for 10 minutes then remove from pans and cool to room temp on a wire rack before slicing layers in half.: When transferring the batter to the prepared pans, spoon it evenly rather than dumping, and tap the pans lightly to release large air bubbles. As the cakes bake the top will change from glossy to matte and develop a light golden edge, and you may smell a warm, slightly caramel scent. Test with a toothpick near the center; it should emerge with a few moist crumbs but not wet batter. Cooling first in the pan for 10 minutes lets the crumb set so the layers do not crack when inverted. Remove gently and place on a wire rack to reach room temperature. A common error is slicing while still warm, which causes tearing and compressed layers, so be patient and cool fully before handling.
- Once cake layers are at room temp, make your frosting: With the whisk attachment on med/low speed, cream together 1 stick butter with 2 cups powdered sugar, scraping the bowl as needed (2-3 min).: With the whisk attachment on med/low speed, cream together 1 stick butter with 2 cups powdered sugar, scraping the bowl as needed (2 to 3 min) : As you cream butter and powdered sugar, the mixture will look light and slightly aerated, resembling soft clouds. The powdered sugar dissolves into the butter, smoothing the texture and adding body to the frosting. Scrape the bowl periodically to ensure no pockets of sugar remain, because undissolved sugar leaves a grainy mouthfeel. If the blend appears too stiff, a tiny splash of milk can loosen it, but add sparingly. The aroma at this point is rich and sweet, and you should aim for a creamy spreadable texture, not runny nor rock hard.
- With the mixer on medium speed, add cream cheese, one chunk at a time. After all the cream cheese is in, set the mixer to high speed and beat the frosting until smooth, fluffy and no lumps remain (5 minutes), scraping down the bowl a couple of times to make sure you don’t have stray cream cheese stuck to the bowl.: Adding the softened cream cheese in increments prevents lumps and helps the frosting emulsify into a velvety cream. Once you beat on high, the frosting will transform visually into a lighter, cloudlike texture, and you will notice a tangy sweet aroma. Scrape often to incorporate any bits stuck to the sides, because lumps of cold cream cheese create an uneven spread. A common pitfall is using cold cream cheese, which will resist mixing and leave little beads in the frosting; always soften beforehand for a flawless finish.
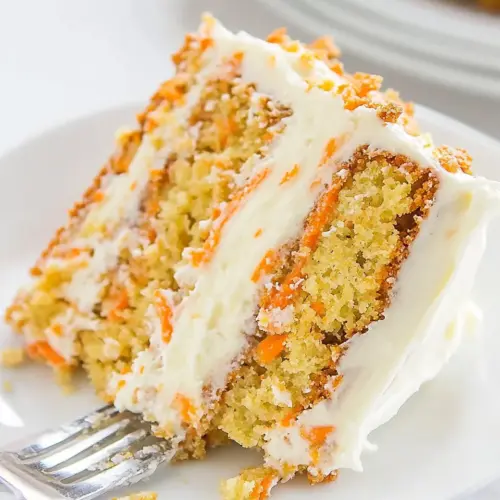
- Place the first layer, cut-side-up on a cake platter. Spread enough frosting to cover the top and sprinkle with 2-3 Tbsp of chopped walnuts. Repeat with remaining cake layers and spread remaining frosting around the sides. Decorate the top layer with remaining chopped nuts around the top border and sides of the cake.: When assembling, a thin crumb coat helps seal in crumbs and create a neat outer appearance. The first layer placed cut-side-up gives a stable base and shows the interior texture once sliced. Spread the frosting with a flexible spatula in an even motion so the surface becomes smooth, and the chopped walnuts add textural counterpoints. The final decoration should look intentional and rustic, with a ring of nuts on the top border and more pressed along the sides. Be mindful of overfilling between layers, which can cause slippage; if that happens, chill the cake briefly to firm the layers before finishing the sides. The finished cake should give off a pleasing combination of creamy tang and nutty warmth when you slice into it.
Notes
- Time saver Use a food processor with the grating attachment to shred the carrots quickly and uniformly, which saves prep time without changing texture.
- Oil choice Use a neutral oil like vegetable or extra light olive oil to keep the cake moist while allowing the carrot and walnut flavors to shine through.
- Frosting firmness If your frosting seems soft, chill it for 15 to 20 minutes and then whip again to regain body before spreading.
- Storage tip Store the finished cake covered in the refrigerator for up to four days to maintain the frosting and prevent the walnuts from going stale.
- Make ahead The layers can be baked and frozen un-iced for up to one month; thaw fully in the fridge before assembling to avoid condensation on the frosting.