Vegetarian Roasted Eggplant Cannelloni
Vegetarian Roasted Eggplant Cannelloni is a creamy, savory pasta bake featuring silky roasted eggplant, tangy Italian tomato sauce, and a luscious bechamel finish. This easy weeknight dinner offers comforting textures and bright herb notes, perfect for entertaining or a cozy family meal. Make it for its rich mouthfeel and simple techniques that deliver impressive results.
Equipment
- Oven
- Baking Tray
- Food Processor
- Large Pot
- Piping Bag
- Baking Dish
Ingredients
- 6 Cannelloni pasta Provide structure and pasta tubes for stuffing; cook until al dente then fill with the eggplant mixture before baking to hold the sauce and cheese together. Offer a hearty, comforting carbohydrate base that absorbs flavors from the bechamel and tomato sauce during roasting. Select a good-quality dry cannelloni or tubular pasta to ensure it doesn’t break apart while assembling.
- 150 ml bechamel sauce Coat the filling and pasta with a creamy, silky layer that adds richness and moisture; pour over assembled cannelloni to create a smooth, lightly browned top during baking. Balance the acidity of the tomato sauce and provide a velvety mouthfeel that complements the roasted eggplant. Warm gently before assembling so it spreads evenly without curdling.
- 400 g Italian tomato sauce Provide an acidic, savory tomato base that layers flavor and moisture around the stuffed pasta; simmer to concentrate sweetness and deepen the sauce. Combine with herbs or seasoning to infuse the dish and prevent dryness while the cannelloni bakes. Use a well-seasoned Italian-style tomato sauce for authentic taste and consistent texture.
- 2 tablespoon Italian-style hard cheese, grated (or Parmigiano Reggiano) Add umami and salty depth when grated over the finished bake, promoting a golden crust and complementary sharpness to the creamy bechamel and sweet tomato sauce. Sprinkle before or after baking to enhance overall flavor complexity and provide a slightly granular texture contrast. Choose a high-quality hard Italian cheese for best melting and seasoning properties.
- a bunch of fresh basil leaves, to decorate Garnish the plated cannelloni with bright, aromatic leaves to add fresh herbal fragrance and a pop of color that contrasts with the rich baked components. Tear or chiffonade leaves just before serving to preserve their vibrant aroma and visual appeal. Use abundant, fresh basil to reinforce classic Italian flavor profiles and lighten each bite.
- 3 medium-large long eggplants / aubergines Transform into the main vegetarian filling when roasted, peeled, and chopped or mashed; provide a smoky, sweet, and meaty texture that mimics traditional fillings. Salt and drain slices after roasting to remove excess moisture, then combine with garlic and seasoning to build a robust interior for the cannelloni. Select firm, meaty eggplants and cook until tender to avoid watery fillings.
- extra virgin olive oil Dress roasted eggplant slices and the baking dish with a drizzle to prevent sticking and enhance caramelization; contribute fruity, peppery flavors that marry the other components. Use sparingly to control richness and help the outer edges crisp slightly while baking the assembled pasta. Opt for extra virgin olive oil for its authentic flavor and good heat stability at moderate oven temperatures.
- sea salt and black pepper Season the eggplant, sauce, and assembled bake to taste to elevate flavors and control balance between sweet, salty, and bitter notes; grind pepper for a subtle warm edge. Apply salt judiciously to draw moisture from eggplant during roasting and to season the filling evenly. Adjust black pepper toward the end of cooking to preserve its aromatic qualities.
- 1 garlic clove, optional Infuse the eggplant or tomato sauce with a mild, aromatic garlic note when minced and sautéed briefly; use optionally to add depth without overwhelming the dish. Add early to the sauté to mellow sharpness, or stir into the filling for a fresher, more pronounced taste depending on preference. Use sparingly if sensitive to strong garlic flavor, as it can dominate delicate basil and cheese.
Instructions
- Preheat oven to 180 C/360 F/160 fan.: When you open the oven you should feel gentle warmth radiating, a steady, even heat that will coax sugars out of the eggplant as it roasts. Preheating ensures the vegetables begin caramelizing immediately rather than steaming, which is essential for concentrating flavor. A common mistake is skipping this step, which leads to pale, under roasted flesh. If your oven runs hot or cool, use an oven thermometer to confirm the actual temperature before you place the pan inside. You'll know the oven is ready when there is a faint dry warmth in the air and it holds temperature steadily.
- Cube the eggplant, or cut the veggie horizontally in two and lightly score each half. Arrange your eggplants over a non-stick baking tray, add garlic, season with a generous glug of olive oil, sea salt and black pepper.: Soft sizzling and a faint sweet smell start as the eggplant surfaces interact with the oil during roasting, and cutting into uniform pieces helps them cook evenly. Cubing gives more surface area and faster caramelization, while halved and scored pieces become silky with pockets of roasted flesh. A frequent error is uneven cuts, which results in some pieces burning while others remain undercooked. Try to keep pieces similar in size for predictable timing, and arrange them in a single layer so each piece browns rather than steams.
- Bake in the oven for 20 min or until soft and cooked through. Then simply pop them in a powerful food processor and blend until creamy.: You should hear a faint hiss when the oil hits the hot tray and smell the fruity aromatics of the extra virgin olive oil , which helps the surface caramelize. Seasoning early assists in drawing out moisture and seasoning the flesh through, creating a more concentrated flavor. Avoid crowding the tray, which leads to steaming instead of roasting, and resist the urge to add too much oil, which can make the pieces greasy. If you notice the pieces sitting in pooled oil, blot slightly before roasting to maintain crisped edges.
- Fold the cannelloni in a large pot of lightly salted boiling water. Cook for about 1-2 min, they should be still very hard. Drain and pat dry on a kitchen cloth.: As the eggplant roasts you will see the edges turn a deepened brown and the flesh collapse slightly, giving off a warm, roasted aroma that is rich and savory. The texture should become tender enough that a fork slides in easily, indicating readiness for blending. A common problem is under roasting, leaving an off taste and watery texture; if pieces are still firm, give them extra time in five minute increments. You want deepening color without charring to preserve sweetness rather than bitterness.
- Fill a piping bag with the roasted eggplant sauce.: The bowl will fill with warm steam and the sound of the processor creates a smooth, steady whir as the roasted eggplant transforms into a velvety filling. The creaminess is achieved by pulsing and scraping down the sides until no large chunks remain, and the residual heat helps loosen the mixture. Over processing can make the mixture too thin, while under processing leaves an inconsistent mouthfeel, so aim for a homogenous, slightly thick cream that holds its shape. Be cautious when handling hot ingredients in a processor; allow a moment for the steam to escape to avoid splatter.
- Hold each cannelloni up on your palm to avoid the filling to escape and fill with the prepared mixture.: The water should be at a lively boil, with rolling bubbles that create a gentle motion in the pasta without agitation that could tear the tubes. Briefly cooking the cannelloni softens the exterior so they can be filled without bursting, but you want them to remain quite firm to avoid collapsing when filled. Overcooking at this stage leads to mushy tubes that break apart; check a test piece to ensure it still has resistance. Drain promptly and lay them on a clean kitchen cloth to dry, which helps the filling adhere and prevents slipping during assembly.
- Brush the base of a baking dish with a little extra virgin olive oil and tomato sauce.: The short blanch brings warmth and flexibility while keeping the center firm, so the tubes keep their shape during filling and baking. You will feel a slight give when you bite into a test piece, demonstrating the right level of doneness. A typical mistake is leaving them too long which results in fragile shells that split; set a timer and remove them at the earliest sign of pliability. Pat them dry gently to remove excess surface moisture for easier handling.
- Arrange the filled cannelloni on top and pour the remaining tomato sauce over them.: The pasta should be barely damp, not wet, so the filling adheres and the baking dish does not become watery. Patting also prevents sliding and helps you control the final texture of the dish. If you notice puddles on the towel, carefully blot until the surface feels tacky rather than soaked. Leaving them too wet will dilute sauces and create a soggy result, so take the time to dry well.
- Top with bechamel or my quick ricotta sauce and some grated parmesan cheese.: The warm, aromatic filling will glide into the bag and the small, steady sound of the filling moving through the nozzle makes assembly easy and precise. A piping bag gives you control and prevents overfilling or tearing the tubes, and it helps distribute the blend evenly for consistent bites. If the mixture seems too thick to pipe, loosen it with a teaspoon of water or reserved bechamel, but avoid making it runny. Using a wide nozzle helps prevent clogging from any fibrous bits of eggplant .
- Bake in the oven for 15-20 min, until the pasta is cooked through and the edges are slightly crispy. Scatter basil leaves over the top and serve immediately.: You will feel the weight of the tube as it fills and hear a quiet suction as it accepts the creamy interior, which should settle without spillage. Holding it gently in your palm stabilizes the pasta and gives you tactile feedback on how full it is. Overstuffing can split the pasta, while under filling gives uneven bites, so aim for a balanced firmness when you squeeze. If any filling squeezes out, wipe the edge and proceed, as neatness will not affect taste but improves presentation.
- Brush the base of a baking dish with a little extra virgin olive oil and tomato sauce: The glossy brush strokes create a saucy bed that prevents sticking and ensures the cannelloni bake in an even layer of moisture, which keeps them tender. The oil adds flavor at the base and helps the edges brown slightly, while the tomato sauce provides acidity and steam for even cooking. Skipping this step often leads to dry spots on the bottom of the bake, so be generous enough to cover the dish without pooling. Smooth the sauce so the pasta sits evenly and doesn’t tip during baking.
- Arrange the filled cannelloni on top and pour the remaining tomato sauce over them: As you place the tubes, you will hear a soft settling and see the sauce nestle around each piece, which signals balanced coverage. This layer seals in moisture and creates pockets of saucy goodness between tubes, leading to a cohesive casserole. Make sure each tube gets an even coating of sauce; uneven coverage can cause drier patches. If you spot gaps, spoon a little extra sauce into those spaces before adding the topping.
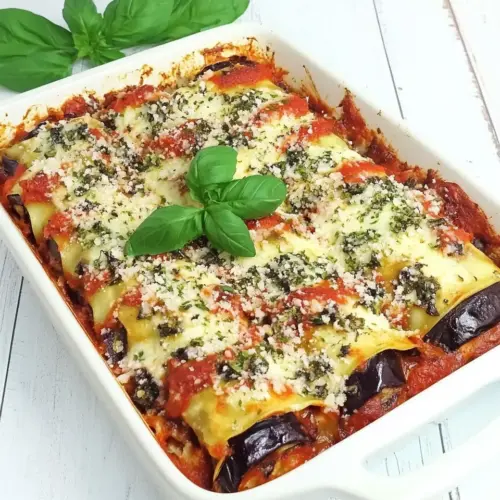
- Top with bechamel or my quick ricotta sauce and some grated parmesan cheese: The creamy layer will spread into the nooks and bubble as it heats, creating a golden, slightly blistered top that contrasts with the tangy tomato beneath. The cheese melts and browns, offering savory crunch on the very top while the bechamel adds silkiness throughout. A common mistake is applying too thick a top layer which delays baking and prevents the pasta from cooking through; keep it moderate and evenly spread. Watch for a gentle golden hue rather than deep browning for the best flavor balance.
- Bake in the oven for 15 to 20 min, until the pasta is cooked through and the edges are slightly crispy: You will notice bubbling around the edges and a delicate toasting on the top when it is ready, with a fragrant mix of roasted eggplant and tomato aromas filling the kitchen. The short final bake melds flavors and crisps the exposed pasta edges, creating textural contrast. Avoid overbaking which can dry out the filling; aim for warm, bubbling sauce and a lightly bronzed top. If the top browns too quickly, tent the dish with foil for the remaining time.
- Scatter basil leaves over the top and serve immediately: Fresh basil adds a cool, aromatic lift that complements the warm, savory casserole, and the contrast in temperature and texture makes each bite more interesting. Serve while hot so the bechamel and sauce are still soft and luscious, which creates that satisfying, saucy spoonful. Letting it sit too long will firm the filling and dull the basil aroma, so plate promptly for the best experience. Garnish just before serving to keep the leaves vibrant and fragrant.
Notes
- Smokier flavor: Roast the eggplant over a higher heat for slightly longer or add a brief char by broiling for a minute, which intensifies the smoky notes but watch carefully to prevent bitterness.
- Extra creamy filling: Stir a spoonful of reserved bechamel sauce into the blended roasted eggplant to make the filling silkier and more cohesive when piping into the tubes.
- Garlic forward: Roast the optional single garlic clove alongside the eggplant and blend it in for a mellow, baked garlic sweetness rather than a sharp raw bite.
- Cheese finish: Increase the grated Italian style hard cheese on top for a more pronounced savory crust, watching the oven so it browns evenly without burning.
- Prep ahead: Assemble the filled cannelloni and refrigerate them covered, then bake just before serving for a stress free entertaining option that only needs final heating.