Vegan Twice Baked Sweet Potatoes with Chili Lime
Vegan Twice Baked Sweet Potatoes with Chili Lime are creamy, slightly sweet, and bright with citrus. These twice baked sweet potatoes have a whipped tahini miso filling, a crisped top, and crunchy toasted pumpkin seeds, making them an easy weeknight dinner or elegant side. The balance of maple, lime, and chili makes them irresistibly flavorful, a reason to make them for guests or a cozy family meal.
Equipment
- Food Processor
Ingredients
- 3 small sweet potatoes, scrubbed (they should weigh around 200 grams each) Scrubbed and roasted to tender perfection, these small sweet potatoes provide the creamy, naturally sweet base for twice-baked filling; each should weigh about 200 grams to ensure uniform cooking and consistent portion sizes.
- 1/2 teaspoon ground cumin Ground cumin adds a warm, earthy undertone that complements the sweet potatoes and deepens the savory profile of the filling without overpowering the other spices.
- 1/2 teaspoon onion powder Onion powder brings concentrated savory and slightly sweet aromatics to the mixture, enhancing overall depth while staying smooth and well-integrated in the whipped filling.
- 1/4 teaspoon ground chilies OR red pepper flakes, or to taste Ground chilies or red pepper flakes contribute adjustable heat and subtle smokiness; add to taste to balance the sweetness and brighten the chili-lime theme.
- 2 tablespoons tahini Tahini provides a silky, nutty richness and helps bind the filling while contributing subtle bitterness that balances sweet, salty, and acidic elements.
- 1 tablespoon olive oil, plus extra Olive oil enriches the filling with healthy fats and smooth mouthfeel, and extra can be used to roast potatoes or finish the dish for added gloss and flavor.
- 1/2 teaspoon lime zest Lime zest delivers an intense citrus aroma and bright oils that lift the dish, cutting through richness and enhancing the chili-lime flavor profile.
- 1 teaspoon lime juice Lime juice supplies fresh acidity to balance sweetness and fat, adding a clean, tangy contrast that brightens the overall taste.
- 1 tablespoon maple syrup Maple syrup imparts natural sweetness and a hint of caramel complexity that complements the sweet potato while harmonizing with tahini and miso.
- 2 teaspoons light miso Light miso contributes savory umami and gentle saltiness, deepening flavor complexity and providing a rounded, fermented note to the filling.
- sea salt and ground black pepper, to taste Sea salt and ground black pepper season and sharpen the filling, allowing all other flavors to shine while providing essential taste balance.
- water, as needed Water adjusts consistency as needed, loosening the filling to achieve a smooth, pipeable or spoonable texture without diluting flavor when used sparingly.
- chopped toasted pumpkin seeds Chopped toasted pumpkin seeds add crunchy texture and nutty flavor contrast, plus a visual finish that enhances both mouthfeel and presentation.
- extra drizzles of maple syrup Extra drizzles of maple syrup provide a glossy sweet finish and optional caramel-like sweetness that can be added to taste for balance and visual appeal.
- extra lime zest Extra lime zest offers a finishing burst of vibrant citrus aroma and oil that elevates the final presentation and reinforces the chili-lime theme.
Instructions
- Preheat the oven to 400°F. Line a baking sheet with aluminum foil.: The smell of a warming oven gives you an immediate signal that the kitchen is about to transform. Preheating ensures the sweet potatoes start cooking evenly the moment they hit the heat, which promotes uniform tenderness. If you skip preheating, you risk uneven cooking where the exterior softens before the center is done. A common mistake is using warped foil that lets the potatoes sit unevenly, so smooth the foil and lay the potatoes flat for consistent contact.
- Prick holes all over the sweet potatoes with a fork. Place the sweet potatoes on a baking sheet and bake until tender, about 1 hour.: You will notice a fragrant, toasted sweetness filling the air as the skins darken and the flesh softens. Pricking helps steam escape so the skins do not split unpredictably. When they are ready, a fork should glide into the center without resistance, and the surface will have slight give when pressed. Avoid underbaking, which leaves a chalky center, and avoid overbaking, which can dry out the flesh. If your potatoes are unusually large, add time in ten minute increments and check for that tender fork test.
- Once the sweet potatoes are cool enough to handle, carefully cut them in half lengthwise.: The potatoes will release a warm, sweet steam when cut, and the exposed flesh will glisten. Cooling slightly makes scooping safer and helps the structure hold up. A sharp knife gives a clean edge, making presentation neater. A pitfall here is cutting too soon while they are scalding hot, which risks burns and a messy spooning process. Let them cool until you can comfortably handle them.
- Using a teaspoon measure or other small spoon, scoop out some of the cooked sweet potato flesh, leaving a good half inch border next to the peel. Place the scooped flesh in the bowl of a food processor. Once you’ve scooped all the sweet potato halves out, place them back on the foil-lined baking sheet.: The act of scooping creates a little cavity ready to be filled, and you will hear the soft scrape of flesh against the skin, a satisfying sound that tells you the texture is tender. Leaving a half inch border prevents the skins from collapsing and gives a nice vessel for the filling. If you scoop too aggressively, the shell can tear, so go gently. Save any stray bits of flesh for the filling bowl so nothing goes to waste.
- To the food processor, add the cumin, onion powder, ground chilies, tahini, olive oil, lime zest, lime juice, maple syrup, miso, salt, pepper, and start with 1 tablespoon of water. Run the food processor until you get a smooth, 'whipped' consistency and everything is completely mixed, adding more water by the tablespoon as necessary.: As the blades whirl, aromatic steam and bright citrus notes will rise, and the mixture should transform into a glossy, smooth mousse. That whipped texture is what gives the filling its light mouthfeel while still tasting rich. If you add water too quickly, the filling can become thin and watery, so add sparingly. A frequent error is under-seasoning after blending; always taste and adjust salt, lime, or maple to balance sweetness and acid.
- Spoon this mixture into the sweet potato halves, swooping the tops with the back of your spoon. Drizzle the tops with olive oil.: The spooning action provides a pleasing, sculpted top that browns attractively. When you drizzle a little olive oil, it helps the surface caramelize and adds a glossy sheen. The aroma of olive oil heating will mingle with maple and miso as the bake begins. Don’t overfill the cavities, which can spill and burn on the tray. If you want a rustic look, leave a small mound; for a formal presentation, smooth and level the tops carefully.
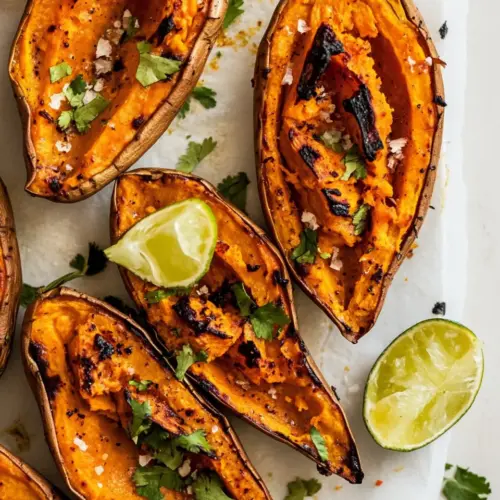
- Bake the filled sweet potato halves for 20-25 minutes, or until the filling has set and browned on top. Broil the tops for a minute. Serve hot with chopped pumpkin seeds, extra drizzles of maple syrup, and lime zest.: The kitchen will fill with a complex scent as sugars caramelize, and the tops should develop golden brown spots. The brief broil is the final flourish, creating tiny toasted edges that enhance texture and aroma. Watch closely under the broiler because things can go from perfect to charred in seconds. A common mistake is leaving them too long under direct broil, which can turn the tender filling bitter instead of nutty and crisp.
- Serve hot with chopped pumpkin seeds, extra drizzles of maple syrup, and lime zest.: When you plate, the crunch of toasted pumpkin seeds contrasts the creamy filling, and the extra maple drizzle adds a shiny sweetness that collects in little pools. The lime zest sprinkled last gives an invigorating citrus perfume that brightens every forkful. Serve immediately for the best texture, because if these sit too long the crunchy bits can soften and lose their appeal. If you must hold them, keep them warm in a low oven and add pumpkin seeds just before serving to preserve the contrast.
Notes
- Choose different seeds: Swap pumpkin seeds for toasted sunflower seeds for a milder crunch that still adds texture and a nutty note.
- Adjust the heat: Increase or decrease the ground chilies or red pepper flakes to tune the spice level to your guests, remembering the heat mellows during baking.
- Make ahead: Roast and scoop the sweet potatoes in advance, store them covered in the fridge, and fill and finish baking just before serving for fresher tops.
- Texture tweaks: For a chunkier filling, reserve some scooped flesh and fold it in at the end instead of processing it completely smooth.
- Presentation boost: Right before serving, add a final scatter of fresh lime zest and a tiny extra drizzle of maple syrup for shine and aroma.