Ultimate Garlic Bread
Ultimate Garlic Bread delivers warm, buttery, herb infused slices with golden edges and a soft, fragrant interior. This easy, crispy sided loaf is perfect for a quick weeknight dinner companion or a crowd pleasing appetizer. With roasted garlic, fresh herbs, and a touch of Parmesan, it transforms a plain loaf into an irresistible, comforting treat you will want to make again and again.
Equipment
- Oven
- Baking Sheet
- Small Bowl
- Serrated Knife
- Aluminum Foil
Ingredients
- 1 large loaf of Italian ciabatta or French baguette Provide structure and a hearty base for the garlic bread; slice horizontally or into thick pieces to maximize buttery coverage and create a crisp exterior while keeping a soft interior. Choose a fresh loaf with a sturdy crumb to absorb the garlic butter without becoming soggy, and toast until golden for optimal texture contrast.
- 3 tablespoons garlic roasted garlic Impart a deeply savory roasted garlic flavor throughout the bread; mash or finely chop to distribute evenly in the butter mixture and enhance aromatic complexity. Use roasted garlic for a milder, slightly sweet profile that browns gently during baking and complements the herbs and cheese.
- 4 tablespoons unsalted butter melted Bind and carry flavors while creating a rich, golden finish when melted; mix thoroughly with garlic and herbs so it soaks into the bread and crisps on the surface. Use unsalted butter to control overall seasoning, adjusting salt separately for balance and to prevent over-salting.
- 1/4 cup mixed minced fresh herbs (oregano, basil, rosemary, parsley) Add fresh, bright herbal notes that lift the richness of butter and garlic; finely mince to allow even distribution and release aromatic oils. Combine oregano, basil, rosemary, and parsley for a balanced, Mediterranean-inspired herb profile that complements Parmesan and enhances complexity.
- 1/4 cup freshly grated Parmesan cheese Contribute a nutty, salty umami boost and a slightly granular texture when sprinkled over the top; grate freshly for best melting and flavor dispersion. Use Parmesan to add savory depth that crisps lightly under heat and pairs well with herbs and roasted garlic.
- 1/4 teaspoon salt Enhance and balance flavors by controlling overall saltiness; sprinkle just enough to elevate the garlic, herbs, and cheese without overpowering them. Use measured salt to fine-tune the seasoning after combining butter and other components, especially since Parmesan adds saltiness as well.
- 1/4 teaspoon pepper Provide subtle savory warmth and help highlight other flavors without dominating them; freshly ground pepper adds a gentle heat that pairs well with garlic and herbs. Use coarse or fine grind according to preference, adjusting quantity to suit taste and to complement red pepper flakes if used.
- 1 pinch red pepper flakes Introduce a sharp, spicy kick for those who enjoy heat; use a pinch to add lively contrast to the buttery, cheesy, and herbaceous elements. Sprinkle sparingly for a hint of heat that elevates flavor complexity without overwhelming the dish.
Instructions
- Preheat the oven to 400 degrees.: The moment you turn the oven on, you will notice a dry warmth building which helps ensure the crust crisps up correctly; preheating to 400 degrees sets the stage for golden edges and warm interior without drying the crumb. The air should feel evenly hot when you open the oven door, and the racks will be at the right temperature to brown the loaf. One common mistake is not allowing the oven to fully reach temperature, which can leave the crust soft instead of crisp. If your oven runs hot or cold, use an oven thermometer to confirm accuracy. I also wipe the baking sheet clean so there is no leftover residue that could burn and add bitter notes.
- Slice the loaf in half lengthwise.: As you slice the loaf lengthwise, the sound is a soft crack followed by the airy crumb exposing itself, which is your cue that the bread is fresh and ready to accept the mixture. A long, even cut keeps the two halves uniform so they heat consistently. Use a serrated knife and a gentle sawing motion to avoid compressing the crumb; pressing down will mash the interior and prevent the butter from soaking in properly. If the loaf is very dense, consider cutting slightly less deep to preserve structure. I like to hold the loaf steady with a towel to keep my fingers safe while maintaining control.
- Slice the loaf in half lengthwise.: When you stir the mixture, the aroma of warm butter and roasted garlic will bloom, releasing an inviting fragrance that promises depth. Combining the ingredients at room temperature helps everything emulsify and cling to the bread; if the butter is too hot, it can separate and make the mixture greasy. Mix until the texture is smooth and the herbs are evenly distributed; the Parmesan should be incorporated but not clumped. Avoid over mixing which can break down the herbs and make the mixture pasty. Taste a small dab to check salt and pepper balance, adjusting carefully because the Parmesan already contributes saltiness.
- In a small bowl, mix the roasted garlic, butter, herbs, parmesan cheese, salt and pepper then set aside.: As you spread, press gently so the mixture sinks slightly into the pockets of the crumb, and watch the butter glisten across the surface. The goal is even coverage without saturating any one area. Spreading slowly helps you control how much mixture each bite will get; too much in one spot makes that section heavy and dense. A common slip is applying the mixture only near the edges, which leaves the center bland; work from the center outwards for balance. If some bits of herb pile up, smooth them with the back of the spoon for a uniform look and melt.
- In a small bowl, mix the roasted garlic, butter, herbs, parmesan cheese, salt and pepper then set aside.: Wrapping in foil traps steam and encourages the flavors to infuse into the crumb, creating a soft, buttery interior while protecting the crust from burning. When I seal the foil, I fold tightly to keep heat consistent, and the baking sheet underneath catches any drips. One downside is that steam can soften the crust more than you might like, which is why timing matters. If you prefer a crisper crust, you can unwrap for the final minutes, but avoid unwrapping too early or the crumb will dry out. Ensure the foil is sealed but not overly tight, so steam circulates a bit within the packet.
- Take a spoon and spread the garlic mixture over the inside of each loaf. Seal the loaf together and wrap with aluminum foil. Place the wrapped bread on a baking sheet.: During baking the aroma becomes pronounced, filling the kitchen with warm roasted notes and herbaceous perfume. The bread will feel slightly firmer to the touch when done, and if you peel back a corner of the foil you will see the butter absorbed into the crumb. This step allows the flavors to penetrate rather than merely sit on the surface. A common error is underbaking which leaves the inside cold and the butter unmelted, so check that the center is warm. If you bake longer than recommended, the crumb can become too soft or even gummy, so keep a close eye at the end of the time.
- Take a spoon and spread the garlic mixture over the inside of each loaf. Seal the loaf together and wrap with aluminum foil. Place the wrapped bread on a baking sheet.: Letting it rest keeps steam from rushing out and drying the bread, and it allows flavors to settle so cutting does not squeeze the filling out. The foil will be hot, and you will notice a concentrated scent of roasted garlic when you finally open it. Resist the urge to unwrap immediately because hot steam can create a mess and also scorch your hands. If you are impatient, use oven mitts and open a small vent first, but be cautious of the steam burst.
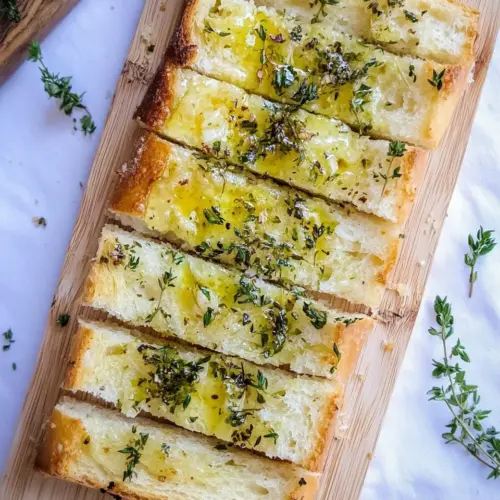
- Bake it in the oven for 15 minutes until the garlic herb flavors are fully absorbed into the bread.: Freshly sliced, each piece will show the glossy pockets of herbed butter and a fine dusting of Parmesan. The first bite should yield a warm, herb infused center and a hint of crisp at the edges. If you choose to add mozzarella, return the sliced or halved loaf to the oven for 3 to 5 minutes until the cheese melts into a gooey layer, which adds a stretchy, indulgent texture. A mistake to avoid is letting the bread sit too long before serving, which cools the butter and mutes the aroma. Keep napkins handy, the melted butter can be deliciously drippy.
Notes
- Choose the right loaf: A crusty Italian ciabatta or a French baguette holds up well to the butter and garlic mixture, giving you a nice contrast between a crisp exterior and a soft, flavorful interior.
- Prefer roasted garlic: Roasted garlic offers a sweeter, more caramelized flavor than raw garlic, which helps the bread taste rich without harshness; roast your own heads of garlic in foil at 400 degrees for about 30 to 40 minutes if you have the time.
- Butter versus oil: You can use melted butter for classic richness or olive oil for a lighter, slightly fruity note; I often blend both to balance flavor and mouthfeel, but stick with unsalted butter to control seasoning.
- Herb timing matters: Fresh herbs are best added right before mixing so they retain brightness; dry herbs can be used in a pinch, but you may want to increase quantity slightly for the same impact.
- Cheese choice: Parmesan adds savory depth and complex notes but will not get stretchy like mozzarella; if you want melty, gooey cheese, top with shredded mozzarella and return to the oven for a few minutes until bubbly.
- Freezing and reheating: Wrap the cooled loaf tightly in foil and freeze for up to three months; to reheat, thaw at room temperature then warm at 350 degrees for about 5 minutes or until heated through, this helps retain texture and flavor.