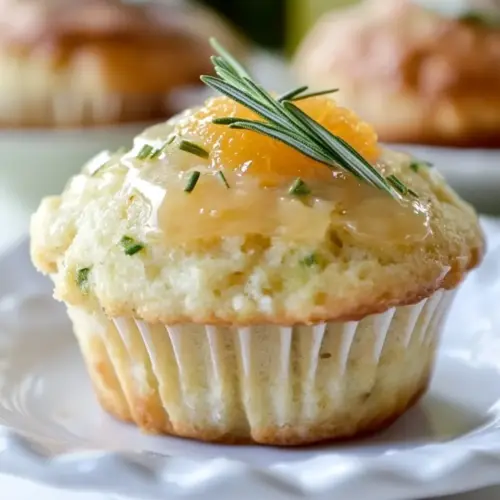
Tuscan Orange Ricotta Muffins
Tuscan Orange Ricotta Muffins offer a creamy, citrusy bite with a tender crumb and a light rosemary orange glaze. These muffins are easy to pull together and deliver a bright, slightly herbaceous finish perfect for brunch or snack time. Make a batch for guests or weekend mornings, they freeze well and stay flavorful, which makes them a delightful, reliable choice.
Equipment
- Muffin Pan
- Mixing Bowls
- Whisk
- Wooden Spoon
- Small Saucepan
- Wire Rack
Ingredients
- 1 3/4 cups all-purpose flour Provide structure and body to the muffins by contributing gluten and starch; sifts or measures accurately to ensure tender crumb and even rise across batches.
- 1/2 cup granulated sugar Sweeten the batter and aid in browning during baking; creamed with wet ingredients to dissolve and distribute sweetness throughout the muffins.
- 2 1/2 teaspoons baking powder Leaven the muffins by producing carbon dioxide when combined with wet ingredients; use fresh, evenly measured powder for reliable lift and light texture.
- 1/4 teaspoons salt Enhance overall flavor balance by providing a subtle mineral note; use precise measurement to avoid over-salting that can mask sweetness.
- 3/4 cup part-skim ricotta cheese Moisten and enrich the batter while adding a creamy tang; fold gently to preserve air and contribute to tender, slightly dense crumb.
- 2 teaspoons orange zest (I use this Microplane grater, which pretty much changed my life) Lift aromatic citrus oils to the surface and intensify orange flavor; grate finely to avoid bitter pith and distribute fragrance evenly.
- 1/2 cup freshly-squeezed orange juice Add bright citrus acidity and moisture that complements ricotta and rosemary; measure fresh juice for the most vibrant, natural orange flavor.
- 1/4 cup olive oil Supply fat for moistness and a smooth mouthfeel while adding a subtle fruity note; whisk with wet ingredients to create an emulsion that helps batter rise evenly.
- 1 large egg Bind ingredients together and provide structure while contributing richness; beat lightly with sugars and wet elements to incorporate air without overmixing.
- 3 tablespoons half-and-half Contribute additional creaminess and slightly thin the batter for proper consistency; choose half-and-half for moderate richness without overpowering the batter.
- 2 teaspoons chopped fresh rosemary leaves plus additional whole rosemary leaves for garnish Deliver an herbaceous, savory contrast to the sweet citrus and ricotta; chop finely to release oils and fold in for aromatic pockets throughout the muffins.
- 1 cup powdered sugar Create a sweet glaze or dusting that adds surface sweetness and a delicate finish; combine with citrus zest or liquid to form a smooth drizzle if desired.
- 1/4 teaspoon orange zest Provide an extra pop of concentrated orange aroma for finishing; grate finely into glazes or onto muffins for an immediate citrus lift.
- Pinch kosher salt Brighten flavors and enhance sweetness perception with a small amount of saline; sprinkle with care to maintain balance between sweet and savory elements.
Instructions
- Preheat oven to 375 degrees Fahrenheit.: You will notice the kitchen warming as the oven comes to temperature and a small dry heat that encourages browning. This step matters because an oven at the right temperature helps the muffins rise quickly, setting tender domes while creating a lightly crisp top. A common mistake is skipping preheat, which can result in flat, dense muffins, so always wait until the oven reads steadily. When the oven clicks and the air smells faintly toasted, you are ready.
- Butter nine cups of a 12-cup standard-size muffin pan, or spray with nonstick cooking spray.: Greasing the pan ensures the muffins release easily and keeps edges from sticking and tearing. As you grease, run your finger along each cup to feel for full coverage, then give a careful tap to remove excess. If you under-grease, muffins can cling to the pan and break when removed, so take the extra second to coat thoroughly. The slightly shiny surface after greasing is a good visual cue that you are set.
- In a large bowl, whisk together the flour, sugar, baking powder, and salt.: You will smell the subtle sweetness as you combine ingredients and see a pale, uniform mixture forming. This dry blend distributes the leavening so every muffin lifts evenly, which is why whisking until homogeneous is important. Overworking the dry mix is not a worry here, but if you see pockets of baking powder, whisk longer. A common error is adding liquids before fully mixing dry ingredients, which can cause uneven rise.
- In a medium bowl, whisk together the ricotta cheese, orange zest, orange juice, olive oil, and egg until well-blended.: The aroma of fresh orange will intensify as you whisk, and the texture will go from lumpy to smooth and slightly glossy. This step creates an emulsion that suspends fat and liquid for a cohesive batter, which is why thorough whisking matters. If the ricotta cheese seems grainy, whisk longer to smooth it out; otherwise you may get uneven pockets of dairy in the muffins. Avoid overbeating, which can aerate the mixture too much.
- Make a well in the center of the dry ingredients, and pour in the wet. Stir with a wooden spoon until just incorporated. The batter will be thick.: At this point, you will notice a contrast in textures, the pale dry mixture and the glossy wet center. Folding gently avoids developing gluten, preserving a tender crumb. Stir until you can no longer see streaks of flour, but expect a thick consistency; this thickness is what creates sturdy domes. A common pitfall is overmixing, which yields chewy muffins, so stop when combined.
- Divide batter evenly between the nine muffin cups, about 1/3 cup each (note: you can go ahead and make 12 muffins instead of the nine, but they will be flatter and smaller).: you can go ahead and make 12 muffins instead of the nine, but they will be flatter and smaller). : As you scoop, you will feel the weight and density of the batter, and the tops will sit slightly mounded. Even distribution ensures uniform baking and consistent texture across the batch. If portions vary wildly, some muffins will brown faster and may dry out. Use a scoop or a measuring cup for steady portions to avoid underfilled or overflowing cups.
- Bake for about 15 minutes, or until a toothpick inserted into the center comes out clean (not wet).: During baking, the kitchen will fill with citrus perfume and you will see the tops turning a light golden color, possibly cracking slightly as they rise. The toothpick test is your best cue for doneness; when it emerges clean the interior has set without being overbaked. Leaving them in a minute or two too long can dry the crumb, so check at the earlier end of the time range if your oven runs hot.
- Remove from oven and set pan on a wire rack. Let cool for five minutes, then remove muffins and set on a wire rack set over a layer of paper towels (to catch any glaze overflow).: The initial cool time lets the structure settle so muffins release cleanly from the pan; you will notice steam easing away. Moving them to another rack helps the bottoms stay crisp rather than steaming on a hot tray. If you rush this step and try to glaze too soon, the tops may be so hot the glaze runs off; wait the five minutes for optimal adhesion.
- In a small saucepan over medium-low heat, warm the half-and-half and rosemary just until steaming. Remove from heat, cover, and let sit for 10 minutes. Strain and discard solids. Add liquid to a small bowl, then sift in powdered sugar. Add orange zest and a pinch of kosher salt. Whisk until smooth. With a spoon, drizzle glaze over the top of the muffins. Drop a fresh rosemary leaf or two on top of each one. Glaze will harden a bit after sitting.: As you warm the half and half , the kitchen will carry a fragrant herbal note as rosemary releases its oils; the steaming point is enough to extract flavor without boiling away delicate aromas. Straining produces a clear infusion for a silky glaze, and sifting the powdered sugar prevents lumps for a glossy finish. When you drizzle, watch for the glaze to cling and set slightly, forming a thin shelliness that adds textural contrast. A common mistake is overheating the cream, which can deepen the herbal flavor too much or scald the dairy, creating an off note.
- The keep in an airtight container at room temperature for up to three days, or freeze in a zipper bag for up to three months.: You will notice that at room temperature the muffins remain tender and the glaze keeps a slight sheen; storing airtight preserves moisture and prevents staling. Freezing halts any loss of freshness, and reheating gently in a low oven revives the texture. Avoid leaving them uncovered, as they will dry out and the glaze can collect a sticky film.
Notes
- Swap pan size carefully If you choose to make 12 smaller muffins instead of nine, expect them to bake faster and have flatter tops, so reduce baking time by a few minutes and watch for a clean toothpick.
- Adjust sweetness mindfully If you prefer less sweet baked goods, reduce the granulated sugar by up to two tablespoons, but keep the glaze as written for balance between batter and topping.
- Control rosemary intensity For a subtler herb note, use only one teaspoon of chopped rosemary for the infusion, steeping for five minutes instead of ten, which still imparts aroma without dominance.
- Make ahead and freeze Bake completely, cool, then freeze in a zipper bag for up to three months. Thaw at room temperature and reheat briefly in a low oven to refresh the crust and soften the glaze.
- Smooth glaze every time Sift your powdered sugar before whisking into the infused cream to avoid lumps, and use a fork or small whisk to achieve a glossy consistency that drizzles smoothly.